ENGLISH
7
IDENTIFICATION OF CONTROLS
FRONT PANEL
DEEP STANDBY MODE
At Deep Standby mode, the C 3050 switches to standby mode at lowest
power consumption (less than 0.5W).
SET C 3050 TO DEEP STANDBY MODE
a
At operating mode, press and hold the front panel POWER button until
the Power LED indicator flashes twice.
b
Release hold of front panel POWER button. Unit will go to Deep
Standby mode.
c
At Deep Standby mode, the C 3050 can be switched back to operating
mode using only the following methods.
• Press any of the SOURCE buttons
• Press front panel POWER or SR 10 ON button
d
The C 3050 switches to Network Standby mode when it is powered
up from Deep Standby mode. Repeat Step 1 to return C 3050 to Deep
Standby mode.
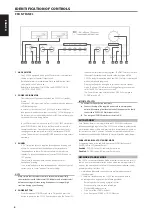
5 REMOTE SENSOR
•
Point the SR 10 remote control at the remote sensor and press the buttons.
•
Do not expose the remote sensor of the C 3050 to a strong light
source such as direct sunlight or illumination. If you do so, you may
not be able to operate the C 3050 with the remote control.
Distance:
About 23ft (7m) from the front of the remote sensor.
Angle:
About 30
o
in each direction of the front of the remote sensor.
6 TONE CONTROLS
•
The C 3050 is fitted with BASS and TREBLE tone controls to adjust
the tonal balance of your system. The 12 o’clock position is “flat” with
no boost or cut, and an indent indicates this position.
•
Rotate the control clockwise to increase Bass or Treble level. Rotate
the control counterclockwise to decrease Bass or Treble level.
7 SOURCE INPUT SELECTORS
•
These buttons select the active Source input to the C 3050 and the
signal sent to the speakers, headphones and the PRE OUT sockets.
PHONO:
The turntable connected to the rear panel PHONO input
sockets is selected as the active Source.
LINE:
The line-level source connected to the rear panel LINE input
sockets is selected as the active Source.
OPTICAL:
The digital optical source connected to the rear panel
OPTICAL input socket is selected as the active Source.
COAX:
The digital coaxial source connected to the rear panel COAXIAL
input socket is selected as the active Source.
HDMI:
The HDMI output source connected to the rear panel HDMI
input socket is selected as the active Source.
•
Pressing any of the Source Input Selector buttons will also power up
the C 3050 from standby mode.
8 SOURCE INPUT LED INDICATORS
•
When a Source input is selected, the corresponding Source input LED
indicator located above said Source input button will illuminate green.
9 SPEAKERS (A, B, A+B, OFF)
Rotate SPEAKERS knob to select
A:
Select SPEAKERS A as the active speaker. SPEAKERS B is disabled or
inactive.
B:
Select SPEAKERS B as the active speaker. SPEAKERS A is disabled or
inactive.
A+B:
Select both SPEAKERS A and SPEAKERS B as the active speakers.
OFF
: Both SPEAKERS A and SPEAKERS B are inactive or disabled.
•
Output signal is always present at PHONES jack at all SPEAKER
selector settings. When using headphones, it is normally advisable
to set the SPEAKER selector control knob to “OFF” muting both
SPEAKERS A and B.
10 BALANCE
•
The BALANCE control adjusts the relative levels of the left and right
speakers. The 12 o’clock position provides equal level to the left and
right channels. A detent indicates this position.
•
Rotating the control clockwise moves the balance towards the right.
Rotating the control counterclockwise moves the balance to the left.
11 BluOS/MDC
•
This BluOS/MDC cap touch sensing button is non-functional unless
there is an applicable MDC2 module installed like the MDC2 BluOS D.
•
With the optional MDC2 BluOS D installed, press BluOS/MDC cap
touch sensing button to select BluOS as the active Source.
Below is a table of the BluOS/MDC Blink codes when the optional
MDC2 BluOS D is installed.
BLUOS/MDC LED
BLINK CODE
DESCRIPTION
Solid green
Hotspot mode
Flashing green
Connecting to Network
Solid red
Upgrade mode
Flashing red
Factory reset in process
Alternate flashing red and green Upgrading
Solid blue
Connected to Network – ready to use with
BluOS App
Flashing blue
Mute mode
Solid purple
Hotspot mode timed out
12 BLUETOOTH
•
Press BLUETOOTH cap touch sensing button to select Bluetooth as
the active Source. Refer also to guideline below on how to setup
Bluetooth as a Source.
BLUETOOTH AS A SOURCE
Initiate pairing of your Bluetooth device with C 3050 by following below
procedure.
a
Ensure that the supplied Bluetooth antenna is connected to the
rear panel BT antenna terminal. Ensure also that your Bluetooth
device is active or turned ON.
b
Using your iOS, Android or your Bluetooth device, go to Settings –
Bluetooth and then scan for Bluetooth devices.
c
Select the unique device ID of your C 3050 among the available
devices listed in your Bluetooth settings. Pair or connect together
your C 3050 and Bluetooth device.
d
Upon successful pairing of your Bluetooth device and C 3050, select
Bluetooth as the active Source and start listening to music playback
from your Bluetooth device.
13 VOLUME LEVEL LED INDICATORS
•
This series of LEDs illuminate one by one as the volume level
increases and extinguishes one by one as the volume level decreases.
•
LED at amber alone indicates that the volume level is at the minimum.
14 VOLUME
•
The VOLUME control adjusts the overall loudness of the signal sent
to the speakers and headphones.
•
The Volume control is characterized by perfect signal tracking and
channel balance. It provides a highly linear and low noise operation.
•
Turn clockwise to increase the volume level and counterclockwise
to lower it.
Содержание C3050
Страница 1: ...Owner s Manual ENGLISH Stereophonic Amplifier C 3050...
Страница 15: ...ENGLISH 15...


