background image

IDENTIFICATION OF CONTROLS

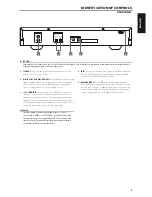
REAR PANEL

1  LINE OUT:

 Connect to the corresponding analog audio input of an 

amplifier, receiver or stereo system. 

2  DIGITAL OUT (COAXIAL, OPTICAL):

 The digital playback audio output 

signal is available at these ports. Connect the optical or coaxial digital 
OUT ports to the corresponding S/PDIF digital input of an amplifier, 
receiver, computer soundcard or other digital processors.

3  +12V TRIGGER IN:

 This input allows the C 546BEE to be switched 

remotely to standby and ON by ancillary equipment, such as an 
amplifier, preamp, AV processor, etc. The controlling device must be 
equipped with a 12 V trigger output to use this feature. Connect this 
+12V-trigger input to the remote component’s corresp12V DC 
output jack using a mono cable with 3.5mm male plug. 

WARNING


If the male plug of the mono cable (with or w12V DC) is 
connected to C 546BEE’s +12V TRIGGER IN, the Standby button in the 
front panel as well as the corresponding ON/OFF function keys in the 
remote control will be disabled. Unplug the mono cable to maintain 
normal power ON/OFF function procedures.

4  IR IN:

 This input is connected to the output of an IR (infrared) repeater 

(Xantech or similar) or the IR output of another component to allow 
control of the C 546BEE from a remote location.

5  AC MAINS INPUT:

 The C 546BEE comes supplied with a separate AC 

Mains cable. Before connecting the cable to a live wall socket ensure that 
it is firmly connected to the C 546BEE’s AC Mains input socket first. Always 
disconnect the AC Mains cable plug from the live wall socket first, before 
disconnecting the cable from the C 546BEE’s Mains input socket.

ATTENTION!


Please make all the connections to your C 546BEE with the unit unplugged. It is also advisable to power down or unplug all associated components while 
making or breaking any signal or AC power connections.

2

3

4

5

1

9

ENGLISH

FR

ANÇ

AIS

ESP

AÑOL

IT

ALIANO

DEUT

SCH

NEDERL

ANDS

SVENSK

A

РУ

ССКИЙ

Содержание C 546BEE

Страница 1: ...ENGLISH FRAN AIS ESPA OL ITALIANO DEUTSCH NEDERLANDS SVENSKA Owner s Manual C546BEE Compact Disc Player...

Страница 2: ...only one way This is a safety feature If you are unable to insert the plug fully into the outlet try reversing the plug If the plug should still fail to fit contact your electrician to replace your ob...

Страница 3: ...B digital device pursuant to part 15 of the FCC Rules These limits are designed to provide reasonable protection against harmful interference in a residential installation This equipment generates use...

Страница 4: ...y improvement of the environment NOTES ON ENVIRONMENTAL PROTECTION At the end of its useful life this product must not be disposed of with regular household waste but must be returned to a collection...

Страница 5: ...ur investment in the C 546BEE One more thing We urge you to register your C 546BEE ownership on the NAD Worldwide Web site http NADelectronics com warranty For warranty information contact your local...

Страница 6: ...ay produce static that would interfere with reception of weak broadcast signals If this occurs move the C 546BEE away from other devices or switch it off when viewing or listening to broadcasts QUICK...

Страница 7: ...ommodate neither a damping disc placed on a CD nor two CDs stacked together It plays audio CDs but not discs identified as CD V DVD CD I CD ROM or PHOTO CD Refer also to the item CD R AND CD RW AUDIO...

Страница 8: ...ng at high speed The SCAN button causes the optical pickup to scan rapidly forward through the music 9 USB INPUT Connect a USB device into this input 10 PLAY PAUSE SKIP This control knob has three fun...

Страница 9: ...to C 546BEE s 12V TRIGGER IN the Standby button in the front panel as well as the corresponding ON OFF function keys in the remote control will be disabled Unplug the mono cable to maintain normal po...

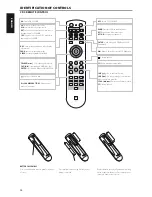
Страница 10: ...h folder lists FILE A S Select through WMA MP3 files ENTER Select desired folder or WMA MP3 file Open or close disc tray Pause playback temporarily 0 to 9 NUMBER BUTTONS Direct entry of track or file...

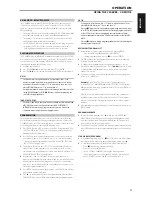
Страница 11: ...ory up to a maximum of 40 entries When you reach P40 the three blinking digits will keep on flashing and won t stop This is unlike the previous 39 entries wherein after an entry blinked thrice it move...

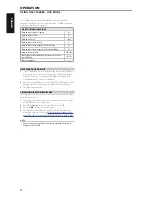
Страница 12: ...e are no applicable MP3 WMA files available in the external USB the VFD will show USB Empty 2 Plug in the external USB device to the USB input USB Reading will be blinking in the VFD and then the tota...

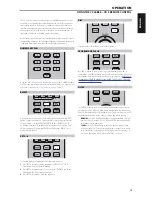
Страница 13: ...B To repeat a sequence implement the following procedures 1 Press RPT A B at your chosen starting point REPEAT A B is illuminated in the VFD with B blinking 2 Press RPT A B again at your chosen end po...

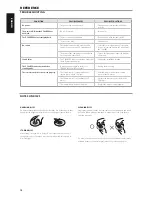
Страница 14: ...lug The remote control does not work properly The remote control is not pointed at the remote sensor on the CD player Point the remote control at the remote sensor of the CD player The remote control...

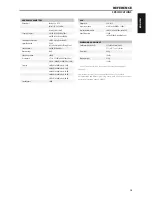
Страница 15: ...05 dB ref 0dB 1 kHz at 20 dB 0 15 dB ref 0dB 1 kHz at 60 dB Standby power 0 5W USB Output level 2 2 0 2V Frequency response 1 dB ref 0 dB 20 Hz 16 kHz Total harmonic distortion 0 03 ref 0 dB 1 kHz Aud...

Страница 16: ...All rights reserved NAD and the NAD logo are trademarks of NAD Electronics International a division of Lenbrook Industries Limited No part of this publication may be reproduced stored or transmitted i...

Отзывы: