background image

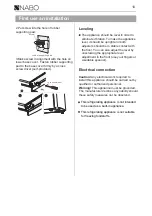
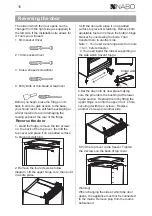
cro ss


screwdrawer

rubber supporting pad


scr ew


First use an installation 

2.Put screw into the hole of rubber 
supporting pad.

3.Make screw in alignment with the hole on 
lower base cover . Fasten rubber supporting 
pad to the base cover firmly by a cross 
screw driver (self-provided).

The appliance should be level in order to 
eliminate vibration. To make the appliance 
level, it should be upright and both 
adjusters should be in stable contact with 
the floor. You can also adjust the level by 
unscrewing the appropriate level 
adjustment in the front (use your fingers or 
a suitable spanner).

Leveling

Caution! 

Any electrical work required to 

install this appliance should be carried out by 
qualified or authorized personnel.

Warning!

 This appliance must be grounded. 

The manufacturer declines any liability should 
these safety measures not be observed.

Electrical connection

10

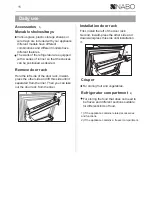
This refrigerating appliance is not intended
to be used as a built-in appliance.
This refrigerating appliance is not suitable
for freezing foodstuffs.

Содержание KT 1487

Страница 1: ...K hlschrank KT 1487...

Страница 2: ...nen mit eingeschr nkten k rperlichen sensorischen bzw geistigen F higkeiten oder mangelnder Erfahrung und Wissen verwendet werden wenn sie eine Beaufsichtigung bzw Anweisung f r die Nutzung der Maschi...

Страница 3: ...ungen in der Ger teverkleidung oder in der integrierten Struktur von Behinderungen frei WARNUNG Verwenden Sie keine mechanische Vorrichtung oder anderen Mittel um den Abtauvorgang zu beschleunigen WAR...

Страница 4: ...er K hlmittelkreislauf besch digt ist Vermeiden Sie offene Flammen und Z ndquellen L ften Sie den Raum sorgf ltig in dem das Ger t steht WARNUNG Die K hlschr nke enthalten K ltemittel und Gase in der...

Страница 5: ...omstecker k nnte berhitzen und einen Brand verursachen 3 Achten Sie darauf dass Sie an den Ger tenetzstecker gelangen 4 Ziehen Sie nicht am Kabel 5 Stecken Sie den Stromstecker nicht ein wenn die Stro...

Страница 6: ...r Getr nke im normalen Haushalt vorgesehen wie in der Gebrauchsanweisung ausgef hrt Das Ger t ist schwer Bei der Bewegung sollte darauf geachtet werden Entfernen oder ber hren Sie keine Elemente aus d...

Страница 7: ...ressor Kondensator ber hrt oder abgefangen werden um eine Brandgefahr zu vermeiden Befolgen Sie die Installationsanweisungen Das Ger t darf nicht in der N he von Heizungen oder Kochstellen stehen Verg...

Страница 8: ...den ist 1 Die Taste dr cken um die Gefriertemperatur zwischen 2 C und 8 C einzustellen Die Temperaturstufen sind in folgender Reihenfolge ausw hlbar Die Temperatur so einstellen dass das Ger t nicht s...

Страница 9: ...rieb des Ger tes Positionieren Sie das Ger t nicht in der N he von W rmequellen wie fen Heizungen direkte Sonneneinstrahlung usw Maximale Leistung und Sicherheit werden durch die Aufrechterhaltung der...

Страница 10: ...sollten festen Kontakt mit dem Boden haben Sie k nnen die H he auch einstellen indem Sie die entsprechende vordere Pegelanpassung abschrauben mit Ihren Fingern oder einem geeigneten Schl ssel Nivellie...

Страница 11: ...nde Zubeh re und Funktionen enth lt 2 Wenn das Ger t ein Gefrierfach enth lt T gliche Nutzung Zubeh re 1 Verschiedene Glas oder Plastik Lagerregale oder Weinregale werden in Ihrem Ger t enthalten Vers...

Страница 12: ...er Schubladen Gem sef cher und Ablagen anzeigt sollten Sie diese Anordnung nicht verstellen da dies zu einer Ver nderung des Energieverbrauchs f hren k nnte Tipps f r das K hlen von frischen Lebensmit...

Страница 13: ...f k nnte die Plastikteile besch digen therische le und organisches L sungsmittel k nnen die Plastikteile angreifen z B Zitronensaft oder der Saft von einer Orangenschale Butters ure oder Reinigungsmit...

Страница 14: ...nur so lange wie n tig Stellen Sie den Temperaturregler vor bergehend auf eine k ltere Temperatur ein Die Innenbeleuchtung funktioniert nicht Das Ger t steht in der N he einer Hitzequelle Die Gl hbirn...

Страница 15: ...sfer m ssen Sie die Scharnierachse von dem Loch zu bewegen 2 Sie m ssen den Gummist tz auf der Seite auf der es kein Scharnier gibt installieren 4 Stellen Sie die T r in seine neue Stelle und stellen...

Страница 16: ...e T r und fixieren Sie dann die Schraube die Sie von der T r entfernen um den Griff fest an der T r zu befestigen 16 Entsorgung des Ger tes Es ist verboten dieses Ger t im Hausm ll zu entsorgen Verpac...

Страница 17: ...rauf hin dass Sie f r die L schung personenbezogener Daten auf dem zu entsorgenden Ger t selbst verantwortlich sind Entsorgung Das Symbol der durchgestrichenen Abfalltonne auf R dern auf dem Produkt o...

Страница 18: ...tiere S wasserprodukte und Fleischprodukte empfohlen f r 3 Monate N hrwerte und Geschmack nehmen mit der Zeit ab geeignet f r gefrorene frische Lebensmittel Meeresfr chte Fisch Garnelen Schalentiere S...

Страница 19: ...en und trocknen Sie es sowie lassen Sie die T r offen um Schimmelbildung im Ger t zu vermeiden Reinigung des Wasserspenders speziell f r Wasserspenderprodukte Reinigen Sie die Wassertanks wenn sie 48...

Страница 20: ...ndard This appliance is not intended for use by persons including children with reduced physical sensory or mental capabilities or lack of experience and knowledge unless they have been given supervis...

Страница 21: ...s offices and other working environments farm houses and by clients in hotels motels and other residential type environments bed and breakfast type environments catering and similar non retail applica...

Страница 22: ...ble During transportation and installation of the appliance ensure that none of the components of the refrigerant circuit becomes damaged The refrigerant R600a is flammable WARNING If the refrigerant...

Страница 23: ...the main cable 5 If the power plug socket is loose do not insert the power plug There is a risk of electric shock or fire 6 You must not operate the appliance without the interior lighting lamp cover...

Страница 24: ...ms with naked flames away from the appliance so that do not set the appliance on fire The appliance is intended for keeping food stuff and or beverages in normal household as explained in this instruc...

Страница 25: ...e spare parts must be used 1 If the appliance is Frost Free 2 If the appliance contains freezer compartment Installation Important For electrical connection carefully follow the instructions given in...

Страница 26: ...8...

Страница 27: ...ormance Built in appliances should be positioned away from heat sources such as heaters and direct sunlight screw provided in a plastic bag with your appliance you can install these accessories accord...

Страница 28: ...s should be in stable contact with the floor You can also adjust the level by unscrewing the appropriate level adjustment in the front use your fingers or a suitable spanner Leveling Caution Any elect...

Страница 29: ...ge shelves or wire trays are included with your appliance different models have different combinations and different models have different features The walls of the refrigerator are equipped with a se...

Страница 30: ...gram shows the correct combination for the drawers crisper and shelves do not adjust the combination as it would produce an effect on energy consumption Hints for fresh food refrigeration Do not store...

Страница 31: ...parts Ethereal oils and organic solvents can attack plastic parts e g lemon juice or the juice from an orange peel butyric acid or cleansers that contain acetic acid Do not use any abrasive cleansers...

Страница 32: ...al Door seal is not air tight possibly after reversing the door Carefully warm the leaking sections of the door seal with a hair dryer on a cool setting At the same time shape the warmed door seal by...

Страница 33: ...Then transfer them to another side Note 1 You need move hinge axis from hole to before transfer 2 You need install the rubber supporting on the side which haven t hinge 4 Set the door into its new pla...

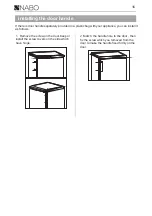
Страница 34: ...c bag with your appliance you can install it as follows 1 Remove the screw on the door Keep or install the screw covers on the side which have hinge 2 Match the handle hole to the door then fix the sc...

Страница 35: ...Cut off the main cable and discard it This marking indicates that this product should not be disposed with other household wastes throughout the EU To prevent possible harm to the environment or human...

Страница 36: ...ition values and taste decrease with time suitable for frozen fresh food 3 Freezer 18 Seafood fish shrimp shellfish freshwater aquatic products and meat products recommended time is 3 months nutrition...

Страница 37: ...ply if water has not been drawn for 5 days If the refrigerating appliance is left empty for long periods switch off defrost clean dry and leave the door open to prevent mould developing within the app...

Страница 38: ...4273632...

Отзывы: