

ESERV-M12T-1210
R2
820 S. University Blvd., Suite 4 E, Mobile, AL 36609 USA
251.342.2164
www.n-tron.com
Copyright, © N-Tron Corp., 2010
C
C
h
h
e
e
c
c
k
k
f
f
o
o
r
r
A
A
l
l
l
l
R
R
e
e
q
q
u
u
i
i
r
r
e
e
d
d
H
H
a
a
r
r
d
d
w
w
a
a
r
r
e
e
ESERV-M12T module
This Quick Start Guide
CD with Modbus Gateway Manager s/w and manuals
Network Cable(s) (not included)
Serial Cable(s) (not included)
Power Supply (not included)
S
S
e
e
t
t
u
u
p
p
t
t
h
h
e
e
M
M
o
o
d
d
b
b
u
u
s
s
G
G
a
a
t
t
e
e
w
w
a
a
y
y
S
S
o
o
f
f
t
t
w
w
a
a
r
r
e
e
Open the Modbus Gateway Software: click
Start
Programs
N-TRON
Modbus Gateway
Manager
Configuration Manager.
The Device Discovery page opens.
.
L
L
o
o
g
g
i
i
n
n
Click Login. Password is blank from factory, no
password is necessary to operate the ESERV-M12T.
The Configuration/General page appears.
Quick Start Guide
ESERV-M12T Modbus
Gateway
I
I
n
n
s
s
t
t
a
a
l
l
l
l
t
t
h
h
e
e
H
H
a
a
r
r
d
d
w
w
a
a
r
r
e
e
Connect a 10 to 58 VDC power supply (Sold
separately). 4W for ESERV-M12T
Connect the top RJ45 connector to a network drop
using a standard network cable (lower RJ45 is pass-
through Ethernet on the model shown below).
Connect the serial device(s):
o
RS-232 with DB9: straight-through for DCE
device, null modem for DTE device.
o
RS-232/422/485 with terminal blocks: see
Appendix D for pin outs.
2
1
L
L
E
E
D
D
S
S
t
t
a
a
t
t
u
u
s
s
LED
STATUS
Ready
Blinks if system is operating correctly, once per second
normally or three times per second for configuration mode
or when reset to factory defaults.
Port 1/
Port 2
On indicates serial port open, blinks when data present
E1
On indicates Ethernet has a link, blinks with data traffic
3
M
M
o
o
d
d
e
e
S
S
w
w
i
i
t
t
c
c
h
h
Hold in Mode switch for…
Result
0 to 2 seconds
Initiates a Hardware Reset
2 to 10 seconds
Enters Console Mode
Over 10 seconds
Reset to Factory Defaults
4
I
I
n
n
s
s
t
t
a
a
l
l
l
l
M
M
o
o
d
d
b
b
u
u
s
s
G
G
a
a
t
t
e
e
w
w
a
a
y
y
S
S
o
o
f
f
t
t
w
w
a
a
r
r
e
e
Insert the included CD and it should auto start.
Follow the prompts to install the Modbus Gateway software.
Note: Be sure you have administrative rights & disable firewalls
in Windows XP
5
6
NOTE:
If the device does not connect, cycle (unplug-
replug) the power, then try again to connect.
To configure via the network, select Network.
If you know the IP address, select “
The device is at this
address
,” and type in the IP address.
If not, select
I don’t know the IP address of the device
.
Click Connect.
O
O
R
R
…
…
S
S
e
e
t
t
u
u
p
p
t
t
h
h
e
e
W
W
e
e
b
b
I
I
n
n
t
t
e
e
r
r
f
f
a
a
c
c
e
e
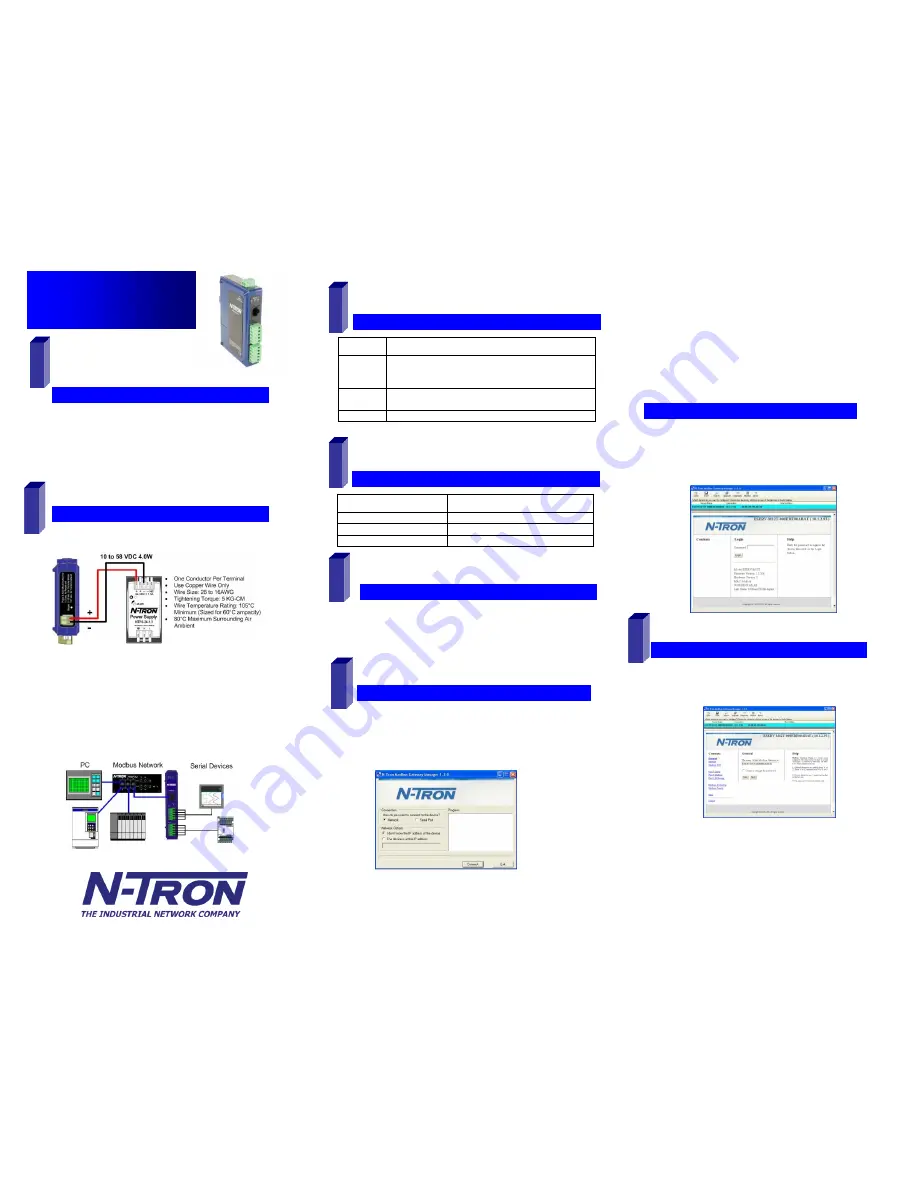
Open a browser and type the IP address of the
Modbus Gateway in the Address Bar.
When the Modbus Gateway is found, the Login window
appears.
7