background image

1

ESSENTIAL SETUP

Video outputs

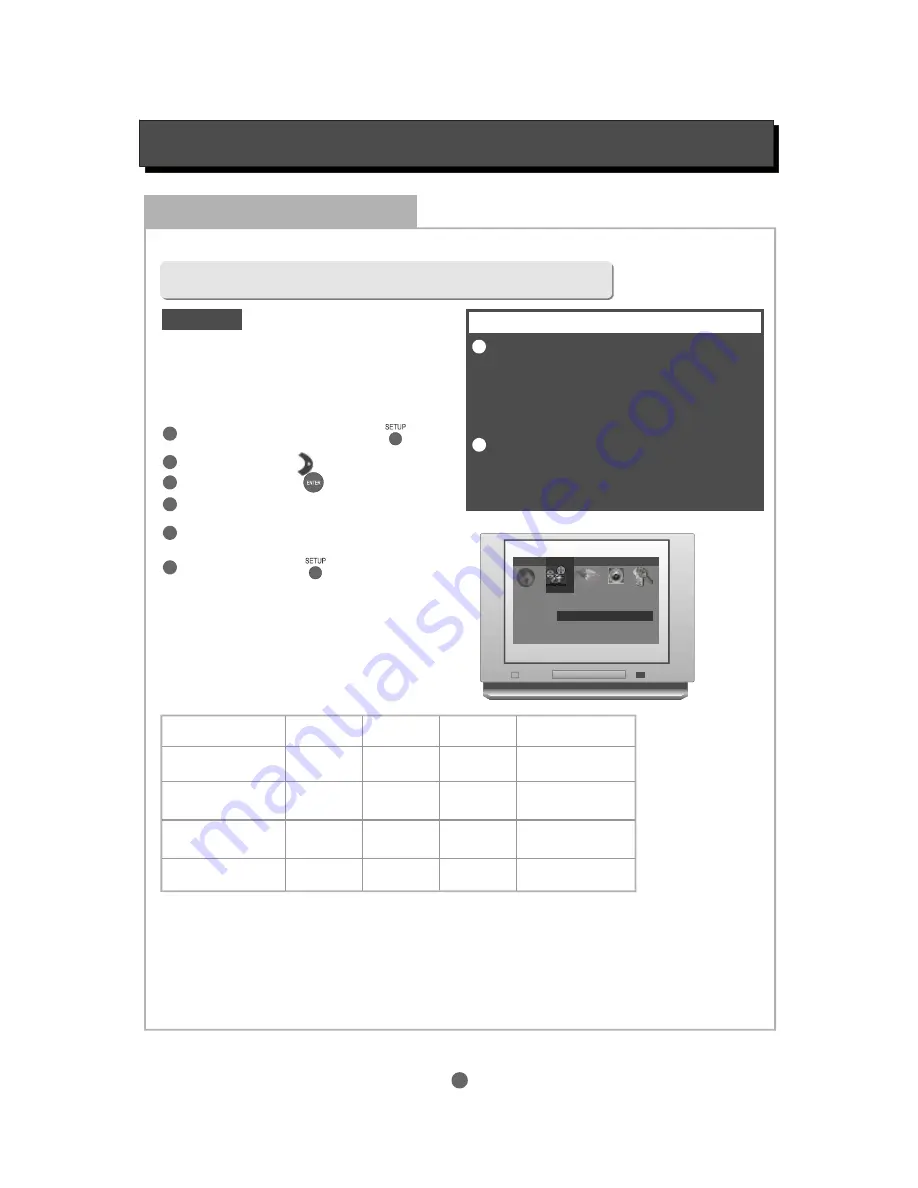
In STOP mode, press

button

,

setup menu appears.

SETUP

1

2
3

Highlight "Interlace Out" icon, press
button, sub menu appears.

ENTER

Highlight “S-Video”, "YCbCr" or “RGB” as desired
and press

button.

.

ENTER

The player is equipped with the following video output ports:

Press

button

to quit.

SETUP

DEFAULT

Composite video (CVBS), S-Video, Y Pb Pr, SCART

Y Pb Pr

Interlaced scan output:
Progressive scan output:

The factory default video output
setting is S-Video (interlaced scan)

In this mode the active video output ports are:
Composite video (CVBS) and S-Video.

To change the video output setting, after the system
connection is completed (see "SYSTEM
CONNECTION"), follow these steps:

Once the video “Interlace Out” has been set using
this procedure, the active video output ports are as
shown in the table below:

For Progressive scan output

With no disc in the player press the PROG SCAN button on the remote control twice. Progressive scan
component signals will be output from the Y/Pb/Pr jacks, whatever the previous “Interlace Out” video setting.
The same procedure is used to switch back to interlaced scan mode.

The composite video (CVBS) output
is active in all three video output
settings. Always connect the CVBS
signal to the TV if any problem is
experienced with obtaining a
picture.

When Progressive Scan has been
selected, no signal will be sent to
the CVBS, S-Video or SCART
outputs.

.........
.........
.........
.........
.........
.........
.........
.........
.........
.........
.........
.........
.........
.........

.........
.........
.........
.........
.........
.........
.........
.........
.........
.........
.........
.........
.........
.........

.........
.........
.........
.........
.........
.........
.........
.........
.........
.........
.........
.........
.........
.........

.........
.........
.........
.........
.........
.........
.........
.........
.........
.........
.........
.........
.........
.........

Language Video

Audio 1 Audio 2 Rating

TV Screen

TV System
Interlace Out

Fade Mode

4:3 Letter Box

Auto

S-Video

Slow

S-Video

YCbCr

RGB

Press

button

highlight "Video" icon.

RIGHT

Press

button

, sub-menu appears.

ENTER

4

5

6

1

2

IMPORTANT NOTE

Video port ->

CVBS

S-Video

Y Pb Pr

RGB (SCART)

Interlace Out

S-Video

Y Cb Cr

RGB

Yes

No

No

Yes

No

Yes

No

Yes

No

No

Yes

Yes

Содержание Z122

Страница 1: ...Progressive Scan DVD Video Player Owner s manual Z122 ...

Страница 2: ...me DVD discs do not allow programming Single track disc cannot be programmed In stop mode press the button program menu appears PROGRAM 4 __ __ 5 __ __ 6 __ __ 7 __ __ 8 __ __ 9 __ __ 10 __ __ 11 __ __ 12 __ __ Program Title Chapter 1 __ __ 2 __ __ 3 __ __ Play Program Clear All Use the buttons to highlight the desired program a DVD Title or Chapter or a Track on a CD input the number of the Title...

Страница 3: ...udio 2 Rating TV screen The aspect ratio of the picture provided by the DVD player can be varied in line with the features available on the TV in use Default setting TV Screen TV System Interlace Out Fade Mode 4 3 Letter Box Auto S Video Slow 4x3 Letter Box Allows you to see movies in their original aspect ratio The entire frame of the movie will be displayed but it will occupy a smaller portion o...

Страница 4: ...et this to Auto to get the best picture quality If your TV is single standard set TV system to PAL or NTSC as appropriate The Z122 will convert PAL to NTSC or NTSC to PAL when required but the best picture quality will always be obtained when playing a disc of the same format as the single standard TV Fade Mode Fade mode is a special feature that fades the picture when you skip a chapter The speed...

Страница 5: ...player will output a noise signal to each of the speakers in turn to allow you to test each speaker analogue outputs only The TV display will show which speaker is active Press to leave Test Mode ENTER RETURN Highlight Rating then press button repeatedly to change the setting ENTER Rating Enter this menu to alter the rating level of the player The player will require a password to play any disc wi...

Страница 6: ...e DVD player or the remote control and both the DVD player and the amplifier will switch out of standby if necessary and the DVD drawer will open The amplifier will automatically select the DVD source 25 Intelligent Input Select Amplifier Press a source button e g DVD on the amplifier s remote control and the system will awaken if in standby only the amplifier and the selected source e g DVD playe...

Страница 7: ...n set to DVD mode will operate the Z122 with the following functions It is recommended that a similar layout is also used if method 3 is adopted The key numbers in the table below are those used in the SL 9000 Operating Manual If the SL 9000 is loaded with code page 001 then the Volume Up Volume Down and Mute keys are already pre programmed to control Myryad integrateds with the handset in DVD mod...

Страница 8: ...Picture Check that the TV set has power use TV remote to select A V signal for DVD rather than broadcast Connect Composite CVBS video cable and check Video Setup menu See Video Outputs page 1 Check that the system is properly and securely connected Check that connection cables are not damaged Clean the disc Picture noise distorted The disc is dirty or damaged Clean the disc or try another disc Che...

Страница 9: ...such as for example a Myryad MDP 500 G6 Pre amplifier Processor No surround sound If digital output has been activated Press SETUP button Highlight AUDIO Highlight DIGITAL OUTPUT Select BITSTREAM or LPCM Press SETUP button Check that the amplifier or active type loudspeakers are switched on MP3 disc no sound or noisy Remote control does not function When PC program files or other data files are mi...

Страница 10: ...cks MPEG 2 MPEG 1 LAYER 1 LAYER 2 LAYER 3 Composite CVBS S Video output X 1 Y Pb Pr Component Video output X 1 Interlaced or Progressive Scan SCART output X 1 CVBS and RGB video stereo analogue audio Down Mix Stereo output Left and Right X 1 DOLBY DIGITAL DTS digital optical output X 1 output X 1 DOLBY DIGITAL decoded 5 1 channel analogue output X 1 DOLBY DIGITAL DTS digital coaxial output X 1 ...

Страница 11: ... Converter Output level at 0 dB Output impedance CD DVD 0 01 Coaxial Optical Standards Sample rates 100 240 VAC 50 60Hz 25W Max Body size W436 x D286 x H78 mm Net weight 5 3 Kg 1 Vp p 75 1 Vp p 75 0 3 Vp p 75 PAL 0 286 Vp p 75 NTSC 0 7 Vp p 75 plus 0 3V sync on Green 1 0 52 0 52 Vp p 75 24 bit Delta Sigma 2 0 Vrms 330 75 Toslink optical coupler PCM Dolby Digital DTS Up to 96 kHz Ω Ω Ω Ω Ω Ω Ω Ω SP...

Страница 12: ...NOTES ...

Страница 13: ...NOTES ...

Страница 14: ... Systems Ltd 2 Piper s Wood Waterberry Drive Waterlooville Po7 7XU Tel 44 0 23 9226 5508 Fax 44 0 23 9223 1407 info myryad co uk For further information please contact Myryad direct or visit www myryad co uk ...

Страница 15: ...hock or fire If in doubt contact qualified service personnel Accessories Do not place this video product on an unstable cart stand tripod bracket or table The video product may fall causing serious injury to a child or adult as well as serious damage to the video product Use this video product only with a cart stand tripod bracket or table recommended by the manufacturer s or sold with the video p...

Страница 16: ...r the video output image will be distorted during recording INTRODUCTION SYSTEM CONNECTION GETTING STARTED FUNCTION BUTTONS About DVD About MP3 About the player Front panel Rear panel Remote control Connecting to a TV set Connecting to Progressive TV Connecting to stereo amplifier Connecting to digital amplifier Connecting to 5 1 ready amplifier Play a disc OSD DVD OSD VCD CD MP3 mode Kodak Pictur...

Страница 17: ...ut ports are as shown in the table below For Progressive scan output With no disc in the player press the PROG SCAN button on the remote control twice Progressive scan component signals will be output from the Y Pb Pr jacks whatever the previous Interlace Out video setting The same procedure is used to switch back to interlaced scan mode The composite video CVBS output is active in all three video...

Страница 18: ...enu appears ENTER Highlight the connected speaker s name press button to switch ON or OFF the speaker ENTER Highlight C S Spkr Size and press button to select Large or Small Centre and Surround speakers If Large is selected the speakers will receive the full frequency range If Small is selected the bass frequencies in the centre and surround channels will be redirected to the subwoofer ENTER Highl...

Страница 19: ...s Separate mains power cord to suit country of sale Z122 remote control handset Two AAA batteries for handset not in some countries Introduction The Myryad Z122 DVD Video Player has been designed to offer a combination of high quality sound reproduction and elegant styling in keeping with other Myryad products The Z122 is a full function remote controlled DVD Video player It has fixed level low im...

Страница 20: ...ymbols 1 NTSC 2 16 9 L B R E S T R I C T E D 2 2 Each DVD disc contains various features depending on production of the disc Below are some of the symbols representing the features Regional Code Video output system Dolby Digital Surround DTS Digital Surround Number of Audio Tracks Number of Sub titles 3 Some features contained in this DVD player are related to the DVD disc s software Some features...

Страница 21: ...ating an MP3 disc the sampling rate should be 44 1 kHz and the bit rate should be between 128 Kbps and 256 Kbps in order to achieve the best performance In general higher quality settings result in larger file sizes MP3 Format 44 1 kHz 44 1 kHz 44 1 kHz 44 1 kHz 44 1 kHz 44 1 kHz 44 1 kHz 44 1 kHz 44 1 kHz 44 1 kHz 56 Kbps 64 Kbps 80 Kbps 96 Kbps 112 Kbps 128 Kbps 160 Kbps 192 Kbps 224 Kbps 256 Kb...

Страница 22: ...reserved Z122 DVD Player Made in England MY LINK SCARTVIDEO OUTPUT CVBS RGB STEREO AUDIO U S Patent Nos 4 631 603 4 577 216 and 4 819 098licensedforlimitedpay per view uses only CVBS R L STEREO ANALOGUE DIGITAL COAX 5 1CHANNELSURROUND AUDIO OUTPUTS VIDEO OUTPUTS COMPONENT S VIDEO Y G Pb B Pr R LFRNT LSURR FRONT RIGHT SURR RIGHT CENTRE SUB About the player Front panel Play button Disc tray Pause St...

Страница 23: ...lect DVD feature DVD audio soundtrack DVD feature Numeric entry Clear the last entry Goto track or time search Arrow Enter PAL NTSC TV system Setup menu Stop Pause Step play Volume Up Down Slow motion play Repeat playback Progressive Interlace video output select in STOP mode Subtitle select DVD disc feature Return to the previous menu Video Equalizer Brightness Sharpness Colour Contrast Programmi...

Страница 24: ...deo CVBS CVBS S Video and Default setting 1 2 3 Audio L R video CVBS to TV audio L R video CVBS or V input Audio L R S Video to TV audio L R S Video input Audio L R Y Pb Pr to TV audio L R Y Pb Cb Pr Cr input Connects and or either one of or only 1 2 3 The player is factory defaulted to S Video and CVBS output active Y Pb Pr output cut For Y Pb Pr connection software setup is required to change th...

Страница 25: ...lity Red White The player is factory defaulted to interlaced video output active progressive scan Y Pb Pr output cut Once connection is completed with no disc in the player press button on the remote twice to change the video output to progressive scan mode PROG SCAN NOTE Audio L R to TV audio L R input Video Y Pb Pr to TV video Y Pb Pr input After connection completed press button on the remote P...

Страница 26: ...ut Digital decoding amplifier 5 1 decoded output speakers connection Set the amplifier to the corresponding output mode Video connection See C onnecting to a TV Once the connection is completed remember to set the amplifier to the corresponding output mode See the amplifier owner s manual Connect either ONE of the digital outputs ONLY Connecting to 5 1 ready amplifier The player has a built in Dol...

Страница 27: ... disc type logo in the left upper corner of the TV screen and then start playing automatically If a DVD Disc Menu appears on screen Press button on the or on the to start playing PLAY remote unit or Unpack the unit Read through this owner s manual before installation and use Load batteries into the remote control unit Connect the system Connect the power cable to the player and then to the AC powe...

Страница 28: ... title total disc titles Chapter current chapter total chapters Playback time Disc remain time Disc Subtitle current subtitle total disc subtitles Audio Sound Track current audio total tracks Multi angle current angle total angles Audio format 6 Ch LPCM Dolby 5 1 DTS LPCM DVD Title 1 6 Chapter 3 21 Angle 1 1 Audio 1 3 Eng 6 Ch 48KHz Subtitle 1 2 Eng 00 12 33 01 36 25 OSD CD mode Disc type Playback...

Страница 29: ... 13 Auto playback The player will load the MP3 disc and will play all tracks in the root directory Select a track Press the buttons to highlight the desired track press button to play the selected track ARROW ENTER In STOP mode highlight the icon on the upper right hand corner of the screen Highlight the desired track and press ENTER Repeat as necessary When programming is complete press the PLAY ...

Страница 30: ... indefinitely PAUSE Press button to resume the automatic slide show PLAY Press buttons to view the next or previous picture SKIP There are two modes to rotate a picture rotate to the left and rotate to right These operations are allowed only when a picture is being displayed normally and will be cancelled automatically when a new picture is displayed Image rotation Press button to select the diffe...

Страница 31: ...S S Video Y Pb Pr and 2 Progressive scan video output Y Pb Pr only To switch between the two modes Press button twice in stop mode with the drawer open Note The first press of the button will briefly indicate the current Video Mode both on the TV and the front panel display Interlaced Interlace Out on TV IntEr on front panel Progressive scan Progressive on TV PS on front panel The second press wit...

Страница 32: ...eo Equalizer Use the UP DOWN ARROW buttons to highlight the desired icon Use Left Right ARROW buttons to adjust the level Press button again to store the adjusted levels and exit the menu VIDEO EQ 1 Volume level Mute To adjust the audio volume output level Press the or volume buttons to turn the volume level up or down To turn the audio output off press MUTE button once Note The volume and mute co...

Страница 33: ...hen in SLOW mode Press to play forwards slowly Press PLAY button Press the button repeatedly to play more slowly to resume normal playback 1 1 2 2 Press to skip to the next chapter Press to skip to the previous chapter The unit is muted in SCAN mode Press to scan forward Press to scan backward Press PLAY button Press the button repeatedly to change scan speed Press the button repeatedly to change ...

Страница 34: ... Disc Title Menu Select an item in a menu In the disc menu or setup menu press ARROW button Press Press Press to move between menu items to confirm a selection to cancel an entry to return to the previous menu 1 2 3 4 Press MENU button Press TITLE button to access the DVD Menu to return to the DVD Title menu 1 2 1 2 18 BUTTON FUNCTIONS 2 1 3 4 1 Press OSD button to switch the OSD indicator on or o...

Страница 35: ...put the desired data using the number keys Press button to execute the search ENTER NOTE Some DVDs do not allow the repeat function Repeat Press the REPEAT button to activate the desired repeat mode 1 In DVD mode Selects Chapter Title Disc or Off In CD mode Selects Single Track Disc or Off NOTE Some DVD discs do not allow A B function A B repeat At the beginning of the desired section A Press the ...

Страница 36: ...ccess Direct Program access 1 Multi Angle When playing a disc press the button repeatedly to select the desired audio track The status will be displayed on screen AUDIO A DVD may contains up to 8 audio tracks Multi Audio Soundtrack 1 1 3 Eng 6 Ch In many case Audio Language selection will be available in the DVD disc start menu NOTE 1 A DVD may contains up to 9 camera angles Note Many DVDs do not ...

Отзывы: