MyBinding IDEAL 4810-95 Скачать руководство пользователя страница 18

                                                                                - 17 -

A

B

B

C

A

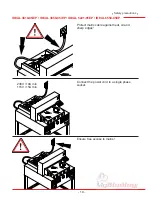
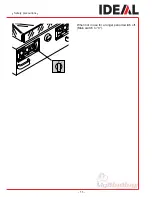
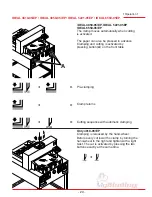
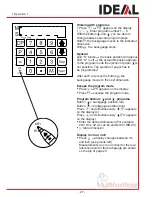
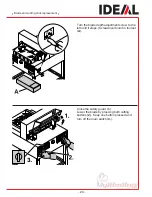
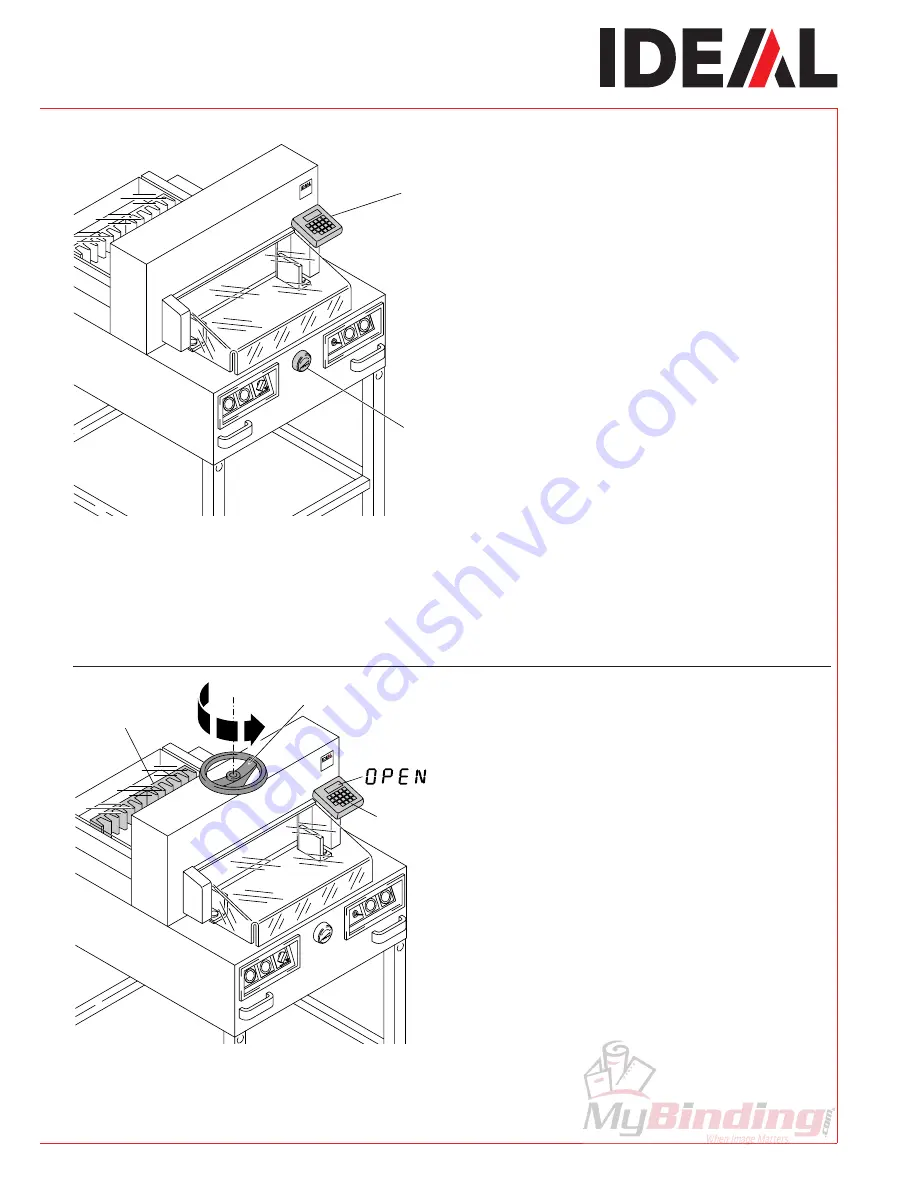
Only IDEAL 4810-95EP

If display shows "

AB 

" the clamp must be

completely opened.

Turn the hand-wheel for clamping (

A

)

completely to the left until the backgauge (

B

)

is activated.

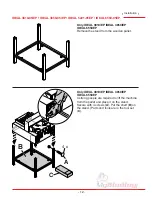
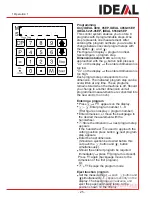
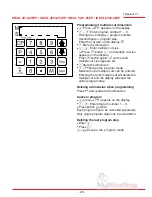
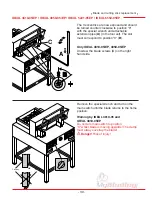
IDEAL 4810-95EP, IDEAL 4850-95EP,

IDEAL 5221-95EP, IDEAL 6550-95EP

The measurement is set either with the hand-

wheel (

A

)  or by programming (

B

) the cutting

measurements. Measurement is shown on the

display in inches or cm (

B

).


Operation

 •

Содержание IDEAL 4810-95

Страница 1: ...Instruction Manual Provided By http www MyBinding com http www MyBindingBlog com MBM Triumph 6550 EP Hydraulic Paper Cutter...

Страница 2: ...IDEAL 4850 95 IDEAL 4850 95EP IDEAL 5221 95EP IDEAL 6550 95EP IDEAL 4810 95 IDEAL 4810 95EP GB Operating Instructions Guillotines...

Страница 3: ...es de poner en funcionamiento esta m quina y cumpla las normas de seguridad Las instrucciones de servicio y seguridad deben estar siempre disponibles S L s igenom denna bruksanvisning innan ni startar...

Страница 4: ...PL Dzieciom nie wolno obs ugiwa urz dzenia RUS H Gyerekek a g pet nem kezelhetik TR Makinay ocuklar Kullanmamal d r DK M kun betjenes af voksne CZ Stroj nesm b t obsluhov n d tmi P As crian as n o de...

Страница 5: ...pgelet voor ongevallen I Non lasciare mai la lama incustodita Non rimuovere o trasportare la lama senza protezione Vedi pagina 31 e 33 Attenzione Rischio di infortunio E No quitar la cuchilla sin pres...

Страница 6: ...terlades uden opsyn Fors g ikke at afmontere eller transportere knivbladet uden beskyttelse Se side 31 og 33 FARE Risiko for legemlig beskadigelse CZ Nikdy nenech vejte n bez krytu Nikdy nevyj mejte n...

Страница 7: ...nteren I Utilizzare il tagliacarte esclusivamente per il taglio di risme di carta o materiali analoghi E No cortar materiales duros o materiales que puedan astillarse S F rst r inte h rt material elle...

Страница 8: ...d size This machine is constructed for one man operation only Disconnect from the mains before starting any service work or before removing the panels Replacement of blade and cutting stick may be per...

Страница 9: ...1 95EP IDEAL 6550 95EP A A A B C A C All components which could endanger the operator are covered by a guard Operating the machine without safety device is forbidden Front safety guard A rear screwed...

Страница 10: ...nd a safety two handed control system B Before working with the machine and after every blade replacement the automatic cut off function of safety guard A correct if distance between cover and table i...

Страница 11: ...DEAL 4850 95 EP IDEAL 5221 95EP IDEAL 6550 95EP 230V 10A min 115V 15A min Protect mains cable against heat oil and sharp edges Connect the power cord to a single phase socket Ensure free access to mai...

Страница 12: ...11 When not in use for a longer period switch off Main switch to 0 Safety precautions...

Страница 13: ...L 4850 EP IDEAL 6550EP Remove the stand from the wooden pallet Only IDEAL 4810 EP IDEAL 4850 EP IDEAL 6550EP 4 strong people are required to lift the machine from the pallet and place it on the stand...

Страница 14: ...urface is level Screws and nuts are in a plastic bag in the tool set C The front and rear wooden panels must be removed for in house transport on a pallet truck For transport through narrow doors Remo...

Страница 15: ...50 95 EP IDEAL 5221 95EP IDEAL 6550 95EP C Only IDEAL 4810 95 EP Attach the enclosed hand wheel for clamping Parts and tools are in the tool set C Plug into socket The machine must be connected direct...

Страница 16: ...fety devices are functioning and complete before use All covers have to be mounted A The release for cutting is allowed only if the cover is closed and the two hand safety device is operated at the sa...

Страница 17: ...The machine is now ready for use Only IDEAL 4810 95EP IDEAL 4850 95EP IDEAL 5221 95EP IDEAL 6550 95EP Press S button D Machine will automatically go to the start position IDEAL 4810 95 IDEAL 4850 95 T...

Страница 18: ...wheel for clamping A completely to the left until the backgauge B is activated IDEAL 4810 95EP IDEAL 4850 95EP IDEAL 5221 95EP IDEAL 6550 95EP The measurement is set either with the hand wheel A or b...

Страница 19: ...ne A that indicates the exact position of the cut Blade cuts on the front edge B of the light beam Only use when no exact cut is required IDEAL 4810 95 has no cutting line indicator Only IDEAL 4810 95...

Страница 20: ...A B C Position the paper on the backgauge A and side lays left or right B To move paper stacks please use the paper knock up block C provided Run backgauge to the front for turning the paper stack Ope...

Страница 21: ...ressed in advance Clamping and cutting is activated by pressing button A on the front table Pre clamping Clamp returns Cutting sequence with automatic clamping Only 4810 95 EP Clamping is released by...

Страница 22: ...Press both buttons of the two handed control system activation A simultaneously and them pressed until the paper is completely cut To interrupt or stop cutting To interrupt or stop cutting release bot...

Страница 23: ...E Paper clamp only IDEAL 4810 95 EP F Main switch G Hand wheel EP or crank handle for backgauge setting H Key switch I Backgauge J Side lay left and right K Display cutting size EP cm or inch L Selec...

Страница 24: ...a wrong dimension is entered this can be corrected by pressing the sbutton Press S button dimension is approached LED S disappears Dimensions below 9 cm can only be approached with the S button presse...

Страница 25: ...ress p press T e on display Insert the desired dimension g Store dimension Multiple cut Enter the multiple cut size on the display Q Advance to the measurement with the S button Push the paper to the...

Страница 26: ...imension unit all programmed measurements are converted into the new unit cm or inch Entering a program Press p P appears on the display 1 9Enter program number 1 9 First figure on display program num...

Страница 27: ...Press Tbutton again Fand second multiple cut size appears etc gStore the dimension p sEscape the program mode Maximum nine multiple cuts can be entered Entering the tenth multiple cut will delete the...

Страница 28: ...ch cut press the button Sthe backgauge moves to the next dimension Escape the program mode Press p P appears on the display Press s escape the program mode Program buttons hand r programs Button h bac...

Страница 29: ...The blade cannot be ground if the blade height is less than 83 mm 3 29 inches A new blade must be used The blade may only be ground by a qualified supplier or from the manufacturer Krug Priester D 72...

Страница 30: ...t screw to the left until it stops Screwdriver found in tool set A Close the safety guard 1 Lower the blade by pressing both cutting buttons 2 Keep one button pressed and turn off the main switch 3 Bl...

Страница 31: ...st correspond to position 0 B Only IDEAL 4810 95 EP 4850 95 EP Unscrew the blade screws C on the right hand side Remove the special wrench and turn on the main switch until the blade returns to the ho...

Страница 32: ...fasten it to the blade 3 Remove 2 blade screws 1 IDEAL 4810 95 EP IDEAL 4850 95 EP and 3 blade screws 1 IDEAL 5221 95EP IDEAL 6550 95EP Loosen the grips 2 of the blade changing tool A lightly and allo...

Страница 33: ...be too deep Remove the cutting stick according to top picture Turn the cutting stick the non used side must be near to the blade and plug it into the holding bolt Danger Risk of injury Cutting test a...

Страница 34: ...e changing tool A Make sure there is a space ot 11 mm or 0 43 inches B Blade must be covered C Danger Risk of injury Place the blade to be exchanged with the blade changing tool A mounted 1 into the b...

Страница 35: ...h washers 1 Remove the blade changing tool 2 Lightly tighten the remaining blade screws with washers 3 IDEAL 4810 95 EP and IDEAL 4850 95 EP Lightly screw in the right blade screw with the washer A wh...

Страница 36: ...gth of the blade The blade must remain parallel not too deep into cutting stick Only IDEAL 4810 95 EP and IDEAL 4850 95 EP Tighten the blade screws A on the right hand side Turn main switch to positio...

Страница 37: ...ually turn the knob for blade depth adjustment A turn to the right until the paper is cut along the entire length Do not set too low as blade will become blunt sooner Warning by IDEAL 4810 95 and IDEA...

Страница 38: ...Advance the backgauge as far as possible to the front Use non resinous oil or grease Grease the remaining parts twice a year see picture The main switch must be on 0 B Remove lower panel and rear woo...

Страница 39: ...DEAL 6550 95EP Safety test The safety regulations are according to the regulations of the country where the cutting machine is operated The manufacturer recommends a safety check is made every 5 years...

Страница 40: ...39 Machine does not function Is the machine plugged in Main switch to position I A Control system activated B Turn key to the right Release a cut see page 21 Possible malfuntions...

Страница 41: ...40 IDEAL 4810 95 EP IDEAL 4850 95 EP IDEAL 5221 95EP IDEAL 6550 95EP Cut cannot be made If cover is open close it If cover is closed open and re close it Security check Possible malfuntions...

Страница 42: ...Machine blocked Blade is blunt Eliminate the cause and push the safety button A Only IDEAL 4810 95EP IDEAL 4850 95EP IDEAL 5221 95EP IDEAL 6550 95EP Backgauge blocked Safety button B ejects Eliminate...

Страница 43: ...5EP B C A Does not cut through the last sheet Turn or turn around the cutting stick A readjust the blade by means of the blade adjusting knob B see page 36 Poor cutting quality or blade stays in the p...

Страница 44: ...en activated Inform the Service Team www ideal de Service service krug priester com Display illumination off Machine is plugged in A Main switch on position I B Push in the safety button C Check the u...

Страница 45: ...EP Cut cannot be made Measurement has not been reached correctly LED S Xdoes not turn off Push the Sbutton again Check the security cover see page 40 Measurement below 9 cm Hold the Sbutton Ountil the...

Страница 46: ...DEAL 4850 95 EP Nr 9000 024 IDEAL 5221 95EP Nr 9000 026 IDEAL 6550 95 EP Blade changing tool 1 Nr 9000 511 IDEAL 4810 95 EP Nr 9000 511 IDEAL 4850 95 EP Nr 9000 512 IDEAL 5221 95EP Nr 9000 513 IDEAL 6...

Страница 47: ...12605 12206 mm Weight 1941 2002 2093 2154 2625 2765 7 3046 kg The exact technical specifications can be found on the technical specifications sticker A on the machine A wiring diagram is found in the...

Страница 48: ...it sont conformes aux dispositions pertinentes suivantes voldoet aan de eisen van de in het vervolg genoemde bepalingen conforme alle seguenti disposizioni pertinenti satisface las disposiciones perti...

Страница 49: ...IDEAL Made in Germany IDEAL Krug Priester 72336 Balingen Germany www ideal de Document Shredders Trimmers and Guillotines Printed in Germany IDEAL 07 2005 G...

Отзывы: