background image

page 14

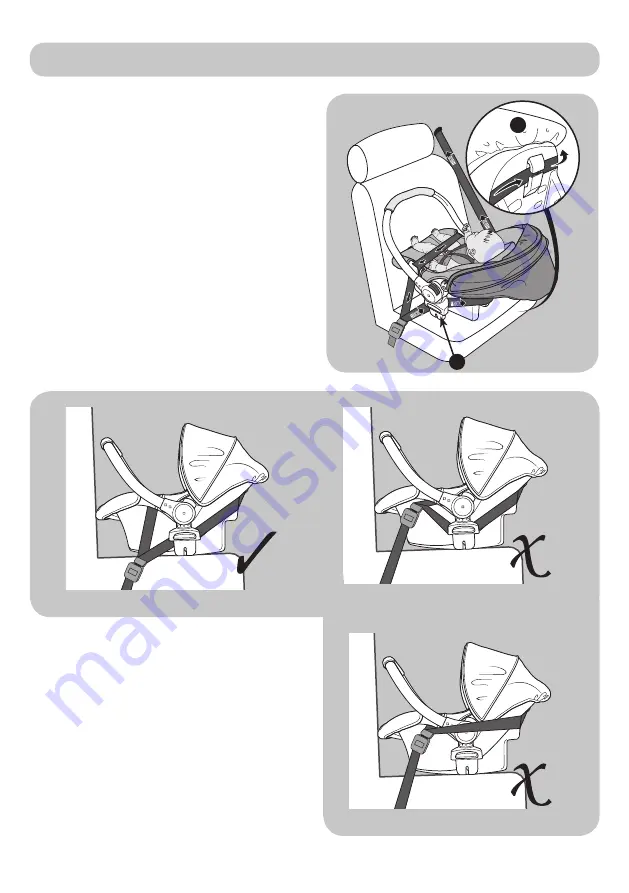
Take the diagonal belt around the back 

of the child car seat and slot it into the 

rear seat belt guide (C), ensuring that 

the diagonal section passes behind the 

pushchair adaptor (D). 

Once the seat belts are in their correct 

mounting points make sure the seat belt 

buckle is secure and there are no twists in 

the belt and that all slack is removed from 

the lap and diagonal sections.

Fitting the child seat in a vehicle 

(continued)

Note: 

If the vehicle seatbelt buckle is 

above or touching the top edge of the 

shell then this car seat is not suitable for 

the vehicle and may cause the vehicle 

seatbelt to come undone in an accident.

D

C

Содержание Floe Infant Carrier

Страница 1: ...s tested to BS EN 1888 2018 1 Group 0 child car seat Suitable for children from birth to 13kg approx 12 months IMPORTANT CONSERVER POUR R F RENCE ULT RIEUR Ce produit r pond aux normes ECE R44 04 et e...

Страница 2: ...e Ensure that the child car seat is not damaged by heavy objects or being caught in the car door Never make unauthorised alterations to the product Child car seat parts may become hot in direct sunlig...

Страница 3: ...d out of the car as first priority in an accident While travelling it is recommended that any luggage or other objects liable to cause injuries in the event of a collision shall be properly secured Yo...

Страница 4: ...st only be used in vehicles which are fitted with a three point seatbelt system that has been approved by regulation ECE 16 or similar 2 A correct fit is likely if the vehicle manufacturer has declare...

Страница 5: ...oad the basket with a weight in excess of 2kg WARNING Always apply the brakes when the pushchair is stationary and when placing and removing children WARNING Taking children up or down stairs escalato...

Страница 6: ...t cover 5 Harness adjuster strap 6 Insert cushion 7 Shoulder strap slots 8 Crotch pad 9 Hood 10 Handle adjuster buttons on left and right of shell 11 Diagonal seatbelt guide on rear of shell 12 Lap be...

Страница 7: ...ety belt A and NOT with a 2 point lap belt B The child car seat can be secured on forward facing back seats of the vehicle by using the existing seat belts However on some seats if the installation is...

Страница 8: ...ar seat on a soft surface e g cushion mattress pillow etc due to risk of suffocation if child car seat tips over Never leave a child unattended Adjusting the carry handle Adjusting the shoulder harnes...

Страница 9: ...A unbuckle the harness move the shoulder straps apart and remove the shoulder pads click Unhook the shoulder straps at the rear of the seat shell by sliding the straps through the slits in yoke B Remo...

Страница 10: ...rap tight and check straps are not twisted The crotch strap can be repositioned for a more comfortable fit as your child grows To reposition the crotch strap pass the strap retainer up through one of...

Страница 11: ...ulder straps apart Place the child in the child car seat and ensure there are no spaces under the child Note a new born baby may need extra support around the head and body Ensure you use the supplied...

Страница 12: ...lace the shoulder harness over the shoulders Note Do not place your child in a sleeping bag blanket or other bulky wrapping before putting the child in the child car seat The shoulder straps will not...

Страница 13: ...ed Choose a seat suitable for fitting the child car seat to See page 6 Positioning the child car seat Place the child car seat rearward facing on the vehicle seat Ensure the handle is in the fitting p...

Страница 14: ...r correct mounting points make sure the seat belt buckle is secure and there are no twists in the belt and that all slack is removed from the lap and diagonal sections Fitting the child seat in a vehi...

Страница 15: ...he hood push the plastic stays into the sockets on each side of the carrier ensuring they click into place Press the belt adjuster button and pull on the shoulder harness straps to create slack A Remo...

Страница 16: ...f the keyhole slots C Loosen the seat cover all around the edges of the shell Carefully pass all straps and buckles through the slots in the cover and remove the cover To replace reverse the above ste...

Страница 17: ...is facing the stroller handle Position the car seat joints A above the mounting points B and push the seat downwards until it clicks into place Attention Lift the car seat to ensure it is firmly attac...

Страница 18: ...ntle or alter any part of the seat shell 3 You must not oil or lubricate any part of the seat shell Inspection 1 Check your child car seat regularly for wear and tear 2 The child car seat may have a s...

Страница 19: ...z vous que le si ge auto n est pas abim par des objets lourds ou n est pas coinc dans la porti re du v hicule Ne jamais faire des modifications non autoris es sur le produit Certaines parties du si ge...

Страница 20: ...mand comme tant la position la plus sure pour installer un si ge auto dans la plupart des v hicules Utiliser le si ge arri re central UNIQUEMENT si celui ci est quip d une ceinture de s curit 3 points...

Страница 21: ...syst me approuv et conforme la norme ECE 16 ou similaire 2 Une installation correcte peut se faire si le fabricant du v hicule a d clar dans le manuel d instruction le v hicule capable d accepter un s...

Страница 22: ...TENTION Ne pas mettre plus de 2Kg dans le panier sous la poussette ATTENTION Toujours actionner les freins lorsque la poussette est l arr t et lorsque vous installez ou sortez l enfant de la poussette...

Страница 23: ...olletonn e 7 Inserts pour sangles du harnais 8 Coussin de sangle d entre jambe 9 Capote soleil 10 Boutons ajusteur de poign e droite et gauche de la coque 11 Guides pour ceinture diagonale l arri re d...

Страница 24: ...ne ceinture de s curit 3 point A et NON AVEC une ceinture ventrale 2 points B Le si ge auto peut tre install face un si ge arri re de v hicule qui fait face la route en utilisant la ceinture de s curi...

Страница 25: ...ATTENTION NE JAMAIS mettre le si ge auto sur une surface moelleuse comme un coussin un matelas etc cause du risque d touffement si le si ge auto bascule Ne jamais laisser un enfant sans surveillance A...

Страница 26: ...uvrir la boucle du harnais ouvrez le harnais et enlever les coussinets molletonn s du harnais click D crocher les sangles l arri re de la coque du si ge en faisant glisser les sangles travers les fent...

Страница 27: ...urez vous qu elles ne sont pas enroul es La sangle d entrejambe peut tre repositionn e pour un ajustement plus confortable au fur et mesure que votre enfant grandit Pour repositionner la sangle d entr...

Страница 28: ...cez l enfant dans le si ge auto pour enfant et assurez vous qu il n y a pas d espace sous l enfant Note un nouveau n peut avoir besoin d un support suppl mentaire autour de sa t te et de son corps Ass...

Страница 29: ...fant travers les sangles du harnais jusqu aux paules Note Ne pas mettre votre enfant dans un sac de couchage couverture ou autre gros manteaux avant de mettre l enfant dans le si ge auto Sinon les san...

Страница 30: ...z le si ge le plus appropri pour installer le si ge auto Voir page 24 Installer le si ge auto Installer le si ge auto dos la route dans le v hicule Assurez vous que la poign e est dans la m me positio...

Страница 31: ...it est dans les loquets assurez vous que la ceinture de s curit est bien attach e et qu elle n est pas enroul e Resserrer la ceinture ventrale en enlevant tout le mou Installer le si ge auto dans un v...

Страница 32: ...rez les tiges en plastique dans les glissi res de chaque c t assurez vous qu elles cliquent lorsqu elles sont r install es Appuyer sur le bouton ajusteur de ceinture et tirer sur les sangles du harnai...

Страница 33: ...trous pr vus cet effet C D tacher la couverture tout autour de la coque Passer doucement toutes les sangles et boucles travers leurs inserts et enlever la housse Pour la remettre faites la pr c dente...

Страница 34: ...sse face au guidon de la poussette Positionner les c t s du si ge auto A au dessus des points de montage B et appuyer sur le si ge jusqu ce qu il clique en place Attention Soulevez le si ge auto pour...

Страница 35: ...e la coque 3 Vous ne devez huiler ou lubrifier aucunes pi ces de la coque Inspection 1 V rifiez r guli rement l usure de votre si ge auto 2 Le si ge auto peut faire un petit bruit m tallique lorsqu il...

Страница 36: ...Customerservice kooltrade co uk Imported by MyChild M34 3QA www mychild co uk Tel 0161 335 2508...

Отзывы: