background image

12

13

MAIN PAGE

MENU GUIDE

I. CHANNEL MANAGER

Press the MENU button on the RCU to open Main
Page on the screen. Main Page will be displayed.

1. You can move into the main page using 


on the RCU.

2. Press OK to confirm your selection.

3. Press EXIT to return to the previous menu or press 

MENU to go to the current live channel.

I. Channel Manager

II. Installations

III. Options

This section may help you to organize channels according to your preference.

1. Select Channel Manager in the Main Page with 

and press OK.

2. TV Channel Manager Page displays on the screen.

3. Select the mode that you want using 


.

4. To see the channel that you choose, go to the channel and then press RED botton.

5. Press EXIT to return to the previous menu or press MENU to go to the current live channel.

I-1. Favorite

I-2. Rename

I-3. Move

I-4. Lock

I-5. Delete

I-1. Favorite

1. Using 


go to the Favorite mode then press 

YELLOW button to choose Favorite 1~8.

2. Press OK on the channel that you want to add 

or delete.

3.

will be marked at the end of selected channel 

name bar. To delete press OK again.

4. Selected channels will be automatically saved.

5. If you want to check the saved Favorite Channel List 

go to other mode(Rename~Delete) except Favorite 
and then press FAV button to check Favorite 1~8.

6. Press EXIT to return to the previous menu or press 

MENU to go to the current live channel.

7. Press BLUE button to rename Favorite.

IV. Utility

V. Accessory

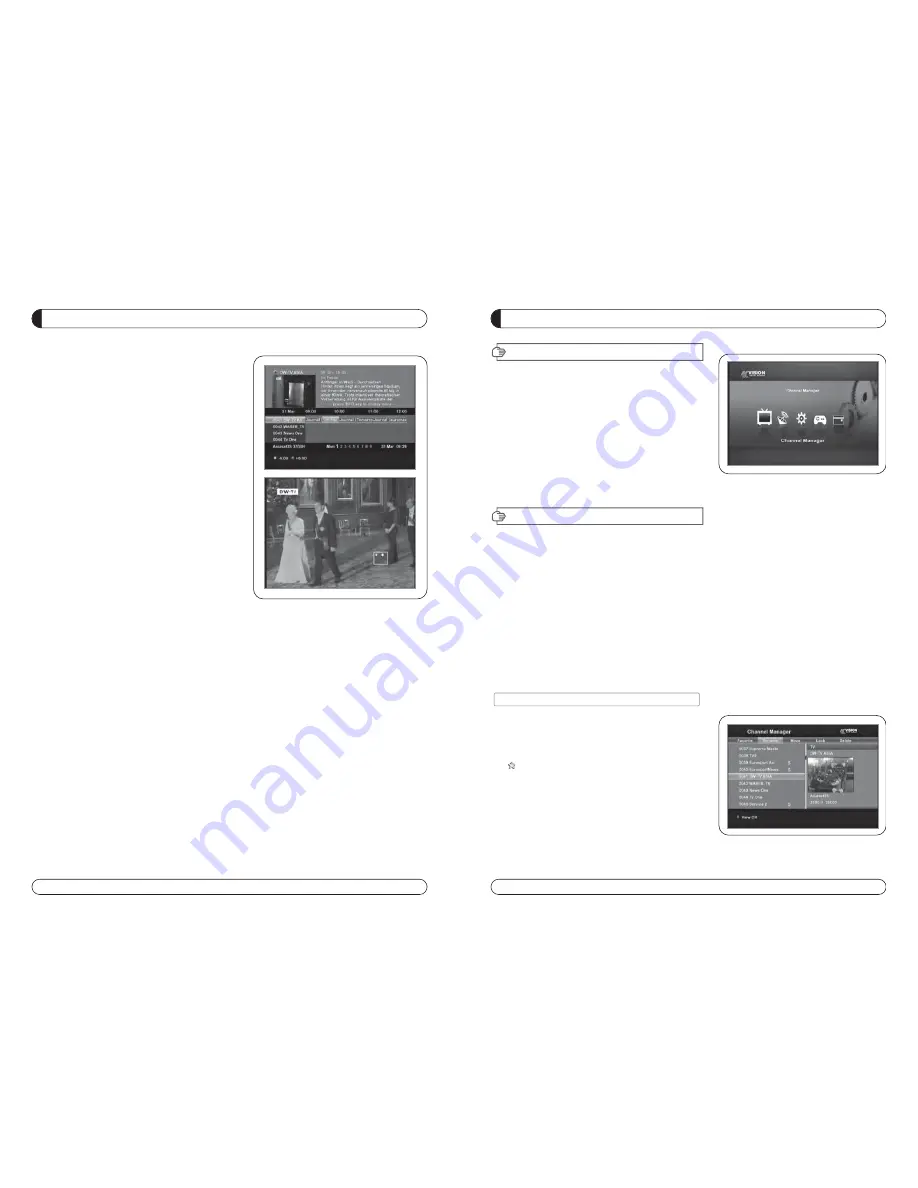
CHANNEL LIST GUIDE

4.EPG (Electronic Program Guide)

a)

Press EPG button on the live mode.

b)

EPG of the current channel appears on the screen.

c)

Select the channel that you want to watch program.

d)

It will be appear like rightside picture.

5. ZOOM IN/OUT

a)

By pressing ZOOM key in a normal live mode, you

can use Zoom In/Out fuction.

b)

You can select zoom size with RED/GREEN key.

c)

You can select the start position with 


key.

d)

After select Zoom size and pisition, you can start
zoom function with OK key.

e)

With 


key, you can move zooming screen.

Содержание HD-300 Combo

Страница 1: ......

Страница 2: ...EQUIPMENT 10 CHANNEL LIST GUIDE 11 MENU GUIDE 13 MAIN PAGE 13 I CHANNEL MANAGER 13 II INSTALLATION 15 III OPTIONS 20 IV UTILITY 22 V ACCESSORY 23 PVR Guide 24 TROUBLESHOOTING 31 SPECIFICATIONS 32 BRAN...

Страница 3: ...FEATURES GENERAL SAFETY Please read the following recommended instructions carefully to avoid the risk of your physical Injury before the product is operated Do not cover the receiver and keep clear s...

Страница 4: ...menu 18 INFO Displaystheprograminformationboxonthescreenandeditthenameoffavoritechannellist 19 V V Turns volume up or down 20 P P Changes channels up or down on normal mode 21 Moves up a page in the c...

Страница 5: ...r keys of RCU whether they working properly If the power buttons works but other keys does not work it means the code was not inserted correctly Please start again from the step 1 and insert other cod...

Страница 6: ...CAM 1 2 3 4 5 1 SAT IN Connects to Satellite antenna cable 2 LOOP OUT Connects to another STB 3 YPbPr Connects to Component jack of TV 4 VIDEO Connects VIDEO to the TV or other eguipment 5 TV SCART Co...

Страница 7: ...tellite will be displayed g Press the FAV key to show Favorite Pop UP Window then select FAV list Channel list of selected FAV will be dis played h Press the Green key then all searched channel list w...

Страница 8: ...press YELLOW button to choose Favorite 1 8 2 Press OK on the channel that you want to add or delete 3 will be marked at the end of selected channel name bar To delete press OK again 4 Selected channel...

Страница 9: ...WORDS in the Keypad Dialog 5 Press EXIT to return to the previous menu or press MENU to go to the current live channel I 3 Move 1 Using go to the Move mode 2 Select channels which you want to move by...

Страница 10: ...Longitude Input directly the Longitude using NUMBER KEY on the RCU Select the direction using WEST EAST b Latitude Input directly the Latitude using UNMBER KEY on the RCU Select the direction using NO...

Страница 11: ...n the download folder by using Browse button It is assigned to c download but must specify the destination folder personally to be able to receive movie files in PC Note Only default server available...

Страница 12: ...k and unlock Install Lock selecting ON or OFF using For Installation Settings 5 Enter new password if you want to change the current pass word 6 Confirm your new password entering new password again 7...

Страница 13: ...ule and smart card that you use 1 Select Common Interface in utility with and press OK 2 Common Interface displays on the screen The phrase No Module is indicated when the conditional access module is...

Страница 14: ...nt as below External USB Hard Disk Drive Flash memory stick Format Type FAT16 32 System does not support NTFS and other file system II Record Function II 1 Reserved Recording 1 Time Reserved Recording...

Страница 15: ...IDE III Playback Function To play previously recorded program press Play button on RCU Use the arrow buttons to select the file which you want to play and press OK button to play While Playing program...

Страница 16: ...o play in PC D Capture the fie which is being played currently to convert into avi 1 Click right button of Mouse Capture Video Quick Capture 2 Then the playing file is saved in designated folder by av...

Страница 17: ...ect System Information Contact your Service Provider Problem Nothing appears on the Front Panel or No power supply No Picture No Sound Remote Control Unit dose not work Service is not running or scram...

Страница 18: ...ect Ratio 4 3 16 9 Letter Box Frame Rate 25Hz for PAL 30Hz for NTSC Video Resolution 576i 576p 720p 1080i Teletext Through VBI or BSD Audio Decoding MPEG 1 Layer 1 2 Dolby Downmix Audio Mode Single Ch...

Страница 19: ......

Страница 20: ...FRONTAL 44 VI PANEL TRASERO 45 INSTALACI N DEL EQUIPO 46 GU A LISTA DE CANALES 47 GU A MEN 49 MEN PRINCIPAL 49 I GESTOR DE CANALES 49 I I INSTALACI N 51 III OPCIONES 56 IV UTILIDAD 58 V ACCESORIOS 59...

Страница 21: ...c Actualizaci n de Software y Base de Datos de Canales a trav s del puerto USB 2 0 I DESEMBALAJE II CARATERISTICAS SEGURIDAD GENERAL Por favor leer las siguientes recomendaciones atentamente para evit...

Страница 22: ...de informaci n del progarama en la pantalla y editar el nombre de lista de canal favorito 19 V V Sintoniza el volume arriba o abajo 20 P P Cambia canales arriba o abajo en el modo normal de canales 21...

Страница 23: ...i la tecla de POWER funciona correctamente pero las otras teclas no significa que el c digo no ha sido insertado correctamente Por favor empezar otra vez desde el paso 1 e insertar otro c digo de la l...

Страница 24: ...lite 2 LOOP OUT Conectar a otro STB receptor 3 YPbPr Conectar a la entrada de Componentes del TV 4 VIDEO Conectar a la entrada de VIDEO del TV u otro equipo 5 TV SCART Conectar al cable EUROCONECTOR T...

Страница 25: ...ra mostrar la Ventana de Sat lites y seleccionar un sat lite Ser visualizada la Lista de Canales del sat lite seleccionado g Presionar la tecla FAV para mostrar la Ventana de Favoritos y seleccionar u...

Страница 26: ...e a adir borra 3 Una marca aparecer al final del nombre del canal seleccionado Para borrar presionar OK otra vez 4 Los canales seleccionados ser n memorizados autom ticamente 5 Si se quiere comprobar...

Страница 27: ...alla 4 Editar el nombre utilizando el teclado N MERICO y PALABRAS 5 Presionar la tecla AMARILLA para renombrar Favorito 1 8 y pre sionar la tecla AZUL para renombrar el Sat lite 6 Presionar EXIT para...

Страница 28: ...i n utilizando Oeste Este b Latitud Introducir directamente la latitud utilizando el teclado num rico del mando Seleccionar la direcci n Norte Sur 3 Presionar EXIT para regresar al men anterior presio...

Страница 29: ...Seleccionar Default URL y asignar la carpeta del PC usando la tecla Browse Por defecto est asignada la carpeta C download pero debe especificar la carpeta de destino para poder recibir archivos de pe...

Страница 30: ...leccionar el tipo de TV c Relaci n de aspecto de pantalla Seleccionar el ratio de pantalla d Control de Pantalla Seleccionar el modo de visualizaci n de pantalla e Brillo Ajuste del brillo de pantalla...

Страница 31: ...ar OK 2 Si desea cambiar de modo S W upgrade BootLoader Upgrade presionar el teclado ROJA del mando a dis tancia 3 Seleccionar el fichero que desea upgrade utilizando y presionar OK 4 Una vez que haya...

Страница 32: ...T16 32 el sistema no soporta NTFS ni otros ficheros desistema II Funci n de Grabaci n II 1 Programar Grabaci n 1 Programar la Hora de Grabaci n Configurar la hora de grabaci n en Utilidades Temporizad...

Страница 33: ...32 PVR GUIDE PVR GUIDE III Funci n Reproducci n Para reproducir los programas grabados previamente pre sionar la tecla Play en el mando a distancia Utilizar las teclas cursores arriba abajo para selec...

Страница 34: ...31821 mpg D Seleccionar el fichero que se desea reproducir 1 Pulsar el bot n derecho del rat n Open Files S Abrir Fichero S Seleccionar X 2 Com o R epro du cir co n el programa DivX Player A El format...

Страница 35: ...tema Contactar con el distribuidor Problema Nada aparece en el display frontal no enciende la fuente de alimentaci n No hay imagen No hay sonido El mando a distancia no fun ciona El canal no opera est...

Страница 36: ...ect Ratio 4 3 16 9 Letter Box Frame Rate 25Hz for PAL 30Hz for NTSC Video Resolution 576i 576p 720p 1080i Teletext Through VBI or BSD Audio Decoding MPEG 1 Layer 1 2 Dolby Downmix Audio Mode Single Ch...

Страница 37: ......

Страница 38: ...V VOORKANT PANEEL 80 VI ACHTERKANT PANEEL 81 INSTALLATIE 82 KANALENLIJST 83 MENU 85 HOOFDMENU 85 I KANALENLIJST 85 II INSTALLATIE 87 III OPTIES 92 IV UTILITY 94 V ACCESSOIRES 95 PVR Guide 96 PROBLEME...

Страница 39: ...II SPECIFICATIES 74 ALGEMENE VEILIGHEID Lees eerst de veiligheidsvoorschriften om eventuele schade aan u of uw installatie te voorkomen Bedek de ontvanger niet en houd de omringende omgeving schoon C...

Страница 40: ...naar huidig kanaal 18 INFO Toont programma informatie in beelden kan de naam van de favorieten lijst veranderen 19 V V Volume harder of zachter 20 P P Kanaal op of neer 21 Pagina omhoog in kanalenlijs...

Страница 41: ...ng Indien de Aan Uit knop goed werkt maar de rest van de knoppen niet dan heeft u de verkeerde code ingevoerd Herhaalt u dan stap 1 en voer een andere code behorende bij dezelfde merk Meestal heeft 1...

Страница 42: ...AT IN Verbinding met satellite antennekabel 2 LOOP OUT Verbinding met andere ontvanger 3 YPbPr Verbind Componenten kabel met TV 4 VIDEO Verbinding VIDEO van TV of ander apparaat 5 TV SCART Verbinding...

Страница 43: ...n in beeld komen f Druk de FAV knop in om het Favorieten scherm op te roepen en kiest u dan de gewenste Favorieten lijst De kanalenlijst van de bewuste satelliet zal dan in beeld komen g Druk op de gr...

Страница 44: ...kunnen kiezen tussen Favorieten 1 8 2 Druk op OK op het kanaal dat u wilt toevoegen of verwijderen 3 Een markering komt tevoorschijn achter gekozen kanaal Om te verwijderen drukt u nogmaals op OK 4 D...

Страница 45: ...ruk op EXIT om terug te keren naar het vorige menuscherm of druk op MENU om terug te keren naar het kanaal dat u aan het bekijken was I 3 VERPLAATSEN 1 Door gebruik te maken van de knoppen gaat u naar...

Страница 46: ...t b Latitude Voer rechtstreeks de latitude in door gebruik te maken van de nummers op uw afstandsbediening Selecteer de richting door gebruik te maken van de knoppen Noord Zuid 3 Druk op EXIT om terug...

Страница 47: ...ntie Tabblad b Selecteer standaard URL selectie vakje en druk op de Browse knop Standaard is toegewezen c download maar u kunt ook zelf een folder toewijzen Opmerking momenteel is alleen de standaard...

Страница 48: ...type c Aspect Ratio Selecteer screen ratio d Screen Control Select screen display modes e Brightness Instellen van screen brightness f Contrast Instellen van screen contrast g Saturation Instellen van...

Страница 49: ...zijn worden bepaald door de Conditional Acces Module en de Smart Card die u gebruikt 1 SelecteerCommonInterfaceinutilitymet endrukopOK 2 Common Interface word in beeld weergegeven Dezin NoModule geef...

Страница 50: ...Geprogrammeerde opnames 1 Tijd Opnames Stel gewenste opname tijd in in Utility Timer om opeen gewenste tijd op te nemen N NO OO OT T I In ns st te el ll li in ng ge en n v vo oo or rd da at t u u T T...

Страница 51: ...erdere opnames af te spleen selecteer Play knop van uw afstandsbediening Gebruik de pijlen om de gewenste opname te selecteren door middel van de OK knop Tijdens het kijken Indien u de links rechts kn...

Страница 52: ...opname in mpg Voorbeeld Welcome to A_131821 Welcome to A_131821 mpg D Selecteer de file die u wilt afspelen 1 Selecteer rechter muis knop Open Files S Select X 2 Afspelen op DIVX player A The file for...

Страница 53: ...n selecteer Systeem Informatie Neem contact op met uw service dienst Probleem Er verschijnt niets op de display Geen beeld Geen geluid Afstandbediening doet het niet Service doet het niet of gecodeerd...

Страница 54: ...ax 90Mbit s Aspect Ratio 4 3 16 9 Letter Box Frame Rate 25Hz for PAL 30Hz for NTSC Video Resolution 576i 576p 720p 1080i Teletext Through VBI or BSD Audio Decoding MPEG 1 Layer 1 2 Dolby Downmix Audio...

Страница 55: ......

Страница 56: ...ALA O DO EQUIPAMENTO 118 GUIA Lista Canal 119 GUIA do MENU 121 P GINA PRINCIPAL 121 I Edi o de canais 121 I I INSTALA O 123 III OP ES 128 IV UTILIDADES 130 V Access rios 131 PVR Guide 132 RESOLU O DE...

Страница 57: ...nstru es cuidadosamente recomendado para evitar o risco de danos f sicos antes do seu produto operado N o cubra o receptor e manter em torno de espa o livre suficiente para o receptor Verificar o func...

Страница 58: ...za onormaldeummenu 18 INFO Apresenta o programa INFO caixa informa o no ecr e editar o nome do canal favorito lista 19 V V Aumenta volume para cima ou para baixo 20 P P Muda canais para cima ou para b...

Страница 59: ...na al l de chaves telecomando quer funcionar correctamente Se a pot ncia bot es funciona mas outras teclas n o funcionam isso significa que o c digo n o foi inserido correctamente Por favor comece nov...

Страница 60: ...erir CAM 1 SAT IN Liga a cabo da antena via sat lite 2 LOOP OUT Liga a outro STB 3 YPbPr Componente YPbPr Liga a tomada da TV 4 VIDEO VIDEO para ligar a TV ou outros eguipamentos 5 TV SCART Liga a TV...

Страница 61: ...Sat lite janela pop up em seguida seleccione sat lite Canal lista de sat lite seleccionado ser apresentado g Pressione a tecla FAV para mostrar Favorita janela pop up em seguida seleccione FAV lista...

Страница 62: ...Pressione OK no canal que pretende adicionar ou apagar 3 ser marcado no final do canal seleccionado Nome do bar Para apagar pressione OK novamente 4 Seleccionado canais ser automaticamente guardado 5...

Страница 63: ...a o canal que pretende renomear usando e em seguida pressione OK 3 Di logo teclado exibido na ecr 4 Edite o nome digitando n meros e ou palavras no teclado Di logo 5 Pressione EXIT para retornar ao me...

Страница 64: ...Seleccione a direc o usando ESTE OESTE b Latitude Entrada directa na Latitude UNMBER usando tecla do RCU Seleccione a direc o usando NORTE SOUTH 3 Pressione EXIT para retornar ao menu anterior ou prim...

Страница 65: ...z Browse atribu do a c download mas deve especificar uma pasta de destino pessoal para ser capaz de receber arquivos de filme no PC Nota Servidor disponivel por defeito 2 Defini es no STB a V ao menu...

Страница 66: ...quear selec o ON ou OFF utilizando 4 5 para a instala o Defini es 5 Digiteumanovasenhasevoc quiseralterarasenhaactual 6 Confirme a sua nova senha entrando nova senha novamente 7 Pressione EXIT para re...

Страница 67: ...rt o inteligente que voc usa 1 Seleccione Interface comum no utilit rio com e pressione OK 2 Interface comum exibe no Ecr A frase N o M dulo indicada quando a m dulo de acesso condicional n o instalad...

Страница 68: ...N memory stick Tipo de formato FAT16 32 Sistema n o d suporte a sistema de arquivos NTFS e outros II Fun o Grava o II 1 Grava o Guardada 1 Hor rio Reservado para Grava o Defina desejada tempo de grava...

Страница 69: ...ra ver o programa previamente gravado prima bot o Play no telecomando Utilize as teclas de seta para seleccionar o ficheiro que pretende reproduzir e prima OK para reproduzir Enquanto estiver vendo o...

Страница 70: ...1 Clique bot o direito do rato Captura Captura de video r pida 2 Em seguida o ficheiro guardado para ver pasta designada por avi E Se o arquivo est a ser visto no STB SD em canal ele salvo por SD e H...

Страница 71: ...rmation 1Contact your Service Provider Problem Nothing appears on the Front Panel or No power supply No Picture No Sound Remote Control Unit dose not work Service is not running or scrambled No Signal...

Страница 72: ...Max 90Mbit s Aspect Ratio 4 3 16 9 Letter Box Frame Rate 25Hz for PAL 30Hz for NTSC Video Resolution 576i 576p 720p 1080i Teletext Through VBI or BSD Audio Decoding MPEG 1 Layer 1 2 Dolby Downmix Audi...

Страница 73: ......

Страница 74: ...ARECCHIATURE 154 GUIDA LISTA CANALI 155 GUIDA DEI MENU 157 PRIMA PAGINA 157 I CANALE MANAGER 157 I I INSTALLAZIONE 159 III OPZIONI 164 IV UTILITA 166 V ACCESSORI 167 PVR Guide 168 RISOLUZIONE DEI PROB...

Страница 75: ...o si prega di leggere le seguenti istruzioni con attenzione per evitare il rischio di compromettere la propria integrit fisica Non coprire il ricevitore e mantenere un sufficiente spazio libero attorn...

Страница 76: ...del programma sullo schermo e modifica il nome della lista dei canali preferiti 19 V V Modula il volume tra alto e basso 20 P P Cambia i canali in su o in gi in modalit normale 21 Si muove su una pagi...

Страница 77: ...o qualsiasi altro tasto del telecomando Se il pulsante power funziona ma gli altri tasti non funzionano significa che il codice non stato inser ito correttamente Si prega di ricominciare dal punto 1 e...

Страница 78: ...re 2 LOOP OUT Connessione a un altro STB 3 YPbPr connessione a componenti jack della TV 4 VIDEO connessione video per la TV o ad altri dispositivi 5 TV SCART connessione alla TV tramite cavo SCART 6 V...

Страница 79: ...onare il satellite Verr visualizzato l elenco dei canali del satellite selezionato g Premere il tasto FAV per mostrare la finestra dei Pop up favoriti quindi selezionare la lista FAV Verr visualiz zat...

Страница 80: ...8 2 PremereOKsulcanalechesidesideraaggiungereoeliminare 3 La barra del none sar evidenziata alla fine del canale selezionato Per cancellare premere di nuovo OK 4 I canali selezionati saranno salvati a...

Страница 81: ...ti presionar OK 3 Una tastiera di dialogo sar visualizzata sullo schermo 4 Modificare il nome con l immissione di cifre o parole nel campo della tastiera di dialogo 5 Premere EXIT per tornare al menu...

Страница 82: ...ecomando Selezionare la direzione utilizzando i tasti ovest est b Latitudine Immettere direttamente la Latitudine utilizzando i tasti numerici del telecomando Selezionare la direzione utilizzando NORD...

Страница 83: ...ionata in automati co c download ma pu essere necessario modificare la cartella per essere in grado di rice vere correttamente i filmati sul PC Nota Il server predefinito attualmente disponibile 2 Imp...

Страница 84: ...V Selezione del tipo di TV c Aspect Ratio Selezione del rapporto dello schermo d schermata di controllo Selezione della modalit di visualizzazione dello schermo e Luminosit Regolazione della luminosit...

Страница 85: ...re OK 2 Se si desidera salvare il Software o il Database premere il pulsante verde del telecomando 3 Selezionare il file che si desidera salvare utilizzando i tasti e OK 4 Dopo aver scaricato il file...

Страница 86: ...Il sistema non supporta NTFS e altri sistemi di file II Funzione di registrazione II 1 Programmare una registrazione a tempo 1 Orario della registrazione programmata Impostare l orario registrazione...

Страница 87: ...GUIDE III Funzione di riproduzione Per riprodurre il programma registrato in precedenza pre mere il tasto Play sul telecomando Utilizzare i tasti freccia per selezionare il file che si desidera riprod...

Страница 88: ...e che si desidera riprodurre 1 Pulsante destro del Mouse Open files S Selezionare X 2 Come riprodurre tramite DivX Player A Il formato del file deve essere modificato in formato avi per poterlo riprod...

Страница 89: ...the dish and adjust it Check the cable connection and correct it Check channel and video output Check the volume level of the TV and receiver Check the mute status of TV and receiver Check the cable...

Страница 90: ...Max 90Mbit s Aspect Ratio 4 3 16 9 Letter Box Frame Rate 25Hz for PAL 30Hz for NTSC Video Resolution 576i 576p 720p 1080i Teletext Through VBI or BSD Audio Decoding MPEG 1 Layer 1 2 Dolby Downmix Audi...

Страница 91: ...11091110112511271 1331139116211981221122612411 2501252125412561 Canton 0361 Capsonic 0451 Carad 00511001108112711981 BRAND LIST TV 178 A R Systems 00510601100107010811 Accent 001100511001 Accuphase 10...

Страница 92: ...01 Expert 022103210441 Exquisit 005104211001 Fagor 00511001 BRAND LIST 180 Carena 005108111001 Carrefour 0041005100911001 Carver 0241 Cascade 001100511001 Casio 00510221059110012521 Cathay 00511001 CC...

Страница 93: ...140125412571 BRAND LIST 182 FamilyLife 00511001 Fenner 00110701 Ferguson 0031005101110171019102010391 0471055106410781096110011011 113119812521 Fidelity 0051022103410451064106610691 075109311001252125...

Страница 94: ...1 Marelli 0141 Mark 0011005103410351070110011391 1401 BRAND LIST 184 Hyundai 0051100113711551186118811891 2221 Iberia 00511001 ICE 0011005103410351036104510691 1001 Ices 03410361 Ict 005110012001 Impe...

Страница 95: ...038106410671 0941096110011221184118512331 2441 Panavision 005107411001 BRAND LIST 186 Master s 0911 Masuda 0011005103510361045106911001 Matsui 0011002100310041005100710101 0221025102710301033103510551...

Страница 96: ...91065108711001 1181127119812041234123612551 SEI 0051014101610221025103210591 0941100119712381 BRAND LIST 188 Papouw 00511001 PatheCinema 0221034103910501051105910681 PatheMarconi 0201 Pausa 0011 Perdi...

Страница 97: ...1020104710551059110011011 1131 Thorn 0021003100410051007100910101 0111017101910201037103910551 0631064107010911093109510971 100119712381 BRAND LIST 190 Sei Sinudyne 0051014101610321094110011971 2381 S...

Страница 98: ...1710191020103910551 06410911 Tiny 21012291 TinyDigital 1251 TMK 02510361 Tobishi 0361 Tokai 0011005101010221035105610701 100112711981 Tokaido 1981 Tokyo 00310341 Tomashi 03610461 Tongtel 10411641 Tosh...

Страница 99: ...Memorex 00020032010201120152 Memphis 0132 Metronic 0142 Metz 00320142018203820462 Micormay 0262 Micromaxx 0262 BRAND LIST 194 Brinkmann 0262 Bush 0002013201420202022202620272 03520372 Carena 0142 Car...

Страница 100: ...0202 Tenosal 0132 Tensai 0002003201320202 Tevion 02620352 Texet 0202 Thomson 00620122020202320242 BRAND LIST 196 Migros 0002 Mitsubishi 000200820122014202920352 Multitec 0032 Multitech 000201320152 Mu...

Страница 101: ...4305030633064307730783 10931213 Daewoointernational 02930783 Dalton 0903 Dansai 050305431053 Dantax 02830373 Daytek 07830863 Dayton 0783 199 BRAND LIST 198 Thorn 003200620152 Thorn Ferguson 0232 Tokai...

Страница 102: ...31943 Magestic 1033 Magnavox 001300730243033306031083 Magnex 03731203 Manhattan 03130333 201 BRAND LIST DCE 0623 DEC 02930603 Decca 0503 Denon 000301631923 Denver 0293055306030843097310331493 15231733...

Страница 103: ...033305730793 Scan 031306530703 ScanMagic 03831943 ScanSonic 0733 SCE 0563 SchaubLorenz 050305531363 Schneider 0543019303130333053305530573 062310131133 Schwaiger 0433 ScientificLabs 04831543 Scott 019...

Страница 104: ...33 Sharp 014302830333043316431753 Sherwood 03530393 Shinco 0353 Sigmatek 07331313 Silva 055306230823 SilvaSchneider 0623 Singer 0273037304230483 Sinotec 0463 Skymaster 03830483 Skysonic 0473 Skyworth...

Отзывы: