background image

USB 2.0 4-Port Extender Kit 


Installation Guide 

 
6.2.3. 

Installing the Receiver

 (Remote Unit)   

1.  Plug the other end of the Cat. 5 cable into the Link port (RJ-45) on the receiver. 
2.  Plug the 5VDC, 2A power adapter into the receiver, and AC plug into the power 

receptacle. 

Note: Make sure to plug the 5VDC 2A power adapter on the receiver side.


3.  The Red Power LED indicator lights on. 
4.  Connect the USB devices through USB cables into the Receiver’s USB ports labeled 1 

to 4 on receiver. 


LED 

Status 

Definition 

Color 

Power 

Red 

Indicates that the 5VDC power adapter is plugged in. 

Activity 

Green 

Indicates that both the transmitter and the receiver are 
powered on and the Cat5 cable is connected properly. 

Link 

Orange 

Indicates that the USB ports are plugged in. 

 
6.3 Checking the Installation 

1.  Check the Activity (Green) and Link (Orange) LED indicators light on both the 

transmitter and the receiver. 

2.  For Windows users (2000, XP, Vista, 7, 8, and 8.1), open Device Manager to confirm 

the extender has been installed correctly. Expand the Entry and check the USB 
controllers. If the extender is installed correctly, it should be listed as a “Generic USB 
Hub.” 

3.  For Mac OS X users, open the System Profiler to confirm that the extender has been 

installed correctly. In the left column under Hardware, select “USB” and check the right 
panel. If the extender has been installed correctly, you should find it listed as a “Hub” 
under the USB High-Speed Bus/USB Bus. 

4.  If the extender is not detected correctly or fails to detect, go to the Troubleshooting 

section of this manual. 


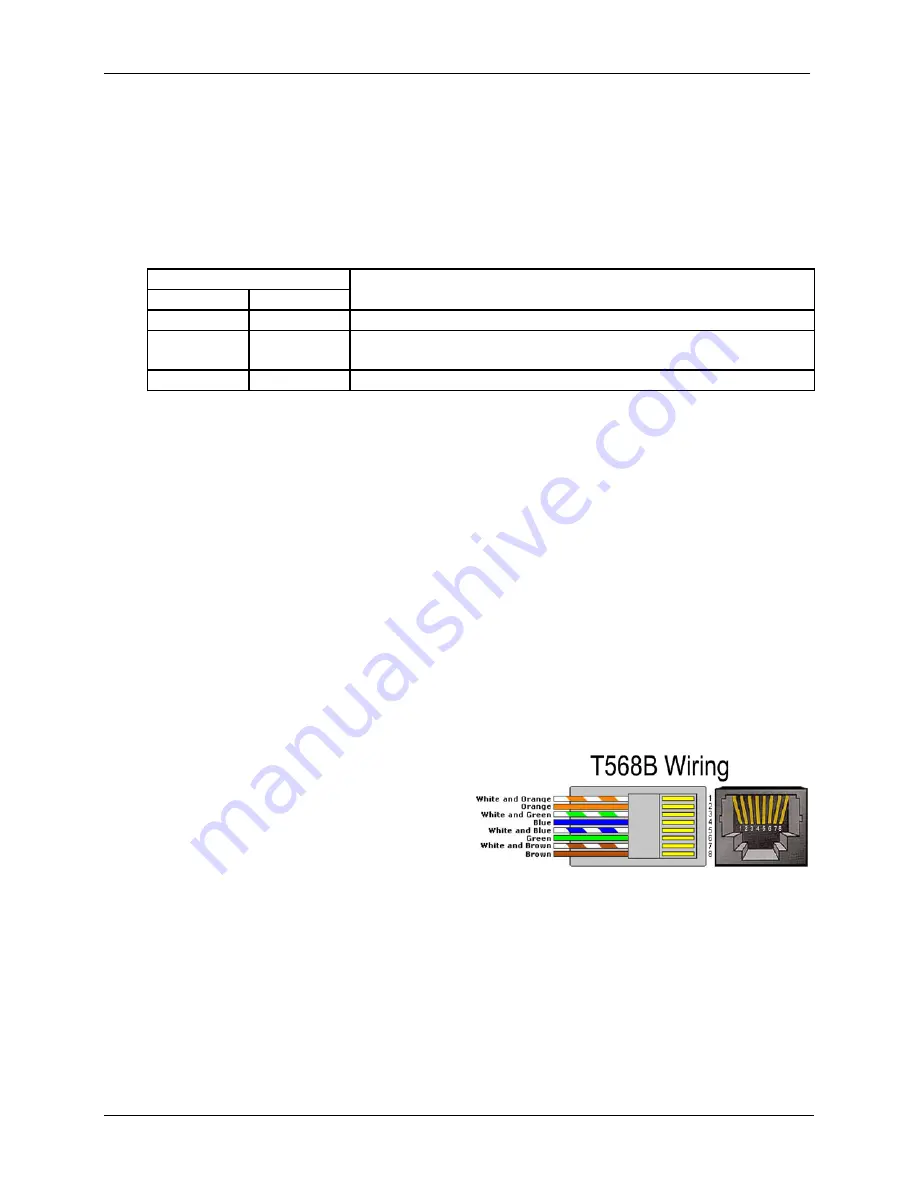
7. Category cable wiring 

Take precaution selecting the Cat. 5 wires 
before connecting; use a cable tester to check 
the wires are correctly terminated. (Incorrect 
Termination may cause damage to the 
receiver unit). Recommend to use T568B 
wiring as shown. 


© MuxLab Inc. 2014 


Содержание 500072

Страница 1: ...USB 2 0 4 Port Extender Kit Installation Guide 500072 MuxLab Inc 2014 94 000760 A SE 000760 A ...

Страница 2: ...ustrial control digital signage scientific data acquisition and other implementations of USB standards 2 Features True plug and play no driver installation required Extends USB 2 0 high speed and USB 1 1 low speed full speed devices up to 100m 328ft over Cat 5e 6 cable Supports all USB device types Control Interrupt Bulk and Isochronous at up to 480Mbps Ideal for a wide variety of USB devices prin...

Страница 3: ...Transmitter Host Side Front view RJ45 Link RJ45 Link port to connect to the Cat 5 cabling Side view Link Led indicates a valid link between the Tx and the Rx via Cat 5 cabling Link Power Act Power Led indicates that the power is connected Act Led indicates activity when data is transmitted between the Tx and the Rx Rear view Power port connects to the 5VDC 1A power supply Host 5VDC 1A Host Port is...

Страница 4: ...abling Power port connects to the 5VDC 2A power supply Side view Link Led indicates a valid link between the Tx and the Rx via Cat 5 cabling Link Power Act Power Led indicates that the power is connected Act Led indicates activity when data is transmitted between the Tx and the Rx Rear view 4 3 2 1 Ports 1 to 4 are USB Device Ports using USB Type A interface MuxLab Inc 2014 4 ...

Страница 5: ...USB device s 3 The extender supports a maximum distance or 328 ft 100m Make sure that Cat5 cabling is installed with Cat 5 outlets located near both computer and USB devices The total length of this cable including patch cords must not be longer than 328 ft 100m 6 2 2 Installing the Transmitter Local Unit 1 Plug the supplied USB cable into the transmitter and connect to an available USB port of co...

Страница 6: ...een and Link Orange LED indicators light on both the transmitter and the receiver 2 For Windows users 2000 XP Vista 7 8 and 8 1 open Device Manager to confirm the extender has been installed correctly Expand the Entry and check the USB controllers If the extender is installed correctly it should be listed as a Generic USB Hub 3 For Mac OS X users open the System Profiler to confirm that the extend...

Страница 7: ...econds plug the power adapter into receiver again 2 If over current keeps occurring either the USB device may use more power than the USB specification or the USB device may be damaged 3 Consult your USB device documentation and plug into your USB device with the required power adapter Activity LED on transmitter or receiver blinks intermittently The Cat 5 cable connecting the transmitter and rece...

Страница 8: ...pecial incidental consequential or other damages No part of this document may be reproduced or transmitted in any form by any means electronic or mechanical including photocopying recording or information recording and retrieval systems without the express written permission of the manufacturer All brand names and product names used in this document are trademarks or registered trademarks of their...

Отзывы: