background image

13.

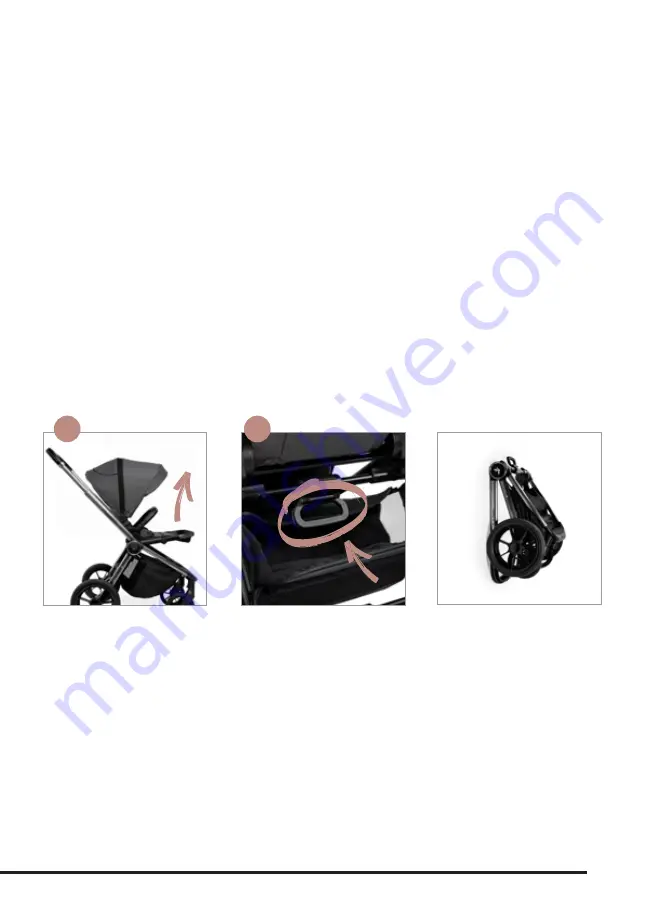
1) Przy montażu przodem do kierunku jazdy podnieś podnóżek i siedzisko w stronę rączki 
    i oparcia (

zdjęcie 13A

). Złóż budkę. Złap za uchwyt umiejscowiony na stelażu pod siedziskiem  

   (

zdjęcie 13B

) i naciśnij kciukiem przycisk blokady. Teraz podnieś delikatnie wózek i zobacz sam, 

   jak łatwo daje się on złożyć i przechowywać. 

   / For front-facing mounting, raise the footrest and seat towards the handle and backrest 
   (

photo 13A

). Fold a canopy. Grab the handle placed on the frame under the seat (

photo 13B

    and press the lock button with your thumb. Now, lift the stroller gently and see for yourself  
    how easy it can be folded and stored.

2) Przy montażu tyłem do kierunku jazdy złóż budkę, podnieś przycisk regulacji oparcia 
     i przechyl je do rączki. Naciśnij przycisk i przekręć całość razem z uchwytem. 

     /With rear-facing mounting, fold up the canopy, raise the backrest adjustment button 
     and move it to the handle. Press the button and turn it along with the handle. 

Składanie wózka / 

Stroller folding

I 9

13A

13B

OSTRZEŻENIE!


 Zawsze składaj siedzisko w kierunku rączki!

                                                      / Always fold the seat towards the handle!


14.

1)


Jeśli gondola nie jest rozłożona, usuń pościel i materac i rozciagnij metalowe obręcze na dnie 

    gondoli zgodnie z kierunkami strzałek, jak na 

zdjęciu 14A

 dopóki się nie zablokują. 

    Następnie dopnij w wózku wyściółkę i materacyk.

    
    / 

If the carrycot is not unfolded, remove the sheets and the mattress and stretch the metal 

    hoops at the bottom of the carrycot in accordance with the directions of the arrows outside 
    until they lock. - see 

picture 14A

. Once the hoop is properly mounted, you hear a click.

    Then place the padding 

Montaż gondoli / 

Carrycot install

Содержание QUICK SE

Страница 1: ......

Страница 2: ...e nowe MUUVO i jak łatwo jesteś w stanie je uruchomić Your new MUUVO stroller is standing right in front of you We re sure both you and your child will experience countless wonderful moments while using it We know that nobody likes reading manuals but this one is definitely worth it it will show you all the features and possibilities that comes with your new MUUVO and how easy it is to get them up ...

Страница 3: ...dź czy siedzisko jest odpowiednio ustawione i zablokowane OSTRZEŻENIE Wózek nie jest przeznaczony do biegania i jazdy na rolkach I 1 ATTENTION Pleasant info All available configurations can be installed by yourself IMPORTANT Keep this manual for future reference WARNING Do not leave your child unattanded at all times WARNING Do not let your child play with this product WARNING Ensure that all the ...

Страница 4: ...tergentu Należy regularnie sprawdzać produkt pod kątem poluzowanych śrub uszkodzonych części zepsutych przeszyć i w razie potrzeby wymienić uszkodzone części W razie potrzeby zdemontuj koła przeczyść i dla konserwacji zabezpiecz łożysko niewielką ilością smaru silikonowego Podczas demontażu należy dokładnie przestrzegać instrukcji aby uniknąć niepotrzebnych uszkodzeń Maintenance To protect your ch...

Страница 5: ...ła w otwór aż do kliknięcia Postępuj tak z każdym następnym kołem jak na zdjęciu 2A i 2B To install the wheels insert the wheel axle into the hole until it clicks into place see picture 2A and picture 2B 2 Aby zdemontować koło znajdź metalowy zaczep jak na zdjęciu 2C Pociągnij go w dół i pociągnij koło do siebie Prawda że proste To remove the wheel find the metal hook as in picture 2C Pull it down...

Страница 6: ...lease the lock now the wheels rotate 360 degrees as shown in the 3 picture Obrót przednich kół o 360 stopni 360 front wheels rotation 3 04 OSTRZEŻENIE Zawsze blokuj hamulec kiedy wkładasz swoje maleństwo do wózka Always lock the brake while putting your baby in the pram 1 Naciśnij pedał hamulca aby zablokować wózek jak na zdjęciu 4 Press the brake pedal to lock the stroller see picture 4 2 Podnieś...

Страница 7: ...B Umieść siedzenie w odpowiednim miejscu żeby zakończyć montaż Pull up the button and pull up the seat in the direction of the arrow in the picture 5A Install the seat in the opposite direction as in the picture 5B Place the seat in the right place to complete the assembly I 5 05 OSTRZEŻENIE Siedzisko nie jest odpowiednie dla dzieci poniżej 6 miesiąca życia The seat is not suitable for children un...

Страница 8: ...dki Canopy install 6 I 7A 7B 08 1 Budkę można rozłożyć pociągając ją do siebie jak na zdjęciu 8A Canopy can be extended by pulling it forward as in picture 8A 2 Budkę można powiększyć odsuwając suwak jednej z sekcji jak na zdjęciu 8B Open the zipper of the first section to extend the canopy even further picture 8B 3 Druga sekcja kryje pod sobą wentylację zwieńczoną siatką jak na zdjęciu 8C The sec...

Страница 9: ...cture 9A Raise the handle to the most comfortable height picture 9B To lock the handle on the height you want release the button Regulacja rączki Handle adjustment 09 9A 9B 10 1 Naciśnij przyciski wskazane strzałką po obydwu stronach jednocześnie aby dostosować podnóżek jak na zdjęciu 10 Press the buttons indicated by the arrow on both sides at the same time to adjust the footrest picture 10 Regul...

Страница 10: ...ture 11B Regulacja oparcia Backrest adjustment 11 12 1 Naciśnij przycisk aby rozpiąć klamrę bezpieczeństwa po obu stronach tak jak na zdjęciu 12A Press the center button to unfasten the safety bracket on both sides as in picture 12A 2 Pasy możesz regulować za pomocą stoperów zdjęcie 12B You can adjust them by pulling the stoppers as in picture 12B 3 Pasy należy dostosować odpowiednio do wzrostu dz...

Страница 11: ... je do rączki Naciśnij przycisk i przekręć całość razem z uchwytem With rear facing mounting fold up the canopy raise the backrest adjustment button and move it to the handle Press the button and turn it along with the handle Składanie wózka Stroller folding I 9 13A 13B OSTRZEŻENIE Zawsze składaj siedzisko w kierunku rączki Always fold the seat towards the handle 14 1 Jeśli gondola nie jest rozłoż...

Страница 12: ...cot as in picture 14B When you hear a click from both sides you will know that the carrycot is well and securely mounted 3 Budka ma 3 stopniową regulację W zależności od potrzeb naciśnij jednocześnie guziki zlokalizowane po dwóch stronach wózka i ustaw do pożądanej wysokości zdjęcie 14C The canopy has a 3 step adjustment Depending on the needs press together the buttons located on both sides of th...

Страница 13: ...amochodowych Zamontuj je na stelażu Kiedy usłyszysz klik będziesz wiedzieć że adaptery są poprawnie zamontowane Install the car seat adapter as in the picture 16A Adapters work with most car seats Mount them on the frame When you hear click you will know that the adapters are correctly mounted 2 Zachowaj ostrożność upewnij się że adaptery i fotelik są poprawnie zainstalowane Zrobisz to chwytając z...

Страница 14: ...ller 17 1 Usuń adaptery z ramy wózka naciśnij przyciski w adapterach jak na zdjęciu 24 i podnieś fotelik do góry jak na zdjęciu 17A Aby zdemontowac fotelik z adapterów postępuj zgodnie z instrukcją dołączoną do fotelika samochodowego Remove adapters from the frame press the buttons on the adapters as in photo 17A and lift the seat up To remove the seat from the adapters follow the instructions sup...

Страница 15: ...Dziękujemy za zakup naszego produktu Thank you for purchasing our product ...

Страница 16: ...Customer service 48 507 98 38 28 office muuvo com Service Complaints 48 507 98 38 29 service muuvo com Muuvo Sp j ul Rychla 18 41 948 Piekary Śląskie www muuvo com ...

Отзывы: