


51
crop frame
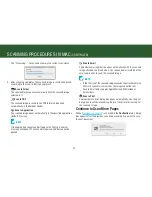
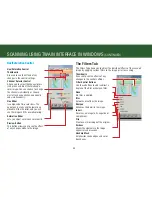
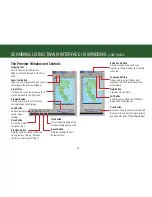
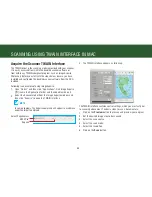
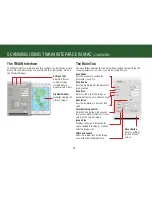
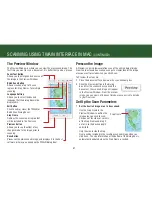
The Preview Window
the preview Window is where you can view the prescanned image. the
first time you want to scan a document, it is better that you do a precan.
Zoom Tool Button
Allows you to enlarge/shrink an area of
the image in the preview Window.
Crop Frame
outlines the scan area or region that
will be included in the final scan.
Save Button
processes the pre-scanned image, and displays it in the host
software (where you opened up the tWAIn dialog box).
Previous Button
Allows you to see the effect of any
changes made to the image prior to
scanning.
Batch Scan Button
Allows creation of up to 10 scan
regions for crop frames for multiple
scanning.
Language Setting
Allows you to select the desired
language that the dialog box will be
displayed in.
Exit Button
click to exit (or close) the tWAIn or
Batch scan dialog boxes.
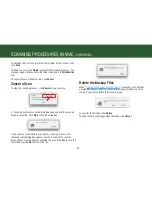
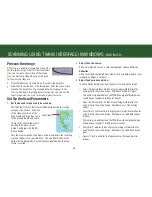
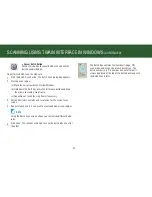
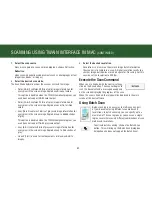
Prescan the Image
A preview is a quick low-resolution scan of the entire original image.
from this low-resolution scan you can get a clearer idea of the image
area you want to include when you click scan.
to preview, the steps are:
1. place the document face down on the scan window glass.
2. click the preview button in the dialog
box. After the scanner has scanned the
document, the scanned image will appear
in the preview Window. from the preview
image, you can now set the exact image area you wish to include
in your final scan.
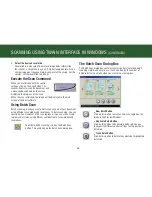
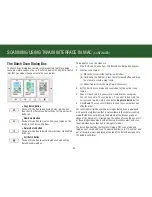
Set Up the Scan Parameters
1.
Set the desired image area to be scanned.
Use the crop frame in the
preview Window to outline the
image area you wish to scan.
click one of the sides or corners
of the crop frame and drag it
out or in to the desired length
and width.
only the area inside the crop
frame will be included in the resulting scanned image when you
click scan. the size information at the bottom of the dialog box is
automatically updated when the crop frame is resized.
scAnnInG UsInG tWAIn InterfAce In mAc
(contInUed)
Содержание PageExpress 4800 Pro
Страница 57: ...57 ...
Страница 58: ...PageExpress 4800 Pro ...