Musical Fidelity M6 SDAC Скачать руководство пользователя страница 7

   7

Operation

Once the M6s DAC unit is correctly wired up, and 
plugged into mains, the orange STBY led should be lit . 

In this mode the M6s DAC is consuming a minimal 
amount of power . 

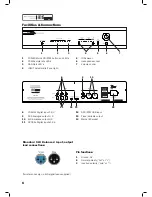
To switch the unit on, press the Power button (1)  
on the front of the unit . The blue PWR indicator will 
light along with the red MUTE indicator . After a few 
seconds, when it has stabilised, the MUTE function 
will switch off and the unit is ready for use .

Input selection

The M6sDAC has a total of seven inputs available . 
These are Optical 1,2 and 3, Coaxial 1,2 and 3 and 
also USB . 

When the power cable is inserted into the Mains IEC 
socket 

14

 the Optical 1 input is selected by default .

When the M6s DAC is taken out of sleep mode, it will 
default to the last input selected .

From the front panel you can cycle through the inputs 

by using the ◄ and ► buttons (

4

). Pressing ► while 

on the USB input will cycle back to Optical 1 . Whilst 

on Optical 1 the ◄ button will take you to the USB 

input again .

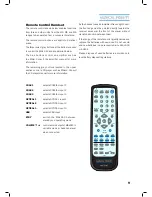
The remote control has direct access buttons for 
each input . Simply press the appropriate button to 
move directly to that input .

When a valid signal is received on the selected input, 
an indicator in either group 

2

 or 

3

 will light to show 

you the incomming sample rate . The upsampling 
LED indicator will light to show that an analog signal 
is now being output .

For devices with “Surround Sound” digital outputs, 
it may be necessary to set such outputs to either “2 
channel”, “stereo”, “PCM” or similar to pass on the 
correct stream to the M6s DAC .

Coaxial Inputs

All coaxial inputs are capable of accepting up to 24 
bit 192 kHz PCM stereo data streams . The incoming 
data sample rate is displayed on the front panel 
LED’s for reference .

Optical Inputs

The OPTICAL input is capable of accepting up to 24 
bit 96 kHz PCM stereo data streams . The incoming 
data sample rate is displayed on the front panel 
LED’s for reference .

USB Input

The USB input is capable of accepting up to 32 bit 
384 kHz PCM or DSD 128 data streams . 

Computer settings for USB

A good quality USB 2 .0 A to Micro B cable is required 
to connect the unit to the computer . Normal USB 
standards stipulate that this should be 5M or less; 
and we recommend keeping it as short as possible .

Plug the Micro B (small rectangle) end into the socket 
in the back of the unit, and the A (rectangle) end into 
a free USB socket on the computer .

If an older style USB B with a larger, square connector 
is to be used then the supplied adaptor can be used .

The computer should now detect the M6s DAC:

•  Linux kernel 2 .6 .33 or later .
•  Apple OS X® 10 .6 .4 or later .
•  Windows 10 Creators Edition .

No other drivers are required for the above operating 
systems .

Note: The indicators 

2

 and 

3

 show the actual 

sample rate of the digital data received by the 
M6s DAC . Some playback software may have 

altered this compared to the original file. .

WARNING: Older USB cables are often heavy and 
bulky and must be supported to avoid damage to 
the USB socket . Any physical damage caused to 
this socket will not be covered by warranty .

Содержание M6 SDAC

Страница 1: ...Instruction Manual ...

Страница 2: ...oduction 3 Safety Information 4 Precautions User Information 4 Installation 5 Facilities Connections 6 Operation 7 Remote Control Handset 9 Troubleshooting 10 Specifications 11 Item Disposal Information for Europe 12 ...

Страница 3: ...ypes exactly as the artist originally intended This revised design now takes into account different sampling frequencies with the upper bandwidth now extending to 90 kHz for 384 kHz natively sampled input signals The M6s DAC fully asynchronous USB input copes with PCM inputs up to 32 bit 384 kHz sample rate and DSD 256 This takes full advantage of the higher quality recordings now available It wor...

Страница 4: ...C to a mains outlet having the same voltage as marked at the back of the unit Always ensure that when disconnecting and reconnecting your audio equipment the mains supply is switched off Position the mains lead and signal interconnects where they are not likely to be walked on or trapped by items placed on them Do not use near water or place water filled containers on the M6s DAC for example a flo...

Страница 5: ... inputs Connect RCA digital source to digital input RCA socket Use a good quality fully connected signal and ground coaxial digital cable for optimum signal transfer OPTICAL input Connect optical digital source to optical input socket Use a good quality Toslink cable for optimum signal transfer USB input Connect computer or similar USB host source to USB input socket Use a good quality USB 2 0 A t...

Страница 6: ...SAMPLE RATE KHz DSD OPTICAL INPUTS COAXIAL INPUTS USB INPUT 768KHz UPSAMPLING 1 2 3 1 2 3 1 Facilities Connections 2 3 4 5 6 8 7 1 POWER Mains ON STBY button and LED s 2 PCM Sample rate LED s 3 DSD Rate LED s 4 INPUT Selectors left and right 5 IR Reciever 6 Headphone socket 7 Volume control 9 10 11 12 13 14 8 COAXIAL Digital input 1 2 3 9 RCA Analogue output L R 10 XLR Balanced output L R 11 OPTIC...

Страница 7: ...such outputs to either 2 channel stereo PCM or similar to pass on the correct stream to the M6s DAC Coaxial Inputs All coaxial inputs are capable of accepting up to 24 bit 192 kHz PCM stereo data streams The incoming data sample rate is displayed on the front panel LED s for reference Optical Inputs The OPTICAL input is capable of accepting up to 24 bit 96 kHz PCM stereo data streams The incoming ...

Страница 8: ...amplifiers or active speakers where the M6s DAC provides the volume control Choosing between these settings is done by using the small switch 13 on the back panel When in variable mode the output level can be controled by either the volume knob on the front panel 7 or the remote control Headphones The M6sDAC also includes a high quality headphone amplifier Connecting headphones to socket 6 will au...

Страница 9: ... front of the player without visual obstruction between them If the range of the remote control greatly decreases replace the batteries with new ones Do not mix old and new batteries two are required size AAA LR03 or SUM 4 Please dispose of used batteries in accordance to local battery disposal regulations 1 2 3 4 5 6 7 8 9 CHECK 0 CLEAR PROGRAM TIME DISPLAY VOLUME CD USB PHONO TUNER AUX1 HT AUX 2...

Страница 10: ... Faulty optical lead Check input lead is fully secured Change lead Please use a good quality straight through signal and ground phono to phono lead Optical lead breakage This can occur if the optical lead is bent into a radius too small Avoid tight corners in routing optical leads No audio output from USB input USB Cable not connected M6 USB Driver not selected Check connections and make sure they...

Страница 11: ... right 3 RCA coaxial SPDIF in 32 192 kbps 16 24 bit stereo PCM 3 TOSLINK optical in 32 96 kbps 16 24 bit stereo PCM 1 USB 2 0 in type Micro B connector for computer PDA other host 16 32 bits 32 192 kbps fully asynchronous Actual data determined by source file computer software settings Power requirement Mains voltages Consumption 230V 115V Internally set or 100V optional 10 Watts maximum Weight Un...

Страница 12: ...das Produkt nicht mit konventionellem Hauskehricht entsorgt werden darf Um Schäden und Verschmutzungen an Umwelt und Mensch zu vermeiden muss das Produkt fachgerecht entsorgt und von anderem Abfall getrennt werden Wenden Sie sich bei Fragen hierzu an Ihren Fachhändler oder an eine öffentliche Informationsstelle AFVAL Het label op de achterzijde van dit apparaat een afvalbak op wielen met een kruis...

Отзывы: