background image

2

Thank you 

for purchasing this quality-built BRUTE snow thrower. We’re pleased that you’ve placed your confidence in the Murray brand.

When operated and maintained according to the instructions in this manual, your Murray product will provide many years of dependable
service. 

This manual contains

safety information to make you aware of the hazards and risks associated with snow throwers and how to avoid

them. This snow thrower is designed and intended only for snow throwing and is not intended for any other purpose. It is important that
you read and understand these instructions throroughly before attempting to start or operate this equipment. 

This snow thrower 

requires final assembly before use.

Refer to the Quck Start Guide for instructions on final assembly procedures. Follow the instructions

completely. 

Save these instructions for future reference.

Where to Find Us 

You never have to look far to find Briggs & Stratton support and service for your snow thrower. Consult your Yellow Pages. There are
over 30,000 Briggs & Stratton authorized service dealers worldwide who provide quality service. You can also contact Briggs and Strat-
ton Customer Service by phone at (800) 528-5087, or on the Internet at 

www.murray.com

.

Snow Thrower 

Model Number

Revision

Serial Number

Engine

Model Number

Revision

Serial Number

Date Purchased

The Illustrated Parts List for this machine can be downloaded from 

www.murray.com

. Please provide model and serial number when 

ordering replacement parts.

Briggs & Stratton Power Products Group, LLC
P.O. Box 702
Milwaukee, WI 53201-0702
1-800-528-5087
murray.com

Copyright © 2009 Briggs & Stratton Power Products Group, LLC
Milwaukee, WI, All rights reserved.
Murray is a trademark of Briggs & Stratton Power Products 
Group, LLC Milwaukee, WI USA.

Содержание 1695722

Страница 1: ...Manual Part No 1737920 Revision B Rev Date 04 2009 Operator s Manual Walk Behind Snow Thrower Mfg No Description 1695722 Dual Stage Snow Thrower 11 5 TP 27 Inch...

Страница 2: ...Follow the instructions completely Save these instructions for future reference Where to Find Us You never have to look far to find Briggs Stratton support and service for your snow thrower Consult yo...

Страница 3: ...8 SERVICE RECOMMENDATIONS 18 AFTER EACH USE 18 LUBRICATE AUGER GEAR BOX 19 LUBRICATE AUGER SHAFT FITTINGS 19 CHECK LUBRICATE FREE HAND LINKAGE 19 LUBRICATE CHUTE ROTATION GEAR 19 ADUST THE DRAG ON THE...

Страница 4: ...esult in personal injury Operator s Manual Read and understand before performing any activity or running snow thrower Rotating Impeller Keep a Safe Distance from Snow Thrower Rotating Auger Rotating G...

Страница 5: ...hazardous operation equipment damage and voiding of the product warranty DANGER Read understand and follow all the instructions on the snow thrower and in the operator s manual before operating this...

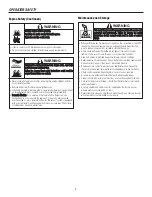
Страница 6: ...safety instructions can cause a fire or explosion which will result in severe burns or death Fuel Handling Keep the area of operation clear of all persons particularly small children and pets Thorough...

Страница 7: ...chute or jam in the auger Use extreme caution when operating on or crossing gravel drives walks or roads Adjust the collector housing height to clear gravel or crushed rock surface Never operate the...

Страница 8: ...specifically recommended by the factory WARNING This snow thrower must be properly maintained to ensure safe operation and performance Failure to observe the safety instructions in this manual could...

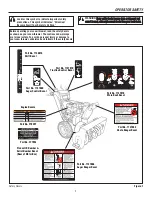
Страница 9: ...68SA XXXX XX XXXX XX FAMILY XXXXX XXXXXX XXXXXX IMPORTANT ENGINE INFORMATION BRIGGS STRATTON CORPORATION Part No 278297 Part No 277953 Part No 1737869 Auger Control Decal Part No 1737870 Traction Cont...

Страница 10: ...y into the carburetor manifold to ensure fast starts in cool weather D Safety Key Must be inserted to start engine Pull out to stop Do not turn safety key E Starter Handle Starts the engine manually F...

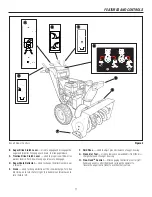
Страница 11: ...Crank Used to change direction of the snow discharge Turn han dle clockwise to turn chute to right Turn handle counterclockwise to turn chute to left Snow Thrower Controls Figure 3 F Skid Shoe Used t...

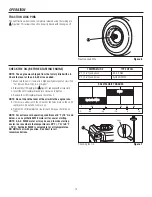
Страница 12: ...the air pressure in the tires with an accurate gauge see Figure 4 CAUTION Avoid Injury Explosive separation of tire and rim parts is possible when they are serviced incorrectly Do not attempt to mount...

Страница 13: ...t all guards covers shields in place Never direct discharge towards windows or allow bystanders near machine while engine is running Stop the engine whenever leaving the operating position Disconnect...

Страница 14: ...p dipstick and check the oil NOTE Do not check the level of the oil while the engine runs 5 If necessary add oil until the oil reaches the FULL mark on the oil fill cap dipstick Do not add too much oi...

Страница 15: ...designed to operate on AC house hold current The power cord must be properly grounded at all times to avoid the possibility of electric shock which can cause injury to the operator Follow all instruct...

Страница 16: ...son to avoid a hazard Starting with Electric Start Figure 11 IMPORTANT To extend the life of the starter use short starting cycles five seconds maximum Wait one minute between starting cycles NOTE If...

Страница 17: ...Adjust Skid Height in the MAINTENANCE section of this manual Rocks and gravel must not be picked up and thrown by the machine 6 After the snowthrowing job has been completed allow the engine to idle f...

Страница 18: ...t cover items that have been subjected to operator abuse or negligence To receive full value from the warranty operator must maintain snow thrower as instructed in this manual The above Service Recomm...

Страница 19: ...ition Adjust the drag by tightening the nut C C Figure 16 Tightening the nut will limit the chute from moving without the operator turning the chute rotation crank Chute Rotation Gear Figure 16 C A B...

Страница 20: ...LL line on dipstick A A Figure 17 Be sure original container is marked A P I service SF or higher Do not use SAE10W40 oil as it may not provide proper lubrication See Chart for oil recommendations Dra...

Страница 21: ...w hood first make sure that the primer button hose and the ignition wire are connected 7 Mount the snow hood to the engine and secure with the mounting screws 8 Connect the choke control knob A A Figu...

Страница 22: ...d Height Figure 23 A B WARNING Be certain to maintain proper ground clearance for your particular area to be cleared Objects such as gravel rocks or other debris if struck by the impeller may be throw...

Страница 23: ...t the lever and cause the auger drive to be engaged without depressing the auger control 4 Tighten nut 5 With the aid of an assistant engage the auger drive clutch Check ten sion on belt which is oppo...

Страница 24: ...auger drive control lever released the hook A A Figure 27 should barely touch the lever B B without raising it There can be a maximum of 1 32 0 8 mm clearance 2 To adjust loosen the nut C C by holding...

Страница 25: ...Z hook from the cable adjustment bracket Move the Z hook down to the next adjustment hole 7 Pull the traction drive cable up through the cable adjustment bracket 8 Put the cable boot over the cable a...

Страница 26: ...tances if the auger strikes an object which could cause damage to the unit the shear pin will break This protects the gear box and other parts from damage The shear pins A A Figure 31 are located on t...

Страница 27: ...ecurely fastened Inspect all visible moving parts for damage breakage and wear Replace if necessary 7 Touch up all rusted or chipped paint surfaces sand lightly before painting 8 Cover the bare metal...

Страница 28: ...ace drive belt See authorized dealer Incorrect adjustment of traction drive cable Adjust traction drive cable Refer to Cable Adjustment in the MAINTENANCE section of this manual Worn or damaged fricti...

Страница 29: ...d or workmanship only To avoid misunderstanding which might occur between the customer and the Dealer listed below are some of the causes of product failure that the warranty does not cover Normal Wea...

Страница 30: ...ne is originally purchased The warranty on emissions related parts is as follows Any warranted part that is not scheduled for replacement as required maintenance in the owner s manual supplied is warr...

Страница 31: ...in accordance with SAE Society of Automotive Engineers code J1940 Small Engine Power Torque Rating Procedure and rating performance has been obtained and corrected in accordance with SAE J1995 Revisi...

Страница 32: ......

Страница 33: ...Manuel n 1737920 R v B Rev Date 04 2009 Manuel d Utilisation Souffleuses neige pousser R f fab Description 1695722 Souffleuse neige double d tente 11 5 TP 27 po...

Страница 34: ...ez suivre attentivement les directives Sauvegardez ces instructions pour votre r f rence O nous trouver Vous n avez pas besoin de chercher bien loin pour trouver le support et service Briggs Stratton...

Страница 35: ...UTILISATION 18 GRAISSAGE DE LA BO TE D ENGRENAGE DE VIS SANS FIN 19 GRAISSAGE DE L ARBRE DE VIS SANS FIN 19 CONTR LER LUBRIFIER LA TRINGLERIE MAIN LIBRE 19 LUBRIFIER LE PIGNON DE ROTATION DE GOULOTTE...

Страница 36: ...toute activit ou de faire fonctionner la souffleuse neige Turbine rotative Maintenez la souffleuse neige une distance de s curit Tari re rotative Engrenages rotatifs Ne cherchez jamais atteindre les...

Страница 37: ...fonctionnement dangereux endommager l quipement et annuler la garantie du produit DANGER Lisez comprenez et suivez toutes les instructions sur la souffleuse neige et dans le manuel de l utilisateur a...

Страница 38: ...et ses vapeurs sont extr mement inflammables et explosifs Manipulez toujours avec extr me soin Le fait de ne pas observer ces instructions de s curit peut causer un incendie ou une explosion entra nan...

Страница 39: ...ve d une extr me prudence lorsque vous utilisez la souffleuse ou lui faites traverser des chemins des all es ou des routes de gravier R glez la hauteur du carter du collecteur pour d blayer les surfac...

Страница 40: ...assurer un fonctionnement et des performances en toute 0 Le fait de ne pas observer les instructions de s curit de ce manuel provoquera de graves blessures voire m me la mort Entretien et remisage S i...

Страница 41: ...X FAMILY XXXXX XXXXXX XXXXXX IMPORTANT ENGINE INFORMATION BRIGGS STRATTON CORPORATION R f 278297 R f 277953 R f 1737869 tiquette de la commande de tari re R f 1737870 tiquette de la commande de tracti...

Страница 42: ...huile I Marche Arr t du moteur emplacement du symbole COMMANDES DE LA SOUFFLEUSE NEIGE A Levier du s lecteur de vitesse Permet de choisir un rapport de vitesse parmi les six 6 en marche avant et deux...

Страница 43: ...tion de la neige Tourner la poign e dans le sens des aiguilles d une montre pour tourner la goulotte vers la droite Tourner la poign e dans le sens in verse pour tourner la goulotte vers la gauche Com...

Страница 44: ...e explosion Soudage structurellement peuvent affaiblir ou d former la roue Ne pas en avant ou sur le pneu lorsqu un gonfler Utilisez un approprier outil vous permettre un stand c t REMARQUE V rifier l...

Страница 45: ...la machine alors que le moteur est en marche Toujours arr ter le moteur avant de quitter la position de conduite D brancher la bougie avant de d boucher le carter de vis sans fin ou la goulotte d ject...

Страница 46: ...le bouchon jauge d huile et v rifier le niveau d huile REMARQUE Ne pas v rifier le niveau d huile durant la marche du moteur 5 Le cas ch ant ajouter de l huile jusqu au rep re FULL Plein sur le boucho...

Страница 47: ...terre ne pas utiliser le d marreur lectrique Si la maison comporte un circuit lectrique trois fils avec terre mais qu aucune prise n est disponible pour brancher le d marreur lectrique faire installer...

Страница 48: ...danger A B C Poign e du cordon de lanceur Figure 10 A D marrage lectrique Figure 11 A B ARR TER LE MOTEUR Faire tourner le moteur pendant quelques minutes pour faire vaporer toute humidit pr sente sur...

Страница 49: ...oin apr s chaque utilisation 8 Nettoyer les d p ts de neige et tous les d bris de l ensemble de la souffleuse neige puis la rincer l eau si possible pour liminer tout le sel et autres substances chimi...

Страница 50: ...ge ne couvre pas les l ments ayant subi un emploi abusif ou des n gligences Pour b n ficier pleinement de la garantie veiller entretenir la souffleuse neige conform ment aux instructions de ce manuel...

Страница 51: ...lles de cisaillement d poser les goupilles et lubrifier les graisseurs zerk de l arbre de vis sans fin B B Faire tourner la vis sans fin plusieurs fois sur son arbre et remettre les goupilles de cisai...

Страница 52: ...huile a un indice A P I SF ou sup rieur Ne pas utiliser d huile SAE 10W40 car la lubrification peut tre insuffisante Voir les huiles recommand es dans le tableau ci contre Vidanger l huile Placer la...

Страница 53: ...le tuyau du bouton d amor age et le c ble d allumage sont branch s 7 Poser le capot neige sur le moteur et l attacher avec les vis de fixation 8 Raccorder le bouton de commande de starter A A Figure 2...

Страница 54: ...es les vingt cinq 25 heures de marche Changer la bouge Figure 22 si les lectrodes sont piqu es ou br l es ou si la porcelaine est fissur e 1 D poser le capot neige Voir la section D POSER LE CAPOT NEI...

Страница 55: ...RTISSEMENT Ne pas trop serrer car cela peut relever le levier et forcer l engagement de l entra nement de vis sans fin alors que la commande de vis sans fin n est pas actionn e 4 Serrer l crou 5 Avec...

Страница 56: ...7 doit peine toucher le levier B B sans le relever Il peut y avoir un espacement de 0 8 mm 1 32 pouce maximum 2 Pour ajuster desserrer l crou C C en tenant le manchon m plats D D tout en faisant tourn...

Страница 57: ...ochet en Z de la ferrure de r glage de c ble Placer le crochet en Z dans le trou de r glage suivant 7 Tirer le c ble de commande de traction vers l arri re de la ferrure de r glage de c ble 8 Remettre...

Страница 58: ...que la vis sans fin heurte un objet susceptible d endommager la machine la goupille de cisaillement se casse Ceci prot ge la bo te d engrenages et les autres pi ces de la machine Les goupilles de cisa...

Страница 59: ...contr ler visuel de l tat et du degr d usure de toutes les pi ces mobiles visibles Les changer le cas ch ant 7 Retoucher toutes les surfaces peintes rouill es ou caill es poncer l g rement avant de p...

Страница 60: ...distributeur homologu R glage incorrect du c ble de commande de traction R gler le c ble de commande de traction Se reporter Contr le et r glage des c bles dans la section ENTRETIEN de ce manuel Roue...

Страница 61: ...malentendu susceptible entre le client et le concessionnaire une liste de certaines causes de d faillances de produit non couvertes par la garantie figure ci dessous Usure normale Le petit mat riel m...

Страница 62: ...il est exempt de tout d faut de mati re ou de construction susceptible d entra ner la d faillance d une pi ce garantie et qu il est mat riellement identique en tous points au moteur d crit dans la dem...

Страница 63: ...ssence est indiqu e conform ment au code J1940 proc dure de calcul de la puissance et du couple des petits moteurs de la SAE Society of Automotive Engineers et les performances th oriques ont t obtenu...

Страница 64: ......

Отзывы: