background image

SERVICE AND ADJUSTMENT

18

F-031306L

HOW TO REMOVE AND INSTALL THE TINES

References to the right or left side of the cul-
tivator are from the viewpoint of the opera-
tor’s position behind the unit.

All four tines are different and cannot be in-
terchanged. The tines must be correctly
installed or the cultivator will not function
properly.

To till around plants or in small areas, the
outside tines can be removed to reduce the
tilling width to approximately 7 inches.

WARNING: The tines are self
sharpening and will become
quite sharp from use.  Handle

carefully.

The tines will all wear evenly. If the tines are
being replaced because of wear, we recom-
mend that all four tines be replaced at the
same time. To replace the tines, do the fol-
lowing:

Tine Removal

1.

Put  the  on-off switch in the OFF posi-
tion.

2.

Disconnect the spark plug wire from the
spark plug.

3.

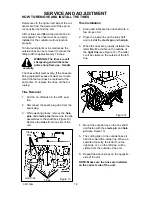
While wearing gloves, remove the hair-
pins
 and clevis pins that secure the tine
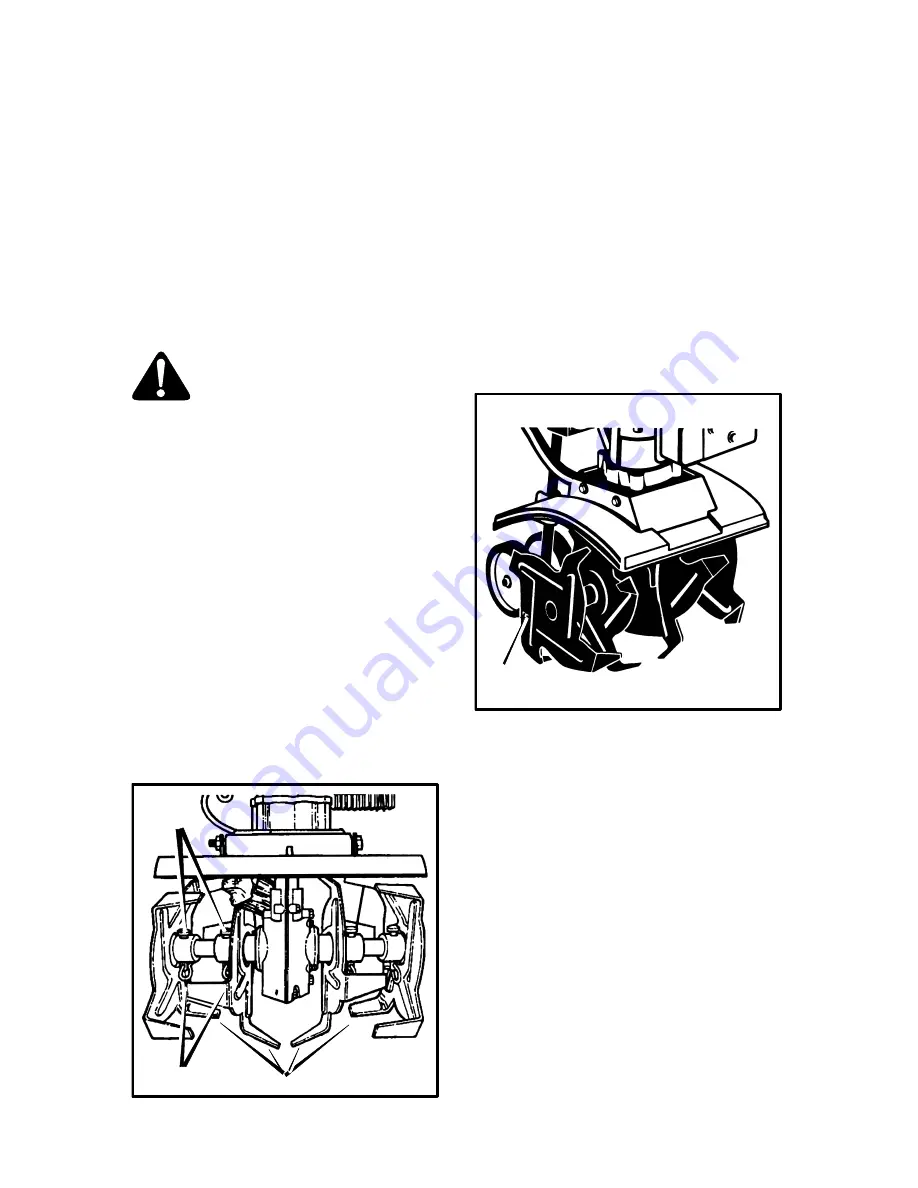
assemblies to the shaft (see Figure 13).
Remove the tines from one side of the
unit.

Figure 13

Clevis

Pins

Hair Pins

Tines

Tine Installation

1.

Clean and lubricate the tine shaft with a
few drops of oil.

2.

Place the inside tine on the tine shaft
and reinstall the clevis pin and hairpin.

3.

When the tines are properly installed, the
letter R will be visible on the outside of
the right tine (see Figure 14). The letter
L will be visible on the outside of the left
tine.

Figure 14

R

4.

Mount the outside tine on the tine shaft
and fasten with the clevis pin and hair-
pin
 (see Figure 13).

5.

The cutting tips on the outside tines all
bend in toward the inside tine. When as-
sembled correctly, the letter R on the
right side, or L on the left side, will be
visible from the outside of the unit.

6.

Repeat the above steps on the opposite
side of the unit.

NOTE: Make sure the tines are installed
on the correct side of the unit.

Содержание 11052x4D

Страница 1: ...uye los MA NUALES DE INSTRUCCI N las PIEZAS DE REPUESTOS y las GA RANT AS Toda esta informaci n debe estar incluida para asegurar que se cumplan las leyes estatales y otras leyes aplicables INFORMACI...

Страница 2: ...d from material use abuse or misuse will be honored This Murray Inc Two 2 Year Limited Warranty is your exclusive remedy however this warranty is void or does not apply to any unit that has been tampe...

Страница 3: ...the owner to make sure the unit is correctly assembled The owner must carefully check the unit according to the instructions in this manual before it is first used RESPONSIBILITY OF THE OWNER The res...

Страница 4: ...e allow ing space for expansion as the heat of the engine and or sun can cause fuel to ex pand S Fill fuel tank outdoors with extreme care Do not smoke while refueling Never fill fuel tank indoors Rep...

Страница 5: ...Safe Storage S Always refer to the owner s manual instruc tions for important details if the cultivator is to be stored for an extended period S Never store the cultivator with fuel in the fuel tank i...

Страница 6: ...t learn and understand the purpose for each symbol Control And Operating Symbols Slow Fast WARNING Thrown Objects Keep Bystanders Away WARNING Rotating Parts Stop Engine Disconnect Spark Wire Before M...

Страница 7: ...ROM THE CARTON 1 Remove the parts bag from the carton 2 Remove the handles from the carton 3 Remove the packing material positioned around the unit 4 Lift the cultivator out of the carton and place on...

Страница 8: ...handles with the fasteners removed in step 7 9 Tighten the knobs NOTE To tighten the knobs hold the curved carriage bolt head against the outside of the lower handle as you tighten the knobs 10 Tighte...

Страница 9: ...and the function of all controls Before you start the engine operate all controls IMPORTANT This unit is equipped with an internal combustion engine and must not be used on or near any unimproved fore...

Страница 10: ...ngine speed is increased Choke Control Lever Use to assist when starting a cold engine ON OFF Switch The ON position al lows the engine to start The OFF position stops the engine and keeps the engine...

Страница 11: ...w To Start The Engine 2 Tilt the unit back on the depth stake or depth rod until the tines are off the ground Squeeze the throttle control all the way up against the hand grip The engine is governor c...

Страница 12: ...automotive gasoline into a one gallon size gasoline container 2 Add 5 3 ounces of clean high quality two cycle oil to the gasoline container IMPORTANT Do not use outboard mo tor oil or multi viscosity...

Страница 13: ...ottle control lever against the hand grip with your left hand As soon as the engine starts slowly release the throttle control If released too slowly the unit will sometimes move forward 7 When the en...

Страница 14: ...or ward motion S Cultivating is loosening or digging around growing plants which allows the plants to flourish S When using the cultivator to remove weeds it is best to cultivate no deeper than 1 1 2...

Страница 15: ...Power 2 Displacement 3 0 cu in 49 2 cc Gasoline Capacity 20 oz Fuel Oil Mix Ratio 24 1 Oil To Gas 5 3 oz oil to 1 gal gas use unleaded regular Spark Plug Champion RCJ 8Y Spark Plug Gap 0 035 inch Idl...

Страница 16: ...s damaged see the Repair Parts section in this manual 6 Clean and lubricate the tine shaft with a few drops of oil 7 Reinstall the left side tines 8 Remove the right side tines Check the felt washer f...

Страница 17: ...loss of engine power and can cause excessive wear or damage to the engine If the air filter is clogged clean or replace immediately 1 Disconnect the spark plug wire from the spark plug 2 Remove the s...

Страница 18: ...rk plug wire from the spark plug 3 While wearing gloves remove the hair pins and clevis pins that secure the tine assemblies to the shaft see Figure 13 Remove the tines from one side of the unit Figur...

Страница 19: ...stment screw an addition al 1 8 turn counterclockwise 5 With the engine running release the throttle control idle position to make the mixture adjustments 6 Slowly turn the mixture adjustment screw cl...

Страница 20: ...r and out of the way the cross piece can also be hooked over a wall hook S Put the cultivator in a building that has good ventilation S Cover the cultivator with a suitable pro tective cover that does...

Страница 21: ...ir filter Engine speed does not increase properly Debris interfering with throttle linkage Clean dirt and debris of top of carburetor Engine smokes excessively Plugged air filter Too much oil in fuel...

Страница 22: ...17 REF LOWER HANDLES REF TINE SHIELD REF THROTTLE MOUNT SCREW 323392C KEY NO PART NO DESCRIPTION KEY NO PART NO DESCRIPTION 10 2 0HP Engine 11 56694 Flat washer 12 335350 Rotor 13 120380 Washer 14 1x9...

Страница 23: ...MODEL 11052x4D 23 F 031306L 318848C 311 300 312 310 KEY NO PART NO DESCRIPTION 300 1901017 Transmission 310 339390E701 Bracket Depth Rod 311 180024 Screw 1 4 20x1 25 312 782585 Nut 1 4 20...

Страница 24: ...Shield Tine 481 310056 Screw 1 4 20x5 50 482 672734 Spacer Flange 483 782585 Nut 1 4 20 484 48x894 Decal Murray 485 48x4031 Decal Caution 490 56158 Washer Felt 491 56157E701 Tine Assy Inner LH 492 561...

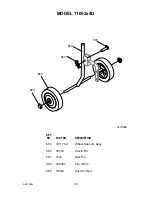
Страница 25: ...MODEL 11052x4D 25 F 031306L 323396B 663 662 661 650 660 KEY NO PART NO DESCRIPTION 650 331176 Z Wheel Support Assy 660 56123 Clevis Pin 661 31x4 Hair Pin 662 338307 Tire Rim 663 73664 Push On Nut...

Страница 26: ...PTION 930 7401025 Upper Handle 932 339398E701 Lower Handle LH 934 7401022 Lower Handle RH 941 56199 Bolt 5 16 18x1 63 942 783000 Formed Washer 943 120393 Flat washer 944 1901018 T Knob 946 56778 Hand...

Страница 27: ...161 Watline Avenue Mississauga Ontario L4Z 1P2 905 890 6900 1 800 861 9559 Edmonton 101 10411 178 Street Edmonton Alberta T5S 1R5 780 453 5791 1 800 861 9559 Ville St Laurent 234 Migneron Street Ville...

Страница 28: ...NOTES 28 F 031306L...

Страница 29: ...sation du mat riel ne sera honor e Cette Garantie limit e Murray Inc de deux 2 ans est votre seul recours Toutefois cette garantie est nulle ou ne s applique pas toute machine ayant fait l objet d une...

Страница 30: ...blage de sa machine Avant toute utilisation le propri taire doit inspecter la machine conform ment aux instructions pr sen t es dans ce manuel RESPONSABILIT S DU PROPRI TAIRE Il incombe au propri tair...

Страница 31: ...ilisez un r cipient agr S V rifiez la quantit d essence avant cha que utilisation en veillant laisser de l es pace pour l expansion de l essence par la chaleur du moteur ou du soleil S Remplissez le r...

Страница 32: ...sibles avant de laisser la motobineuse sans sur veillance Arr tez le moteur et si elle en est quip e retirez la cl S Ne surchargez pas la capacit de la moto bineuse en tentant de labourer trop profon...

Страница 33: ...es de commandes et de fonctionnement Lent Rapide ATTENTION DANGER Projection d objets loignez toute personne de la zone de travail ATTENTION DANGER Pi ces rotatives Arr ter le moteur D branchez le fil...

Страница 34: ...de pi ces du carton 2 Retirez les manches du carton 3 Retirez les mat riaux d emballage entou rant la machine 4 Soulevez la motobineuse hors du carton et placez le sur une surface dure et pla ne 5 Re...

Страница 35: ...ttaches retir es l tape 7 9 Serrez les boutons REMARQUE Pour serrer les boutons tenez la t te du boulon t te ronde courb appuy e sur la face externe du manche inf rieur tout en serrant 10 Serrez les c...

Страница 36: ...enez bien la fonction de toutes les commandes Avant de d marrer la machine utili sez toutes les commandes IMPORTANT cette machine est quip e d un moteur combustion interne et ne doit pas s utiliser su...

Страница 37: ...r de commande du doseur Uti lisez le pour faciliter le d marrage du mo teur quand il est froid Interrupteur MARCHE ARR T La position de MARCHE permet au moteur de d marrer La position d ARR T arr te l...

Страница 38: ...ez le moteur Consultez la sec tion D marrage du moteur 2 Inclinez la machine en arri re sur la tige ou la barre de profondeur jusqu ce que les lames ne touchent plus le sol Serrez la commande d acc l...

Страница 39: ...on U S d ess ence moteur fra che propre et sans plomb dans un bidon d essence d une contenance d un gallon U S 2 Ajoutez 5 3 onces d huile deux temps de qualit sup rieure dans le bidon d ess ence IMPO...

Страница 40: ...d utiliser la main gauche pour tenir le levier d acc l rateur contre la poign e D s que le moteur d marre rel chez doucement l acc l ra teur Si l acc l rateur est rel ch trop lentement la machine peut...

Страница 41: ...n obtenir la meilleure croissance possible S Lors de l utilisation de la motobineuse pour d sherber il est conseill de biner une profondeur ne d passant pas 3 4 cm Biner plus profond ment ne fait que...

Страница 42: ...Date d achat Puissance HP 2 Cylindr e 3 0 cu in 49 2 cc Capacit en essence 20 oz env 60 cl Ratio m lange ess huile 24 1 hui ess 5 3 oz d huile pour 1 gal US d essence ordinaire sans plomb Bougie Cham...

Страница 43: ...Remplacez la rondelle de feutre si elle est est endommag e voir la rubrique Pi ces d tach es de ce manuel 6 Nettoyez et lubrifiez l arbre des lames avec quelques gouttes d huile 7 Remontez les lames d...

Страница 44: ...ch par la poussi re peut engendrer une perte de puissance et endommager le moteur ou provoquer son usure pr matu r e Si le filtre air est bouch nettoyez le ou remplacez le imm diatement 1 D branchez...

Страница 45: ...t sur OFF 2 D branchez le fil d allumage de la bou gie 3 Apr s avoir enfil des gants retirez les goupilles et les clavettes d axe fixant les lames l arbre voir la Figure 13 Retirez les lames d un c t...

Страница 46: ...es d une montre 5 Le moteur en marche rel chez la poi gn e d acc l rateur en position de ra lenti pour effectuer les r glages du m lange 6 Tournez lentement la vis de r glage du m lange dans le sens d...

Страница 47: ...ut tre accroch e par la barre transversale sur un crochet mural S Entreposez la motobineuse l int rieur d un b timent bien ventil S Recouvrez la motobineuse d une housse appropri e ne retenant pas l h...

Страница 48: ...oteur n acc l re pas comme il faut D bris encombrant la tringlerie de l acc l rateur Nettoyez salet s et d bris au dessus du carburateur Le moteur met trop de fum e Filtre air bouch Trop d huile dans...

Страница 49: ...incoln Mineral Missoulo Ravalli Sanders Or gon Washington CPT CANADA POWER TECHNOLOGY LIMITED Mississauga 161 Watline Avenue Mississauga Ontario L4Z 1P2 905 890 6900 1 800 861 9559 Edmonton 101 10411...

Страница 50: ...NOTES 50 F 031306L...

Страница 51: ...uso o maltrato por parte del operador Esta Garant a Limitada de Dos 2 A os de Murray Inc es su remedio exclusivo sin embargo esta garant a queda nula o sin efecto para cualquier unidad que haya sido e...

Страница 52: ...te El propietario debe revisar minuciosamente la unidad de acuerdo a las instrucciones de este manual antes de usarla por primera vez RESPONSABILIDAD DEL PROPIETARIO La responsabilidad del propietario...

Страница 53: ...los embragues y cam bie a neutro antes de hacer arrancar el motor Seguridad con el combustible S Tenga cuidado al manejar el combustible es sumamente inflamable S Use un bid n aprobado para combustib...

Страница 54: ...s cuando deba dejar la cultivadora desaten dida Pare el motor y saque la llave si la hay S No exceda la capacidad de su cultivadora al tratar de arar muy profundo a una veloci dad muy r pida Almacenam...

Страница 55: ...s mbolos S mbolos de control y funcionamiento Marcha lenta Marcha r pida ADVERTENCIA Lanza objetos Mantener transe ntes alejados ADVERTENCIA Piezas giratorias Apagar el motor y desconectar el cable de...

Страница 56: ...A CAJA 1 Saque la bolsa de partes de la caja 2 Saque los mangos de la caja 3 Retire el material de empaque colocado alrededor de la unidad 4 Levante y saque la cultivadora de la caja y col quela sobre...

Страница 57: ...es que quit en el paso 7 9 Apriete las perillas NOTA Para apretar las perillas sujete la cabeza curva del perno de coche contra la parte exterior del mango infe rior mientras aprieta las perillas 10 A...

Страница 58: ...de todos los controles Antes de hacer arrancar el motor verifique el funcio namiento de todos los controles IMPORTANTE Esta unidad est equipada con un motor de combusti n interna y no debe ser usada...

Страница 59: ...se aumenta la velocidad del motor Palanca de control del ahogador Se usa para ayudar a arrancar el motor en fr o Interruptor de ENCENDIDO APAGA DO La posici n ENCENDIDO permite ha cer arrancar el mot...

Страница 60: ...1 Arranque el motor Consulte C mo ha cer arrancar el motor 2 Incline la unidad hacia atr s sobre la ba rra de profundidad o la varilla de profun didad hasta que los dientes no toquen el suelo Apriete...

Страница 61: ...ro de un contenedor de gasolina con capacidad para un gal n 2 A ada al contenedor de gasolina 5 3 on zas de aceite para motor de dos tiempos asegur ndose que el aceite est limpio y que sea de buena ca...

Страница 62: ...de control de aceleraci n con la mano izquierda contra la empu adura Tan pronto se encienda el motor suelte lentamente el control de aceleraci n Si lo suelta muy lentamente a veces la uni dad se desp...

Страница 63: ...e la cultivadora para quitar la maleza obtendr mejores resultados al arar a una profundidad no mayor de 1 pulgada y media 1 1 2 Al arar a mayor profundidad s lo conseguir sacar a la superficie las sem...

Страница 64: ...lindrada 3 0 pulg c b 49 2 cc Capacidad de gasolina 20 onzas Proporci n mezcla de combustible aceite 24 1 Aceite a gasolina 5 3 onzas de aceite a1 gal n de gasolina use gasolina regular sin plomo Buj...

Страница 65: ...ada consulte la secci n de Piezas de Repuesto en este manual 6 Limpie y lubrique con unas pocas gotas de aceite el eje de los dientes 7 Reinstale los dientes del lado izquierdo 8 Retire los dientes de...

Страница 66: ...obstruido con pol vo puede reducir el rendimiento del motor y causar desgaste o da o extensi vo a ste Si el filtro de aire est tapado l mpielo o reempl celos inmediatamente 1 Desconecte el cable de la...

Страница 67: ...AGADO 2 Desconecte el cable de la buj a 3 Usando guantes de protecci n retire los pasadores abiertos y los pasadores de horquilla que sujetan las unidades de dientes al eje Figura 13 Desmonte los dien...

Страница 68: ...marcha en vac o para hacer los ajustes de la mezcla 6 Gire lentamente el tornillo de ajuste de la mezcla hacia la derecha hasta que el motor empiece a correr de forma irregu lar F jese en esta posici...

Страница 69: ...a colgar la cultivadora en un gancho de la pared S La cultivadora debe almacenarce en un lugar que disponga de buena ventila ci n S Proteja la cultivadora con una cubierta apropiada que no retenga hum...

Страница 70: ...ad para acelerar Suciedad que interfiere con el paso de gases del regulador Limpie el polvo y suciedad de la parte superior del carburador El motor genera humo excesivo Filtro de aire obstruido Demasi...

Страница 71: ...NOTA 71 F 031306L...

Страница 72: ...ad Lake Lincoln Mineral Missoulo Ravalli Sanders Oregon Washington CPT CANADA POWER TECHNOLOGY LIMITED Mississauga 161 Watline Avenue Mississauga Ontario L4Z 1P2 905 890 6900 1 800 861 9559 Edmonton 1...

Отзывы: