background image

206

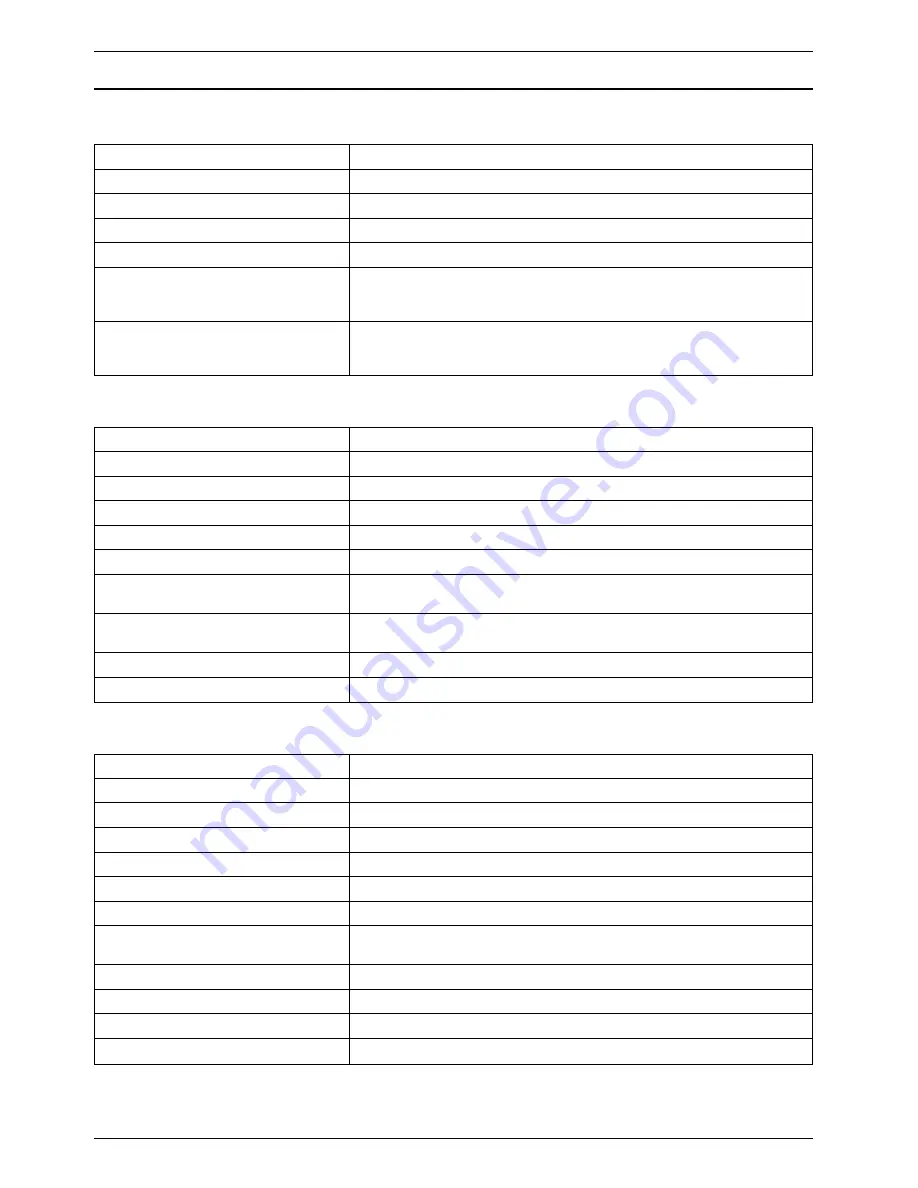
Main specifications

Basic specifications

System configuration

Network interface

Network protocol

Client OS

Client PC

Hardware requirements 
(Minimum)

Remarks

1 server / 5 clients

Ethernet 10Base-T / 100Base-TX

TCP / IP

Windows95*

1

/ 98 / Me / 2000 / NT

PC/AT compatible / PC-98NX series

CPU : Pentium 166MHz or higher
RAM : 32MB or more 
HD

: 20MB or more free space

The client browser requirement is either Microsoft

®

Internet

Explorer 4.01 SP1 or a later version, or Netscape Navigator 4.0
or a later version

PC-FAX

Original document size

Resolution

Encoding method

Compatibility

Transmission speed

Halftones

Group transmission

Total number of jobs in queue in
Scheduled communication

Cover page transmission

F code communication

Reception routing

Address

A3 / B4 / A4

Max. 400 

400 dpi equivalent

MH / MR / MMR / JBIG

Super G3

33.6Kbps

256 gradation

Available 

Up to 100

Available 

Available 

Available (User ID / FAX / E-mail)

Private (10,000 items) / Share (10,000 items)

Internet fax

E-mail communication protocol

Original document size

Resolution

Encoding method

Standard

Halftones

E-mail / fax mixed group
transmission

Total number of jobs in queue in
Scheduled communication

Address

Data attachment format

SMTP / POP3

A3 / B4 / A4

Max. 400 

400 dpi equivalent

MH / MMR

T.37

256 gradation

Available 

Up to 100

Private (10,000 items) / Share (10,000 items)

TIFF

Содержание OFFICEBRIDGE ONLINE

Страница 1: ...Information Server Kit OfficeBridge User s Guide for MFX 2500 MFX 2530 ...

Страница 2: ...and trademarks Windows 95 Windows 98 Windows NT Windows Millennium Edition and Windows 2000 are the registered trademarks of Microsoft Corporation in the U S A and or other countries Screen copies in this manual are shown under permission of Microsoft Corporation IBM OS 2 NuOffice are the registered trademarks of IBM Corporation in the U S A and or other countries Salutation is the registered trad...

Страница 3: ... directly from the PC with no need of a printout copy keeping a high image quality with no deterioration Direct transmission saves consumption of paper which is otherwise needed to print a copy only for fax transmission PC FAX reception A message received by the fax main unit can be downloaded into a PC without printing and printout can be limited to only the message truly needing it Paper consump...

Страница 4: ...n like the sender s fax number a received fax meeting this condition can be forwarded to the designated user PC Because an e mail address can be specified as the forwarding destination a person away from the office can receive a message simply by checking for e mail arrival if carrying a mobile computer A received fax can be stored and managed as electronic data which eliminates concerns about pap...

Страница 5: ...iv Fax main unit operation panel FAX key Numeric keys One touch keys Cursor keys MENU key STOP key NEXT key START key ...

Страница 6: ...er Printer driver for network printing 14 Installing OfficeBridge FAX Printer driver for fax transmission 27 Installing TiffFormer Printer driver for image file format conversion 44 Uninstalling OfficeBridge 61 Chapter 2 Basic operations OfficeBridge 66 What is OfficeBridge 66 How to log on 67 How to log on 67 Multi user operation 68 Sending fax 69 How to send fax 69 Scanning 70 How to scan 70 Pri...

Страница 7: ...iceBridge Environment settings 112 Deleting file after fax transmission 112 Auto log on 113 Minimized screen setting 114 Managing data 115 Creating a new folder 115 Renaming a folder 115 Deleting a folder 115 Moving a folder 115 Copying a folder 115 Sharing data 116 Sharing data on single PC 116 Sharing data with multiple PCs on the network 116 Making print output 119 Searching for file 120 Regist...

Страница 8: ...8 Paste 149 Deletion 149 Sharing address 150 Importing and exporting address 152 Importing address 152 Exporting address 154 Chapter 6 Using CoverPage Editor CoverPage Editor overview 156 What is CoverPage Editor 156 Startup 156 CoverPage Editor operations 159 Entering text 159 Creating objects 160 Object setup 162 Changing objects layout 163 Cut copy and paste of object 166 Deleting object 167 Vi...

Страница 9: ...object 185 Deleting object 186 Viewing image 187 Adjusting angle 188 Print 190 Save 190 Chapter 8 Device Management on PC Viewing fax communication history 192 Viewing e mail communication history 194 Mail transmission history check 194 Mail reception history check 196 Confirming or canceling Scheduled communication 198 Confirming or canceling print job 200 Chapter 9 Troubleshooting guide Troubles...

Страница 10: ...Chapter 1 Before use Safety precautions 2 Product package 3 System configuration 4 Installation and uninstallation 7 ...

Страница 11: ...al for bodily harm or damage to hardware The following symbols are used to distinguish the types of alerts Shown below are the examples This symbol indicates warning or caution An illustration will give a concrete description This symbol indicates prohibition in handling An illustration will give a concrete description This symbol indicates mandatory handling An illustration will give a concrete d...

Страница 12: ...his manual if you find any item missing or if there is a missing page or anything unclear in this manual Setup CD 1 piece End user license agreement 1 sheet Operation manual 1 copy Caution An end user license agreement is a legal instrument to permit the use of this product Be sure to read this agreement before you start to use this product and to make a user registration Be careful to keep the do...

Страница 13: ... and scanned data Disk drive device CD ROM drive 2 Network protocol TCP IP protocol must be installed Browser Netscape Navigator 4 0 or later version 3 Microsoft Internet Explorer 4 01 SP1 or later version Other requirements Minimum 800 600 pixels resolution and 256 colors display capability graphic accelerator board network interface board 1 Version 4 00 950 needs to be updated by Microsoft Windo...

Страница 14: ...d reception Scanned data loading The following requirements need to be met in order to make the above capabilities available Connection to a mail server SMTP POP3 Connection of a MFX 2500 IS 100 server to client PCs in the same LAN segment There is no need for a mail server connection if Internet fax is not used Client Client Mail server Internet fax E mail Sending and receiving fax through teleph...

Страница 15: ...net fax can be registered in Address Book The recipient s department name and address can be registered as well for efficient database management Image Viewer Image Viewer displays a received fax or scanned image It is also possible to retouch the image Printer driver functionality MFX 2500 IS Printer This printer driver is used to make print output of a document or image composed by application s...

Страница 16: ...ly from the Setup CD Depending on the user s environment please follow whichever procedure is appropriate This product requires a Microsoft Windows 95 or later operating system environment Before installation please check if your PC meets the software and hardware requirements When you install the program on a PC with either a Windows 2000 or Windows NT operating system consult your system adminis...

Страница 17: ...apter 1 Before use 8 4 The Run screen appears Enter Drive letter Setup exe in Open and click OK Drive letter is the letter assigned to your CD ROM drive 5 The OfficeBridge Setup screen appears Click Next ...

Страница 18: ...t screen appears Read the agreement carefully and if you agree click Yes OfficeBridge cannot be installed unless you agree To cancel the setup click No 7 The User Information screen appears Enter or confirm User name and Company name Then click Next ...

Страница 19: ...The Choose Destination Location screen appears If the folder shown is agreeable click Next To change the installation folder click Browse Determine the installation folder and then click OK The previous screen appears Click Next ...

Страница 20: ...Chapter 1 Before use 11 1 9 The Select Program Folder screen appears Click Next 10 The Server address setting screen appears Enter the IP address of the server fax main unit and click Next ...

Страница 21: ...Chapter 1 Before use 12 11 The Start Copying Files screen appears Check Current Settings and click Next to start installation 12 Installation status is displayed ...

Страница 22: ... Finish the computer will be restarted If you are running other application programs end the session after saving the data Then click Finish If you select the No I will restart my computer later button and click Finish the installation has not been completed correctly Make sure to restart your computer ...

Страница 23: ...ake print output from the fax main unit Caution Make sure that OfficeBridge has been installed before installing the printer driver Windows 9x 1 Insert the Setup CD into your CD ROM drive 2 Click the Start button point to Settings and then click Printers 3 The printer folder opens Double click the Add Printer icon ...

Страница 24: ...Chapter 1 Before use 15 1 4 The Add Printer Wizard screen appears Click Next 5 Specify the printer connection Select the Network printer check box and click Next ...

Страница 25: ...path entry screen appears Enter the IP address of the server fax main unit in Network path or queue name Select No under Do you print from MS DOS based programs Click Next 7 Select the manufacturer and model of your printer Click Have Disk ...

Страница 26: ...er s files from type Drive letter Driver Model name Win9x and click OK It is also possible to click Browse and choose the folder Drive letter is the letter assigned to your CD ROM drive Model name is the model name of the fax main unit 9 Select Muratec MFX 2500 IS Printer and click Next ...

Страница 27: ...hown under Printer name When any other printer driver has already been installed the message Do you want your Windows based programs to use this printer as the default printer appears Select either the Yes or No button and click Next 11 Select the No button and click Finish ...

Страница 28: ... 2 Click the Start button point to Settings and then click Printers 3 The printer folder opens Double click the Add Printer icon 4 The Add Printer Wizard screen appears Click Next 5 The Local or Network Printer selection screen appears Select the Network printer button and click Next ...

Страница 29: ...fore use 20 6 The Locate Your Printer screen appears Select the Type the printer name button type the IP address of the server fax main unit into Name and click Next 7 The Connect to Printer screen appears Click OK ...

Страница 30: ...een appears Under Copy manufacturer s files from type Drive letter Driver Model name Winnt4_2k and click OK It is also possible to click Browse and choose the folder Drive letter is the letter assigned to your CD ROM drive Model name is the model name of the fax main unit 10 Select Muratec MFX 2500 IS Printer and click OK ...

Страница 31: ...ter driver has already been installed the message Do you want your Windows based programs to use this printer as the default printer appears Select either the Yes or No button and click Next 12 The Completing the Add Printer Wizard screen appears Check the contents and click Finish ...

Страница 32: ...int to Settings and then click Printers 3 The printer folder opens Double click the Add Printer icon 4 The Add Printer Wizard screen appears Select the Network printer server button and click Next 5 The Connect to Printer screen appears Type the IP address of the server fax main unit into Printer and click OK ...

Страница 33: ...ars Click Have Disk 8 The Install From Disk screen appears Under Copy manufacturer s files from type Drive letter Driver Model name Winnt4_2k and click OK It is also possible to click Browse and choose the folder Drive letter is the letter assigned to your CD ROM drive Model name is the model name of the fax main unit ...

Страница 34: ... MFX 2500 IS Printer and click OK When any other printer driver has already been installed the message Do you want your Windows based programs to use this printer as the default printer appears Select either the Yes or No button and click Next ...

Страница 35: ...Chapter 1 Before use 26 10 The message notifying installation is finished appears Click Finish ...

Страница 36: ...to perform fax transmissions from a computer Caution Make sure that OfficeBridge has been installed before installing the printer driver Windows 9x 1 Insert the Setup CD into your CD ROM drive 2 Click the Start button point to Settings and then click Printers 3 The printer folder opens Double click the Add Printer icon ...

Страница 37: ...Chapter 1 Before use 28 4 The Add Printer Wizard screen appears Click Next 5 Specify the printer connection Select the Local printer button and click Next ...

Страница 38: ...7 The Install From Disk screen appears Under Copy manufacturer s files from type Drive letter Driver Model name Win9x and click OK It is also possible to click Browse and choose the folder Drive letter is the letter assigned to your CD ROM drive Model name is the model name of the fax main unit ...

Страница 39: ...Chapter 1 Before use 30 8 Select Muratec OfficeBridge Fax and click Next 9 Select the printer port Select LPT1 and click Next ...

Страница 40: ...x is shown under Printer name When another printer driver has already been installed the message Do you want your Windows based programs to use this printer as the default printer appears Select either the Yes or No button and click Next 11 Select No and click Finish ...

Страница 41: ...12 Click the Start button point to Settings and then click Printers The printer folder opens Right click Muratec OfficeBridge Fax and click Properties 13 The properties screen appears Select the Details tab and click Add Port ...

Страница 42: ... 33 1 14 Select the type of port to be added Select the Other button and Local port and then click OK 15 Enter the port name Under Enter a port name type Muratec FAX and click OK 16 Click OK to close the properties screen ...

Страница 43: ... 2 Click the Start button point to Settings and then click Printers 3 The printer folder opens Double click the Add Printer icon 4 The Add Printer Wizard screen appears Click Next 5 The Local or Network Printer selection screen appears Select the Local printer button and click Next ...

Страница 44: ... 1 Before use 35 1 6 The Select the Printer Port screen appears Select the Use the following port button and Muratec FAX and then click Next 7 Select the manufacturer and model of your printer Click Have Disk ...

Страница 45: ...r s files from type Drive letter Driver Model name Winnt4_2k and click OK It is also possible to click Browse and choose the folder Drive letter is the letter assigned to your CD ROM drive Model name is the model name of the fax main unit 9 Select Muratec OfficeBridge Fax and click Next ...

Страница 46: ...inter name When any other printer driver has already been installed the message Do you want your Windows based programs to use this printer as the default printer appears Select either the Yes or No button and click Next 11 The Printer Sharing screen appears Select the Do not share this printer button and click Next ...

Страница 47: ...Chapter 1 Before use 38 12 The Print Test Page screen appears Select the No button and click Next 13 The Completing the Add Printer Wizard screen appears Check the contents and click Finish ...

Страница 48: ...Click Yes Windows NT 1 Insert the Setup CD into your CD ROM drive 2 Click the Start button point to Settings and then click Printers 3 The printer folder opens Double click the Add Printer icon 4 The Add Printer Wizard screen appears Select the My Computer button and click Next ...

Страница 49: ...Chapter 1 Before use 40 5 Select the printer port Under Available ports select the Muratec FAX check box and click Next 6 Select the manufacturer and model of your printer Click Have Disk ...

Страница 50: ...er s files from type Drive letter Driver Model name Winnt4_2k and click OK It is also possible to click Browse and choose the folder Drive letter is the letter assigned to your CD ROM drive Model name is the model name of the fax main unit 8 Select Muratec OfficeBridge Fax and click Next ...

Страница 51: ...der Printer name When any other printer driver has already been installed the message Do you want your Windows based programs to use this printer as the default printer appears Select either the Yes or No button and click Next 10 The Sharing printer screen appears Select the Not shared button and click Next ...

Страница 52: ...Chapter 1 Before use 43 1 11 The Test page print screen appears Select No and click Finish ...

Страница 53: ...d to convert image data s file format to Tiff Caution Make sure that OfficeBridge has been installed before installing the printer driver Windows 9x 1 Insert the Setup CD into your CD ROM drive 2 Click the Start button point to Settings and then click Printers 3 The printer folder opens Double click the Add Printer icon ...

Страница 54: ...Chapter 1 Before use 45 1 4 The Add Printer Wizard screen appears Click Next 5 Specify the printer connection Select the Local printer button and click Next ...

Страница 55: ... The Install From Disk screen appears Under Copy manufacturer s files from type Drive letter Driver Model name Win9x and click OK It is also possible to click Browse and choose the folder Drive letter is the letter assigned to your CD ROM drive Model name is the model name of the fax main unit ...

Страница 56: ...Chapter 1 Before use 47 1 8 Select Muratec OfficeBridge TiffFormer and click Next 9 Select the printer port Select Muratec FAX and click Next ...

Страница 57: ...er is shown under Printer name When any other printer driver has already been installed the message Do you want your Windows based programs to use this printer as the default printer appears Select either the Yes or No button and click Next 11 Select No and click Finish ...

Страница 58: ... Click the Start button point to Settings and then click Printers The printer folder opens Right click Muratec OfficeBridge TiffFormer and click Properties 13 The properties screen appears Select the Details tab and click Add Port ...

Страница 59: ...e 50 14 Select the type of port to be added Select the Other button and Local port and then click OK 15 Enter the port name Under Enter a port name type Muratec FAX and click OK 16 Click OK to close the properties screen ...

Страница 60: ... 2 Click the Start button point to Settings and then click Printers 3 The printer folder opens Double click the Add Printer icon 4 The Add Printer Wizard screen appears Click Next 5 The Local or Network Printer selection screen appears Select the Local printer check box and click Next ...

Страница 61: ...r 1 Before use 52 6 The Select the Printer Port screen appears Select the Use the following port button and Muratec FAX and then click Next 7 Select the manufacturer and model of your printer Click Have Disk ...

Страница 62: ... files from type Drive letter Driver Model name Winnt4_2k and click OK It is also possible to click Browse and choose the folder Drive letter is the letter assigned to your CD ROM drive Model name is the model name of the fax main unit 9 Select Muratec OfficeBridge TiffFormer and click Next ...

Страница 63: ...er Printer name When any other printer driver has already been installed the message Do you want your Windows based programs to use this printer as the default printer appears Select either the Yes or No button and click Next 11 The Printer Sharing screen appears Select the Do not share this printer button and click Next ...

Страница 64: ...Chapter 1 Before use 55 1 12 The Print Test Page screen appears Select No and click Next 13 The Completing the Add Printer Wizard screen appears Check the contents and click Finish ...

Страница 65: ...lick Yes Windows NT 1 Insert the Setup CD into your CD ROM drive 2 Click the Start button point to Settings and then click Printers 3 The printer folder opens Double click the Add Printer icon 4 The Add Printer Wizard screen appears Select the My computer button and click Next ...

Страница 66: ...Chapter 1 Before use 57 1 5 Select the printer port Under Available ports select the Muratec FAX check box and click Next 6 Select the manufacturer and model of your printer Click Have Disk ...

Страница 67: ...files from type Drive letter Driver Model name Winnt4_2k and click OK It is also possible to click Browse and choose the folder Drive letter is the letter assigned to your CD ROM drive Model name is the model name of the fax main unit 8 Select Muratec OfficeBridge TiffFormer and click Next ...

Страница 68: ...wn under Printer name When any other printer driver has already been installed the message Do you want your Windows based programs to use this printer as the default printer appears Select either the Yes or No button and click Next 10 The Sharing printer screen appears Select the Not shared button and click Next ...

Страница 69: ...Chapter 1 Before use 60 11 The Test page print screen appears Select No and click Finish ...

Страница 70: ...install OfficeBridge close all applications in use The printer drivers IS Printer OfficeBridge Fax TiffFormer must be removed before uninstalling OfficeBridge 1 Click the Start button point to Settings and then click Control Panel 2 Double click the Add Remove Programs icon ...

Страница 71: ...Chapter 1 Before use 62 3 Select OfficeBridge and click Add Remove 4 The OfficeBridge Maintenance Program screen appears Select Remove button and click Next ...

Страница 72: ... use 63 1 5 The Confirm File Deletion screen appears Click OK to start uninstalling 6 The Shared File Detected screen appears Click Yes to remove the shared file 7 The Maintenance completed screen appears Click Finish ...

Страница 73: ... appears click Yes and then click Finish to restart the computer When you are running other programs save your sessions and end the programs Then click Yes When you click No OfficeBridge is not uninstalled correctly Be sure to restart your computer ...

Страница 74: ...Chapter 2 Basic operations OfficeBridge 66 How to log on 67 Sending fax 69 Scanning 70 Printing 72 ...

Страница 75: ...utput Recipients management OfficeBridge cannot be used unless it is connected to a network by an Information Server After you have logged on once however you can start it offline and perform a job such as checking image data OfficeBridge Scanning See p 97 See p 88 Fax See p 155 CoverPage Editor Fax cover page making See p 133 Address Book Telephone directory See p 173 Image Viewer Image display ...

Страница 76: ... your user ID and password on the log on screen Once the Add into User List check box is selected a user ID can be chosen from a drop down list by clicking the button next time you start up Information In order to log on to OfficeBridge user registration to the fax main unit is needed For the user registration procedure see the IS 100 operation manual p 33 ...

Страница 77: ...the one used in the above example OfficeBridge has a limit on the number of usable PCs but there is no limit for the number of users on a single PC Benefit In multi user operation the Personal Folder of each user can be utilized for orderly data management Screen of user ID murata Screen of user ID akiyama ...

Страница 78: ...the recipient Direct entry 1 On the fax standby screen press the NEXT key twice and then press Mail Adr key 2 Enter the recipient s e mail address using a one touch key and the dial key numeric keypad One touch key operation 1 Press the one touch key on which the destination is registered See One touch dial registration p 84 Speed dial operation 1 Press the SPEED DIAL TEL INDEX key 2 Enter the reg...

Страница 79: ... the ADF Automatic Document Feeder or on the book scanner 2 Press the NEXT key twice and then press Net Func key 3 Press Scanner key 4 Designate the user Direct entry 1 Press ID key 2 Enter the user ID using a one touch key and the dial key numeric keypad ID Scanner Net Func ...

Страница 80: ... registered See One touch dial registration p 84 Speed dial operation 1 Press the SPEED DIAL TEL INDEX key 2 Enter the registered abbreviated numbers using the dial key numeric keypad See Speed dial registration p 86 5 Press the START key to begin scanning For the procedure to view a scanned image see p 97 ...

Страница 81: ...ons 72 Printing How to print 1 Open the data file to be printed using the related application program 2 On the Print screen of the program select Muratec Model name IS Printer as the printer name 3 Click OK to start printing ...

Страница 82: ...Chapter 3 Useful functions Useful functions at a glance 74 Settings 75 Fax operations 88 Scanner operations 97 Internet fax operations 100 Other operations 102 ...

Страница 83: ...g received fax 88 Sending data by fax from PC 88 Sending fax to recipient in the log 93 ReSend 94 Set a time to send fax 95 Batch transmission 96 Scanner Viewing scanned image 97 Setting scanner 97 Specifying folder to save scanned data 99 Internet fax SendConfirmation 100 ReadConfirmation 101 Others Reading image using TWAIN driver 102 Converting image to TIFF format 104 Backing up information 10...

Страница 84: ...ons 75 3 Settings Receiving fax with PC 1 Start up Web Manager 1 Log on to OfficeBridge Cross reference Page 67 2 Click Web Manager Information Clicking Tool in the menu bar and then Web Manager can also start up Web Manager ...

Страница 85: ...Chapter 3 Useful functions 76 2 Settings for Received fax forwarding 1 Click Received fax forwarding under Operation setting 2 Click the number in the list you want to register ...

Страница 86: ...to be included in the condition It is not possible to set the password without designating the sub address The sender s number can be entered in up to 20 digits of numbers and symbols 0 9 and The sub address can be entered in up to 20 digits of numbers 0 9 The password can be entered in up to 20 digits of numbers and symbols 0 9 and Check either of the following two search conditions Include any o...

Страница 87: ...d symbols 0 9 and For multiple entries up to 1000 characters are allowed including semicolons Forward by e mail When an e mail address is designated as the destination the received fax is delivered by e mail as an attachment file When making multiple e mail address entries separate them with a semicolon A single e mail address can be entered with up to 80 characters For multiple entries up to 1000...

Страница 88: ... setting is used to decide in advance how to handle a received fax that does not conform to any of the registered delivery settings 1 Click Change under Exceptions Handling in the Received fax forwarding screen 2 Fill in each field and click the SET button B A ...

Страница 89: ...d fax is forwarded to that remote fax When making multiple fax number entries separate them with a semicolon A single fax number can be entered in up to 40 digits of numbers and symbols 0 9 and For multiple entries up to 1000 characters are allowed including semicolons Forward by e mail When an e mail address is designated as the destination the received fax is delivered by e mail as an attachment...

Страница 90: ...y means of Received Fax Forwarding can be forwarded to further destinations 1 Start up Web Manager Cross reference Page 75 2 Make the settings for Individual fax forwarding 1 Click Individual fax forwarding under Operation setting 2 Enter the user ID and password and click the ENTER button ...

Страница 91: ...ignate the period that will activate the forwarding operation Select Month day Day of week or Time E Interval Set the starting and ending times of the period that will activate the forwarding operation In Month day designation set the month day and time for both starting and ending There is no need to set the day of the week In Day of week designation set the day of the week and time for both star...

Страница 92: ...3 Useful functions 83 3 SET button Click this button to register the entry REDO button Click this button to restore the current settings Deletion of setting Select the setting number and click the ERASE button ...

Страница 93: ...84 One touch dial registration 1 Start up Web Manager Cross reference Page 75 2 Make a one touch dial registration New registration 1 Click One touch dialing under Operation setting 2 Click the number in the list to be registered ...

Страница 94: ...cters A fax number can be entered with up to 40 digits of numbers and symbols 0 9 and C Contact name Enter the recipient s name D Group No 0 32 Specify the group number from 0 32 For multiple entries separate them with a comma Group 0 means it belongs to all groups from 1 to 32 E Attached file format Select the image data format for the attachment out of TIFF S TIFF Expansion and PDF SET button Cl...

Страница 95: ... enter the editing data Click the SET button Deletion Click the ERASE button in the list for the number to be deleted Speed dial registration 1 Start up Web Manager Cross reference Page 75 2 Make a speed dial registration New registration 1 Click Speed dialing under Operation setting ...

Страница 96: ...d and click the SET button Entry items are the same as described in One touch dial registration Cross reference Page 85 Editing Click the number in the list to be edited and enter the editing data Click the SET button Deletion Click the ERASE button in the list for the number to be deleted A B C D E ...

Страница 97: ... the next time you log on 2 Click Yes Image Viewer starts up and shows the image When there are multiple faxes received the fax that was received most recently appears If you do not want to view the fax click No The received fax is saved in the InBox folder See Using Image Viewer p 173 Sending data by fax from PC Sending data in OfficeBridge 1 Select the data to send and click SendFax ...

Страница 98: ...l address under Receiver Recipients can be registered in Private Address See Recipient registration on the SendFax screen p 92 Sending to registered recipient 1 Click Browse 2 Select the Catalog Information When Arrange and Company are clicked the recipients are sorted in company name order 3 Click the recipient and the Add button 4 Click OK ...

Страница 99: ... Cover Click View to see the selected cover page See Using CoverPage Editor p 155 5 Enter the subject and comment in each text box and click Send 6 With the Send Confirmation message confirm that the transmission has been directed Click OK ...

Страница 100: ...e related application program 2 On the Print screen of the program select Muratec OfficeBridge Fax as the printer name 3 Click OK to start printing After this follow steps 2 6 in Sending data in OfficeBridge mentioned above When OfficeBridge has not yet been started the log on screen appears Log on to OfficeBridge ...

Страница 101: ...reen 1 Select the recipient you want to register and click Name 2 Fill in each field and click Insert For a description of each item above see Registering address p 138 Caution No correction is allowed for the items entered before registration fax number or e mail address ...

Страница 102: ...nding procedure Cross reference Page 88 2 Click the button under Receiver Then up to 100 recipients appear to which faxes were previously sent Select the desired recipient by clicking and click Add The recipient s name appears in the Receiver List 3 After this follow the procedure for sending Cross reference Page 90 ...

Страница 103: ...pient of a failed transmission is shown 4 After this follow the procedure for sending Cross reference Page 88 2 Resending to all recipients 1 Click the data you want to resend in the OutBox folder 2 Click the button beside ReSend and select Resend all Fax 3 All recipients are shown 4 After this follow the procedure for sending Cross reference Page 88 ...

Страница 104: ...nd fax 1 According to the sending procedure designate the recipient and click Detail Cross reference Page 88 2 Select the ScheduledTime check box set the desired time and click OK 3 After this follow the procedure for sending Cross reference Page 90 ...

Страница 105: ...bar and click New Folder 3 Put the sending data into a newly created folder 2 Sending the data 1 Select the newly created folder and right click it 2 Select FolderSend Information You may also click Tool in the menu bar and then FolderSend to perform sending 3 After this follow the procedure for sending Cross reference Page 88 ...

Страница 106: ...Image Viewer starts up and shows the scanned image When there is multiple scanned data the data the most recently scanned data appears If you do not want to view the image click No The scanned data is saved in the Scan folder See Using Image Viewer p 173 Setting scanner 1 On the fax standby screen press the NEXT key twice 2 Press the Net Func key and then the MENU key 3 Press the cursor key to sel...

Страница 107: ... Confirm that 01 Network Scan Settings is selected and press the Enter key 5 Use the cursor key to select each item and press the Enter key to enter the setting 6 Check the setting of each item and press the Exit key Exit Enter Enter ...

Страница 108: ... scanned data 1 Select Tool in the menu bar and then click Specify scan file 2 Specify the folder to save the scanned image in name the folder and then click OK 3 When a user is specified on the main unit the scanned data will be saved in the specified folder ...

Страница 109: ...ached the recipient This notification is not possible however if the recipient s mail server is not compatible with this function 1 According to the sending procedure designate the recipient and click Detail Cross reference Page 88 2 Select the SendConfirmation check box and click OK 3 After this follow the procedure for sending Cross reference Page 90 ...

Страница 110: ...the user had sent This notification is not possible however if the recipient s mail server is not compatible with this function 1 According to the sending procedure designate the recipient and click Detail Cross reference Page 88 2 Select the ReadConfirmation check box and click OK 3 After this follow the procedure for sending Cross reference Page 90 ...

Страница 111: ... data can be read into TWAIN compatible application programs The procedure is described here using Imaging 1 Log on to OfficeBridge Cross reference Page 67 2 Start up the application program 3 Open the Select Scanner screen 4 Select Muratec TWAIN Connector under TWAIN scanners and click OK ...

Страница 112: ...ist of files in the open folder Click to select the file to be read C Preview Shows a scanned image of the selected file Check the button to get a preview shown Click to turn the page or enter the page number D Resolution Image resolution can be changed Select the desired resolution Select Original if no change is required E Pages Select the page to be read in F Pixel type Select either Bi level o...

Страница 113: ...nformation Displays information about the Muratec TWAIN Connector Converting image to TIFF format 1 Using the related application program open the data file you want to convert into TIFF format and select Print 2 Select Muratec OfficeBridge TiffFormer as the printer name and click OK 3 Enter the file name select where you want to save it and then click OK ...

Страница 114: ...ration Sending a Word document and an Excel document simultaneously 1 Log on to OfficeBridge and create a new folder in the print folder 2 Open the Word document and select Print 3 On the Print screen select Muratec OfficeBridge TiffFormer Click OK ...

Страница 115: ...eps as described above for the Excel document also On the Print screen select Muratec OfficeBridge TiffFormer and put the file in the same folder 6 Log on to OfficeBridge Select the folder created in 1 above right click it and select FolderSend 7 Designate recipient select the cover page enter a subject and comments and then click Send By following the above steps a Word document and an Excel docu...

Страница 116: ...fficeBridge is not running 1 Log on to OfficeBridge Cross reference Page 67 2 Open the OfficeBridge folder and double click the UpData exe icon Information The OfficeBridge folder is created in the location specified during the installation 3 Click the GO button for backup Information When you do not log on to OfficeBridge the screen to the right appears Click OK log on to OfficeBridge and retry t...

Страница 117: ...er the name of the folder you want to back up and click Next You may also click Browse and select the folder 5 Enter the name of folder where you want to save the backup data and click Next You may also click Browse and select the folder ...

Страница 118: ...9 3 6 Select whether to convert the data into TIFF format or to save it without changes and click Next 7 Check the settings and click GO if they are correct To modify the settings click Prev and enter the settings again 8 Click OK ...

Страница 119: ...Chapter 3 Useful functions 110 ...

Страница 120: ...Chapter 4 Management with OfficeBridge Environment settings 112 Managing data 115 Sharing data 116 Making print output 119 Searching for file 120 Registering sender 122 Changing password 124 Others 125 ...

Страница 121: ... settings Deleting file after fax transmission 1 Log on to OfficeBridge Cross reference Page 67 2 Select Tool Setting Environment 3 Under Send File select Delete after send and click OK Information Select Retain after send if the file should not be deleted ...

Страница 122: ...sary to enter a password when logging on This will allow anyone to log on regardless of password knowledge 1 Log on to OfficeBridge Cross reference Page 67 2 Select Tool Setting Environment 3 Under Auto Logon select Logon and click OK Information Select Do not logon to clear the auto log on setting ...

Страница 123: ...t either Task Tray or Task Bar in Window Minimum and click OK Descriptions Task Tray When the screen minimization button is clicked the OfficeBridge icon is placed on the task tray The icon flashes in red when receiving incoming data Double click the icon to restore the screen size Task Bar When the screen minimization button is clicked the screen name is shown on the task bar Click it to restore ...

Страница 124: ...ormation You may also right click the folder and select Delete to delete the folder Moving a folder 1 Click the folder you want to move and click Cut Information You may also right click the folder and select Cut to cut the folder 2 Click the destination folder and click Paste Information You may also right click the destination folder and select Paste to paste the folder Copying a folder 1 Click ...

Страница 125: ...e print folder The print folder is a folder for sharing When multiple users work on a single PC the data in this folder can be shared among the users Sharing data with multiple PCs on the network Shared folder B Print folder Print folder Print folder A C E D F H G I Users Server Client PC Users Client PC B A C Print folder ...

Страница 126: ...h OfficeBridge 117 4 1 Select Tool Setting Environment 2 Select I want to use shared folder and click Browse You may also directly type in the Directory Name box 3 Select the folder you want to save shared data in and click OK ...

Страница 127: ...4 Click OK 5 A Shared Folder is added in the tree view The data in this folder can be shared among users who have done the above 1 4 steps Copy or move scanned data or other data in a personal folder into this folder and use them as shared data ...

Страница 128: ...Chapter 4 Management with OfficeBridge 119 4 Making print output 1 Click the data you want to print 2 Click Print Information You may also select File Print to produce print output ...

Страница 129: ...Chapter 4 Management with OfficeBridge 120 Searching for file 1 Select Edit Find ...

Страница 130: ... If you do not want to specify the date and time select All files D Look in Specify the folders you want to search Personal Folder The fax folder scan folder and personal folder are searched Specify Folder The folder selected after clicking Browse is searched All All folders are searched E Cancel button The previous screen appears F Search button The search starts 3 Click Cancel and return to the ...

Страница 131: ...ceBridge 122 Registering sender The sender you register here will appear as the sender s information on the fax cover page Registration of sender 1 Select Tool Setting Sender 2 Fill in each field and click OK A B C D E F G H I J K L ...

Страница 132: ...ter address F TelNumber Enter telephone number G FaxNumber Enter fax number H SubAddress Enter sub address I Password Enter password to use sub address J SalutationID Enter Salutation ID or user ID K E mail Enter e mail address L Make Internet Fax Return Address When this check box is selected the e mail address entered above can be specified as the return e mail address for an Internet Fax ...

Страница 133: ...ter 4 Management with OfficeBridge 124 Changing password You can change the password for logon 1 Select Tool Setting Change Password 2 Fill in each field and click OK Caution Each typed letter appears as a ...

Страница 134: ...to any other folder until it is completely deleted by Deleting data or Emptying Trash Retrieving data from the Trash is useful when the data was deleted by mistake Retrieving data from Trash 1 Drag the data from Trash back into its original folder Deleting data 1 Click the Trash folder 2 Select desired data and click Delete Information You may also select File Delete to delete the data ...

Страница 135: ...ect View Tool Bar Text Labels to show toolbars with button descriptions Clear the selection to hide the button descriptions Similarly select View Tool Bar Standard to show toolbars and clear the selection to hide toolbars Toolbars with button descriptions Toolbars without button descriptions Hidden toolbars It is not possible to show button descriptions only ...

Страница 136: ...fax data right click it and then click Property Information You can also open this menu by pressing the Shift and F10 keys simultaneously 2 Click Prev or Next to view the information on other recipients to whom the fax was sent simultaneously Information You can also open the property screen by pressing the Alt and Enter keys simultaneously Click OK to go back to the previous screen ...

Страница 137: ...as sender name and status of reception 1 Select the fax data right click it and then click Property Information You can also open this menu by pressing the Shift and F10 keys simultaneously Information You can also open the property screen by pressing the Alt and Enter keys simultaneously Click OK to go back to the previous screen ...

Страница 138: ...ress the Tab key to switch the selection in tree view left side view or in list view right side view How to set printer The printer setting done in OfficeBridge also works in Image Viewer and vice versa OfficeBridge 1 Select File Print Setup 2 Select options under Print Mode and click OK Tab key ...

Страница 139: ...Chapter 4 Management with OfficeBridge 130 Image Viewer 1 Select File Print Setup 2 Click Option 3 Select options under Print Mode and click OK ...

Страница 140: ...Chapter 4 Management with OfficeBridge 131 4 Sorting data Click an item such as To to sort the data in ascending or descending order Information You may also click View Sort to rearrange data similarly ...

Страница 141: ...Chapter 4 Management with OfficeBridge 132 ...

Страница 142: ...Chapter 5 Using Address Book Address Book overview 134 Registering address 138 Modification copy paste and deletion 148 Sharing address 150 Importing and exporting address 152 ...

Страница 143: ...uding such data as company name department name and address the registration is useful as an address book Startup When started up the Address Book screen you previously used appears 1 Log on to OfficeBridge Cross reference Page 67 Information Address Book cannot be opened without logging on to OfficeBridge If you have not logged on the screen to the right appears Click OK log on to OfficeBridge an...

Страница 144: ...ddress book Other users cannot use it Share Address Share address can be used in the same way as Private Address but it can also be used by other users Other user s address books can be made usable with due setting See p 150 Private Group Multiple recipients can be registered as a group Other users cannot use it The recipients you register are selectable from Private Address the recipients registe...

Страница 145: ...ent name appears L Company name Registered company name appears M Department name Registered department name appears N Index Registered recipient names or company names when recipient names are not registered are sorted in alphabetic order When a letter tab is clicked the recipients sorted by letter appear Click All to show all recipients registered O User ID ID of the user who logged on appears P...

Страница 146: ...rs with button descriptions Clear the selection to hide button descriptions Similarly select View Tool Bar Standard to show toolbars and clear the selection to hide toolbars Toolbars with button descriptions Toolbars without button descriptions Hidden toolbars It is not possible to show button descriptions only ...

Страница 147: ...ng Address Book 138 Registering address Registration on Private Address 1 Click the button of the Address Catalog and select Private Address 2 Click Add Information You may also click Edit Add to add a registration ...

Страница 148: ...ters can be entered D Zip code Enter zip code of recipient E Address 1 Address 2 Enter recipient s address F Telephone Enter recipient s telephone number G Fax number Enter recipient s fax number H Subaddress Enter recipient s F code sub address Only numbers and can be entered Up to 20 characters can be entered I Password Enter recipient s F code password Only numbers and can be entered Up to 20 c...

Страница 149: ...You can select a company already registered and copy its registration data company name department zip code address telephone number and fax number Caution You cannot finish registration until entries in the following items are completed User name or Company Fax number or E mail ...

Страница 150: ...hapter 5 Using Address Book 141 5 Registration on Share Address 1 Click the button of the Address Catalog and select Share Address 2 Click Add Information You may also click Edit Add to add registration ...

Страница 151: ...Chapter 5 Using Address Book 142 3 Fill in each field and click OK Description of each item is the same as Private Address Cross reference Page 139 L A B C D E F G H I J K ...

Страница 152: ...lick the button of the Address Catalog and select Private Group 2 Click Add Information You may also click Edit Add to add a registration 3 Fill in the Group field and click OK Descriptions A Group Enter a name you want to register Up to 255 characters can be entered A ...

Страница 153: ...Chapter 5 Using Address Book 144 4 Click the button of the Address Catalog and select Private Address 5 Click the recipient you want to register and click Add ...

Страница 154: ...the registered fax number Internet FAX Send Sends to the registered e mail address Salutation FAX Send Sends to the registered user ID Only one send method is selectable for a single transmission If more than two send methods are to be used for the same recipient designate the recipient again and select another method 7 To add recipients in the Address Catalog Private Address One Touch Speed Dial ...

Страница 155: ...Chapter 5 Using Address Book 146 Registration on Share Group 1 Click the button of the Address Catalog and select Share Group 2 Click Add Information You may also click Edit Add to add registration ...

Страница 156: ... field and click OK Descriptions A Group Enter the name you want to register Up to 255 characters can be entered 4 Register recipients in the Share Group The registration procedure is the same as described in Private Group above Cross reference Page 144 A ...

Страница 157: ... 3 In the cases of Private Address and Share Address the Modify private address or Modify share address screen appears Modify the entry and click OK In the cases of Private Group and Share Group the Modify private group or Modify share group screen appears Modify the registration and click OK Copy 1 Select the recipient or group name you want to copy 2 Click the Copy button Information You may als...

Страница 158: ...r in Share Address to Private Group or to Share Group You cannot paste recipients in Private Group or in Share Group to Private Address or to Share Address 2 Click the Paste button Information You may also click Edit Paste to paste the copy Deletion 1 Select the recipient or group name you want to delete 2 Click the Delete button Information You may also click Edit Delete to make deletion ...

Страница 159: ...ter 5 Using Address Book 150 Sharing address This setting enables you to use the Share Address and Share Group data of other users 1 Select Tool Setting 2 Select Other share addressbook set and click Browse ...

Страница 160: ... share and click Open For example when Murata s User ID Private Address is designated as the Share Address the path to the address data is OfficeBridge murata Address AdrUsr dat Information The OfficeBridge folder is created in the location specified during the installation ...

Страница 161: ...ss Book 152 Importing and exporting address Importing address CSV format data in other programs can be imported to the address book 1 Select File Import 2 Select the file you want to import and click Open to import the data ...

Страница 162: ... Address Display tab Enter A Company Up to 255 characters can be entered Department Up to 255 characters can be entered Name Up to 255 characters can be entered Zip code Up to 255 characters can be entered Address 1 Up to 255 characters can be entered Address 2 Up to 255 characters can be entered Telephone Up to 255 characters can be entered Fax number Up to 255 characters can be entered Subaddres...

Страница 163: ...ddress book data can be converted to CSV format data For details of exporting to other programs consult the instruction manual of each program 1 Select File Export 2 Select where to save type a file name and click Save to convert the data into CSV format ...

Страница 164: ...Chapter 6 Using CoverPage Editor CoverPage Editor overview 156 CoverPage Editor operations 159 ...

Страница 165: ...t is CoverPage Editor CoverPage Editor helps you create a fax cover page As it is capable of inserting the information registered in the Address Book there is no need to make a cover page for each recipient Startup 1 Select Start Programs OfficeBridge CoverPage Editor ...

Страница 166: ...t Zoom in Displays a magnified image Zoom out Displays a reduced image H Font Font Size Bold Italic Underline Font Shows the font name of the selected text Font Size Shows the font size of the selected text Bold Shows the selected text in bold Italic Shows the selected text in italics Underline Adds an underline to the selected text I Align Left Center Align Right Align Left Left justify the selec...

Страница 167: ...e Creates an ellipse M Bring Forward Send Backward Bring Forward Brings selected object to the front Send Backward Sends selected object to the back N Align Left Align Right Align Top Align Bottom Align Left Aligns the left end of selected object Align Right Aligns the right end of selected object Align Top Aligns the top of selected object Align Bottom Aligns the bottom of selected object ...

Страница 168: ...Page Editor operations Entering text 1 Click the Text button Information You may also select Insert Text Object to enter text 2 Drag the pointer and define the space to enter text 3 Enter text To change font and font size drag to select the text ...

Страница 169: ...rmation You may also select Insert Draw Object Line to draw lines 2 Drag the pointer wherever you want to draw a line Rectangle 1 Click the Rectangle button Information You may also select Insert Draw Object Rectangle to create a rectangle 2 Drag the pointer wherever you want to create a rectangle ...

Страница 170: ...er 6 Using CoverPage Editor 161 6 Ellipse 1 Click the Ellipse button Information You may also select Insert Draw Object Ellipse to create an ellipse 2 Drag the pointer wherever you want to create an ellipse ...

Страница 171: ...setup 1 Select the object right click it and select Config Object Information You can also display the menu screen by pressing the Shift and F10 keys simultaneously 2 Click the Font Colors and Lines and Config tabs to make the proper adjustments ...

Страница 172: ...cts layout Bringing object forward 1 Click the Select button and then click the object you want to bring forward 2 Click the Bring Forward button Information You may also select Layer Bring Forward to perform this job 3 The object is brought to the front ...

Страница 173: ...object you want to send backward 2 Click the Send Backward button Information You may also select Layer Send Backward to perform this job 3 The object is sent to the back Information When you select Layer and Bring to front or Send to Back the object is brought to the front or sent to the back respectively ...

Страница 174: ...e Align Left button Information You may also select Layer Align Objects Align Left to align the left end of an object 3 The left end of the selected object is aligned Aligning right end of object 1 Click the Select button and drag the pointer to select the objects you want to align 2 Click the Align Right button Information You may also select Layer Align Objects Align Right to align the right end...

Страница 175: ...cted object is aligned Aligning bottom of object 1 Click the Select button and drag the pointer to select the objects you want to align 2 Click the Align Bottom button Information You may also select Layer Align Objects Align Bottom to align the bottom of an object 3 The bottom of the selected object is aligned Cut copy and paste of object Cut 1 Click the Select button and select the object you wa...

Страница 176: ...select Edit Copy to copy an object Paste 1 After selecting the object you want to paste by clicking the Cut or Copy button click the Paste button Information You may also select Edit Paste to paste an object Deleting object 1 Select the object you want to delete 2 Click Delete Information You may also select Edit Delete or use the Del key to delete an object ...

Страница 177: ...e Zoom out button Information You may also select View Zoom Out to get a reduced view Showing grid lines 1 Select View Grid to show grid lines Clear the selection to hide them Inserting information 1 Select the desired information from Insert in the menu Recipient The recipient s selected information registered in the Address Book is automatically inserted Cross reference Page 138 ...

Страница 178: ...Bridge is automatically inserted Cross reference Page 122 Message Comment Inserts the comment to be entered when sending Subject Inserts the subject to be entered when sending Pages Inserts automatically the number of pages to be sent 2 Click the Select button and adjust the text box size and position ...

Страница 179: ...Chapter 6 Using CoverPage Editor 170 3 Click the Select button and select the font and font size ...

Страница 180: ...le you want to insert and open it Scrolling screen The magnified view screen can be scrolled by keyboard operation This can be done when none of the objects are selected Scrolls up Scrolls down Scrolls leftward Scrolls rightward Home Moves to the top of current page End Moves to the bottom of current page ...

Страница 181: ...ew button Information You may also select File Print Preview to view a print image Print Select File Print to print output Save 1 Click the Save button If you want to rename and save click the button and select Save as Information You may also select File Save to save a file ...

Страница 182: ...Chapter 7 Using Image Viewer Image Viewer overview 174 Image Viewer operations 177 ...

Страница 183: ... display a fax or scanned image received by OfficeBridge Image Viewer can also retouch an image or convert its file format into another format Startup 1 Double click a fax data file fax or scanned data file scn Image Viewer starts up and the image appears D F J B A C E G H I K L M N O P S R Q ...

Страница 184: ...s a selected object Paste Pastes a copied object G Delete Deletes a selected object H Select Selects an object I Text Shows a text box to enter text J Freehand Line Rectangle Ellipse Freehand Draws a freehand line Line Draws a straight line Rectangle Creates a rectangle Ellipse Creates an ellipse K Eraser Erases a part of the image Unable to delete an object L Bring Forward Send Backward Bring For...

Страница 185: ... Italic Shows the selected text in italics Underline Adds an underline to the selected text O Align Left Center Align Right Align Left Left justify the selected text Center Center justify the selected text Align Right Right justify the selected text P First Page Previous Page Next Page Last Page First Page Displays the first page Previous Page Displays the previous page Next Page Displays the next...

Страница 186: ...r operations Entering text 1 Click the Text button Information You may also select Insert Text Object to enter text 2 Drag the pointer and define the space to enter the text 3 Enter the text To change the font and font size drag to select the text ...

Страница 187: ...Information You may also select Insert Draw Object Freehand to draw freehand lines 2 Drag the pointer wherever you want to draw a line Straight line 1 Click the Line button Information You may also select Insert Draw Object Line to draw lines 2 Drag the pointer wherever you want to draw a line ...

Страница 188: ... also select Insert Draw Object Rectangle to create a rectangle 2 Drag the pointer wherever you want to create a rectangle Ellipse 1 Click the Ellipse button Information You may also select Insert Draw Object Ellipse to create an ellipse 2 Drag the pointer wherever you want to create an ellipse ...

Страница 189: ...Chapter 7 Using Image Viewer 180 Object setup 1 Select the object right click it and select Config Object 2 Click the Font Colors and Lines and Config tabs to make the proper adjustments ...

Страница 190: ...t be deleted with this operation See Deleting object p 186 1 Click the Eraser button Click the button to change the size Information You may also select Insert Draw Object Eraser Large Middle or Small to erase an image 2 Drag the pointer wherever you want to erase an image ...

Страница 191: ...yout Bringing object forward 1 Click the Select button and then click the object you want to bring to the front 2 Click the Bring Forward button Information You may also select Layer Bring Forward to perform this job 3 The object is brought to the front ...

Страница 192: ...bject you want to send backward 2 Click the Send Backward button Information You may also select Layer Send Backward to perform this job 3 The object is sent to the back Information When you select Layer and Bring to front or Send to Back the object is brought to the front or sent to the back respectively ...

Страница 193: ...lign Left button Information You may also select Layer Align Objects Align Left to align the left end of an object 3 The left end of the selected object is aligned Aligning right end of object 1 Click the Select button and drag the pointer to select the objects you want to align 2 Click the Align Right button Information You may also select Layer Align Objects Align Right to align the right end of...

Страница 194: ...ted object is aligned Aligning bottom of object 1 Click the Select button and drag the pointer to select the objects you want to align 2 Click the Align Bottom button Information You may also select Layer Align Objects Align Bottom to align the bottom of an object 3 The bottom of the selected object is aligned Cut copy and paste of object Cut 1 Click the Select button and select the object you wan...

Страница 195: ...lso select Edit Copy to copy an object Paste 1 Click the Select button and select the object you want to paste 2 Click the Paste button Information You may also select Edit Paste to paste an object Deleting object 1 Select the object you want to delete 2 Click Delete Information You may also select Edit Delete or use the Del key to delete an object ...

Страница 196: ...f the viewer 1 Select View Fit Width Fit Window You can fit the size of the document to the window size of the viewer 1 Select View Fit Window Rotation 1 Click the Rotate button Information You may also select View Rotate to rotate the page Information of rotation is stored without performing an operation to save it Showing grid lines 1 Select View Grid to show grid lines Clear the selection to hi...

Страница 197: ...lay the previous page Displaying next page 1 Click the Next Page button Information You may also select Move Next Page to display the next page Displaying last page 1 Click the Last Page button Information You may also select Move Last Page to display the last page Adjusting angle You can incline the image to any angle you want 1 Select View Adjust ...

Страница 198: ...to the reference position vertically and horizontally 3 Enter the angle or change it with the key Adjust the guide angle to the reference in 2 above and click the Horizontal or Vertical button 4 If the adjustment is acceptable click OK If you want to adjust the image further repeat steps 2 3 above Angle guide ...

Страница 199: ...t 1 Click the Print button Information You may also select File Print to print output Save 1 Click the Save button If you want to rename and save click the button and select Save as Information You may also select File Save to save a file ...

Страница 200: ...Chapter 8 Device Management on PC Viewing fax communication history 192 Viewing e mail communication history 194 Confirming or canceling Scheduled communication 198 Confirming or canceling print job 200 ...

Страница 201: ...Chapter 8 Device Management on PC 192 Viewing fax communication history 1 Start up Web Manager Cross reference Page 75 2 Click Fax transmission reception history under Management information ...

Страница 202: ...Chapter 8 Device Management on PC 193 8 3 A list of sent received faxes is displayed Up to 125 fax events including sent and received faxes can be recorded ...

Страница 203: ... 8 Device Management on PC 194 Viewing e mail communication history Mail transmission history check 1 Start up Web Manager Cross reference Page 75 2 Click Mail transmission history under Management information ...

Страница 204: ...is displayed Descriptions A No Displays numbers 01 50 serially B Address Displays only one address at the top C Date Displays the date of transmission D Subject Displays the subject of the sent e mail E Dept Displays the department code F Result Displays Completed or Failed A B C D E F ...

Страница 205: ...Chapter 8 Device Management on PC 196 Mail reception history check 1 Start up Web Manager Cross reference Page 75 2 Click Mail reception history under Management information ...

Страница 206: ...enied Rejected forwarding to fax Connection failed Failed in connecting to the mail server Reception failed Received e mail unrecognizable F Remarks Print Printed out received e mail Fax forwarding Forwarded received e mail to fax Mail forwarding Forwarded to preset e mail address because received e mail is unrecognizable Reply Sent back e mail to sender because it is unrecognizable Error notice r...

Страница 207: ...Chapter 8 Device Management on PC 198 Confirming or canceling Scheduled communication 1 Start up Web Manager Cross reference Page 75 2 Click Scheduled communication under Management information ...

Страница 208: ...s the recipient s telephone number B Status Displays the transmission status C Owner Displays the name of the client requesting the job D Specified date Displays the date and time requested for transmission Displays the current time in case of immediate transmission E Delete To cancel the job put a checkmark in this field and press the DELETE button A B C D E ...

Страница 209: ...Chapter 8 Device Management on PC 200 Confirming or canceling print job 1 Start up Web Manager Cross reference Page 75 2 Click Print job under Management information ...

Страница 210: ... document name of the job B Status Displays the current status of the job C Owner Displays the name of the client requesting the job D Progress status Displays the progress of the job E Time received Display the date and time when the job was accepted F Delete To cancel the job put a checkmark in this field and press the DELETE button A B C D E F ...

Страница 211: ...Chapter 8 Device Management on PC 202 ...

Страница 212: ...Chapter 9 Troubleshooting guide Troubleshooting guide 204 ...

Страница 213: ...am was running normally before the error some failure is likely due to a factor such as installation of another program Reinstall the program Time out exists in the communication with the server Check the network for the presence of overly heavy traffic or too many client PCs connected Another client is already logged on with the same ID Use a different ID to log on or end the log on client operat...

Страница 214: ...m Address Book setting again Remedy Select File Log on and log on again If unable to log on check the server connection and restart the client PC Check the setting Also check the operation of the computer sharing the setting Symptom Stopped fax delivery Remedy Check the Web Manager setting for received fax forwarding 2 Other symptom ...

Страница 215: ...atibility Transmission speed Halftones Group transmission Total number of jobs in queue in Scheduled communication Cover page transmission F code communication Reception routing Address A3 B4 A4 Max 400 400 dpi equivalent MH MR MMR JBIG Super G3 33 6Kbps 256 gradation Available Up to 100 Available Available Available User ID FAX E mail Private 10 000 items Share 10 000 items Internet fax E mail co...

Страница 216: ...g capability Received fax forwarding Individual fax forwarding Environment setting capability SNMP Agent Device information Device status Fax E mail Fax Printer One touch dial Speed dial User ID Fax number E mail address User ID Fax number E mail address Network environment E mail environment Security setting TRAP sending destination Network printer Paper size Resolution Halftones Printer language...

Страница 217: ...ss 154 F Fax main unit operation panel iv Fax operations 88 Forwarding received fax 81 H How to log on 67 How to print 72 How to scan 70 How to send fax 69 How to set printer 129 How to use Trash 125 I Image Viewer operations 177 Image Viewer overview 174 Importing address 152 Importing and exporting address 152 Index 208 Inserting graphics 171 Inserting information 168 Installation and uninstalla...

Страница 218: ...fax 69 Sending fax to recipient in the log 93 Set a time to send fax 95 Setting scanner 97 Settings 75 Sharing address 150 Sharing data 116 Sharing data on single PC 116 Sharing data with multiple PCs on the network 116 Showing and hiding toolbars 126 Software and hardware requirements 4 Software functionality 6 Sorting data 131 Specifying folder to save scanned data 99 Speed dial registration 86 ...

Страница 219: ...210 ...

Страница 220: ...nal Parkway Suite 1500 Plano Texas 75093 8218 http www muratec com Muratec UK Ltd Tempus Court Onslow Street Guildford Surrey GU1 4SS http www muratec co uk MAI ItemMasterNo OMIS100 2001 Murata Machinery Ltd Printed in Japan D90 90110 60 ...

Отзывы: