background image

The gas tightness test procedure is as follows:

1. Once the piping system is completed and the indoor, 
MS box and outdoor units have been connected, 
vacuum the piping to -0.1 MPa. 

2. Charge the indoor piping with nitrogen at 0.3 MPa 
through the needle valves on the liquid, high pressure 
and low pressure gas stop valves and leave for at least 3 
minutes (do not open the liquid or gas stop valves). 
Observe the pressure gauge to check for large leakages. 
If there is a large leakage, the pressure gauge will drop 
quickly. 

3. If there are no large leakages, charge the piping with 
nitrogen at 1.5 MPa and leave for at least 3 minutes. 
Observe the pressure gauge to check for small 
leakages. If there is a small leakage, the pressure gauge 
will drop distinctly. 

4. If there are no small leakages, charge the piping with 
nitrogen at 4.0 MPa and leave for at least 24 hours to 
check for micro leakages. Micro leakages are difficult to 
detect. To check for micro leakages, allow for any 
change in ambient temperature over the test period by 
adjusting the reference pressure by 0.01 MPa per 1°C of 
temperature difference. Adjusted reference pressure = 
pressure at pressuri (temperature at observation 
- temperature at pressurization) x 0.01 MPa. Compare 
the observed pressure with the adjusted reference 
pressure. If they are the same, the piping has passed the 
gas tightness test. If the observed pressure is lower than 
the adjusted reference pressure, the piping has a micro 
leakage. 

5. If the leakage is detected, refer to following part “Leak 
detection”. Once the leak has been found and fixed, the 
gas tightness test should be repeated. 

6. If not continuing straight to vacuum drying once the 
gas tightness test is complete, reduce the system 
pressure to 0.5 - 0.8 MPa and leave the system 
pressurized until ready to carry out the vacuum drying 
procedure. 

Vacuum drying should be performed in order to remove 
moisture and non-condensable gases from the system. 
Removing moisture prevents ice formation and 
oxidization of copper piping or other internal 
components. The presence of ice particles in the system 
would cause abnormal operation, whilst particles of 
oxidized copper can cause compressor damage. The 
presence of non-condensable gases in the system would 
lead to pressure fluctuations and poor heat exchange 
performance.

Vacuum drying also provides additional leak detection 
(in addition to the gastightness test).

During vacuum drying, a vacuum pump is used to lower 
the pressure in the piping to the extent that any moisture 
present evaporates. At 5 mm Hg (755 mm Hg below 
typical atmospheric pressure) the boiling point of water is 
0°C. Therefore a vacuum pump capable of maintaining a 
pressure of -756 mm Hg or lower should be used. Using 
#€###\$+„#
a precision level of 0.02 mm Hg is recommended. The 
vacuum drying procedure is as follows: 

1. Connect the vacuum pump through a manifold with a 
pressure gauge to the service port of all stop valves.

2. Start the vacuum pump and then open the manifold 
valves to start vacuuming the system.

3. After 30 minutes, close the manifold valves.

4. After a further 5 to 10 minutes check the pressure 
gauge. If the gauge has returned to zero, check for 
leakages in the refrigerant piping.

5. Re-open the manifold valves and continue vacuum 
drying for at least 2 hours and until a pressure difference 
of 0.1 MPa or more has been achieved. Once the 
pressure difference of at least 0.1 MPa has been 
achieved, continue vacuum drying for 2 hours. Close the 
manifold valves and then stop the vacuum pump. After 1 
hour, check the pressure gauge. If the pressure in the 
piping has not increased, the procedure is finished. If the 
pressure has increased, check for leakages.

6. After vacuum drying, keep the manifold connected to 
the master unit stop valves, in preparation for refrigerant 
charging.

Leak  detection

The general methods for identifying the source of a leak 
are as follows:

1. Audio detection: relatively large leaks are audible.

2. Touch detection: place your hand at joints to feel for 
escaping gas. 

3. Soapy water detection: small leaks can be detected by 
the formation of bubbles when soapy water is applied to 
a joint.

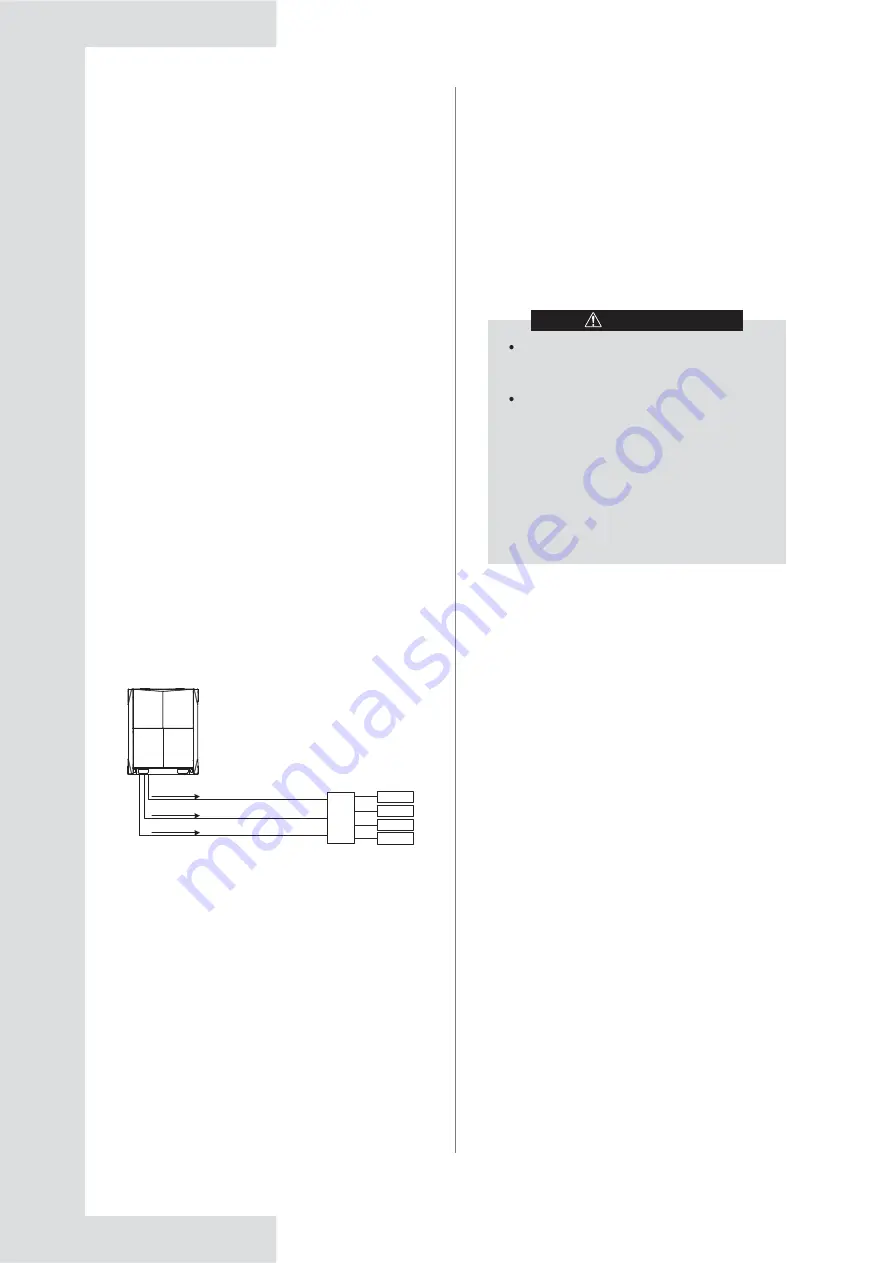
Fig. 5-17

5.7 Vacuum Drying

Before performing vacuum drying, make sure 
that all the outdoor unit stop valves are firmly 
closed.

Once the vacuum drying is complete and the 
vacuum pump is stopped, the low pressure in 
the piping could suck vacuum pump lubricant 
into the air conditioning system. The same 
could happen if the vacuum pump stops 
unexpectedly during the vacuum drying 
procedure. Mixing of pump lubricant with 
compressor oil could cause compressor 
malfunction. Therefore a check valve should  
be used to prevent vacuum pump lubricant 
seeping into the piping system.

CAUTION

MS

Liquid pipe

High pressure gas pipe

Low pressure gas pipe

Nitrogen

Nitrogen

Nitrogen

A

Indoor unit

B
C
D

Outdoor unit

23

Содержание MAXI MVD V6R Series

Страница 1: ...IT www mundoclima com MVD MAXI MVD V6R and information requirements FR Manual d utilisation et d installation voir www mundoclima com fr DE Benutzer und Installationshandbuch sehen www mundoclima com...

Страница 2: ...power supply must be SINGLE PHASE one phase L and one neutral N with his grounded power GND switch Any breach of these specifications involve a breach of the warranty conditions provided by the In lin...

Страница 3: ...CONTENTS Installation manual 1 Owner s manual 49 Information requirements Technical fiche LOT 21 58...

Страница 4: ...allation Operator Must Know Important Information for User OVERVIEW ABOUT THE PACKING BOX ABOUT THE OUTDOOR UNIT COMBINATION PREPARATIONS BEFORE INSTALLATION 30 30 31 Overview Dial Switch Settings Dig...

Страница 5: ...s after Test Run is Completed with Exceptions Operating This Unit 7 4 7 5 7 6 7 7 38 39 41 43 44 Dimensions Maintenance Space Outdoor Unit Component Layout and Refrigerant Circuits Fan Performance Out...

Страница 6: ...Installation site 1 2 3 Refrigerant Make sure the installation testing and materials used comply with the applicable law Plastic bags should be disposed of properly Avoid contact by children Potential...

Страница 7: ...local law Use only copper core wires for installation Wiring must be carried out in accordance with what is stated in the nameplate The unit does not include a safety switch device Make sure a safety...

Страница 8: ...electric box of the unit Do not operate the unit with wet hands Do not place any items that contain water on the unit To prevent electric shock or fire WARNING NOTE Do not install the power cord near...

Страница 9: ...Plastic film should be disposed of properly Avoid contact by children Potential risk Asphyxia WARNING Name Qty Outline Function Installation manual Reserved for maintenance To connect piping For 10 18...

Страница 10: ...0 22 24 26 28 30 32 34 36 38 40 42 44 46 48 50 52 54 64 64 64 64 64 64 64 64 64 64 64 64 64 64 64 64 64 64 64 64 64 64 64 64 Max Qty of indoor units1 CAUTION In the system where all indoor units are r...

Страница 11: ...neral public must be installed in the safety area to prevent others from getting close to these electric appliances Both indoor and outdoor units are suitable for the installation of commercial and li...

Страница 12: ...or use with the refrigerant Use only phosphoric acid deoxidized seamless copper for the refrigerant piping If 12 ports or less are required only one mode selection MS box is required If 13 ports or mo...

Страница 13: ...mes NAME Outdoor unit connection pipe Outdoor unit branch joint Main pipe Indoor unit main pipe Branch joint between main pipe and MS box or HT hydro module Branch joint between MS box and indoor unit...

Страница 14: ...r unit exceed 90 m or the level difference is greater than 50 m outdoor unit is above or 40 m outdoor unit is below the liquid pipe of the main pipe L1 should be increased as Table 4 12 More details a...

Страница 15: ...egislation The minimal pipe thickness for R410A piping must be in accordance with the Table 4 8 Notes 1 Material Only seamless phosphorus deoxidized copper piping that complies with all applicable leg...

Страница 16: ...n pipe Branch joint between main pipe and MS box Branch joint between MS box and indoor unit Indoor unit auxiliary pipe VRF indoor unit Designation g1 g2 g3 G1 L M L1 L2 to L9 A to D I II a to p N1 to...

Страница 17: ...d 175 m actual length and 200 m equivalent length The equivalent length of each branch joint is 0 5 m When the _ increased as Table 4 12 X 40 m unless the following conditions are met and the followin...

Страница 18: ...nit and outdoor branch joint Largest level difference between VRF indoor unit or HT hydro module and outdoor unit L1 L2 L4 f i L2 L4 f i Piping between farthest VRF indoor unit or HT hydro module and...

Страница 19: ...erences Total piping length 1 Piping between farthest VRF indoor unit or AHU and outdoor unit or the last multi outdoor piping branch 2 Actual length Equivalent length Outdoor unit is above4 Outdoor u...

Страница 20: ...vertically offset below the outlets When inserting a vertical offset to avoid an obstacle the whole outdoor piping should be offset rather than just the section adjacent to the obstacle This equipment...

Страница 21: ...Select the wire diameters minimum value individually for each unit based on the Table 4 18 and Table 4 19 where the rated current in table 4 18 means MCA in Table 4 19 In case the MCA exceeds 63 A the...

Страница 22: ...o the uppermost position to rotate the partition plate completely Once the front panel is opened you can access the electric control box Refer to section 5 2 2 on how to open the electric component bo...

Страница 23: ...he internal components of the air conditioner The images shown here are for illustrative purposes only and may differ from the actual product due to reasons like model and product upgrade Please refer...

Страница 24: ...nitrogen to remove dust moisture and other particles After all the piping connections have been completed check to make sure there is no gas leak Use nitrogen to conduct the leak check for gas NOTE H...

Страница 25: ...When brazing copper and other alloy flux is required Flux produces an extremely harmful effect on the refrigerant piping system For example using a chlorine based flux is used may corrode the pipes a...

Страница 26: ...is now closed Direction to close 1 2 3 4 Fastening torque Table 5 2 _ _ X X Stop valve size mm turn clockwise to close Axis Valve body 9 30 12 30 16 30 24 30 25 35 5 4 8 Connecting refrigerant piping...

Страница 27: ...as Fig 5 15 Solenoid valve can be opened while downstream gas pressure is 20 kPa above that of upstream 5 5 Pipe Flushing 5 6 Gas Tightness Test The refrigerant piping should be flushed using nitrogen...

Страница 28: ...m drying also provides additional leak detection in addition to the gastightness test During vacuum drying a vacuum pump is used to lower the pressure in the piping to the extent that any moisture pre...

Страница 29: ...ed greenhouse gases and the GWP value is 2088 Do not discharge the gas into the atmosphere When charging the refrigerant make sure you wear protective gloves and safety glasses Be careful when you ope...

Страница 30: ...es closed would damage the compressor A B C D E 3 2 1 Low pressure gas pipe stop valve High pressure gas pipe stop valve Liquid pipe stop valve Pressure gauge Hose a Hose d Hose c Hose b Field piping...

Страница 31: ...rth lines and the shielded layer of the earth lines of the indoor units in the P Q E communication line See below for an example of a wiring layout a 5 10 4 Communication wiring layout 5 10 4 1 Wiring...

Страница 32: ...of the communication terminals block of the outdoor unit The communication wiring between outdoor units must be connected to the H1 H2 E terminals on the PCB of the communication terminals block of t...

Страница 33: ...e master outdoor unit can communicate with MS box or HT hydro module Before the performance test set the number of the indoor unit the address of the outdoor unit After the test run is completed you c...

Страница 34: ...ions Power supply L1 L2 L3 N L1 L2 L3 N L1 L1 L2 L3 N L2 L3 N M8 Screw specification Tightening torque N m The size of the screws power supply terminal specifications and recommended torque are as fol...

Страница 35: ...atic dedusting default Auto dedusting need customization 0 1 No forced commissioning default Force commissioning ON 1 ON 1 ON ON 123 ENC1 ENC2 ENC4 ENC5 ENC3 S12 0 2 0 5 0 7 0 F 000 0 F 010 0 F 011 0...

Страница 36: ...s Running speed of the compressor in rotations per second Error or protection Placeholder and error or protection code In menu mode System check Display menu mode code Display system check code SW3 UP...

Страница 37: ...open 1 1 2 2 2 2 3 3 3 3 4 4 4 4 5 5 5 5 1 2 3 4 5 Only available for master unit Only available for master unit Te target temperature during cooling operation Automatic control Only available for ma...

Страница 38: ...air temperature T4 C Liquid pipe temperature T5 C Injection liquid temperature T6A C Subcooling gas temperature T6B C Compressor discharge temperature T7C1 C Outdoor heat exchanger gas pipe temperatur...

Страница 39: ...ts has no sense Frequency Actual value Displayed value 10 Y Y Opening angle of EEV Actual value Display value 24 Opening angle of EEV Actual value Display value 4 High pressure Actual value Display va...

Страница 40: ...led correctly to prevent strange noises and vibrations when the unit starts Field wiring Based on the wiring schematic and the relevant regulations make sure the field wiring is based on the instructi...

Страница 41: ...s including the terminals make sure that static electricity in your own body is eliminated You can touch the sheet metal of the outdoor unit to achieve this If conditions permit please wear anti stati...

Страница 42: ...le error DC bus low voltage protection Error or protection definition Remarks Displayed content Only displayed on the the master unit Displayed on the unit with the error Displayed on the unit with th...

Страница 43: ...valve with 1 representing electronic expansion valve A and 3 representing electronic expansion valve C 4 w is a placeholder for the protection mode of refrigerant leakage with 1 representing the syste...

Страница 44: ...ient air may flow through each unit Sufficient airflow across heat exchangers is essential for outdoor units to function properly NOTE For single row installation 1m 1m 1m Front Front 100 500 mm 800mm...

Страница 45: ...t to be placed closer to a wall Depending on the height of adjacent walls relative to the height of the units ducting may be required to ensure proper air discharge In the situation depicted the verti...

Страница 46: ...exchanger gas temperature sensor Heat sink temperature sensor Heat exchanger liquid temperature sensor Compressor discharge temperature sensor 9 10 11 12 13 14 15 16 17 18 19 20 21 Electronic expansio...

Страница 47: ...xchanger Electronic expansion valve EEVC Stop valve liquid side Stop valve high pressure gas side Stop valve low pressure gas side Electronic expansion valve EEVA High pressure sensor Hot gas bypass s...

Страница 48: ...ure Pa External ststic pressure Pa External ststic pressure Pa Air flow m3 120 100 80 60 40 20 0 Air flow m3 Air flow m3 120 100 80 60 40 20 0 120 100 80 60 40 20 0 8075 8575 9075 9575 10075 10575 119...

Страница 49: ...need ducting each outdoor unit should has independent ducting it cannot share one ducting for more than one outdoor units 6 According to the actual static pressure of the outdoor unit ducting an appr...

Страница 50: ...t to duct 3m long Dial switch S4 setting Ducting for 14 18HP Option A Transverse ducting unit mm D C Support Radius E A Radius B 630 90 100 Air outlet louver 12 ST3 9 self threading screws Remove the...

Страница 51: ...ion code 5 Long press SW5 MENU button for 5 seconds on master unit to enter menu mode and the digital display displays n1 then press SW3 SW4 UP DOWN button to select the first level menu When the digi...

Страница 52: ...d with refrigerant so be careful when connecting the charge hose 2 After adding the refrigerant do not forget to close the lid of the refrigerant auto gauge point Note 1 The digital display will displ...

Страница 53: ...48...

Страница 54: ...igerant After sales Service and Warranty 56 54 7 7 1 7 2 Error Code Overview Fault Symptom Non Air Conditioning Issues 50 Operating Range Operating System Using the Dry Program 50 1 1 50 8 57 9 57 Mea...

Страница 55: ...a safe way and understand the hazards involved Children shall not play with the appliance Cleaning and user maintenance shall not be made by children without supervision WARNING The air outlet must n...

Страница 56: ...DB X 2 X 2 Mix cooling heating mode Main cooling Main Heating Notes 1 15 C cooling is possible only with the single MS box otherwise the minimum allowable cooling operating temperature is 5 C 2 Conden...

Страница 57: ...ot check or repair the unit on your own Please get relevant professionals to conduct any check or repairs Do not use substances like gasoline diluent and chemical dust cloth to wipe the operations pan...

Страница 58: ...es as stipulated in the Kyoto Protocol Do not discharge the gas into the atmosphere Refrigerant Type R410A GWP Value 2088 Based on the applicable law the refrigerant must be checked regularly for leak...

Страница 59: ...ets or outlets of the outdoor or indoor units are blocked by any obstacles Remove the obstacles and maintain good ventilation in the room Check if the filter is blocked please refer to the Maintenance...

Страница 60: ...e unit with the error Displayed on the unit with the error Displayed on the unit with the error Displayed on the unit with the error Displayed on the unit with the error Displayed on the unit with the...

Страница 61: ...nit The air direction is not consistent with the user interface display The air direction does not swing This is because the unit is controlled by the centralized controller 7 2 2 Fault symptom Fan sp...

Страница 62: ...E INSTALLATION SITE This unit uses hydrogen fluorocarbons Please contact the agent when you want to dispose this unit Based on the requirements of the law the collection transportation and disposal of...

Страница 63: ...Pdc Pdc 22 40 16 51 11 51 6 69 kW kW kW kW kW kW kW kW Tj 35 C Tj 30 C Tj 25 C Tj 20 C EERd EERd EERd EERd 4 27 5 45 8 50 17 16 Degradation co efficient for air conditioners Cdc 0 25 Power consumptio...

Страница 64: ...Pdh 13 70 kW kW Pdh Tbiv 13 70 2 63 2 63 TOL operation temperature Tbiv bivalent temperature TOL operation temperature COPd COPd Bivalent temperature 10 Cdh 0 25 C Degradation co efficient for heat pu...

Страница 65: ...e heater mode Standby mode PCK PSB Pdc Pdc Pdc Pdc 28 00 20 63 13 25 6 69 kW kW kW kW kW kW kW kW Tj 35 C Tj 30 C Tj 25 C Tj 20 C EERd EERd EERd EERd 3 90 5 07 8 37 17 44 Degradation co efficient for...

Страница 66: ...4 15 8 62 5 91 7 25 kW kW kW kW Tj 7 C Tj 2 C Tj 7 C Tj 12 C COPd COPd COPd COPd 2 83 4 01 5 76 7 42 Information requirements for heat pumps Tbiv bivalent temperature Pdh 16 00 kW kW Pdh Tbiv 16 00 2...

Страница 67: ...heater mode Standby mode PCK PSB Pdc Pdc Pdc Pdc 33 50 24 68 15 12 8 72 kW kW kW kW kW kW kW kW Tj 35 C Tj 30 C Tj 25 C Tj 20 C EERd EERd EERd EERd 3 88 5 29 8 61 12 49 Degradation co efficient for a...

Страница 68: ...kW kW Pdh Tbiv 18 43 2 48 2 48 TOL operation temperature Tbiv bivalent temperature TOL operation temperature COPd COPd Bivalent temperature 10 Cdh 0 25 C Degradation co efficient for heat pumps Power...

Страница 69: ...kcase heater mode Standby mode PCK PSB Pdc Pdc Pdc Pdc 40 00 29 47 18 95 12 60 kW kW kW kW kW kW kW kW Tj 35 C Tj 30 C Tj 25 C Tj 20 C EERd EERd EERd EERd 4 07 4 84 6 97 13 68 Degradation co efficient...

Страница 70: ...W Pdh Tbiv 22 00 2 42 2 42 TOL operation temperature Tbiv bivalent temperature TOL operation temperature COPd COPd Bivalent temperature 10 Cdh 0 25 C Degradation co efficient for heat pumps Power cons...

Страница 71: ...nkcase heater mode Standby mode PCK PSB Pdc Pdc Pdc Pdc 45 00 33 16 21 32 11 53 kW kW kW kW kW kW kW kW Tj 35 C Tj 30 C Tj 25 C Tj 20 C EERd EERd EERd EERd 3 75 4 69 7 11 13 45 Degradation co efficien...

Страница 72: ...10 kW kW Pdh Tbiv 26 10 2 24 2 24 TOL operation temperature Tbiv bivalent temperature TOL operation temperature COPd COPd Bivalent temperature 10 Cdh 0 25 C Degradation co efficient for heat pumps Pow...

Страница 73: ...kcase heater mode Standby mode PCK PSB Pdc Pdc Pdc Pdc 50 00 36 84 23 68 12 84 kW kW kW kW kW kW kW kW Tj 35 C Tj 30 C Tj 25 C Tj 20 C EERd EERd EERd EERd 3 62 4 84 7 06 15 65 Degradation co efficient...

Страница 74: ...kW Pdh Tbiv 29 00 2 11 2 11 TOL operation temperature Tbiv bivalent temperature TOL operation temperature COPd COPd Bivalent temperature 10 Cdh 0 25 C Degradation co efficient for heat pumps Power con...

Страница 75: ...se heater mode Standby mode PCK PSB Pdc Pdc Pdc Pdc 22 40 16 51 10 61 9 56 kW kW kW kW kW kW kW kW Tj 35 C Tj 30 C Tj 25 C Tj 20 C EERd EERd EERd EERd 4 10 5 87 9 10 10 47 Degradation co efficient for...

Страница 76: ...dh 13 70 kW kW Pdh Tbiv 13 70 2 91 2 91 TOL operation temperature Tbiv bivalent temperature TOL operation temperature COPd COPd Bivalent temperature 10 Cdh 0 25 C Degradation co efficient for heat pum...

Страница 77: ...ase heater mode Standby mode PCK PSB Pdc Pdc Pdc Pdc 28 00 20 63 13 26 9 85 kW kW kW kW kW kW kW kW Tj 35 C Tj 30 C Tj 25 C Tj 20 C EERd EERd EERd EERd 3 60 4 92 7 63 12 82 Degradation co efficient fo...

Страница 78: ...15 8 62 5 84 6 97 kW kW kW kW Tj 7 C Tj 2 C Tj 7 C Tj 12 C COPd COPd COPd COPd 2 76 3 99 5 96 7 20 Information requirements for heat pumps Tbiv bivalent temperature Pdh 16 00 kW kW Pdh Tbiv 16 00 2 70...

Страница 79: ...se heater mode Standby mode PCK PSB Pdc Pdc Pdc Pdc 33 50 24 68 15 87 9 65 kW kW kW kW kW kW kW kW Tj 35 C Tj 30 C Tj 25 C Tj 20 C EERd EERd EERd EERd 3 50 4 72 6 83 14 25 Degradation co efficient for...

Страница 80: ...kW kW Pdh Tbiv 18 43 2 66 2 66 TOL operation temperature Tbiv bivalent temperature TOL operation temperature COPd COPd Bivalent temperature 10 Cdh 0 25 C Degradation co efficient for heat pumps Power...

Страница 81: ...ankcase heater mode Standby mode PCK PSB Pdc Pdc Pdc Pdc 40 00 29 47 18 95 12 72 kW kW kW kW kW kW kW kW Tj 35 C Tj 30 C Tj 25 C Tj 20 C EERd EERd EERd EERd 3 45 4 77 7 17 14 81 Degradation co efficie...

Страница 82: ...Pdh Tbiv 22 00 2 67 2 67 TOL operation temperature Tbiv bivalent temperature TOL operation temperature COPd COPd Bivalent temperature 10 Cdh 0 25 C Degradation co efficient for heat pumps Power consu...

Страница 83: ...ankcase heater mode Standby mode PCK PSB Pdc Pdc Pdc Pdc 45 00 33 16 21 32 11 64 kW kW kW kW kW kW kW kW Tj 35 C Tj 30 C Tj 25 C Tj 20 C EERd EERd EERd EERd 3 20 4 23 6 68 13 66 Degradation co efficie...

Страница 84: ...Pdh Tbiv 26 10 2 36 2 36 TOL operation temperature Tbiv bivalent temperature TOL operation temperature COPd COPd Bivalent temperature 10 Cdh 0 25 C Degradation co efficient for heat pumps Power consu...

Страница 85: ...ankcase heater mode Standby mode PCK PSB Pdc Pdc Pdc Pdc 50 00 36 84 23 68 12 98 kW kW kW kW kW kW kW kW Tj 35 C Tj 30 C Tj 25 C Tj 20 C EERd EERd EERd EERd 3 06 4 60 6 91 16 40 Degradation co efficie...

Страница 86: ...Pdh Tbiv 29 00 2 24 2 24 TOL operation temperature Tbiv bivalent temperature TOL operation temperature COPd COPd Bivalent temperature 10 Cdh 0 25 C Degradation co efficient for heat pumps Power consu...

Страница 87: ......

Страница 88: ...SAT 34 93 652 53 57 www mundoclima com C N POLES 249 P1 ESPA A SPAIN 34 93 446 27 80 08013 BARCELONA...

Отзывы: