background image

  How To Install

  How To Install

10

11

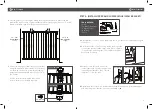
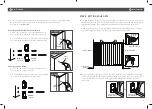
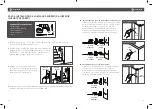
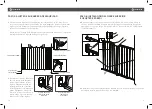
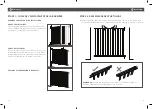
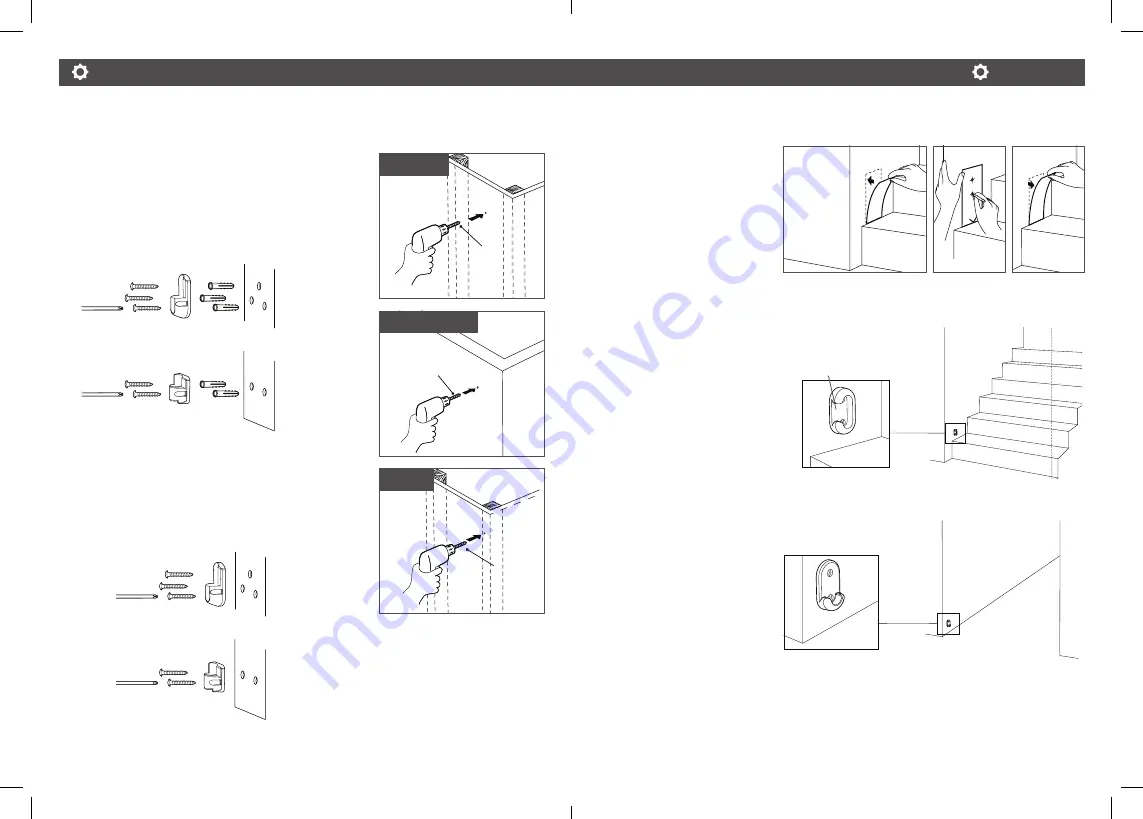
5a. For Drywall Without Stud / Plasterboard:


Drill a 7/32"(5.5mm) hole into the drywall at each 
pencil mark. Insert a drywall anchor into each hole. 
Then, use a screwdriver or drill to insert the screws 
through the upper and lower hinge wall bracket into 
the drywall anchors. 


5b. For Drywall with Stud:


Drill a 5/64"(2mm) pilot hole into the stud at each 
pencil mark (no anchor needed). Then, use a 
screwdriver or drill to insert the screws through the 
upper and lower hinge wall bracket into the stud. 

Medium 

screw

Medium 

screw

Medium 

screw

Medium 

screw

Drywall 

anchor

Drywall 

anchor

7/32" 

5.5mm

1 Way Lower Catch 

Wall Bracket

Open edge

7/32" 

5.5mm

5/64" 

2.0mm

5a. Drywall

5a. Plasterboard

5b. Stud

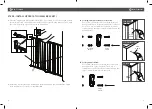
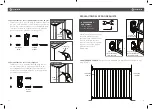
STEP 4: INSTALL LOWER CATCH (WALL BRACKET)

1. 

Place template “I” against 
the wall with tape, flush to 
the floor. Mark the screw 
holes with a pencil to create 
indentation, then remove 
the template. 


2. Identify which lower catch 

wall bracket to use: 


For Top and bottom of stairs:


Choose the 1 way lower 
catch wall bracket. The 
opening on the edge of the 
bracket should always be 
facing towards you (away 
from the stairs), so the gate 
only swings away from  
the stairs. 


For Hallway and Doorways:


Choose the 2 way lower 
catch wall bracket so that 
the gate swings in either 
direction. 


Temp. I 

(Catch Side)

2 Way Lower Catch 

Wall Bracket

Содержание Extending XL

Страница 1: ...tion videos are available at www munchkin com GUARDE PARA FUTURA REFERENCIA Lea las instrucciones detenidamente antes de instalar esta barrera de seguridad Si necesita m s ayuda vea los videos de inst...

Страница 2: ...Paso 4 Instalaci n del cierre inferior Soporte de Pared 28 Paso 5 Ajuste de su barrera de seguridad 30 Paso 6 Instalaci n del cierre superior Soporte de Pared 31 Regulaci n del perno de ajuste 33 MODO...

Страница 3: ...usly injured when gates are not securely installed ALWAYS install and use gates as directed using all required parts STOP using when a child can climb over or dislodge the gate Use only with locking m...

Страница 4: ...the bottom of stairs we recommend placing it on the floor If the gate must be placed on the lowest stair position it toward the front of the step HALLWAYS AND DOORWAYS STEP 2 ASSEMBLING GATE PANELS 1...

Страница 5: ...ere you will install the upper and lower hinge wall bracket Proceed to either 5a or 5b Upper Hinge TOOLS NEEDED Drill Phillips Screwdriver Adhesive Tape Hex Key Pencil 2 Size the gate to your opening...

Страница 6: ...Medium screw Drywall anchor Drywall anchor 7 32 5 5mm 1 Way Lower Catch Wall Bracket Open edge 7 32 5 5mm 5 64 2 0mm 5a Drywall 5a Plasterboard 5b Stud STEP 4 INSTALL LOWER CATCH WALL BRACKET 1 Place...

Страница 7: ...sing the wrench Upper hinge pin Adjustment Rod 2 25 57mm 2 25 57mm Lower catch bracket Lower hinge pin 1 way Lower catch bracket OR 2 way Lower catch bracket 3 After selecting the wall bracket determi...

Страница 8: ...cket Proceed to either 3a or 3b 3a For Drywall Without Stud Plasterboard Drill a 7 32 5 5mm hole into the drywall at each pencil center mark Insert a drywall anchor into each hole Then use a screwdriv...

Страница 9: ...er catch bracket Upper catch bracket 1 way Lower catch bracket OPENING YOUR GATE Push the lever down on the upper catch bracket using your thumb then lift the gate out CLOSING YOUR GATE Swing and lift...

Страница 10: ...in value to the expense incurred in shipping the product Alternatively Munchkin Inc at its option may issue a UPS call tag in order to expedite receipt of the defective product for review B Condition...

Страница 11: ...mero de serie invalidar todos y cada uno de los reclamos que pudiesen presentarse contra el fabricante Todo da o material producido durante la instalaci n es responsabilidad absoluta del usuario final...

Страница 12: ...direcci n 1 Tornillos peque os 4 Anclajes para pared 9 Tornillos medianos 7 Tornillos grandes 2 Llave hexagonal Llave inglesa Soporte de pared para el cierre inferior de 2 dirrecciones 1 PASO 1 IDENTI...

Страница 13: ...izando el panel de bisagra y el panel de cierre hacia fuera en direcci n a las paredes Para facilitar la instalaci n de la barrera m s adelante deje un espacio de 1 5 a 2 pulg 38mm and 50mm entre cada...

Страница 14: ...Bisagra superior HERRAMIENTAS REQUERIDAS Taladradora Destornillador Phillips Cinta adhesiva Llave hexagonal L piz Bisagra inferior 5a Para paredes de yeso sin montantes Placas de yeso Taladre un orifi...

Страница 15: ...ine si hay o no un montante detr s de la pared de yeso en los lugares donde desea instalar el soporte de pared del cierre inferior Contin e con 4a o 4b 4a Para paredes de yeso sin montantes Placas de...

Страница 16: ...el sentido de las agujas del reloj hasta que quede apoyada en el soporte del cierre inferior colocado en la pared Luego ajuste la tuerca al tubo usando la llave inglesa Clavija de bisagra superior Va...

Страница 17: ...o por el soporte de pared del cierre superior 3a Pared de yeso 3a Placa de yeso 3b Montante 7 32 pulg 5 5mm Anclaje de pared Tornillo grande Tornillo grande 7 32 pulg 5 5mm 5 64 pulg 2 0mm REGULACI N...

Страница 18: ...d Puede comunicarse con el Equipo de Satisfacci n del Cliente de Munchkin Inc llamando al 1 800 344 2229 de lunes a viernes de 8am a 5pm Hora del Pac fico o por email a cserv munchkin com Se requiere...

Страница 19: ...s en efectivo por compras realizadas a trav s de cualquiera de los sitios web de barreras de seguridad de Munchkin Inc SOLO en caso de un error de env o o procesamiento por parte de Munchkin Inc Si ti...

Страница 20: ...res non correctement install es TOUJOURS installer et utiliser les barri res avec toutes les pi ces requises et selon le mode d emploi CESSER d utiliser la barri re si l enfant est capable de l escala...

Страница 21: ...t diminu s vers l int rieur TAPE 1 CHOIX DE L EMPLACEMENT DE LA BARRI RE BARRI RE CON UE POUR UNE INSTALLATION EN HAUT DES ESCALIERS Si vous installez la barri re en haut des marches d es calier elle...

Страница 22: ...pe 5a ou 5b Charni re sup rieure OUTILS N CESSAIRES Perceuse Tournevis cruciforme Ruban adh sif Cl Allen Crayon Charni re Inf rieure 2 Rep rez la taille de l ouverture en d ployant le portillon charni...

Страница 23: ...x sens pour que la barri re puisse s ouvrir dans les deux sens Gabarit I C t fermeture 5a Pour les cloisons s ches sans montant placopl tre Percez un trou de 5 5m dans la cloison s che sur la marque d...

Страница 24: ...che de charni re sup rieure La tige de r glage 57mm 57mm Fixation de fermeture inf rieure Broche de charni re inf rieure Fixation murale de fermeture inf rieure sens unique OU Fixation murale de ferme...

Страница 25: ...enfoncez la vis par la fixation murale de fermeture sup rieure l int rieur du montant 3a Cloison s che 3a Placopl tre 3b Montant 5 5mm Cheville Vis longue Vis longue 5 5mm 2 mm TAPE 6 INSTALLATION DE...

Страница 26: ...n doux et essuyez avec un chiffon humide Faites attention de ne pas laver ou essuyer les autocollants en bas de la barri re La garantie sera annul e si les autocollants ont t retir s ou sont ab m s R...

Страница 27: ...tial de la barri re PROC DURE Communiquez nous toutes les informations pertinentes concernant le probl me Communiquez avec le service apr s vente de Munchkin Inc en appelant le 1 800 344 2229 u lundi...

Страница 28: ......
Страница 29: ...GO AND IT S THE LITTLE THINGS ARE TRADEMARKS OR REGISTERED TRADEMARKS OF MUNCHKIN INC 7835 GLORIA AVE VAN NUYS CA 91406 MUNCHKIN BABY CANADA LTD 50 PRECIDIO CT UNIT A BRAMPTON ON L6S 6E3 PATENT HTTP W...

Отзывы: