background image

Software Installation

17

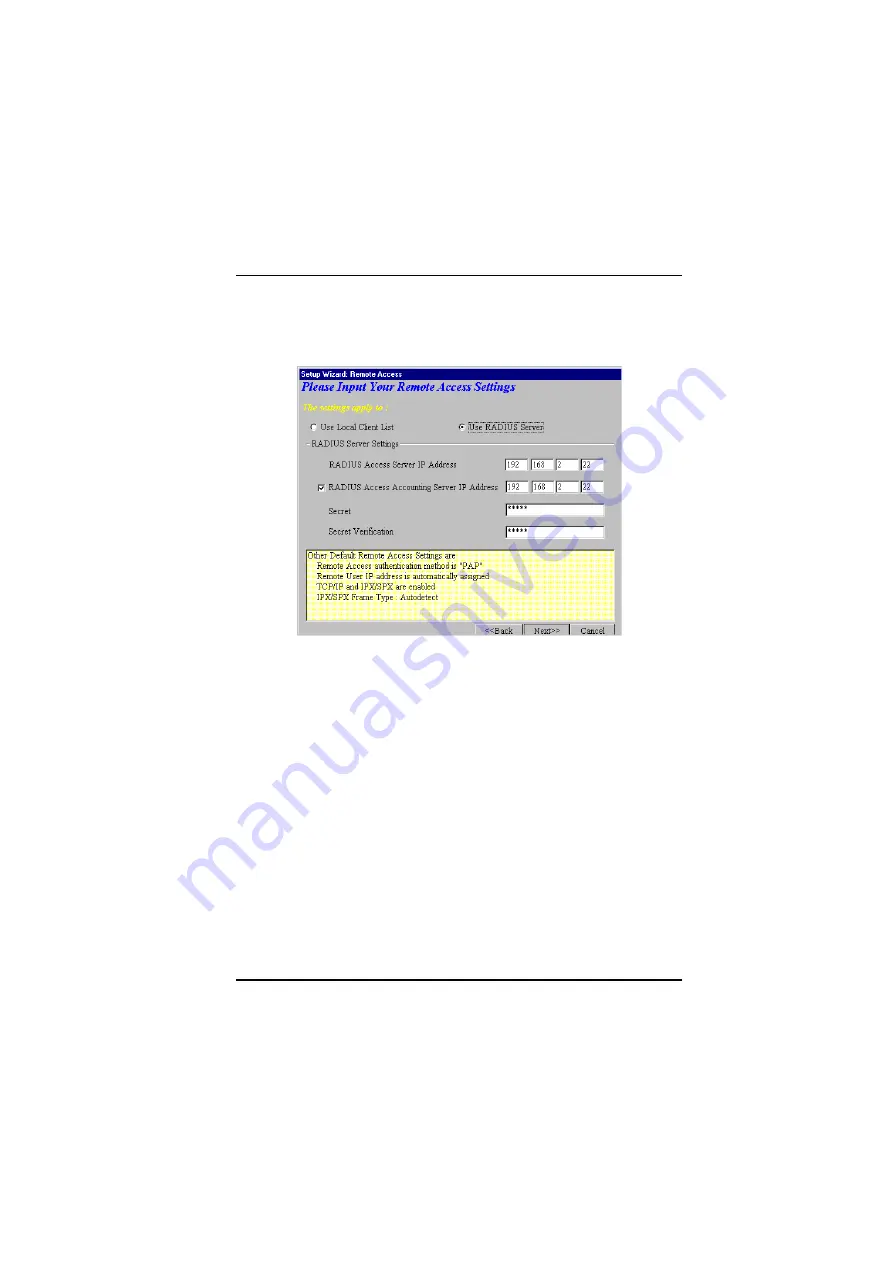
Use RADIUS Server

Select this option to authenticate your remote clients on a

RADIUS server.  Enter the following RADIUS Server

Settings:

•


RADIUS Access Server IP Address

:

 Enter the IP

address of the RADIUS Access Server.

• 

RADIUS Accounting Server IP Address

:

 Enter the IP

address of the RADIUS Accounting Server.

• 

Secret

:

 Enter your shared Secret RADIUS code or

password.

• 

Secret Verification

:

 To confirm your Secret code, re-

enter your code or password.

Note:

 In most cases, the RADIUS Access Server and the

RADIUS Accounting Server are the same server, so the IP

address will be the same.
Click 

Next

 and continue with Step 9.

All manuals and user guides at all-guides.com

Содержание RouteFinder RF102S

Страница 1: ...Model RF102S Dual Serial Port Router with Built in 4 Port 10 100 Switch Quick Start Guide All manuals and user guides at all guides com a l l g u i d e s c o m ...

Страница 2: ...8 01 Manual released Patents This device is covered by one or more of the following patents 6 031 867 6 012 113 6 009 082 5 905 794 5 864 560 5 815 567 5 815 503 5 812 534 5 809 068 5 790 532 5 764 628 5 764 627 5 754 589 D394 250 5 724 356 5 673 268 5 673 257 5 644 594 5 628 030 5 619 508 5 617 423 5 600 649 5 592 586 5 577 041 5 574 725 D374 222 5 559 793 5 546 448 5 546 395 5 535 204 5 500 859 ...

Страница 3: ...ion 6 Safety Warnings 6 Unpacking your RouteFinder 6 Cabling your RouteFinder 7 Software Installation and Configuration 9 Using RouteFinder Setup Wizard 10 Testing your Connection 22 Configuring your Route Finder 23 Using Telnet to Configure your RouteFinder 23 Limited Warranty 24 Technical Support 25 All manuals and user guides at all guides com ...

Страница 4: ...ent your enterprise networks into workgroups The RF102S features an integrated 4 port 10 100 switch The Network Monitor Utility enables the network administrator to view incoming and outgoing packets the status of network connections and specific connection events The RF102S uses the NAT protocol to implement firewall and gateway security for LAN based resources It also supports Internet access re...

Страница 5: ...the features and functions available on your router Get Adobe Acrobat Reader AdobeAcrobat Reader is a free program used to view documents created in Adobe PDF format AdobeAcrobat Reader can be installed from the System CD click Install Manuals and select InstallAdobe Acrobat Reader or downloaded from Adobe sWeb site at http www adobe com Get the User Guide The User Guide can be installed from the ...

Страница 6: ...k interface 5 Avoid using a telephone other than a cordless type during an electrical storm There may be a remote risk of electrical shock from lightning 7 Do not use the telephone to report a gas leak in the vicinity of the leak 8 To reduce the risk of fire use only No 26 AWG or larger Telecommunications line cord Unpacking your RouteFinder The RF102S shipping box contains the following items Sys...

Страница 7: ...guration section of this Quick Start Guide Optional Uplink Serial Cables To Modem or ISDN TA Power Connection Network Printer Hub PC PC Uplink Normal 1 2 3 4 Reset Serial 1 5VDC Serial 2 Cabling the RouteFinder RF102S 1 Before beginning turn off the power for all network devices PCs analog modems ISDN TAs and disconnect the router power supply 2 Connect the Ethernet port of each PC or network devi...

Страница 8: ...he Uplink feature place the switch in the Normal position 5 Connect the provided power supply cable to the 5V DC power port on the back of the router Plug the power supply into an AC power outlet as shown 6 If you are using or or two analog modems or ISDN TAs turn on the power for the devices 7 Press and hold the RouteFinder s Reset button for 3 seconds to restore the default settings You are read...

Страница 9: ...on each workstation accessing the Internet Software Installation The software installation process involves installing the RouteFinder Utilities including RouteFinder Setup Wizard RouteFinder Manager and RouteFinder Monitor A description of each component follows Refer to the User Guide for more information RouteFinder Setup Wizard The RouteFinder Setup Wizard provides a step by step process to as...

Страница 10: ...he device After installing the software you can return to the RouteFinder Setup Wizard by clicking Start Programs RouteFinder Manager RouteFinder Wizard Before running the Setup Wizard it is strongly recommended that you exit all Windows programs 1 Insert the RF102S System CD into your computer s CD ROM drive The RF102S System CD window displays Note If Autorun is disabled on your computer use Win...

Страница 11: ...Software Installation 11 4 When the software installation completes the Setup Wizard dialog box displays Click OK All manuals and user guides at all guides com a l l g u i d e s c o m ...

Страница 12: ...evice you want to configure from the Device Name list Record the information in the Device Information area for later reference Device IPAddress ______________________ Device Firmware Version _________________ Click Next Note If a message appears indicating the device is not found or you do not see the device you are attempting to configure listed click Refresh Device List All manuals and user gui...

Страница 13: ... you are connecting to an ISP the device name can act as your computer name if required on the remote system Click Next to continue The device will search the network to ensure that the IP address is valid This may take several seconds Note If your ISP provided you with an IP address do not enter that address Enter the IP address for this device on your local network Refer to the Glossary in the U...

Страница 14: ...ys Select IP Routing NAT Enabled to enable local LAN clients to share one external IP address for accessing the Internet Select Remote Access to enable remote users to use a dial up connection to log on to the network Click Next All manuals and user guides at all guides com ...

Страница 15: ... user database that your system will use Note The Local Client list enables you to add a maximum of 64 users Use Local Client List Use Local Client List enables you to create an authentication database consisting of user names passwords and dial in options for each remote user Enter the following information for each client User Name Enter the User Name to authenticate the remote dial in user Pass...

Страница 16: ...tion the device will callback the telephone number you enter in the callback telephone number box This option is best used for clients requiring callback security while dialing in from the same location each time Variable Callback Select Variable Callback for remote users that travel or dial in from various locations and need callback security This option allows clients to specify the callback tel...

Страница 17: ...er RADIUS Accounting Server IP Address Enter the IP address of the RADIUS Accounting Server Secret Enter your shared Secret RADIUS code or password Secret Verification To confirm your Secret code re enter your code or password Note In most cases the RADIUS Access Server and the RADIUSAccounting Server are the same server so the IP address will be the same Click Next and continue with Step 9 All ma...

Страница 18: ...d to dial your remote server ISP Note If you must dial a number to get an outside line such as 9 or 0 enter the required number plus a w wait or a comma in the Telephone box For example 9w555 2323 or 9 5552323 Each comma provides a 3 4 second delay User Name Enter the User Name for your remote server or ISP account Password Enter the Password for your remote server or ISP account Password Verifica...

Страница 19: ...er your ISP s DNS Server IP address If you are not sure of the IP address contact your ISP Refer to the Glossary in the User Guide for more information about the DNS Server Click Next 10 The Setup Wizard Modem Settings dialog box displays All manuals and user guides at all guides com ...

Страница 20: ...o select your modem in the Modem settings box click The system loads modem information 12 The Modem Initial Command dialog box displays Select your modem manufacturer and model and click OK Note This setting configures the initial string of the asynchronous port on the RF102S so that it will know how to communicate with your modem If you are using an analog modem and your modem is not included in ...

Страница 21: ...il Note You may need to set a lower baudrate since the modem s maximum connection speed may not be attainable due to variations in phone line quality and ISP connection Click Next to complete the basic configuration 14 The Check List dialog box displays summarizing your configuration selections Verify that all selections are correct If you find an incorrect setting click Back to return to the wind...

Страница 22: ...m opens 1 To test your current settings select Test Connection Select Connect Port 1 to test serial port 1 Select Connect Port 2 to test serial port 2 The monitor activity will appear in the display window Refer to the RouteFinder Monitor chapter in the User Guide for additional information about the monitoring capabilities of the RF102S 2 Before using the device you must configure your workstatio...

Страница 23: ... Manager select Start Programs RouteFinder Manager RouteFinder Manager See the User Guide for more information Using Telnet to Configure your RouteFinder Telnet is a telecommunications software utility which allows you to access a remote device The RouteFinder RF102S has a built in Telnet Server that enables a Telnet client to remotely configure the device using a menu system Non Windows operating...

Страница 24: ...er or power surges or which have been neglected altered abused used for a purpose other than the one for which they were manufactured repaired by Customer or any party without MTS s written authorization or used in any manner inconsistent with MTS s instructions MTS s entire obligation under this warranty shall be limited at MTS s option to repair or replacement of any products which prove to be d...

Страница 25: ...t If you have any questions about the operation of this unit or experience difficulty during installation you can contact Tech Support via the following Phone 800 972 2439 USA and Canada 763 785 3500 international and local Internet http www multitech com Please have your product information available including model and serial number All manuals and user guides at all guides com ...

Страница 26: ...S0000137 All manuals and user guides at all guides com a l l g u i d e s c o m ...

Отзывы: