GETTING STARTED WITH AEP MODELS
24
MultiConnect
®
Conduit
TM
AP MTCAP User Guide for North America
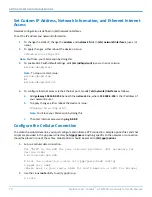
Setting Up PPP Authentication
To setup cellular PPP authentication:
1.
Select an authentication protocol
Type
used to negotiate with the remote peer:
pap, chap, or pap-chap
.
The default is
None
.
2.
Type the
Username
for the remote peer to use for authentication. Optional. Username is limited to 60
characters.
3.
Type the
Password
for the remote peer to use for authentication. Optional. Password is limited to 60
characters.
4.
Click
Next
to exit the wizard.
Enter IP Address and Network Information
Set the IP address and network information for the Ethernet port:
Note:
Leave the interface static unless using a DHCP server on the network that the device is connecting to. If
you select DHCP client, you need to know which address is assigned to the Conduit. For information on DHCP
settings, refer to DHCP in the AEP Help.
1.
Type the device's
IP Address
2.
Enter the network
Mask
.
3.
Enter the
Gateway
address (optional and not displayed when
Cellular
is enabled).
4.
Enter the
Primary DNS
server address (optional and not displayed when
Cellular
is enabled).
5.
Enter the
Secondary DNS
server address (optional and not displayed when
Cellular
is enabled).
6.
Click
Next
.
Configuring Access
When Cellular is disabled, the default settings enable HTTPRedirect to HTTPs via LAN.
Note:
Enabling
HTTPs via WAN
can increase security risk including allowing web users to access the WAN
interface.
1.
Under
HTTP Redirect to HTTPs,
check
Enabled
to turn on or uncheck to turn off.
2.
Enter
Port
or use default value.
3.
Check either
Via LAN
or
Via WAN
.
4.
Under
HTTPs
, enter
Port
or use default value.
5.
Click
Finish
.
Finish Configuration
When you finish entering basic settings:
1.
To save and apply the settings, click
Save and Restart
near the top of the left sidebar. The device restarts.
2.
After restart, log back into the AEP interface. On the Dashboard under
Cellular
, the PPP state displays
Link is Up
. You may have to wait for short time.
3.
To configure a LoRa Network, refer to
Getting Started with LoRa

