background image


Figure 3: TFRAME with red arrows pointing to the 4 Multilane cassettes  

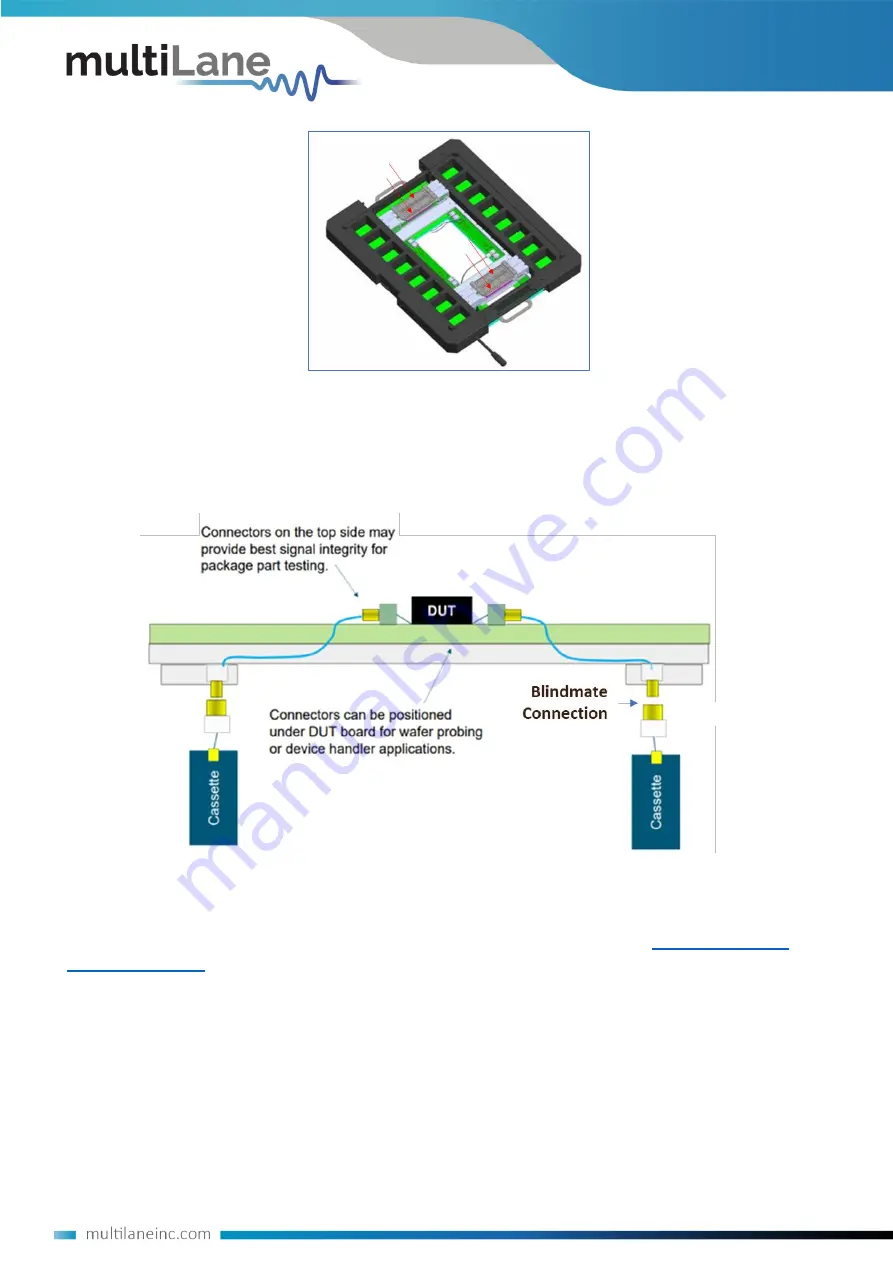
The  main  advantage  of  the  ATE  system  as  compared  to  using  benchtop  instruments,  is  that  the 
signal path between DUT and Cassette instruments is considerably shorter thus minimizing insertion 
and return losses. The AT93000 channel density maximum is up to 32 channels if all 4 cassettes are 
fully populated. 


Figure 4: AT93000 signal paths from instruments to DUT  

Each of the four Multilane cassettes contains either one or two Multilane high-speed instruments. 
Refer to each 

instrument’s 

User Manual for the blindmate connector pinout of that instrument in 

the  cassette.  Instrument  manuals  and  datasheets  can  be  found  at 

ATE  |  MultiLane 

(multilaneinc.com)

.


Figure 5

 shows one side of a cassette with the protective cover removed. This 

exposed PCB is a 4-channel (differential) Multilane instrument. The other side of the cassette can 
have a second 4-channel Multilane instrument for a total of 8 differential channels per cassette. 

Figure 5

 also shows the backplane connector. User Manual pinouts are referenced to this connector. 

The instrument on the opposite side of the cassette is facing into the page so that its backplane 
connector is located on the backside, lower left corner. For example, a cassette might contain a 4-
channel  AT4039D  BERT  on  side  1  of  the  cassette  and  a  4-channel  AT4025  DSO  on  side  2  of  the 
cassette. In the case of 8-channel instruments, like the 8-channel AT4079B BERT, there will only be 
one 8-ch instrument in the cassette with one connector due to blindmate 32-pins limitation. 

Содержание AT93000

Страница 1: ...USER MANUAL AT93000 System User Manual System Overview...

Страница 2: ...s While using this product you may need to access other parts of the system Read the General Safety Summary in other system manuals for warnings and cautions related to operating the system To Avoid F...

Страница 3: ...ter Slave using USB Programming Mode 12 Family Board 13 Air Power and Ethernet sources 14 Site Preparation and Installation 14 Docking the TFRAME to the V93000 testhead 14 Ethernet Connections and IP...

Страница 4: ...ock ordered through Advantest Part number E8028 PSD 8 Figure 9 Cassette 4 populated AT4039 plugs into Backplane 1 AT4025 into Backplane 2 9 Figure 10 SPMP Clock Connectors on ML Backplanes 1 and 2 10...

Страница 5: ...op of a V93000 test head The AT93000 is compatible with CTH and STH Advantest V93000 testheads The user s DUT loadboard is hard docked on top of the TFRAME and the device handler or wafer prober is ha...

Страница 6: ...ound at ATE MultiLane multilaneinc com Figure 5 shows one side of a cassette with the protective cover removed This exposed PCB is a 4 channel differential Multilane instrument The other side of the c...

Страница 7: ...d Backplane Location References page 8 3 Backplane connectors Instrument PCB s inside cassettes plug into these connectors 4 Power connector 12V 6 5A each backplane for a total requirement of 13A exte...

Страница 8: ...backplane 2 Instruments on the left side of cassettes are plugged into backplane 1 User documentation should be provided to explain to the cassette installer which direction to plug in the cassette T...

Страница 9: ...his section If the clock is coming from the DUT or V93000 then all cassette instruments will be slaved to the external master clock In this case the external differential clock3 should be cabled to th...

Страница 10: ...s can either connect from backplane 1 to backplane 2 or to the family board as shown in Figure 11 The family board connections go up through the G1A Advantest pogo block and are available to be connec...

Страница 11: ...e in Figure 13 Figure 12 Backplane Reference Designators U450 is MASTER U451 is MASTER U452 is MASTER U453 is MASTER All U45x SLAVE Backplane 1 C1L C2L C3L C4L All Slave Backplane 2 C4R C3R C2R C1R Al...

Страница 12: ...ep 1 Set all switches to PRG Step 2 Connect laptop to USB port shown in Figure 14 Step 3 Obtain ML AT4000 GUI Step 4 Use GUI shown in Figure 15 to set one of the instruments as the master or to set al...

Страница 13: ...urrent requirements If this Family board does not suit your application and you require a different selection of V93000 tester resources a custom family board will have to be designed V93000 mapped re...

Страница 14: ...paration and Installation Refer to the site preparation and installation manuals at V93000 ATE Test Solutions MultiLane multilaneinc com Docking the TFRAME to the V93000 testhead The AT93000 weighs ap...

Страница 15: ...osing the appropriate ethernet connections for each instrument contact Multilane at ATE FAE multilaneinc com Software installation when controlling AT93000 via V93000 Smartest Refer to the site prepar...

Страница 16: ...documentation that Multilane uses to guarantee consistent customer configurations leaving our factory Items in RED are unique for each assembly The items in RED here are an example and should be chan...

Страница 17: ...ltiLane s public website o Go to ATE MultiLane multilaneinc com o Scroll down MultiLane Instruments for V93000 Click on any instrument eg AT4039E o You will find the instrument GUI here Connect the po...

Страница 18: ...to control MASTER SLAVE clock selection Figure 17 AT4000 REV B Backplane Figure 18 AT4000 REV B cable connection options between backplanes To set MASTER SLAVE refer to the following table U450 is MA...

Страница 19: ...cassette s Jan 14 2021 0 9 2 Changed U13 to 0 for ALL SLAVE configuration March 2 2021 0 9 3 Appendix 4 Added Appendix showing system block diagram Oct 26 2021 0 9 4 All Updated all sections to reflec...

Отзывы: