background image


OP 


20


Innovation. Quality. Performance. Best in Industry. Worldwide.


Plasma Units 

Plasma units power the cutting head of the plasma torch, and each option (i.e., plasma head, scribe, oxy-fuel) has 
its own plasma unit. The plasma unit can be customized to the particular cutting needs of the system, and 
operators may contact Sales for additional information on upgrades or changes in system cutting needs. 

MultiCam

 offers PowerMax and Hypertherm plasma units, though customers are welcome to provide their own 

type of plasma unit with their 

MultiCam


plasma 

system. 


Options


PowerMax Plasma Units 

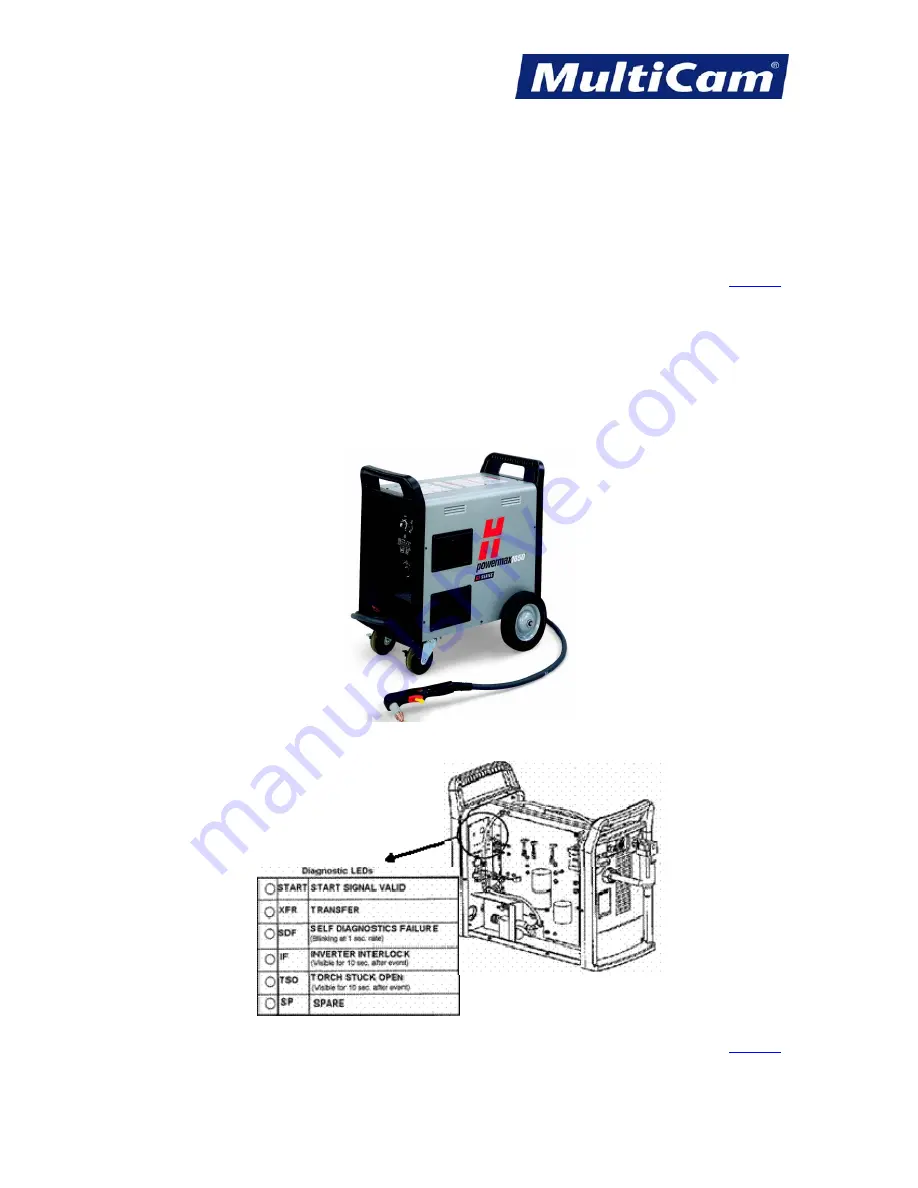
The PowerMax line of plasma units are easier to maintain and use because of the inverter technology. While air is 
the standard gas of the PowerMax line, most customers prefer using nitrogen when cutting stainless steel. 
Customers should always refer to the plasma unit user manual for proper settings and air supply. 


A diagnostics display is available on the inside of the PowerMax unit showing the different meanings of the LEDs 
used for diagnostics (shown below).   


Options


Routers * Lasers * Plasma * Water Jets * Knife Cutters  

                                                                                                                        www.MultiCam.com                        v. 03 13


Содержание Plasma 1000 V Series

Страница 1: ...ons KF 1 32 Menu Items MI 1 96 Options OP 1 24 Connections CN 1 11 Software SW 1 30 Read this manual before using this product Failure to follow the instructions and safety precautions in this manual can result in serious injury or death Keep this manual in a safe location Routers Lasers Plasma Water Jets Knife Cutters www MultiCam com v 03 13 ...

Страница 2: ... and can cause serious bodily damage up to and including possible death i The assembly installation and connection information is attached j The information relating to reducing noise and vibration is attached k The technician performing the installation will follow an installation checklist as well as an instruction checklist for training operators This information is attached l The residual risk...

Страница 3: ...ace for ventilation q The operating method to be followed if the machine is involved in an accident or breakdown includes the operator or installation technician securing the work area so that the installation technician may determine the cause of the malfunction and troubleshoot a possible workable solution If a blockage is likely to occur then the operator or installation technician will halt an...

Страница 4: ...ilter or filters on the vacuum hold down systems should be removed and cleaned All oil levels if applicable in the vacuum hold down system should be checked and filled if needed On MG Series routing systems the Y axis Ball Screw should also be lubricated with oil or lithium grease MT Series routing systems will need to follow this procedure for the X axis Ball Screw as well Some older routing syst...

Страница 5: ...ors should not use compressed air when cleaning out the cabinet as this action may cause unwanted particles to short out some of the electrical components MultiCam recommends that the belts on all transmissions and Lead Screw Z nuts be replaced every other year t The specifications of spare parts to be used that may affect the health and safety of operators are attached u The information on airbor...

Страница 6: ...o the control box 3 Reseat the X axis motor assemblies in the rack 7 Slightly loosen the bolts connecting the X castings to the gantry 4 Connect the motor connectors for XA XB Y and Z to the control box Electrical Installation Make sure the voltage setting is close to 40Vdc without going over 1 Measure the incoming voltage at C B with wires 100 L1 and 102 L3 6 Check the AC voltage at pins 23 24 fo...

Страница 7: ...bigger the perfect rectangle or square the more accurate Tighten Gantry Bolts Tighten both sides of the X axis moving gantry only Suite4 Machine Software Installation Reboot Machine Check for red letter errors Capture NVRAM Check the factory Flash settings before making any modifications Save to Computer and Tech computers Check Init and Firmware Version Type v press Enter Capture the screen or wr...

Страница 8: ...this is a new setup 8 Refer to the ConnectionManager dialog and locate the specific machine connection 4 Check the box next to Auto Launch JobNameServer 9 Right click on the connection and select Report a Problem 5 Check the box next to Set Preferred Neti using the Current Neti if the customer wants this computer to be in charge of all communications 10 Set up the following email settings Email em...

Страница 9: ...nce Best in Industry Worldwide Introduction top Customer Responsibilities for Safety 2 Power Lockout Instructions 4 Safety Measures for Handling Oxygen 5 Labels 6 Routers Lasers Plasma Water Jets Knife Cutters www MultiCam com v 03 13 ...

Страница 10: ...onnel should learn how the equipment functions and be able to respect the capabilities of the machinery Anyone working on or around the equipment should understand the potential losses associated with mishandling the machinery and its parts and be able and willing to follow all safety precautions Sudden movement loud noises horseplay etc must be avoided as such distractions may result in unsafe co...

Страница 11: ...n use When working with oxygen operators should refer to the Safety Measures for Handling Oxygen Operators should never leave the machine unattended during the cutting sequence Installation Safety An electrician must read and understand the electrical schematics prior to connecting the machine to the local power system Connecting the wrong voltage power will void the warranty All switches should b...

Страница 12: ...ic lockout latch 3 Insert any padlock into one of the holes of the lockout latch With the plastic lockout latch in this position the switch cannot be moved to the ON position 1 2 3 4 Throw the bulkhead switch to the OFF position 5 Open the control cabinet 6 Make sure the LEDs on the drives and inverters are not lit It may take a few minutes for the light from the LEDs to fade away 7 Make sure the ...

Страница 13: ...r manufacturer if repairs are needed on the oxygen cylinder valves At no point should an operator use a hammer or wrench to open the valves Like all pressurized gases used in cutting oxygen requires that operators approach and handle the cylinders with great care When operators use oxygen in the cutting sequence they should follow these steps 1 Stand to the side before opening each oxygen cylinder...

Страница 14: ...ys capitalized and presented in bold format Any auxiliary equipment e g fume extractor chiller will include vendor specific labels advising the customer of proper safety practices regarding those units as well The serial number label is unique to the machine The most common labels are identified below Cautions Caution labels indicate the potential for minor or moderate injury and are usually yello...

Страница 15: ...the potential for death or serious injury and usually show the word WARNING in black writing against an orange background These labels are normally located in areas where serious injury could be sustained such as the carriage Routers Lasers Plasma Water Jets Knife Cutters www MultiCam com v 03 13 ...

Страница 16: ...IN 8 Innovation Quality Performance Best in Industry Worldwide Routers Lasers Plasma Water Jets Knife Cutters www MultiCam com v 03 13 ...

Страница 17: ... the probability of death or serious injury and usually show the word DANGER in white writing against a red background These labels are normally located in areas where serious injury could occur such as the knife cartridge Routers Lasers Plasma Water Jets Knife Cutters www MultiCam com v 03 13 ...

Страница 18: ...white writing against a blue backdrop This label is normally located at the front of the machine Serial Number The serial number label indicates the name and contact information for the company specific serial number for the machine and voltage and amp information for the operating system This specific information relates to the table only Each auxiliary unit has its own serial number tag with mac...

Страница 19: ...Fast Start Plasma 2 Fast Start Oxyacetylene Torch 4 Squaring the Table 7 Hints and Tips 10 Contacting MultiCam 11 Maintenance 12 Maintenance Log 14 Warranty for Plasma Systems 15 Warranty Registration List 16 Routers Lasers Plasma Water Jets Knife Cutters www MultiCam com v 03 13 ...

Страница 20: ...ns on the HPR130 and HPR260 with auto gas consoles 5 Find Machine Hard Home Press Shift and Go Home to find the Hard Home 0 0 or the Machine Home by indexing the gantry carriage and Z assembly off of the proximity limit switches 6 Set Home Press Jog Speed to set the speed of the movement to slow medium or fast Press Jog Arrows to place the center of the head assembly over the front right corner of...

Страница 21: ...eypad will display a list of job folders and job files which are located in the C Dncfiles directory Press X axis Jog Arrows until the appropriate folder is highlighted in blue Press Enter to display the DNC files that are available in that particular folder Press X axis Jog Arrows until the appropriate file is highlighted in blue Press Start to begin the file 11 Start Cancel Pause Press Start to ...

Страница 22: ...a to Oxyfuel 6 Set Home Press Jog Speed to set the speed of the movement to slow medium or fast Press Jog Arrows to place the center of the torch over the front right corner of the material Press Set Home to set the home location for the oxyacetylene torch The system will prompt the operator as to whether the selected position should be set as Home and the display will read Press Down to set Rotat...

Страница 23: ...ccess the Flame Adjustment menu Adjust the flame for Low preheat High preheat and Cut Refer to a Welder s Guide for more information 11 Turn on Fume Extraction Turn on fume extraction to prevent creating unsafe conditions Operators should make sure that the fume extraction system is turned off when the oxyacetylene torch is off 12 Access DNC Press DNC This will display a list of job folders and jo...

Страница 24: ...amount of time necessary to cut a particular material Press Start to override the timer and begin the cutting sequence Press Z axis Jog Arrows to adjust the height during the cutting sequence Press Cancel to abort the cutting sequence Press Pause to yield the cutting sequence Operators should never leave the machine unattended during the cutting sequence Fast Starts Routers Lasers Plasma Water Jet...

Страница 25: ...eck the Square of the Table 1 Home the machine 2 Install a V point cutter or permanent marker to the cutting head 3 Jog the cutting head to the lower right corner of the table 4 Press Set Home 5 Jog the cutting head down in Z to make a small mark at X0 Y0 6 Use the Move command on the keypad to exactly position the cutting head at the next corner of a large square and make another small mark 7 Rep...

Страница 26: ... would be added to the current X square value found in the flash parameter location 23 Example Current X square Param 23 0 050 Calculated ΔX Square 0 090 New value for Param 23 0 040 Verify the Square of the Table After changing parameter 23 with the new value the operator must make some additional changes to insure that the square of the table is correct 1 Loosen the gantry casting bolts to allow...

Страница 27: ...50 square is better than 10 square Accurately squaring the gantry to the machine may take more than one attempt The rail distance can be measured from the center of the XA gantry casting to the center of the XB gantry casting Since it is often difficult to locate the exact center of the casting operators usually start at the outer edge of one gantry casting and measure to the inner edge of the oth...

Страница 28: ...plied back to the machine by pressing Find Home to index the machine When the machine has found Home the operator should press Return to Home 0 to move the machine back to the last home position and set home there before re establishing the Cut Height Lift Height and X Y Feedrate The Proximity Restart function can then be used to resume the file 4 Maintaining the Machine The MultiCam Plasma System...

Страница 29: ...3 stage coalescing filtration system filters water and particles oil and oil vapors from the gas supply as shown below Water and Particulate Filter Oil Filter Oil Vapor Filter Gas Supply Plasma Power Supply Fast Starts Contacting MultiCam For Sales questions or concerns please direct all necessary email correspondence to the following address sales multicam com Customers with technical questions a...

Страница 30: ...hield Check the gas volume and pressure Weekly The following tasks should be completed at the end of shift weekly on the MultiCam Plasma System Complete all daily tasks Clean the machine thoroughly and remove any excess grease grime Inspect the slag trays Check the slat condition Inspect the E chain Lube the torch O rings Rinse out the retaining cap and shield with distilled water Monthly The foll...

Страница 31: ...nually The following tasks should be completed at the end of last shift bi annually on the MultiCam Plasma System Complete all quarterly tasks Change the coolant Change the coolant filter Fast Starts Routers Lasers Plasma Water Jets Knife Cutters www MultiCam com v 03 13 ...

Страница 32: ...ation Quality Performance Best in Industry Worldwide Maintenance Log Date Support Personnel Maintenance Performed Recommendations Fast Starts Routers Lasers Plasma Water Jets Knife Cutters www MultiCam com v 03 13 ...

Страница 33: ...anty period in accordance with the following specific procedure MultiCam will at its option either repair or replace the parts at no charge Replacement parts may be refurbished All parts that are replaced shall become the property of MultiCam This warranty does not include the following items particulate filters timing belts hoses tooling dust brushes items consumed in normal use Also excluded fro...

Страница 34: ...rapped or returned at the Distributor s expense The customer assumes cost of shipment for returned items MultiCam will not issue Call Tags for any machine part or equipment Outside the USA Please contact the local MultiCam Distributor for specific instructions Fast Starts Warranty Registration List The following documents must be returned to MultiCam in order for the warranty to be registered Some...

Страница 35: ...l Library 12 Shift 12 DNC 13 Bar Code 14 Drive Enable 15 Cancel 15 Jog Speed 16 Help 16 Soft Homes 17 Enter 18 Find Home 18 Park Z Up or Down 18 Proximity Restart 19 Return to Home 0 20 Park X High or Low 20 Park Y High or Low 21 Preheat Cut Gas Test 22 Drive Disable 22 Controller Information 23 Execute Self Test 23 Set Soft Homes 24 Advanced 25 Advanced Features 27 Dry Run 27 Rotate File 28 Step ...

Страница 36: ...ght i e Normal Mode Shift Mode The computer connection is also indicated at the bottom right i e connected not connected Text will appear at the bottom to indicate what action is occurring or needs to be accomplished before the cutting sequence can be started e g Operators may press the X axis Down Jog Arrow to view additional menu items in the various menus available on the keypad The keypad also...

Страница 37: ...E Stop button must be pulled out when the main power switch is turned on Keypad Hot Keys for the Plasma The Hot Keys are the keys on the MultiCam Handheld Keypad which access functions without using the menu system The operator can access different aspects of the system using the Hot Keys which are listed under Normal Hot Key Functions and Shifted Hot Key Functions Normal Hot Key Functions as show...

Страница 38: ...k X High Preheat Cut Gas Test Park Y High Park Y Low Park X Low Drive Disable Controller Info Execute Self Test Set Soft Homes Keypad Go Home The Go Home function is a return to the current 0 0 Soft Home and Lift Height The coordinates can be modified but most operators prefer using Soft Homes for establishing different Home coordinates during the cutting process Press Go Home Hot Keys Keypad Rout...

Страница 39: ...isplay as a percentage of the actual speed Feed The Feedrate Override determines the percentage by which the operator adjusts the cut speed 1 Press Feedrate Override to adjust the feedrate in 1 increments when a file is being executed on the machine 2 Hold Feedrate Override to adjust the feedrate in faster moving 1 increments when a file is being executed on the machine Hot Keys Keypad Jog Z axis ...

Страница 40: ...re Pause was activated and continue with the commanded motion or the file 1 Press Pause to stop the machine for any reason 2 Press X axis Jog Arrows until the appropriate option is highlighted in blue a Continue finishes out the operation or file originally executed b Cancel ends the operation or file executed and shows Motion Cancelled on the keypad display c Jog allows the operator to Jog the ma...

Страница 41: ...ition the oxyacetylene torch scribe or similar attachment anywhere over the material 2 Press Set Surface 3 Enter the number corresponding to the attachment e g 2 for oxyacetylene torch using the number keypad 4 Press Enter to select the tool 5 Press Z axis Jog Arrows to lower the head assembly until the attachment is just above the surface of the table The operator should monitor the Jog speed whe...

Страница 42: ...le that is to be executed on the table will use this location as the software reference point home or origin 0 0 the machine will begin and return to this new origin and the X and Y coordinate locations are stored in the controller s memory The location of the Set Home position will be the new origin 0 0 until a new home is set The software reference point must be the material home point 1 Press J...

Страница 43: ...om the Set Home position The Z axis will reference from the surface of the material 1 Press Move 2 Enter the desired value for X from the number keypad e g 4 0 3 Press Enter to accept the value 4 Enter the desired value for Y from the number keypad e g 4 0 5 Press Enter to accept the value 6 Enter the desired value for Z from the number keypad e g 0 0 7 Press Enter to accept the value 8 Press Ente...

Страница 44: ... axes The Jog Arrows are used to Jog the location of the head assembly and to move through the menu Jog Speed can be pressed to change the Jogging speed of the machine 1 Left Arrow is the Y axis Positive Jog Key and Left Scroll Key in the menu 2 Up Arrow is the X axis Positive Jog Key and Line Up Key in the menu 3 Down Arrow is the X axis Negative Jog Key and Line Down Key in the menu 4 Right Arro...

Страница 45: ... help the operator handle many of the functions of the MultiCam Plasma System by providing the ability to set feedrates and other parameters run tests and cut basic shapes With the addition of some advanced features of the MultiCam Plasma System the operator can also adjust tools or duplicate shapes which create G Code files quickly 1 Press Menu to access the menu system 2 Press X axis Jog Arrows ...

Страница 46: ...s X axis Jog Arrows to position the cursor over the appropriate selection e g MS 02 AIR 3 Press Enter to access the material 4 Press Y axis Jog Arrows to position the cursor over the parameter to be changed i e AMP THICKNESS FEED 5 Press X axis Jog Arrows to change the value 6 Press Enter to accept the changes The display will return to the main menu Hot Keys Keypad Shift Pressing Shift before pre...

Страница 47: ... Jog Arrows until the appropriate directory is highlighted 4 Press Enter The keypad will display the DNC files that are available in that directory and directories or folders and any associated subfolders are displayed between brackets Press Enter while the blinking cursor is located over the 2 decimal points at the beginning of the directory to return to the list of directories if necessary 5 Pre...

Страница 48: ...cally return to the directory Hot Keys Keypad Bar Code The Bar Code function allows the operator to scan a label with the bar code scanner which will automatically call up and download the correct job for execution on the machine and is an option on MultiCam Plasma Systems The Bar Code Scanner is limited to 48 characters excluding the initial DNC path that is set up in JobNameServer e g C DNCfiles...

Страница 49: ...rator to find home after re enabling the motor drives 2 Press Enter to ensure proper machine operation Hot Keys Keypad Cancel Press Cancel to cancel or exit any selected function or menu item In some cases this needs to be pressed twice to make sure the function has been completely canceled Hot Keys Keypad Routers Lasers Plasma Water Jets Knife Cutters www MultiCam com v 03 13 ...

Страница 50: ...ons of any Hot Key selected There are 2 modes of the Help function Normal and Shifted In Normal mode the operator can review the standard function of any Hot Key on the display In Shifted mode the operator can review the second or shifted function of that key on the display 1 Press Help to access the Hot Key Help Feature 2 Press any key for a brief description of that key in Normal mode 3 Press Sh...

Страница 51: ...e operator to input a decimal into a numeric value 1 Press Soft Homes 2 Enter the appropriate number 1 9 to assign the proper value for the new home position e g 6 3 Press Enter to accept the soft home The display will acknowledge that the particular home position has been selected 4 Press Shift and Soft Homes to set new soft home locations Hot Keys Keypad Routers Lasers Plasma Water Jets Knife Cu...

Страница 52: ...tches after one of the following actions have been completed a The machine has just been turned on b The machine has stalled or lost its position coordinates c The machine has been stopped because the operator pushed in E Stop 2 Refer to the display as it will indicate when the system locates the targets for each axis The head assembly will be enabled when the Find Home function has been activated...

Страница 53: ...e it originally began This command will function through the internal replay buffer of the machine 1 Press Shift and Start from the Home position where the file was originally executed 2 Press Jog Arrows to move the head assembly to a position within the restart tolerance of the desired point for restart 3 Press Enter to begin the search The keypad display will indicate the coordinates when a poin...

Страница 54: ...w The Park X function will move the head and gantry assembly to a set park position that could be as far away as the maximum length of the table or all the way back in X axis This allows the operator to reload material on the table or examine work without interference 1 Press Shift and X axis Up Jog Arrow to move the head and gantry assembly to the high or farthest set park position 2 Press Shift ...

Страница 55: ...right or left in Y axis This allows the operator to examine the work without interference 1 Press Shift and Y axis Left Jog Arrow to move the head assembly to the left side of the gantry 2 Press Shift and Y axis Right Jog Arrow to move the head assembly to the right side of the gantry Hot Keys Keypad Routers Lasers Plasma Water Jets Knife Cutters www MultiCam com v 03 13 ...

Страница 56: ...te the Oxygen Hi and Fuel Hi solenoid valves d 3 will activate the Cut Oxygen and Pierce Rate solenoid valves 3 Press Cancel to exit the Preheat Cut Gas test Hot Keys Keypad Drive Disable The X Y and Z axis drives will be disabled in the event of a system failure or a mechanical obstruction to prevent possible damage to the individual drives The operator also has the ability to disable the drives ...

Страница 57: ...files and firmware as well as the types of Interface and Control boards 2 Press X axis Down Jog Arrow to access Ethernet information while viewing the controller information 3 Press DNC to change the IP address if necessary Hot Keys Keypad Execute Self Test Press Shift and Zero to enter the self test which runs a diagnostic on the following Memory verification Rectangle cutting Surface block check...

Страница 58: ...removed from the system 1 Press Jog Arrows to position the center of the head assembly where the new Soft Home location should be set 2 Press Jog Speed to change the Jogging speed if necessary 3 Press Shift and Soft Homes 4 Enter a number between 1 and 9 using the number keypad If the operator wants to save the Z value in the Soft Home he or she should contact a MultiCam technician for assistance ...

Страница 59: ...Firmware Version Controller and Interface Board rev and ID Keypad Version Ethernet Information Screen Ethernet Information IP Address Net Mask DHCP Server Address only shows if DHCP enabled Press DNC from this screen to be prompted to enable DHCP or specify an IP address Power Information Screen Power Information Main Voltage Value Web Voltage Value MODBUS Information MODBUS Information Number of ...

Страница 60: ...ts Knife Cutters www MultiCam com v 03 13 Drive Temperature Information Screen PCB Temperature Control Board Temperature Inputs Information Screen Each box shows the status of the specific input Dark off Bright on Machine Information Screen Machine Information Model and Type Serial Number Keypad ...

Страница 61: ...keypad displays Tool 1 Up when the head assembly would normally be in the UP position moving between contours The keypad displays Tool 1 Down when the head assembly would normally be in the material cutting the contours This command will function through the DNC or through the internal replay buffer of the machine 1 Make sure that JobNameServer has been activated on the computer 2 Press DNC The ke...

Страница 62: ... square material sufficiently when heavy materials are loaded onto the table so the Rotate File feature allows the operator to rotate the program to match the material 1 Press Jog Arrows to position the center of the head assembly over the rear right corner of the material and press Set Home 2 Press the Jog Forward to set the Rotation Point The keypad will briefly display the rotation setting then...

Страница 63: ...available in that directory and directories or folders and any associated subfolders are displayed between brackets Press Enter while the blinking cursor is located over the 2 decimal points at the beginning of the directory to return to the list of directories if necessary 5 Press X axis Jog Arrows until the appropriate file is highlighted Z axis Jog Arrows page up or down one screen at a time wh...

Страница 64: ...ows to select whether the machine should step along the X or Y axis 13 Press X axis Jog Arrows to select Yes or No for the Serpentine option If X axis was selected above and serpentine is selected next then the machine will cut the parts in a line down the X axis move over in the Y axis and cut back up the X axis This sequence of motions increases efficiency since the machine will not make a big s...

Страница 65: ...l automatically recognize that Dual Start is being requested Other Home values will not work a Press Jog Arrows to position the center of the head assembly where the first Soft Home location should be set b Press Shift and Soft Homes c Enter One for Home 1 and press Enter to record the Soft Home d Press Jog Arrows to position the center of the head assembly where the second Soft Home location shou...

Страница 66: ...n 1 or 2 on the op station to move the spindle to Soft Home 1 or 2 8 Press Start to begin the file 9 Press the other button on the op station to run the same job at the other Soft Home location after the first job file has been completed Operators should make sure the material has been properly loaded at the other location before beginning the job file at that location Advanced Keypad ...

Страница 67: ... 19 Update Material Library 20 Change Tip 21 Plasma Tip 22 Perf Mode 23 Recorded Home 24 SurfMap 25 Start Z Surface Mapping 26 Surf Mode 27 X Distance 28 Y Distance 28 Step Size 29 Z Seek Speed 30 Z Safe Lift 31 Save Surface Map 32 Load Surface Map 33 Surf Map Status 34 Move to Probe Offsets 35 Test I O 36 Shutdown 37 Gauge Chart 38 Digitize 39 Start Digitize 40 Auto Scan Rate 43 Auto Step Size 44...

Страница 68: ...e Sensor 67 Tip Usage 68 DNC_Mode 69 HD ComTst 71 Purge 72 VacMode 73 Kerf Comp 74 Select TL 75 PlasmaUnit 76 Lathe 77 Lathe Mode 78 Diameter of Part 79 Set Lathe Home 80 Move to Lathe Offset 81 Find Lathe Home 82 Set Resolution 83 Knife 85 Knife Feedrate 86 Knife Lift 87 Knife Dn Dly 88 Knife Up Dly 89 Closeness 90 Rotate Degree 91 Min Radius 92 Home Knife 93 Set Knife Offset 94 Move to Knife Off...

Страница 69: ...w values Some of these settings may not apply to all plasma systems 1 Press Menu to access the menu system 2 Press X axis Jog Arrows until Params_2D is highlighted in blue 3 Press Enter to access the Params_2D sub menu 4 Press X axis Jog Arrows until the appropriate option is highlighted in blue Certain menu items will then enter a sub menu with more selections X Y Feedrate Cut Height Pierce Heigh...

Страница 70: ...n programmed in the numerically controlled NC file The machine will default to 15 IPM if the machine loses power or the controller is rebooted 1 Press Menu to access the menu system 2 Press X axis Jog Arrows until Params_2D is highlighted in blue 3 Press Enter to access the Params_2D sub menu 4 Press X axis Jog Arrows until Cut Speed is highlighted in blue 5 Press Enter to adjust the cut speed 6 E...

Страница 71: ...the menu system 2 Press X axis Jog Arrows until Params_2D 3 Press Enter to access the Params_2D sub menu 4 Press X axis Jog Arrows until Cut Height is highlighted in blue 5 Press Enter to adjust the Cut Height 6 Enter the Cut Height using the number keypad e g 0 100 7 Press Enter to accept the value and return to the Params_2D sub menu Params_2D Menu Routers Lasers Plasma Water Jets Knife Cutters ...

Страница 72: ... the pierce cycle which helps to protect the life of the torch consumables 1 Press Menu to access the menu system 2 Press X axis Jog Arrows until Params_2D is highlighted in blue 3 Press Enter to access the Params_2D sub menu 4 Press X axis Jog Arrows until Pierce Height is highlighted in blue 5 Press Enter to adjust the pierce height 6 Enter the desired pierce height value from the number keypad ...

Страница 73: ...nter to access the Params_2D sub menu 4 Press X axis Jog Arrows until Lift Height is highlighted in blue 5 Press Enter to adjust the Lift Height 6 Enter the Lift Height using the number keypad e g 1 5 7 Press Enter to accept the value and return to the Params_2D sub menu The number entered should be a positive number but the display will show it as a negative number since movement up from the surf...

Страница 74: ...ess the menu system 2 Press X axis Jog Arrows until Params_2D is highlighted in blue 3 Press Enter to access the Params_2D sub menu 4 Press X axis Jog Arrows until Pierce Delay is highlighted in blue 5 Press Enter to adjust the pierce delay 6 Enter the desired pierce delay value from the number keypad e g 1000 7 Press Enter to accept the value and return to the Params_2D sub menu Params_2D Menu Ro...

Страница 75: ...e Z Tracking in the cutting sequence are also able to access additional menu items within the Params_2D menu Voltage Sample ATHC THC Delay HS Radius Max Volt Gap and Z Track Gage These additional menu items are no longer available once the operator toggles Z Tracking to No 1 Press Menu to access the menu system 2 Press X axis Jog Arrows until Params_2D is highlighted in blue 3 Press Enter to acces...

Страница 76: ... available if Z Tracking is enabled 1 Press Menu to access the menu system 2 Press X axis Jog Arrows until Params_2D is highlighted in blue 3 Press Enter to access the Params_2D sub menu 4 Press X axis Jog Arrows until Voltage is highlighted in blue 5 Press Enter to adjust the voltage settings 6 Enter the desired voltage value from the number keypad e g 124 a If the operator chooses to enter a spe...

Страница 77: ...ress Menu to access the menu system 2 Press X axis Jog Arrows until Params_2D is highlighted in blue 3 Press Enter to access the Params_2D sub menu 4 Press X axis Jog Arrows until Sample ATHC is highlighted in blue 5 Press Enter to toggle between Yes and No Choosing Yes will permit an automatic configuration of Voltage while choosing No will permit a value to be entered for Voltage Params_2D Menu ...

Страница 78: ...s Jog Arrows until Params_2D is highlighted in blue 3 Press Enter to access the Params_2D sub menu 4 Press X axis Jog Arrows until THC Delay is highlighted in blue 5 Press Enter to adjust the torch height control delay 6 Enter the desired pierce delay value from the number keypad e g 5400 7 Press Enter to accept the value and return to the Params_2D sub menu Params_2D Menu Routers Lasers Plasma Wa...

Страница 79: ...HS Radius is only available if Z Tracking is enabled 1 Press Menu to access the menu system 2 Press X axis Jog Arrows until Params_2D is highlighted in blue 3 Press Enter to access the Params_2D sub menu 4 Press X axis Jog Arrows until HS Radius is highlighted in blue 5 Press Enter to adjust the touch off proximity radius 6 Enter the desired proximity radius value from the number keypad e g 4865 7...

Страница 80: ...eration point is reached Max Volt Gap is only available if Z Tracking is enabled 1 Press Menu to access the menu system 2 Press X axis Jog Arrows until Params_2D is highlighted in blue 3 Press Enter to access the Params_2D sub menu 4 Press X axis Jog Arrows until Max Volt Gap is highlighted in blue 5 Press Enter to adjust the maximum volt charge for the gap 6 Enter the desired pierce delay value f...

Страница 81: ...hen operators should set the Z Track Gage to thick Z Track Gage is only available if Z Tracking is enabled 1 Press Menu to access the menu system 2 Press X axis Jog Arrows until Params_2D is highlighted in blue 3 Press Enter to access the Params_2D sub menu 4 Press X axis Jog Arrows until Z Track Gage is highlighted in blue 5 Press Enter to adjust the Z tracking gage 6 Press Enter to toggle betwee...

Страница 82: ...m the material edge 1 Press Menu to access the menu system 2 Press X axis Jog Arrows until Params_2D is highlighted in blue 3 Press Enter to access the Params_2D sub menu 4 Press X axis Jog Arrows until Start on Edge is highlighted in blue 5 Press Enter to toggle between Yes and No Params_2D Menu Routers Lasers Plasma Water Jets Knife Cutters www MultiCam com v 03 13 ...

Страница 83: ... until Params_2D is highlighted in blue 3 Press Enter to access the Params_2D sub menu 4 Press X axis Jog Arrows until Speed Factor is highlighted in blue 5 Press Enter to adjust the speed factor 6 Enter the desired speed factor value from the number keypad e g 6 7 Press Enter to accept the value and return to the Params_2D sub menu Params_2D Menu Routers Lasers Plasma Water Jets Knife Cutters www...

Страница 84: ...s X axis Jog Arrows until Params_2D is highlighted in blue 3 Press Enter to access the Params_2D sub menu 4 Press X axis Jog Arrows until Arc Factor is highlighted in blue 5 Press Enter to adjust the arc factor 6 Enter the desired pierce delay value from the number keypad e g 0 80 7 Press Enter to accept the value and return to the Params_2D sub menu Params_2D Menu Routers Lasers Plasma Water Jets...

Страница 85: ... kerf width and lead in status a Kerf Width i Press Enter over Kerf Width ii Enter the corrected value using the number keypad Negative numbers should be used for an inside cut iii Press Enter to confirm the value and return to the Settings sub menu b Lead In i Press Enter over Lead In ii Press Enter to toggle between YES and NO c Lead In Length i Press Enter over Lead In Length ii Enter the Lead ...

Страница 86: ...cess the menu system 2 Press X axis Jog Arrows until Params_2D is highlighted in blue 3 Press Enter to access the Params_2D sub menu 4 Press X axis Jog Arrows until Update Material Library is highlighted in blue 5 Press Enter to make changes to the material library 6 Press Enter to update the material library or Exit to cancel the activity and return to the main display Params_2D Menu Routers Lase...

Страница 87: ...nu system 2 Press X axis Jog Arrows until Params_2D is highlighted in blue 3 Press Enter to access the Params_2D sub menu 4 Press X axis Jog Arrows until ChangeTip is highlighted in blue 5 Press Enter to configure the system 6 Press Enter to unload the material The keypad will briefly display the message Unloading Material and the display will return to the Params_2D sub menu Params_2D Menu Router...

Страница 88: ...s Jog Arrows until Params_2D is highlighted in blue 3 Press Enter to access the Params_2D sub menu 4 Press X axis Jog Arrows until Plasma Tip is highlighted in blue 5 Press Enter to adjust the shielding of the plasma tip 6 Press X axis Jog Arrows to move between Shield and Unshielded 7 Press Enter to accept the status and return to the Params_2D sub menu Params_2D Menu Routers Lasers Plasma Water ...

Страница 89: ... menu item works with the PowerMax plasma unit only 1 Press Menu to access the menu system 2 Press X axis Jog Arrows until Params_2D is highlighted in blue 3 Press Enter to access the Params_2D sub menu 4 Press X axis Jog Arrows until Perf Mode is highlighted in blue 5 Press Enter to toggle between Yes and No Params_2D Menu Routers Lasers Plasma Water Jets Knife Cutters www MultiCam com v 03 13 ...

Страница 90: ...emoved from the system 1 Press Jog Arrows to position the center of the head assembly where the new Soft Home location is to be set 2 Press Menu to access the menu system 3 Press X axis Jog Arrows until Recorded Home is highlighted in blue 4 Press Enter to access the Recorded Home function 5 Enter the desired number 1 9 to record the new home 6 Press Enter to return to the main menu Menu Routers L...

Страница 91: ...Menu to access the menu system 2 Press X axis Jog Arrows until SurfMap is highlighted in blue 3 Press Enter to access the SurfMap sub menu 4 Press X axis Jog Arrows until the appropriate option is highlighted in blue Certain menu items will then enter a sub menu with more selections Start Z Surf Mapping Surf Mode X Distance Y Distance Step Size Z Seek Speed Z Safe Lift Save Surface Map Load Surfac...

Страница 92: ...ess the SurfMap sub menu 4 Press X axis Jog Arrows until Start Z Surf Mapping is highlighted in blue 5 Press Enter to access the Z surface map function 6 Press Jog Arrows to place the head assembly at the area to be mapped 7 Press Enter to begin mapping The system will scan the area 8 Press Z axis Jog Arrows to Jog to the surface 9 Press Enter to begin mapping the surface The system will Jog to th...

Страница 93: ...enu system 2 Press X axis Jog Arrows until SurfMap is highlighted in blue 3 Press Enter to access the SurfMap sub menu 4 Press X axis Jog Arrows until Surf Mode is highlighted in blue 5 Press Enter to select the type of surface mode e g None 6 Press Z axis Jog Arrows to move between the types of modes The double arrows indicate which mode is selected 7 Press Enter to set the system for that mode T...

Страница 94: ... highlighted in blue 3 Press Enter to access the SurfMap sub menu 4 Press X axis Jog Arrows until X Distance or Y Distance is highlighted in blue 5 Press Enter to adjust the distances for either axis 6 Enter the value for each distance using the number keypad e g 5 000 7 Press Enter to accept the value entered and return to the SurfMap sub menu SurfMap Menu Routers Lasers Plasma Water Jets Knife C...

Страница 95: ...ows until SurfMap is highlighted in blue 3 Press Enter to access the SurfMap sub menu 4 Press X axis Jog Arrows until Step Size is highlighted in blue 5 Press Enter to adjust the step size 6 Enter the value for the step size using the number keypad e g 1 000 7 Press Enter to accept the value and return to the SurfMap sub menu SurfMap Menu Routers Lasers Plasma Water Jets Knife Cutters www MultiCam...

Страница 96: ...fMap is highlighted in blue 3 Press Enter to access the SurfMap sub menu 4 Press X axis Jog Arrows until Z Seek Speed is highlighted in blue 5 Press Enter to access the Z assembly speed 6 Enter the value for the Z assembly speed using the number keypad e g 0 500 7 Press Enter to accept the value entered and return to the SurfMap sub menu SurfMap Menu Routers Lasers Plasma Water Jets Knife Cutters ...

Страница 97: ... Jog Arrows until SurfMap is highlighted in blue 3 Press Enter to access the SurfMap sub menu 4 Press X axis Jog Arrows until Z Safe Lift is highlighted in blue 5 Press Enter to access the Z Safe Limit 6 Enter the value for the Z Safe Limit using the number keypad e g 0 200 7 Press Enter to accept the value entered and return to the SurfMap sub menu SurfMap Menu Routers Lasers Plasma Water Jets Kn...

Страница 98: ...lighted in blue 3 Press Enter to access the SurfMap sub menu 4 Press X axis Jog Arrows until Save Surface Map is highlighted in blue 5 Press Enter to enter the surface map to be saved 6 Enter the value for the map being saved using the number keypad 7 Press Enter to accept the number The system will prompt the operator about saving the Map File 8 Press Enter to update or Cancel to exit without sav...

Страница 99: ...3 Press Enter to access the SurfMap sub menu 4 Press X axis Jog Arrows until Load Surface Map is highlighted in blue 5 Press Enter to access the saved surface map 6 Enter the value for the saved surface map using the number keys If the operator types in a map number that does not exist the system will indicate that the map number does not exist and will return to the SurfMap sub menu 7 Press Enter...

Страница 100: ...n the X and Y axes to verify the Z position If no surface map has been loaded then the status will remain inactive 1 Press Menu to access the menu system 2 Press X axis Jog Arrows until SurfMap is highlighted in blue 3 Press Enter to enter the SurfMap sub menu 4 Press X axis Jog Arrows until Surf Map Status is highlighted in blue 5 Press Enter to toggle the surface map to active or inactive SurfMa...

Страница 101: ...1 Press Menu to access the menu system 2 Press X axis Jog Arrows until SurfMap is highlighted in blue 3 Press Enter to enter the SurfMap sub menu 4 Press X axis Jog Arrows until Move to Probe Offsets is highlighted in blue 5 Press Enter to access the probe offsets 6 Press Enter to move the offsets 7 Press Cancel to return to the SurfMap sub menu SurfMap Menu Routers Lasers Plasma Water Jets Knife ...

Страница 102: ... is highlighted in blue 3 Press Enter to enter the SurfMap sub menu 4 Press X axis Jog Arrows until Test I O is highlighted in blue 5 Press Enter to test the input output 6 Press 1 to toggle the slider up and down The display will indicate which direction is active 7 Press Cancel to exit the Test I O function and return to the SurfMap sub menu SurfMap Menu Routers Lasers Plasma Water Jets Knife Cu...

Страница 103: ...me 1 Press Menu to access the menu system 2 Press X axis Jog Arrows until Shutdown is highlighted in blue 3 Press Enter to access the Shutdown sequence Operators may press Y axis Jog Arrows to move between Yes and No 4 Press Enter when Yes is highlighted to shut down the machine The system will disable the motor drives and prompt the operator when it is safe to power down the machine If No is sele...

Страница 104: ...lighted in blue 3 Press Enter to access the Gauge Chart 4 Press X axis Jog Arrows until the blinking cursor is over the first letter of the appropriate material 5 Press Enter to access the conversion information for the material e g Galvanized 6 Press X axis Jog Arrows to review the appropriate conversion factors 7 Press Cancel to return to the main menu Menu Routers Lasers Plasma Water Jets Knife...

Страница 105: ...am systems carry the Digitize option but the Digitize option can be purchased from the local distributor 1 Press Menu to access the menu system 2 Press X axis Jog Arrows until Digitize is highlighted in blue 3 Press Enter to access the Digitize sub menu 4 Press X axis Jog Arrows until the menu item is highlighted in blue Some menu items will then enter a sub menu with more selections Start Digitiz...

Страница 106: ...ooden object on MDF 2 Turn on the table vacuum to hold the part flat to the sacrifice material Warped material can introduce errors in the scanning process 3 Lower the LED probe to usually about 3 8 1 2 above the material The numbers on the counter will decline e g 70 134 and then 134 16 at the contrast edge 4 Raise the probe until the counter shows the higher number e g 134 and press the Set butt...

Страница 107: ...nter This will set the point for the file 13 Jog the digitizer laser away slightly so that the beam splits the target and non target areas 14 Press Five to begin Auto Scan The system will scan back and forth across the object for a few seconds at the rate and step size entered in the Digitize menu items before moving in the set direction along the contour of the pattern The scanner will continue a...

Страница 108: ... as needed 17 Open Machine Tools JobNameServer Digitize 18 Click on and select the folder to save the file All files are saved automatically as CNC files Operators who want to save the file as a DXF should make sure the checkbox is filled Digitize Menu Routers Lasers Plasma Water Jets Knife Cutters www MultiCam com v 03 13 ...

Страница 109: ...ess time to complete Operators will need to rely on the material the complexity of the object and experience to find the best time 1 Press Menu to access the menu system 2 Press X axis Jog Arrows until Digitize is highlighted in blue 3 Press Enter to access the Digitize sub menu 4 Press X axis Jog Arrows until Auto Scan Rate is highlighted in blue 5 Press Enter to access the automatic scan rate fu...

Страница 110: ...ple or the part is large then operators are encouraged to use a larger step size e g 1 0 25 4mm 1 Press Menu to access the menu system 2 Press X axis Jog Arrows until Digitize is highlighted in blue 3 Press Enter to access the Digitize sub menu 4 Press X axis Jog Arrows until Auto Step Size is highlighted in blue 5 Press Enter to access the automatic step size function 6 Enter the value for the st...

Страница 111: ...to access the menu system 2 Press X axis Jog Arrows until Digitize is highlighted in blue 3 Press Enter to access the Digitize sub menu 4 Press X axis Jog Arrows until Scan Mode is highlighted in blue 5 Press Enter to toggle between Edge and Line 6 Continue with the Digitize setup or press Cancel to exit the Digitize sub menu Digitize Menu Routers Lasers Plasma Water Jets Knife Cutters www MultiCa...

Страница 112: ...d can leave the setting OFF if most of the corners are rounded 1 Press Menu to access the menu system 2 Press X axis Jog Arrows until Digitize is highlighted in blue 3 Press Enter to access the Digitize sub menu 4 Press X axis Jog Arrows until Add Corners is highlighted in blue 5 Press Enter to toggle between YES and NO 6 Continue with the Digitize setup or press Cancel to exit the Digitize sub me...

Страница 113: ...rams for importation 1 Press Menu to access the menu system 2 Press X axis Jog Arrows until Digitize is highlighted in blue 3 Press Enter to access the Digitize sub menu 4 Press X axis Jog Arrows until Output Start is highlighted in blue 5 Press Enter to toggle between YES and NO 6 Continue with the Digitize setup or press Cancel to exit the Digitize sub menu Digitize Menu Routers Lasers Plasma Wa...

Страница 114: ...es is highlighted in blue 3 Press Enter to access the Cut Utilities sub menu 4 Press X axis Jog Arrows until the appropriate option is highlighted in blue 5 Press Enter to accept the appropriate command or press Cancel during the process to exit the function without changing any settings Material Cutoff Circle Square Rectangle Radiused Rectangle Polygon RipCut Flange Menu Routers Lasers Plasma Wat...

Страница 115: ...as the cut will begin at the current X Y location of the head assembly 2 Press Jog Arrows to position the head assembly in the desired start position 3 Press Menu to access the menu system 4 Press X axis Jog Arrows until Cut Utilities is highlighted in blue 5 Press Enter to access the Cut Utilities sub menu 6 Press X axis Jog Arrows until Material Cutoff is highlighted in blue 7 Press Enter to acc...

Страница 116: ...for the Y Cutoff Distance using the number keypad e g 60 12 Press Enter to accept the value 13 Press Start to execute Material Cutoff Cancel to abort the function or Pause to reposition the start point Cut Utilities Menu Routers Lasers Plasma Water Jets Knife Cutters www MultiCam com v 03 13 ...

Страница 117: ...Cut Height Lift Height Pierce Height and X Y Feedrate 2 Press Menu to access the menu system 3 Press X axis Jog Arrows until Cut Utilities is highlighted in blue 4 Press Enter to access the Cut Utilities sub menu 5 Press X axis Jog Arrows until Circle is highlighted in blue 6 Press Enter to access the Circle function 7 Enter the radius of the Circle using the number keypad e g 0 50 8 Press Enter t...

Страница 118: ...cess the menu system 3 Press X axis Jog Arrows until Cut Utilities is highlighted in blue 4 Press Enter to access the Cut Utilities sub menu 5 Press X axis Jog Arrows until Square is highlighted in blue 6 Press Enter to access the Square function 7 Enter the length of the side for the Square using the number keypad e g 9 000 8 Press Enter to accept the value 9 Press Start to execute Square Cut Can...

Страница 119: ...m 3 Press X axis Jog Arrows until Cut Utilities is highlighted in blue 4 Press Enter to access the Cut Utilities sub menu 5 Press X axis Jog Arrows until Rectangle is highlighted in blue 6 Press Enter to access the Rectangle function 7 Enter the length of the X and Y sides for the Rectangle using the number keypad e g X 19 Y 20 8 Press Enter to accept the X value 9 Press Enter to accept the Y valu...

Страница 120: ...ierce Height and X Y Feedrate 2 Press Menu to access the menu system 3 Press X axis Jog Arrows until Cut Utilities is highlighted in blue 4 Press Enter to access the Cut Utilities sub menu 5 Press X axis Jog Arrows until Radiused Rectangle is highlighted in blue 6 Press Enter to access the Radiused Rectangle function 7 Enter the Length of the X and Y sides for the Rectangle using the number keypad...

Страница 121: ...rners using the number keypad e g 1 5 11 Press Enter to accept the value of the radius 12 Press Start to execute Radiused Rectangle Cut Cancel to abort the function or Pause to reposition the start point Cut Utilities Menu Routers Lasers Plasma Water Jets Knife Cutters www MultiCam com v 03 13 ...

Страница 122: ...Y Feedrate 2 Press Menu to access the menu system 3 Press X axis Jog Arrows until Cut Utilities is highlighted in blue 4 Press Enter to access the Cut Utilities sub menu 5 Press X axis Jog Arrows until Polygon is highlighted in blue 6 Press Enter to access the Polygon function 7 Enter the number of sides ranging between 3 and 20 for the Polygon using the number keypad e g 3 8 Press Enter to accept...

Страница 123: ...rt position 3 Press Menu to access the menu system 4 Press X axis Jog Arrows until Cut Utilities is highlighted in blue 5 Press Enter to access the Cut Utilities sub menu 6 Press X axis Jog Arrows until RipCut is highlighted in blue 7 Press Enter to access the Rip Cut function 8 Press Set Surface to toggle between Jog and Cut 9 Press Jog Arrows to start moving the head assembly which will plunge i...

Страница 124: ...he menu system 3 Press X axis Jog Arrows until Cut Utilities is highlighted in blue 4 Press Enter to access the Cut Utilities sub menu 5 Press X axis Jog Arrows until Flange is highlighted in blue 6 Press Enter to access the Flange function 7 Enter the number of bolts for the flange using the number keypad e g 4 and press Enter 8 Enter the bolt center diameter using the number keypad e g 3 000 and...

Страница 125: ...r keypad e g 2 000 and press Enter 11 Enter the outer diameter using the number keypad e g 4 000 and press Enter 12 Press Start to execute Flange Cut Cancel to abort the function or Pause to reposition the start point Cut Utilities Menu Routers Lasers Plasma Water Jets Knife Cutters www MultiCam com v 03 13 ...

Страница 126: ...nu items 1 Press Menu to access the menu system 2 Press X axis Jog Arrows until Utility is highlighted in blue 3 Press Enter to access the Utility sub menu 4 Press X axis Jog Arrows until the appropriate option is highlighted in blue Certain menu items will then enter a sub menu with more selections Clear Home Show Job_Time Reboot Set X Park Position Load Material Change Tip Calibrate Sensor Tip U...

Страница 127: ...n does not erase Soft Home 1 Press Menu to access the menu system 2 Press X axis Jog Arrows until Utility is highlighted in blue 3 Press Enter to access the Utility sub menu 4 Press X axis Jog Arrows until Clear Home is highlighted in blue 5 Press Enter to clear the Home position and return to Utility sub menu Utility Menu Routers Lasers Plasma Water Jets Knife Cutters www MultiCam com v 03 13 ...

Страница 128: ... access the menu system 2 Press X axis Jog Arrows until Utility is highlighted in blue 3 Press Enter to access the Utility sub menu 4 Press X axis Jog Arrows until Show Job Time is highlighted in blue 5 Press Enter to view the exact job time 6 Press Cancel to return to the Utility sub menu Utility Menu Routers Lasers Plasma Water Jets Knife Cutters www MultiCam com v 03 13 ...

Страница 129: ...ty is highlighted in blue 3 Press Enter to access the Utility sub menu 4 Press X axis Jog Arrows until Reboot is highlighted in blue 5 Press Enter to access the reboot process 6 Press Y axis Jog Arrows to move between Yes and No 7 Press Enter to process the reboot of the machine If No is selected then the display will return to the Utility sub menu Utility Menu Routers Lasers Plasma Water Jets Kni...

Страница 130: ...ss Menu to access the menu system 2 Press X axis Jog Arrows until Utility is highlighted in blue 3 Press Enter to access the Utility sub menu 4 Press X axis Jog Arrows until Set X Park Position is highlighted in blue 5 Press Enter to access the Set X Park Position function 6 Enter the desired park position for the head assembly in X using the number keypad e g 100 000 or enter 0 to use the table s...

Страница 131: ...s Menu to access the menu system 2 Press X axis Jog Arrows until Utility is highlighted in blue 3 Press Enter to access the Utility sub menu 4 Press X axis Jog Arrows until Load Material is highlighted in blue 5 Press Enter to access the Load Material menu 6 Press Enter to send the current material configuration to the plasma system and return to the Utility sub menu Utility Menu Routers Lasers Pl...

Страница 132: ... to access the menu system 2 Press X axis Jog Arrows until Utility is highlighted in blue 3 Press Enter to access the Utility sub menu 4 Press X axis Jog Arrows until Change Tip is highlighted in blue 5 Press Enter to access the Change Tip sub menu 6 Press Enter to change the tip or Cancel to return to the Utility sub menu 7 Press Enter to enable the head assembly Utility Menu Routers Lasers Plasm...

Страница 133: ... Arrows until Calibrate Sensor is highlighted in blue 5 Press Enter to access the Calibrate Sensor function 6 Press Jog Arrows to position the head assembly over the material to be cut 7 Press Z axis Jog Arrows to lower the Z axis until the end of the head assembly is approximately 1 4 above the material 8 Press Enter to begin the calibration routine The machine will move the Z head down until the...

Страница 134: ...ss the menu system 2 Press X axis Jog Arrows until Utility is highlighted in blue 3 Press Enter to access the Utility sub menu 4 Press X axis Jog Arrows until Tip Usage is highlighted in blue 5 Press Enter to review the information 6 Press Enter to display the Clear Statistics screen 7 Press Enter to clear the tip usage statistics or Cancel to return to the Utility sub menu Utility Menu Routers La...

Страница 135: ...y capacity is full with a notice showing Error Writing File Out of Room The operator will need to delete a job file from the controller memory before adding any new job files 1 Press Menu to access the menu system 2 Press X axis Jog Arrows until Utility is highlighted in blue 3 Press Enter to access the Utility sub menu 4 Press X axis Jog Arrows until DNC Mode is highlighted in blue 5 Press Enter ...

Страница 136: ...ailable from the controller 8 Press X axis Jog Arrows until the particular job file to be run is highlighted in blue 9 Press Enter to access the job file and then Start to execute the job file Deleting Files from Controller DNC 1 Make sure the DNC mode is set for local 2 Press DNC to access the list of job files available in the controller 3 Press X axis Jog Arrows until the particular job file to...

Страница 137: ... menu 4 Press X axis Jog Arrows until HD ComTst is highlighted in blue 5 Press Enter to access HD ComTst The controller will then perform a communications test and will display one of the following messages Negative responses indicate failure in the communications Get State Error Code Meaning 3 System not responding 2 Error sending data 1 No communication from the system to the HD 0 Idle 1 Wait fo...

Страница 138: ...stem 2 Press X axis Jog Arrows until Utility is highlighted in blue 3 Press Enter to access the Utility sub menu 4 Press X axis Jog Arrows until Purge is highlighted in blue 5 Press Enter to purge the system No screen changes are made and the display remains at the Utility sub menu Utility Menu Routers Lasers Plasma Water Jets Knife Cutters www MultiCam com v 03 13 ...

Страница 139: ...ows until Utility is highlighted in blue 3 Press Enter to access the Utility sub menu 4 Press X axis Jog Arrows until Vac Mode is highlighted in blue 5 Press Enter to access the vacuum mode function 6 Press Y axis Jog Arrows to move between options The star indicates which mode is active 7 Press Enter to select the mode and return to the Utility sub menu Utility Menu Routers Lasers Plasma Water Je...

Страница 140: ...s left kerf almost exclusively so that CCW in the codes indicates internal cuts and CW indicates external cuts 1 Press Menu to access the menu system 2 Press X axis Jog Arrows until Kerf Comp is highlighted in blue 3 Press Enter to access kerf compensation 4 Enter the kerf value up to a maximum of 0 10 using the number keypad 5 Press Enter to accept the value The display will acknowledge the chang...

Страница 141: ...ted as needed by the operator and not all plasma systems will require all the tool numbers The Unassigned tools are purposely left open so that operators can establish those tools based on individual preferences and the particular options selected for the plasma system 1 Press Menu to access the menu system 2 Press X axis Jog Arrows until Select TL is highlighted in blue 3 Press Enter to access th...

Страница 142: ...s test The display extends so the operator must Jog down to see additional menu items 1 Press Menu to access the menu system 2 Press X axis Jog Arrows until PlasmaUnit is highlighted in blue 3 Press Enter to access the PlasmaUnit sub menu 4 Press X axis Jog Arrows until the appropriate option is highlighted and press Enter Each display will provide read only information regarding the particular he...

Страница 143: ...nu to access the menu system 2 Press X axis Jog Arrows until Lathe is highlighted in blue 3 Press Enter to access the Lathe sub menu 4 Press X axis Jog Arrows until the appropriate option is highlighted in blue Certain menu items will then enter a sub menu with more selections Lathe Mode Diam of Part Set Lathe Home Move To Lathe Offset Find Lathe Home Set Resolution Menu Routers Lasers Plasma Wate...

Страница 144: ...ting during the cutting sequence 1 Press Menu to access the menu system 2 Press X axis Jog Arrows until Lathe is highlighted in blue 3 Press Enter to access the Lathe sub menu 4 Press X axis Jog Arrows until Lathe Mode is highlighted in blue 5 Press Enter to toggle between OFF and ON Lathe Menu Routers Lasers Plasma Water Jets Knife Cutters www MultiCam com v 03 13 ...

Страница 145: ...e 1 Press Menu to access the menu system 2 Press X axis Jog Arrows until Lathe is highlighted in blue 3 Press Enter to access the Lathe sub menu 4 Press X axis Jog Arrows until Diameter of Part is highlighted in blue 5 Press Enter to set the diameter value 6 Enter the diameter of the part e g 6 00 7 Press Enter to save the value and return to the Lathe sub menu Lathe Menu Routers Lasers Plasma Wat...

Страница 146: ...u to access the menu system 2 Press X axis Jog Arrows until Lathe is highlighted in blue 3 Press Enter to access the Lathe sub menu 4 Press X axis Jog Arrows until Set Lathe Home is highlighted in blue 5 Press Enter to set the home location for the lathe The display will return to the Lathe sub menu Lathe Menu Routers Lasers Plasma Water Jets Knife Cutters www MultiCam com v 03 13 ...

Страница 147: ...axis Jog Arrows until Lathe is highlighted in blue 3 Press Enter to access the Lathe sub menu 4 Press X axis Jog Arrows until Move to Lathe Offset is highlighted in blue 5 Press Enter to set the lathe offset value 6 Press Enter again to move to the lathe 7 Press Jog Arrows to move the plasma head to the lathe 8 Press Enter to set the lathe offset Lathe Menu Routers Lasers Plasma Water Jets Knife C...

Страница 148: ... the menu system 2 Press X axis Jog Arrows until Lathe is highlighted in blue 3 Press Enter to access the Lathe sub menu 4 Press X axis Jog Arrows until Find Lathe Home is highlighted in blue 5 Press Enter to find the Lathe Home The lathe will rotate and the display will return to the Lathe sub menu Lathe Menu Routers Lasers Plasma Water Jets Knife Cutters www MultiCam com v 03 13 ...

Страница 149: ... axis Jog Arrows until Set Resolution is highlighted in blue 5 Press Enter to access the resolution setting 6 Press Enter again to set the lathe resolution 7 Enter the number of rotations required to set the resolution The system defaults to 1 but operators may choose a higher number for increased confidence in its positioning 8 Press Enter The system will find the Lathe home and then rotate the n...

Страница 150: ...ormance Best in Industry Worldwide 9 Press Enter to accept the changes to the resolution and find home The display will return to the Lathe sub menu Lathe Menu Routers Lasers Plasma Water Jets Knife Cutters www MultiCam com v 03 13 ...

Страница 151: ... lines into material The oscillating knife has a straight blade formation that moves at approximately 2000 Hz Most operators using the knife option are cutting insulation or duct liner The display extends so the operator must Jog down to see additional menu items 1 Press Menu to access the menu system 2 Press X axis Jog Arrows until Knife is highlighted in blue 3 Press Enter to access the Knife su...

Страница 152: ...system 2 Press X axis Jog Arrows until Knife is highlighted in blue 3 Press Enter to access the Knife sub menu 4 Press X axis Jog Arrows until XY Feedrate is highlighted in blue 5 Press Enter to set the cutting speed 6 Input the cutting speed e g 25 and press Enter The value will be displayed on the Knife sub menu Knife Menu Routers Lasers Plasma Water Jets Knife Cutters www MultiCam com v 03 13 ...

Страница 153: ...erator must set the Knife Lift value from the Knife menu options before executing the cut file 1 Press Menu to access the menu system 2 Press X axis Jog Arrows until Knife is highlighted in blue 3 Press Enter to access the Knife sub menu 4 Press X axis Jog Arrows until Knife Lift is highlighted in blue 5 Press Enter to set the Knife Lift 6 Enter lift height e g 1 500 and press Enter The value will...

Страница 154: ...quence begins 1 Press Menu to access the menu system 2 Press X axis Jog Arrows until Knife is highlighted in blue 3 Press Enter to access the Knife sub menu 4 Press X axis Jog Arrows until Knife Dn Dly is highlighted in blue 5 Press Enter to set the Knife Down Delay 6 Enter the value e g 1000msec and press Enter The value will be displayed on the Knife sub menu Knife Menu Routers Lasers Plasma Wat...

Страница 155: ...ited the material 1 Press Menu to access the menu system 2 Press X axis Jog Arrows until Knife is highlighted in blue 3 Press Enter to access the Knife sub menu 4 Press X axis Jog Arrows until Knife Up Dly is highlighted in blue 5 Press Enter to set the Knife Up Delay 6 Enter the value e g 1000msec and press Enter The value will be displayed on the Knife sub menu Knife Menu Routers Lasers Plasma W...

Страница 156: ...igh minimum radius value Operators who wish to disable rounding should set a high closeness value and a low minimum radius value If the arc from the closeness value is less than the minimum radius value then the knife will move to the vertex lift up to the Knife Lift Height rotate to follow the path exactly and re enter the material to continue the job file 1 Press Menu to access the menu system 2...

Страница 157: ...ome operators will use a lower degree for thicker materials and a higher degree for thinner materials to prevent extra indentations in the material from where the knife rotated Operators who wish to enable rounding should set a low closeness value a high minimum radius value and a rotate degree value of greater than 90 Operators who wish to disable rounding should set a high closeness value a low ...

Страница 158: ...n and continue cutting The parameters at the keypad have little or no effect on arc commands in G Code Operators who wish to enable rounding should set a high minimum radius value and a low closeness value Operators who wish to disable rounding should set a low minimum radius value and a high closeness value 1 Press Menu to access the menu system 2 Press X axis Jog Arrows until Knife is highlighte...

Страница 159: ...ical Home location 1 Press Menu to access the menu system 2 Press X axis Jog Arrows until Knife is highlighted in blue 3 Press Enter to access the Knife sub menu 4 Press X axis Jog Arrows until Home Knife is highlighted in blue 5 Press Enter to access the Home Knife function 6 Wait until the Knife has located its Home position and the keypad shows the Knife sub menu before continuing with the setu...

Страница 160: ...enu to access the menu system 2 Press X axis Jog Arrows until Knife is highlighted in blue 3 Press Enter to access the Knife sub menu 4 Press X axis Jog Arrows until K Offset is highlighted in blue 5 Press Enter to adjust the knife offset 6 Enter the number for the knife to be adjusted e g 31 and press Enter to accept the value 7 Press Jog Arrows to reach the Knife Offset and press Enter 8 Press E...

Страница 161: ...s the menu system 2 Press X axis Jog Arrows until Knife is highlighted in blue 3 Press Enter to access the Knife sub menu 4 Press X axis Jog Arrows until Move to Knife Offset is highlighted in blue 5 Press Enter to access the Move to Knife Offset function 6 Enter the knife number e g 31 7 Press Enter to move to the offset The display will return to the Knife sub menu Knife Menu Routers Lasers Plas...

Страница 162: ...leting the cutting sequences 1 Press Menu to access the menu system 2 Press X axis Jog Arrows until Knife is highlighted in blue 3 Press Enter to access the Knife sub menu 4 Press X axis Jog Arrows until Knife 1 Slider Test is highlighted in blue 5 Enter the knife number e g 31 and press Enter 6 Press Enter to begin the knife slider test 7 Enter 1 to move the knife slider along the Z axis 8 Press ...

Страница 163: ...ter 9 Bar Code Scanner 10 Liner Cutter Pinch Roller 11 Knife 12 Scribe 12 Skirt Guard 13 Lathe 13 Oxy Fuel 14 Downdraft Tables 15 Water Tables 16 Operator Station 18 Fume Extraction 19 Plasma Units 20 PowerMax Plasma Units 20 Troubleshooting Tips for the PowerMax Plasma Unit 21 Hypertherm Plasma Units 22 Safety Mat 23 Light Curtains 24 Routers Lasers Plasma Water Jets Knife Cutters www MultiCam co...

Страница 164: ...s The Digitize Commands are used to provide commands and key locations for Manual Digitizing and Rapid Shape Only a few of these commands are used in Rapid Shape 1 Linear Feedrate Up allows straight line point to point moves in these G Code Commands G00 for Pen Up PU G01 for Pen Down PD 2 Spline Feedrate Up allows moving a series of points that make up a spline in these G Code Commands G25 G26 G27...

Страница 165: ...U command will be generated on the following move This allows the operator to produce only one command even if the PD PU key is pressed multiple times 10 Exit Cancel Exit ends the Job and exits Digitizing in the G Code Command M02 If the current PD PU state is PD then an M21 will be issued to lift the pen prior to exiting 11 Enter Enter enters a point When entering a point in Linear mode either a ...

Страница 166: ...tizing 6 Enter a numerical name for the file to be created When executing or importing the file the operator must include a number before dig cnc e g 1234dig cnc 7 Jog to the start of a contour and press Enter This carries the PU move to just above the first location Digitize starts in a PU mode so the first move is a PU move 8 Press Material Library to toggle between PU and PD This enters a PD mo...

Страница 167: ...asma system to automatically follow an edge of a pattern or object placed on the table and record the outline on the host PC Easy and accurate calibration makes digitizing a variety of materials possible with digitizing speeds typically of 60 inches minute The Rapid Shape software generates a G Code file for importing to many CAD CAM systems Options Routers Lasers Plasma Water Jets Knife Cutters w...

Страница 168: ...Scan rate sets the speed the system will auto scan The default setting is 2 0 per second b Step Size sets the distance along a line between 2 scanned points The default setting is 15 c Scan Mode sets the style of scanning to be completed Operators should select EDGE for templates and LINE for drawings or patterns d Add Corners adjusts for corners when detected by the system e Output START places S...

Страница 169: ...access manual mode The operator may continue Auto Scan by moving the head assembly forward along the contour at least the step size distance while keeping the laser dot close to but not actually on the material and pressing Auto Scan The system will move back and forth to calibrate again before continuing around the contour At the end of the Auto Scan Digitize will be left in a PU move 14 Repeat f...

Страница 170: ...es START at the beginning of the G Code file which is required by some software packages due to the importance of the G Code file Rapid Shape will exit if one of the following occurs The module is not loaded The operator should load the module by selecting JobNameServer from the MultiCam folder under the Windows Start menu Once the module is loaded the plasma system should be calibrated to the mat...

Страница 171: ... Laser Pointer ON and OFF by pressing 0 and the Home screen will show whether or not the Laser Pointer is active by inserting the letter L in the lower right corner Operators who wish to set Home with the standard method should leave the Laser Pointer OFF Operators cannot set Home using the Laser Pointer if the Laser Pointer is OFF 2 Jog the Laser Pointer to the Home location 3 Press Set Home The ...

Страница 172: ...the machine operator scans the bar code DNC will automatically call up the correct file and send it to the controller This saves time and reduces the chance for error An excellent tool for communication of special instructions the work order contains a graphical representation of the cut file material descriptions and user notes The bar code label on the work order ensures that the correct job is ...

Страница 173: ...a piston style configuration to raise and lower the pinch roller at the back of the table and hold the material in place The pinch roller provides up to 2 50 8mm clearance and is controlled by the switchbox at the front of the machine The pinch roller is raised when the knob is pointing toward Unclamp and lowered when the knob is pointing toward Clamp Options Routers Lasers Plasma Water Jets Knife...

Страница 174: ...is available in pneumatic piston style and is used to etch characters directly onto material Using a carbide stylus the scribe is a better choice for making marks on steel or other metals than using the marking function available in the HPR260 or other plasma unit The scribe provides a deeper indentation when used directly on metal and this marking cannot be wiped off or smudged during regular cle...

Страница 175: ... as another consumable in the cut sequence Options Lathe The Lathe option offers plasma operators the ability to complete plasma cuts on square or round tubes The lathe can either hold a square tube in a fixed position for cutting along the X and Y axes or a rotate a round tube for X axis cuts only Specific coding is required for operating the lathe and the lathe is available on plasma systems wit...

Страница 176: ...t are cleaner and less expensive Such alternate fuels are methylacetylene propadiene MAPP Propane Propylene Natural Gas and Hydraflame The Oxy Fuel torch is designed to cut up to 6 152 4mm thick solid steel The configuration option available for MultiCam Plasma systems uses a dual pressure high low regulator manifold to conserve gases used during the cutting process and provide shortened pre heat ...

Страница 177: ... automatic zones allow doors to open and close inside the table thereby connecting the fume evacuation with the area in which the plasma head is working Each zone is 41 1042mm long The table sections can have either 2 or 3 zones depending on the size of the table The controller alerts the corresponding solenoid that the plasma head is in a particular zone The doors in front of the operation zone c...

Страница 178: ...amp 200 conventional plasma systems rather than Hi Def plasma systems since water tables can be detrimental to Hi Def plasma cutting if the water level is not properly adjusted The water level MUST be dropped approximately 1 0 25 4mm below the plate to prevent splash from contaminating the Hi Def consumables Consumable contamination can cause initial height sensing and height controlling problems ...

Страница 179: ...ly actuated at 115Vac Either a 3 position switch or 2 individual ON OFF switches must be supplied 3 Install the 2 Water Drain The measurements listed are for reference only and may differ per machine 4 Fill the Water Table a Locate the outer and inner enclosures The outer enclosure contains water while the inner enclosure holds air b Fill the outer enclosure of the water table using any water sour...

Страница 180: ... equipped with a flat panel PC keyboard mouse standard operation buttons and knobs and the electrical components typically located in the electrical cabinet The operator station is attached to the table and is customized for the machine Options Routers Lasers Plasma Water Jets Knife Cutters www MultiCam com v 03 13 ...

Страница 181: ... produce specific fumes and particulates that would be better handled by certain types of fume extraction systems Operators may refer to any MultiCam Technician for recommendations on a MultiCam Fume Extraction system for their plasma system The fume extraction system must be turned on and off independently of the plasma system and no adjustments need to be made to the system once it is on Operato...

Страница 182: ...ers are welcome to provide their own type of plasma unit with their MultiCam plasma system Options PowerMax Plasma Units The PowerMax line of plasma units are easier to maintain and use because of the inverter technology While air is the standard gas of the PowerMax line most customers prefer using nitrogen when cutting stainless steel Customers should always refer to the plasma unit user manual f...

Страница 183: ...sor Failure Replace PCB3 Replace PCB2 also if SDF remains lit START and IF Inverter Interlock Fault in Board PCB2 PFC IGBT Q7 or Inverter IGBT Q6 Perform Tests 14 and 15 START and TSO Torch Stuck in Open Position 1 Stuck Torch Plunger 2 Worn Consumables 3 Defective Pilot Arc in IGBT board Perform Test 7 START SP and SDF Control Board Failure Faulty PCB3 Replace PCB3 For more information on trouble...

Страница 184: ...e HPR Series operate as manual or gas systems capable of a higher quality cut at lower operating costs The HSD plasma unit is the cross over conventional plasma The status of the Hypertherm plasma unit can be determined from the LED board Illuminated LEDs indicate the following activities The gas callouts are similar for all Hypertherm plasma units At this time CH4 and H5 are not used Code ID Gas ...

Страница 185: ...Reset switch at the operator station and then clearing the error at the keypad MultiCam advises operators to pause operations during any changing of tools or materials and recommends that operations be paused when any disruptive action e g change of shift emergency situation occurs in the cutting area All cutting operations should be stopped and the machine turned off before any maintenance issues...

Страница 186: ...ng machine These specifications are outlined in the light curtain user manual which is provided in hardcopy with the machine and available in softcopy upon request All applicable federal state and local government requirements must be followed All operators and machine personnel must be knowledgeable about the machine s processes and safety risks One light curtain has a 70m 229 6 linear range The ...

Страница 187: ...erformance Best in Industry Worldwide Connections top Communication 2 Ethernet Connection Information 2 Setup for Ethernet Connection 8 Ethernet Cables 11 Routers Lasers Plasma Water Jets Knife Cutters www MultiCam com v 03 13 ...

Страница 188: ...net 10 100 MHz multiple port switch cannot be wireless or a router Ethernet patch cabling MultiCam Controller IP Subnet in the same class network IP Subnet as the Host PC Wireless communication is not recommended for any MultiCam Ethernet system Ethernet Process Every computer on a network has an IP address The IP address tells other computers that the Host PC is ready to communicate with another ...

Страница 189: ... This information is acknowledged by the computer and used in setting up that configuration Static Network Manual Configuration The static network has a manually configured setup for each computer or device and each device must be assigned the same subnet mask but a different IP address from all other computers and devices By default most laptops and computers are shipped with DHCP already enabled...

Страница 190: ...s This information will be required if the technician has to change any of the addresses If the network has an active DHCP then DHCP Enabled will show Yes The technician must also have an assigned IP address for the DHCP server shown above If the network does not have an active DHCP then DHCP Enabled will show No which indicates a static network If any of the above information is not provided then...

Страница 191: ...s of the computer the controller or both The following directions describe how technicians can change the IP and subnet addresses Computer Static IP Subnet Address 1 Access Network Connections by selecting Start Control Panel Network Connections 2 Double click on the Local Area Connection and select Properties Routers Lasers Plasma Water Jets Knife Cutters www MultiCam com v 03 13 ...

Страница 192: ...ustry Worldwide 3 Highlight Internet Protocol TCP IP and select Properties 4 Click in the circle next to Use the following IP address and enter an IP address and the subnet mask Routers Lasers Plasma Water Jets Knife Cutters www MultiCam com v 03 13 ...

Страница 193: ... in the IP address as 4 groups of 3 numbers e g 192 168 005 223 and press Enter to move between the groups 5 Press Enter and wait for the screen to prompt for the netmask 6 Type in the netmask address as 4 groups of 3 numbers e g 255 255 255 000 and press Enter to move between the groups 7 Press Enter to save the changes 8 Reboot the machine for the IP and or subnet mask address changes to take ef...

Страница 194: ...nection before attempting to automatically install the Ethernet connection The following directions assume that the operator has complied with all hardware requirements for Ethernet connections see Ethernet Connection Information 1 Right click on the Machine Connections icon in the toolbar and select Connection Manager At the initial setup the Connection Manager dialog should show an unassigned ma...

Страница 195: ... at the Default Settings dialog All customers are encouraged to check the box next to Auto Launch Job Name Server so that JobNameServer will automatically activate once the machine is connected 4 Highlight the XMI files specific to the machine type and select Open Routers Lasers Plasma Water Jets Knife Cutters www MultiCam com v 03 13 ...

Страница 196: ... in Industry Worldwide 5 Select Yes at the prompt to upload the modules from the controller and load the XMI file This will assign a connection name to the machine Connect Routers Lasers Plasma Water Jets Knife Cutters www MultiCam com v 03 13 ...

Страница 197: ...printer and MultiCam controller to a hub or switch However the patch cable is unable to provide a direct connection with the MultiCam controller so the host computer must be connected through a hub or switch RJ45 Patch Cable A patch cable is also known as a straight through cable The wires are in the same order on connector 1 as they are on connector 2 The RJ45 connectors are used on each end of t...

Страница 198: ...ltiCam Software 12 Motion Controller Utilities 12 JobNameServer 13 JobEditor 14 JobReporter 14 MotionMechanic 15 ConnectionManager 15 JobConsole 16 JobNameServer Programs Digitize 17 HotWatch 17 JobQueue 17 HPGL Command Support 18 HPGL Commands 20 MultiCam M and G Code Support 21 Mapping M Code to Output 24 Glossary 26 Routers Lasers Plasma Water Jets Knife Cutters www MultiCam com v 03 13 ...

Страница 199: ...he MultiCam ATC ARP post processor interfaces with both ATC and multiple head units while the MultiCam ARP post processor interfaces with single head units and outputs a manual tool change command so that multiple tool change files can be run on single head units Multiple Post Units 1 Copy the appropriate post processor located in Software Drivers AlphaCam from the MultiCam Installation CD into th...

Страница 200: ... one of its authorized distributors for a copy of the OnePost file to use with the single post unit 2 Copy the encrypted OnePost file into the LICOMDAT RPOSTS ALP directory This file has no extension 3 Verify that AlphaCam completes the auto detect of the single post unit post processor once the file is copied into the RPOSTS ALP directory Software Routers Lasers Plasma Water Jets Knife Cutters ww...

Страница 201: ...atibility 1 Refer to the EnRoute Recommended System Requirements to make sure the host PC is compatible with the software package 2 Open EnRoute and select Setup Machine Setup from the toolbar at the top 3 Click Active Drivers in the Machine Drivers dialog at the bottom right 4 Scroll down on the left side to MultcmGC in the Manufacturers Window 5 Click on the down arrow to the right of MultcmGC a...

Страница 202: ...ing This driver will output all cut parameters and will override any parameters set at the keypad c MultiCam No Depth can be used on 2D and 3D MultiCam machines and will only output the tool path without outputting any cut parameters regardless of their settings in EnRoute All settings must be set on the keypad pendant This driver will not output 3D 2 Highlight the default driver e g A R T 3D All ...

Страница 203: ...ble along the gantry c Z lift Z axis up and down Lift Height above the table 3 Make sure the dimensions are correct before moving on Completing EnRoute Setup 1 Select OK in the Machine Driver Dialog to finish the EnRoute Setup 2 Make no changes to the Driver Units section as the system is configured with default settings and will not work if these settings are changed The operator can modify the s...

Страница 204: ...use button Return to the default settings by selecting Setup Toolbars Reset to Defaults The Preference Settings available in EnRoute i e General Initialization Dsplay Units Grids View Setup Start Points are used to maximize or speed up the process in which the operator creates a design and applies the tool paths While the operator has the final say in setting up the program MultiCam recommends the...

Страница 205: ...he program and any files at maximum window size Reserve the Display 4 Views option until toolpaths are in place and a particular view should be seen normally Display 4 Views will show the top front side and perspective view when opening importing or starting a new file Select Prompt for Plate so that the system will prompt at the start of a file to define a plate or material size A plate does not ...

Страница 206: ...ar right checked in order to make certain commands user friendly and more functional Units Adjust the Length Time and Speed only when working with metric systems as most companies in the US use inches per minute which is also the basis for most tool catalog formulas Change unit measurements in this window only Operators should avoid making any changes in the Machine Setup Driver configuration Rout...

Страница 207: ... the size of the grid while Size describes the pixel size of the Style View Setup Adjust View Setup settings to show or hide the listed items when creating contours and toolpaths Avoid changing the options in the white window until all paths and options for them have been created At that point these settings can be changed to see only certain paths with these 3 options Routers Lasers Plasma Water ...

Страница 208: ...e Long Edge configuration as this places the start point on the longest edge of the geometry Select the Edge Midpoint only if the start point should be relocated to the middle of the longest edge When both Long Edge and Edge Midpoint options are selected EnRoute determines that the 0 0 location should be at the middle on the edge of the longest side Software Routers Lasers Plasma Water Jets Knife ...

Страница 209: ...ct Run 3 Select Browse on the Run Dialog box 4 Select the Multicam Installation Folder from the directory 5 Select Setup Exe 6 Select Open 7 Select OK on the Run dialog box 8 Follow the setup menus for a complete installation of the MultiCam Software Software Motion Controller Utilities The MultiCam Software was developed to allow the operator more options and to interface with the newer Windows s...

Страница 210: ... interface b HotWatch helps automate the production process by monitoring a folder on the network and automatically executing jobs that are placed into that folder c Digitize helps operators reproduce 2D and even 3D objects Not all machines support Digitize and operators can contact MultiCam for additional information A machine supporting Digitize uses special sensors to scan the object and create...

Страница 211: ...obs through resizing repositioning or modifying current job files in any way Software JobReporter The JobReporter generates reports on machine use The report results can be filtered and modified to obtain general or specific information about the machine usage Software Routers Lasers Plasma Water Jets Knife Cutters www MultiCam com v 03 13 ...

Страница 212: ...onnectionManager helps in creating and configuring the connection between a host PC and the machine tool and has built in testing features for diagnosing communications issues and sending email correspondence for assistance Operators can also establish one particular computer to be in charge of all communications which is helpful if multiple computers are connected to a machine Software Routers La...

Страница 213: ... interface between a machine tool and the operator allowing the operator to preview and execute jobs as well as monitor the job progress pause and resume the job move to a specific point in the job and move through the job a single cut at a time Software Routers Lasers Plasma Water Jets Knife Cutters www MultiCam com v 03 13 ...

Страница 214: ... file from the Inbox directory to the Outbox directory These directories do not have to be located on the local hard drive but can exist as shared folders on a local or wide area network HotWatch can be configured to check for new files at specified intervals to help minimize network traffic The full path of the Inbox and Outbox directories is displayed in the HotWatch applet and these directories...

Страница 215: ...ges contain all of the supported commands Bracketed information is optional while braced information is exclusive A semi colon or a linefeed must terminate all commands and spaces cannot be substituted for required commas in the syntax of a command All Z axis arguments are only valid if the 3D mode is set All commands are integers unless otherwise specified Help documents on the HPGL and plasma sy...

Страница 216: ...PA2630 1180 PD AA2540 1270 360 000000 PU PA7747 2540 PD AA5588 2540 90 000000 PA2540 381 AA2540 2540 180 000000 PA5588 4699 AA5588 2540 90 000000 PU PA8128 0 SP0 Multi Pass File without Lifting the Z IN PU PA0 0 SP1 ZD100 PA1016 1016 PD1016 1016 PD11176 1016 PD11176 11176 PD1016 11176 PD1016 1016 ZD200 PD1016 1016 PD11176 1016 PD11176 11176 PD1016 11176 PD1016 1016 ZD300 PD1016 1016 PD11176 1016 P...

Страница 217: ... Z executes a PU then moves to the requested position if one is specified This position is dependent on whether absolute or relative mode is set The Feedrate Override knob is turned OFF AA X Ctr Y Ctr Angle is a floating point requiring a non integer value that draws an arc with its center at X Y A positive angle creates a counter clockwise arc ZA Z moves the Z axis to the absolute position specif...

Страница 218: ... helical G18 Specify ZX plane for helical G19 Specify YZ plane for helical G37 Find home G62 Clear soft home G70 English programming inches G71 Metric programming mm G72 Xd d Yd d Zd d Id d Jd d Kd d Fd d CW 3D circular move G73 Xd d Yd d Zd d Id d Jd d Kd d Fd d CCW 3D circular move G74 Incremental mode for G02 03 arcs G75 G90 G91 mode for G02 03 arcs G83 Rd d Zd d Dd d Fd d Peck drill G90 Absolu...

Страница 219: ...sion used in G02 G03 G72 G73 M Miscellaneous function control function N Sequence number R Beginning Z motion dimension used in G83 S Plasma head RPM used in G97 T Tool change used in G00 X X motion dimension Y Y motion dimension Z Z motion dimension The following is a plasma cut 5 square w 2 center circle w Lead in outs M90 G90 G75 G00 T1 G00 X1 976294 Y2 685 M11 G03 X1 8999 I1 938097 G03 X3 8401...

Страница 220: ...6294 Y2 685 G41 M11 G03 X1 8999 I1 938097 G03 X3 8401 I2 87 G03 X1 911474 Y2 834403 I2 87 G03 X1 900364 Y2 714995 I2 87 J2 685 G03 X1 962027 Y2 649395 I1 963995 J2 713027 M21 G40 G00 X0 22 Y5 215 G41 M11 G01 X0 34 G01 X5 4 G01 Y0 155 G01 X0 37 G01 X0 34 G01 Y5 065 G01 Y5 215 G01 Y5 315 M21 G40 M02 Software Routers Lasers Plasma Water Jets Knife Cutters www MultiCam com v 03 13 ...

Страница 221: ... add M Codes to an output on their existing machines assign the code to a particular device and set the active status by completing the following steps 1 Open MachineTools and select JobNameServer 2 Select XMI Settings 3 Select CNC Routers Lasers Plasma Water Jets Knife Cutters www MultiCam com v 03 13 ...

Страница 222: ...2 can be mapped per the operator s preference however JobConsole treats the M12 M22 coding specifically for the start end of a contour 6 Download and store an MCode_Device_Map uc file to location 3 For assistance on any of these steps please contact MultiCam Tech Support Operators may also modify or delete M Codes from this same dialog Modify Highlight an existing M Code make changes e g Device 1 ...

Страница 223: ...the climb cut is clockwise on the outside of the cut and counter clockwise on the inside of the cut Consumables The components that are used up in the cutting process Conventional Cut The opposite cut of a climb cut or closed counter clockwise on the outside of the cut and clockwise on the inside of the cut Cross over Cable The type of Ethernet connection that is directly connected to the computer...

Страница 224: ... plasma unit also known as the bridge which moves the head assembly from the front to the rear of the table G Code The machine code language used by the controller to execute motion commands Gearbox The drive system on Pro series that uses planetary gear reduction to produce rotation of the pinion Good Slag The slag which falls away easily and requires little effort to remove Hard Home Position Th...

Страница 225: ...ding and unloading Patch Cable The type of Ethernet connection that is connected to the computer through a networking component such as a hub switch or router Pause The yellow button on the keypad that puts the controller into Pause mode where action is momentarily stopped and can be restarted at the keypad Pendant The control module consisting of the keypad and mechanical inputs Plasma The fourth...

Страница 226: ...f the tool path usually the radius of the plasma unit Tool Path The path that the center of the plasma unit takes during a cut Transmission The drive system on SF series using a 4 1 belt drive pulley system to produce rotation of the pinion µCito The native language of the controller pronounced micro see tow Vector A line segment showing a particular direction or path X axis The axis that refers t...

Страница 227: ...Industry Worldwide Routers Lasers Plasma Water Jets Knife Cutters www MultiCam com v 03 13 Z Motor Plate The horizontal plate on top of the Y carriage plate where the Z axis motor is mounted Z Speed The vertical speed of the head assembly Software ...

Отзывы: