15
s
ectiOn
6 — M
aintenance
& a
djustMents
Engine Care
A list of key engine maintenance jobs required for good
performance by the mower is given below. Follow the
accompanying engine manual for a detailed list and instructions.
Maintain oil level as instructed in engine manual.
•
Service air cleaner every 25 hours under normal conditions.
•
Clean every few hours under extremely dusty conditions.
Poor engine performance and flooding usually indicates
that the air cleaner should be serviced. To service the air
cleaner, refer to the engine manual.
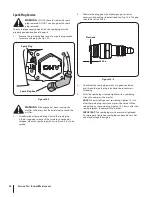
Clean spark plug and reset the gap once a season. Spark
•
plug replacement is recommended at the start of each
mowing season. Check engine manual for correct plug
type and gap specifications.
Clean engine regularly with a cloth or brush. Keep the
•
top of the engine clean to permit proper air circulation.
Remove all grass, dirt, and combustible debris from muffler
area.
Replacing Rear Flap
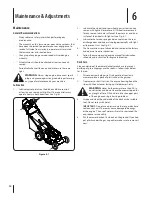
To remove rear flap, lift rear door, remove screw, and press
1.
flap in on either side to remove from hole. See Fig. 6-2.
Remove screw and flap from opposite hole and replace
2.
with new flap in the opposite order and manner of
removal.
Adjustments
Variable Speed Cable
Periodic adjustment of the variable speed cable may be
necessary due to normal wear on the drive system. Adjustment is
needed if unit begins to run too slow or too fast.
Start engine and place shift lever in the third speed
1.
position.
Stop engine and disconnect spark plug wire and ground it
2.
against engine.
With engine off, shift back to first speed. This will provide
3.
slack in the cable.
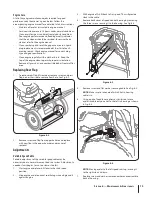
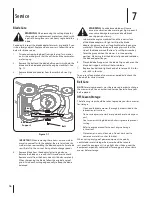
Remove back cover of speed control housing by removing
4.
the three screws securing it to the housing. See Fig. 6-3.
Remove screw and flat washer securing cable. See Fig. 6-3.
5.
NOTE:
Make sure to take note of which slot in housing
cable is in.
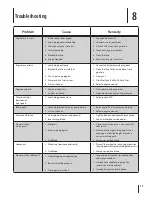
Using a pair of needle nose pliers or similar tool, move
6.
eyelet in cable only one slot to the left in housing as shown
in Fig. 6-4.
NOTE:
Moving eyelet to the left speeds unit up; moving it
to the right slows it down.
Replace screw and washer removed earlier and reassemble
7.
back of housing.
Figure 6-2
Figure 6-3
Figure 6-4


