background image


3-3

G

e

ttin

g

 Sta

rted 


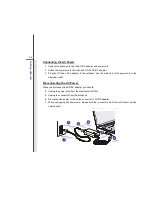
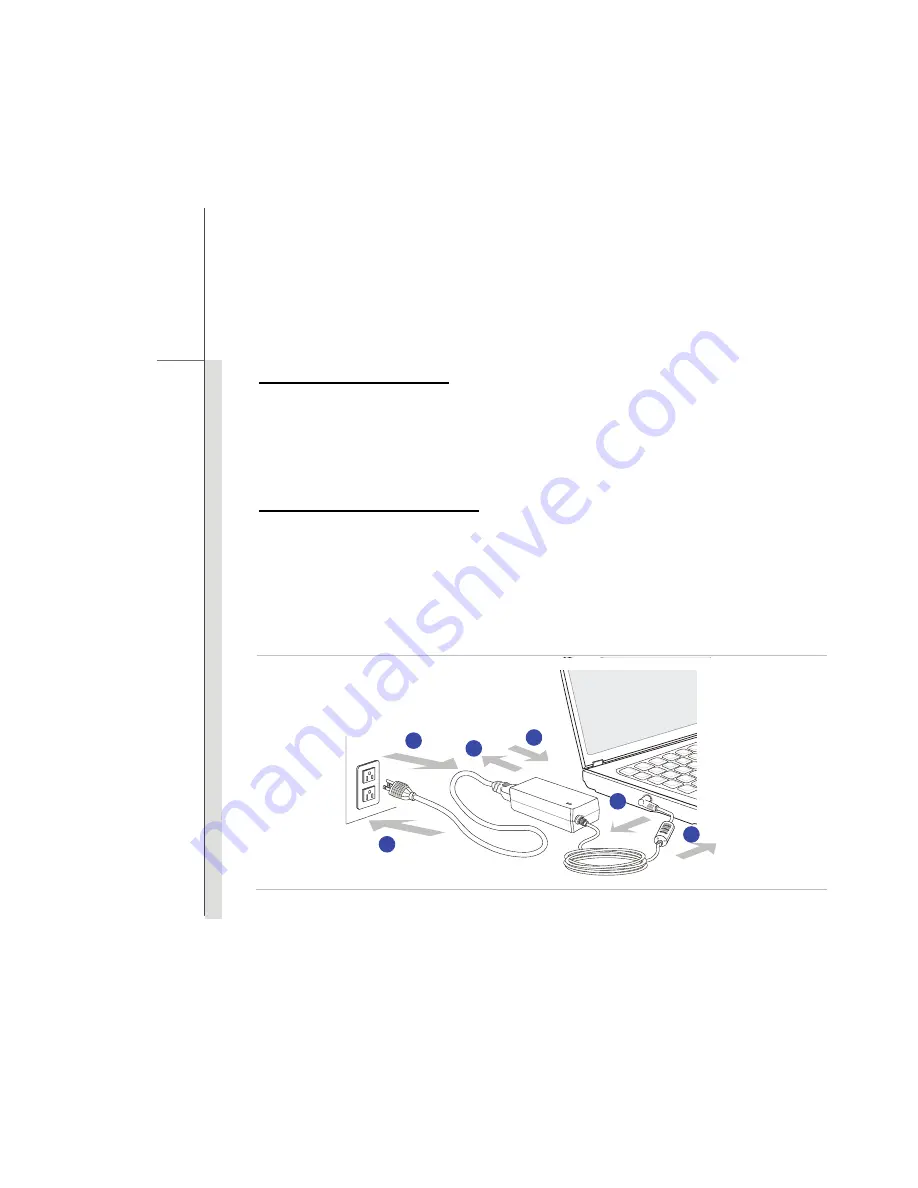
Connecting the AC Power 

1.  Unpack the package to find the AC/DC adapter and power cord. 

2.  Attach the power cord to the connector of the AC/DC adapter. 

3.  Plug the DC end of the adapter to the notebook, and the male end of the power cord to the 

electrical outlet. 

Disconnecting the AC Power   

When you disconnect the AC/DC adapter, you should: 

4.  Unplug the power cord from the electrical outlet first. 

5.  Unplug the connector from the notebook. 

6.  Disconnect the power cord and the connector of AC/DC adapter. 

7.  When unplugging the power cord, always hold the connector part of the cord. Never pull the 

cord directly! 


2

3

3

4

5

Содержание U160

Страница 1: ...CHAPTER 1 Preface ...

Страница 2: ...CC Conditions 1 6 CE Conformity 1 6 Safety Instructions 1 7 Safety Guideline for Using Lithium Battery 1 11 WEEE Statement 1 15 Trademarks 1 22 Reversion History 1 22 Introductions Manual Map 2 2 Unpacking 2 3 Specification 2 4 Product Overview 2 8 Top open View 2 8 Front View 2 13 Right Side View 2 14 Table of Content ...

Страница 3: ... OS 3 10 Energy Saving Tips 3 12 Basic Operations 3 13 Safety and Comfort Tips 3 13 Having a Good Work Habit 3 14 Knowing the Keyboard 3 15 Knowing the Touchpad 3 22 About Hard Disk Drive 3 25 Connecting the External Devices 3 26 Using the External Optical Storage Device 3 26 Connecting the Peripheral Devices 3 27 Connecting the Communication Devices 3 29 Safely Remove Hardware 3 32 Components Rep...

Страница 4: ...ace BIOS Setup About BIOS Setup 4 2 When to Use BIOS Setup 4 2 How to Run BIOS Setup 4 2 Control Keys 4 3 BIOS Setup Menu 4 4 Main Menu 4 5 Advanced Menu 4 7 Boot Menu 4 9 Security Menu 4 10 Save Exit Menu 4 12 ...

Страница 5: ...guarantee that interference will not occur in a particular installation If this equipment does cause harmful interference to radio or television reception which can be determined by turning the equipment off and on the user is encouraged to try to correct the interference by one or more of the following measures Reorient or relocate the receiving antenna Increase the separation between the equipme...

Страница 6: ...f the FCC Rules Operation is subject to the following two conditions This device may not cause harmful interference This device must accept any interference received including interference that may cause undesired operation CE Conformity This device is in compliance with the essential safety requirements and other relevant provisions set out in the European Directive ...

Страница 7: ...ture reference Keep this equipment away from humidity and high temperature Lay this equipment on a stable surface before setting it up The openings on the enclosure are used for air convection and to prevent the equipment from overheating Do not cover the openings Do not leave the equipment in an unconditioned environment with a storage temperature above 60O C 140O F or below 0O C 32O F which may ...

Страница 8: ... disconnect the AC power cord or uninstall the battery pack or switch off the wall socket if the equipment would be left unused for a certain time to achieve zero energy consumption Never pour liquid into the opening that could damage the equipment or cause an electrical shock Place the power cord in a way that people are unlikely to step on it Do not place anything on top of the power cord Always...

Страница 9: ...axial Cable To prevent explosion caused by improper battery replacement use the same or equivalent type of battery recommended by the manufacturer only Always keep the battery in a safe place If any of the following situations arises get the equipment checked by a service personnel The power cord or plug is damaged Liquid has penetrated into the equipment The equipment has been exposed to moisture...

Страница 10: ...of natural resources by encouraging recycling Extended product lifetime through easy upgrades Reduced solid waste production through take back policy Environmental Policy The product has been designed to enable proper reuse of parts and recycling and should not be thrown away Users should contact the local authorized point of collection for recycling and disposing of their end of life products ...

Страница 11: ...n vom Hersteller empfohlenen gleich wertigen Typ Entsorgung gebrauchter Batterien nach Angaben des Herstellers Spanish Español PRECAUCIÓN Peligro de explosión si la batería es reemplazada incorrectamente Cámbiela solo por la misma o un tipo equivalente recomendado por el fabricante Descarte usar baterías usadas de acuerdo con las instrucciones del fabricante Italian Italiano ATTENZIONE Pericolo di...

Страница 12: ...aną przez producenta urządzenia Zużyte baterie można wyrzucać zgodnie z instrukcjami producenta Hungarian Magyar VIGYÁZAT A nem megfelelő akkumul tor haszn lata robban svesz lyes Kizárólag ugyanolyan vagy a berendezés gyártója által ajánlott egyenértékű típust használjon Az elhasznált akkumulátorokat a gyártó utasításának megfelelően ártalmatlanítsák Czech Čeština UPOZORNĚNÍ Nebezpečí výbuchu při ...

Страница 13: ...ya dengan jenis yang sama atau setara sesuai rekomendasi pabrik peralatan tersebut Buang baterai bekas sesuai petunjuk pabrik Serbian Srpski OPREZ Ukoliko baterija nije ispravno postavljena postoji opasnost od eksplozije Zamenu izvršite koristeći isključivo istu ili ekvivalentnu bateriju koju preporučuje proizvođač opreme Odbacite iskorišćene baterije u skladu sa uputstvima proizvođača Netherlands...

Страница 14: ...lebo za rovnocenný typ batérie ktorý odporúča výrobca zariadenia Batérie zneškodnite podľa pokynov výrobcu Slovenian Slovenščina POZOR V primeru nepravilne zamenjave baterije obstaja nevarnost njene eksplozije Baterijo zamenjajte le z enako ali ekvivalentno vrsto ki jo priporoča proizvajalec Odpadne baterije odstranite skladno z navodili proizvajalca Danish Dansk ADVARSEL Lithiumbatteri Eksplosion...

Страница 15: ...ﮐﺖ ﭘﻴﺸﻨﻬﺎدﯼ ﺑﺎﺗﺮیﻬﺎﯼ از ﺗﻨﻬﺎ ﺑﺎﺗﺮﯼ ﺗﻌﻮیﺾ ﺻﻮرت در ﻧﻤﺎیﻴﺪ اﺳﺘﻔﺎدﻩ ﻧﻤﺎیﻴﺪ ﻋﻤﻞ ﮐﻨﻨﺪﻩ ﺗﻮﻟﻴﺪ ﺷﺮﮐﺖ راهﻨﻤﺎیﯽ ﻃﺒﻖ ﺑﺮ و ﮐﻨﻴﺪ ﺧﻮددارﯼ ﺑﺎﺗﺮﯼ اﻧﺪاﺧﺘﻦ دور از Arabic اﻟﻌﺮﺑﻴﺔ ﺗﺤﺬیﺮ ﺧﻄﺮ واﻟﺘﻠﻒ ﻟﻼﻧﻔﺠﺎر اﻟﺒﻄﺎریﺔ ﺗﺘﻌﺮض ﻗﺪ إذا ﺗﻢ اﺳﺘﺒ ﺪاﻟﻬﺎ أﺻﻠﻰ ﻏﻴﺮ ﺑﻨﻮع أﺳﺘﺒﺪل أوﺻﻰ ﻣﻜﺎﻓﺊ ﻧﻮع أو ﺑﻨﻔﺲ ﻓﻘﻂ ﺑﻪ ﻗﺒﻞ ﻣﻦ ﻣﻨﺘﺞ اﻟﺠﻬﺎز اﻟﺒﻄﺎریﺎت ﺗﺠﺎهﻞ اﻟﻤﺴﺘﻌﻤﻠﺔ وﻓﻘﺎ ﻹرﺷﺎدات اﻟﺸﺮآﺔ اﻟﻤﺼﻨﻌﺔ WEEE Statement English Under the European Union EU Direc...

Страница 16: ...sificados como eléctricos y equipos electrónicos no pueden ser depositados en los contenedores habituales de su municipio los fabricantes de equipos electrónicos están obligados a hacerse cargo de dichos productos al termino de su período de vida Italian Italiano In base alla Direttiva dell Unione Europea EU sullo Smaltimento dei Materiali Elettrici ed Elettronici Direttiva 2002 96 EC in vigore da...

Страница 17: ...yczącą odpadów produktów elektrycznych i elektronicznych Dyrektywa 2002 96 EC która wchodzi w życie 13 sierpnia 2005 tzw produkty oraz wyposażenie elektryczne i elektroniczne nie mogą być traktowane jako śmieci komunalne tak więc producenci tych produktów będą zobowiązani do odbierania ich w momencie gdy produkt jest wycofywany z użycia Hungarian Magyar Az Európai Unió EU 2005 augusztus 13 án hatá...

Страница 18: ...책임이 있습니다 Vietnamese Tieng Viet Theo Hướng dẫn của Liên minh Châu Âu EU về Thiết bị điện điện tử đã qua sử dụng Hướng dẫn 2002 96 EC vốn đã có hiệu lực vào ngày 13 8 2005 các sản phẩm thuộc thiết bị điện và điện tử sẽ không còn được vứt bỏ như là rác thải đô thị nữa và các nhà sản xuất thiết bị điện tử tuân thủ hướng dẫn sẽ phải thu hồi các sản phẩm này vào cuối vòng đời Thai ไทย ภายใต ข อกําหนดของ...

Страница 19: ...ische producten 2002 96 EC die op 13 Augustus 2005 in zal gaan kunnen niet meer beschouwd worden als vervuiling Fabrikanten van dit soort producten worden verplicht om producten retour te nemen aan het eind van hun levenscyclus Romanian Română În baza Directivei Uniunii Europene UE privind Evacuarea Echipamentului Electric şi Electronic Directiva 2002 96 EC care intră în vigoare pe 13 august 2005 ...

Страница 20: ...S ktorá vstúpila do platnosti 13 augusta 2005 výrobky ktorými sú elektrické a elektronické zariadenia nesmú byť zneškodňované spolu s komunálnym odpadom a výrobcovia patričných elektronických zariadení sú povinní takéto výrobky na konci životnosti prevziať naspäť Slovenian Slovenščina Skladno z določili direktive Evropske unije EU o odpadni električni in elektronski opremi Direktiva 2002 96 ES ki ...

Страница 21: ...ktrični i elektronički uređaji se ne smiju više bacati zajedno s kućnim otpadom i proizvođači su obvezni zbrinuti takve proizvode na kraju njihovog životnog vijeka Estonian Eesti Vastavalt Euroopa Liidu EL direktiivile 2002 96 EÜ elektri ja elektroonikaseadmete jäätmete kohta mis jõustus 13 augustil 2005 on keelatud kodumajapidamiste elektri ja elektroonikaseadmete jäätmete hävitamine koos majapid...

Страница 22: ...ce Trademarks All trademarks are the properties of their respective owners SRS Premium Sound SRS and the symbol are trademarks of SRS Labs Inc Revision History Version Revision Note Date 1 0 First release 12 2009 ...

Страница 23: ...CHAPTER 2 Introductions ...

Страница 24: ...formation or caution when using this notebook for the first time Chapter 2 Introductions includes the descriptions of all the accessories of this notebook It is recommended to check out that if you have all the accessories included when you open the packing box If any of these accessories is damaged or missing please contact the vendor where you purchased this notebook Also this chapter provides t...

Страница 25: ...contact your local dealer immediately Also keep the box and packing materials in case you need to ship the unit in the future The package should contain the following items Notebook Quick Start Manual High capacity Li ion battery AC DC adapter and AC power cord Carry bag optional All in one application disk containing the full version of user s manual drivers utilities and optional recovery functi...

Страница 26: ...ed Support 667 MHz Special Notification The actual processor preinstalled in the notebook depends on the model you purchased Please contact the local dealer for detailed information Core Chips North Bridge Intel N450 N470 South Bridge Intel NM10 Express Chipset Special Notification The actual core chip s preinstalled in the notebook depends on the model you purchased Please contact the local deale...

Страница 27: ...AC DC Adapter 40W 19V Input 100 240V 1 5A 50 60Hz Output 19V 2 1A Battery Type 3 cell optional 6 cells optional RTC Battery Yes I O Port Monitor VGA 15 pin D Sub x 1 USB x 3 USB version 2 0 Mic in x 1 Headphone Out x 1 RJ45 x 1 Card Reader x 1 SD MMC The supported memory cards may vary without notice ...

Страница 28: ...re may vary without notice LAN 10 100 Ethernet Wireless LAN Optional Supported Bluetooth Optional Supported 3G 3 5G Optional Supported WiMax Optional Supported Audio Sound Interface Realtek ALC888S Internal Speaker 2 speakers with housing Sound Volume Adjust by volume button K B hot key SW Video Dual View Function LCD or CRT will be auto detected when connected External Display Output Supported ...

Страница 29: ...y LCD Type 10 1 1024 x 600 Brightness Adjustment Supported WebCam CMOS optional Supported Software BIOS USB Flash Boot Yes USB floppy boot up DOS only BIOS Fast Boot Support Yes Others Kensington Lock Hole x 1 Compliance WHQL ...

Страница 30: ...t Please be aware that the notebook shown in this section may vary from the actual one that users purchased Top open View The figure of top open view and description shown below will lead you to browse the main operating area of your notebook The figures show here are for reference only 1 Webcam 2 Power Button Power LED 3 Touchpad 4 Status LED 5 Keyboard Quick Launch Fn Buttons 3 5 4 1 2 ...

Страница 31: ...FF Press the power button to awake the notebook from the sleep state Glowing blue when the notebook power is turned on 3 Touchpad This is the pointing device of the notebook 4 Status LED Bluetooth Bluetooth LED indicator glows blue when Bluetooth function is enabled Warning For flight safety consideration make sure this LED indicator goes out when you are in flight Contact the local distributor fo...

Страница 32: ...hat 3G WiMax are optional functions Battery Status Glowing green when the battery is being charged Glowing amber when the battery is in low battery status Blinking amber if the battery fails and it is recommended to replace a new battery Consult the local dealer for purchasing an equivalent type of battery recommended by the manufacturer Battery LED goes out when it is fully charged or when the AC...

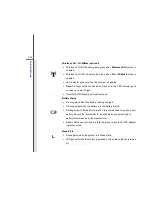
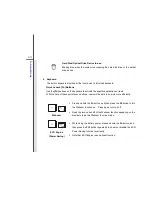
Страница 33: ...he help of these quick launch buttons users will be able to do work more efficiently Webcam Press and hold the Fn button and then press the F6 button to turn the Webcam function on Press again to turn it off Read the icon on behalf of the Webcam function appearing on the display to learn the Webcam function status ECO Engine Power Saving While using the battery power press and hold the Fn button a...

Страница 34: ...e or disable the 3G or Bluetooth or WiMax function recurrently Read the icon on behalf of the function of 3G or Bluetooth or WiMax appearing on the display to learn the function status Note that the functions listed here may vary depending on the model users purchased 3G function will be disabled once WLAN switch is turned ON ...

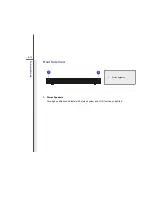
Страница 35: ...2 13 Introductions Front Side View 1 Stereo Speakers Give high quality sound blaster with stereo system and Hi Fi function supported 1 1 1 Stereo Speakers ...

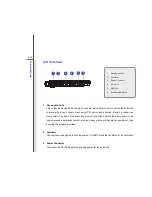
Страница 36: ... various types of memory card such as MMC Multi Media Card SD Secure Digital cards Contact the local dealer for further and correct information and be noted that the supported memory cards may vary without notice 1 Card Reader 2 Audio Port Connectors 3 USB Port 4 RJ 45 Connector 4 1 2 3 ...

Страница 37: ... Used for an external microphone Headphone A connector for speakers or headphones 3 USB Port The USB 2 0 port allows you to connect USB interface peripheral devices such as the mouse keyboard modem portable hard disk module printer and more 4 RJ 45 Connector The Ethernet connector is used to connect a LAN cable for network connection ...

Страница 38: ...s a small loop which allows the whole cable to be looped around a permanent object such as a heavy table or other similar equipment thus securing the notebook in place 2 Ventilator The ventilator is designed to cool the system DO NOT block the ventilator for air circulation 3 Power Connector To connect the AC DC adapter and supply power for the notebook 4 5 6 1 3 2 1 Kensington Lock 2 Ventilator 3...

Страница 39: ...or a great view of the computer display 5 USB Port The USB 2 0 port allows you to connect USB interface peripheral devices such as the mouse keyboard modem portable hard disk module printer and more 6 Wireless LAN Switch Press the switch to turn the Wireless LAN function ON and OFF Note For flight safety consideration make sure this switch is at OFF position ...

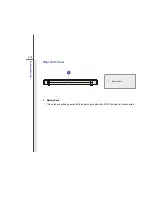
Страница 40: ...2 18 Introductions Rear Side View 1 Battery Pack This notebook will be powered by the battery pack when the AC DC adapter is disconnected 1 1 Battery Pack ...

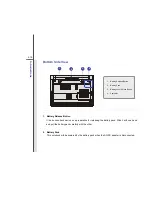
Страница 41: ...ion for releasing the battery pack Slide it with one hand and pull the battery pack carefully with the other 2 Battery Pack This notebook will be powered by the battery pack when the AC DC adapter is disconnected 1 Battery Release Button 2 Battery Pack 3 Battery Lock Unlock Button 4 Ventilator 3 1 2 4 ...

Страница 42: ...on Battery cannot be moved when the button is positioned on lock status Once the button is slid to unlock position the battery is removable 4 Ventilator The ventilator is designed to cool the system DO NOT block the ventilator for air circulation ...

Страница 43: ...CHAPTER 3 Getting Started ...

Страница 44: ... time When the AC power is connected recharging the battery will start immediately Note that the AC DC adapter included in the package is approved for your notebook using other adapter model may damage either the notebook or other devices attached to it Do not cover the AC DC adapter since it may produce a certain heat while in use Always be aware of heat coming from the AC DC adapter in use ...

Страница 45: ...ok and the male end of the power cord to the electrical outlet Disconnecting the AC Power When you disconnect the AC DC adapter you should 4 Unplug the power cord from the electrical outlet first 5 Unplug the connector from the notebook 6 Disconnect the power cord and the connector of AC DC adapter 7 When unplugging the power cord always hold the connector part of the cord Never pull the cord dire...

Страница 46: ...ble the battery pack on their own Also note that the limited warranty to the battery pack may also lose its efficacy when this battery pack is disassembled not by an authorized machinist To prevent explosion caused by improper battery replacement use the same or equivalent type of battery recommended by the manufacturer only Always keep the battery which is not in use in a safe place Please follow...

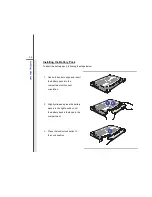
Страница 47: ...steps below 1 Use both hands to align and insert the battery pack into the compartment with correct orientation 2 Slightly slide and press the battery pack into the right position until the battery back is fastened in the compartment 3 Press the lock unlock button to the Lock position 3 2 1 ...

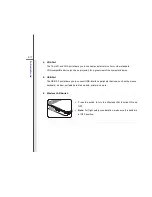
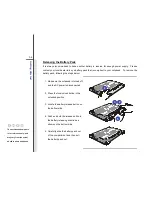
Страница 48: ...ake sure the notebook is turned off and the AC power is disconnected 2 Press the lock unlock button in the unlocked position 3 Locate the battery release button on the bottom side 4 Push and hold the release button to the battery releasing direction as shown on the bottom side 5 Carefully slide the battery pack out of the compartment and then pull the battery pack out The notebook shown here is fo...

Страница 49: ...o local regulations Check with your local solid waste officials for details about recycling options or for proper disposal in your area Conserving Battery Power Efficient battery power is critical to maintain a normal operation If the battery power is not managed well the saved data and customized settings may be lost To optimize battery life and avoid a sudden power loss read the tips below Suspe...

Страница 50: ...end system operation or shut down and turn off the system without interrupting the charging process The battery pack uses Lithium ion battery cells that have no memory effect It is unnecessary to discharge the battery before recharging However to optimize the life of battery we suggest that consuming the battery power completely once a month is necessary If you do not use the notebook for a long t...

Страница 51: ... this notebook Read the instructions bellow to activate the ECO Engine power saving function 1 Press and hold the Fn button and then press the F10 button repeatedly to switch among various power saving modes provided by ECO Engine or to turn this function off recurrently 2 To learn which power saving mode is activated presently read the icon on behalf of each mode appearing on the display when sel...

Страница 52: ...ect this mode while performing presentation applications Office Mode Select this mode while dealing with office documentation tasks Turbo Battery Mode Select this mode to maximize the battery running time ECO Off Selected to disable ECO Engine ...

Страница 53: ...ement settings in Windows OS 1 Power Options in Windows OS allows you to control the power management features of your display hard drive and battery Go to the Start menu and click on the Control Panel Click on the System and Maintenance 2 Then click on the Power Options 3 Then select a power plan that meets your personal needs 4 The Shut Down Computer menu will present the options to Sleep S3 S4 ...

Страница 54: ...3 12 Getting Started 1 2 3 4 ...

Страница 55: ...er inactivity Utilize the Fn and F12 sleep mode keys to turn into power saving mode Tune the settings in Power Options under Windows OS to optimize the computer s power management Always disconnect the AC power cord or uninstall the battery pack or switch off the wall socket if the computer would be left unused for a certain time to achieve zero energy consumption ...

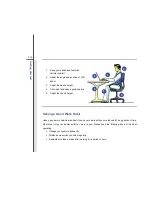
Страница 56: ...ination Choose the proper desk and chair and adjust their height to fit your posture when operating When sitting on the chair adjust the chair s back if available to support your back comfortably Place you feet flat and naturally on the floor so that your knees and elbows have the proper position about 90 degree when operating Put your hands on the desk naturally to support your wrists Adjust the ...

Страница 57: ...the chair s height Having a Good Work Habit Have a good work habit is important if you have to work with your notebook for long periods of time otherwise it may cause discomfort or injury to you Please keep the following tips in mind when operating Change your posture frequently Stretch and exercise you body regularly Remember to take a break after working for a period of time 2 5 4 3 1 1 ...

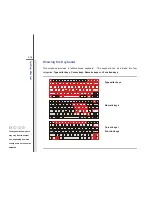
Страница 58: ...ed keyboard This keyboard can be divided into four categories Typewriter keys Cursor keys Numeric keys and Function keys The keyboard shown here may vary from the actual one depending on which county users purchase the notebook Typewriter keys Numeric keys Cursor keys Function keys ...

Страница 59: ...n and off When this function is activated you can use the numeric keys that are embedded in the typewriter keys Caps Lock Press this key to toggle the Caps Lock on and off When this function is activated the letters you type are kept in uppercase Scroll Lock Press and hold the Fn key and press this key to toggle the Scroll Lock on and off This function is defined by individual programs and is usua...

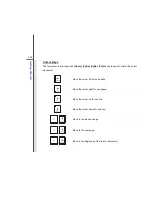
Страница 60: ... End keys are used to control the cursor movement Move the cursor left for one space Move the cursor right for one space Move the cursor up for one line Move the cursor down for one line Move to the previous page Move to the next page Move to the beginning of the line or document ...

Страница 61: ...the cursor and move the following text left for one space Press this key to delete one character to the left of the cursor and move the following text left for one space Function Keys Windows Keys You can find the Windows Logo key and one Application Logo key on the keyboard which are used to perform Windows specific functions such as opening the Start menu and launching the shortcut menu For more...

Страница 62: ...he display output mode between the LCD external monitor and both Enable or disable the touchpad function Decrease the LCD brightness Increase the LCD brightness Decrease the built in speaker s volume Increase the built in speaker s volume ...

Страница 63: ...he F6 button to turn the Webcam function on Press again to turn it off Read the icon on behalf of the Webcam function appearing on the display to learn the Webcam function status ECO Engine Power Saving While using the battery power press and hold the Fn button and then press the F10 button repeatedly to enable or disable the ECO Power Saving function recurrently Note that ECO Engine is an optiona...

Страница 64: ...le or disable the 3G or Bluetooth or WiMax function recurrently Read the icon on behalf of the function of 3G or Bluetooth or WiMax appearing on the display to learn the function status Note that the functions listed here may vary depending on the model users purchased 3G function will be disabled once WLAN switch is turned ON ...

Страница 65: ...he cursor on the screen and making selection with its two buttons 1 Cursor Movement Area This pressure sensitive area of the touchpad allows you to place your finger on and control the cursor on the screen by moving one of your finger 2 Enter Buttons Acts as the Enter button of the keyboard The touchpad figures shown here are for reference only and may be different from the notebook that users pur...

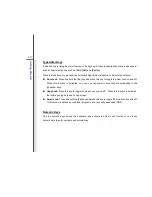
Страница 66: ... To configure the touchpad you can use the standard Microsoft or IBM PS 2 driver in your Windows operating system The Mouse Properties in Control Panel allows you to change the configuration Positioning and Moving Place your finger on the touchpad usually using the forefinger and the rectangular pad will act as a miniature duplicate of your display When you move your fingertip across the pad the c...

Страница 67: ... procedure called as point and click is the basics of operating your notebook Unlike the traditional pointing device such as the mouse the whole touchpad can act as a left button so that your each tap on the touchpad is equivalent to pressing the left button Tapping twice more rapidly on the touchpad is to execute a double click 1 Move the cursor by sliding your fingertip 2 Put your wrist on the d...

Страница 68: ...nd optical storage device Therefore it is usually used to install the operating system and software applications To avoid unexpected data loss in your system please backup your critical files regularly Do not turn off the notebook when the hard disk In use LED is on Do not remove or install the hard disk drive when the notebook is turned on The replacement of hard disk drive should be done by an a...

Страница 69: ...es listed here are for reference only Using the External Optical Storage Device An optional external optical storage device may come with the package of the notebook The actual external optical storage device may vary depending on the model you purchased The devices shown in the reference figures here may be different from the devices users have ...

Страница 70: ...m printer and external optical storage device ete To connect these devices install the drivers for each device first if necessary and then connect the device to the notebook This notebook is capable to auto detect the USB devices installed and if there is no detection of the devices please manually enable the USB devices by going to Start Menu Control Panel Add Hardware to add the new device ...

Страница 71: ...or a great view of the notebook display To connect the external display make sure the notebook and the external display are both powered off and then connect the display to the notebook Once the display is connected to the notebook power on the notebook and the external display should respond by default If not you can switch the display mode by pressing Fn F2 Alternately you can change the display...

Страница 72: ...The RJ 45 connector of the notebook allows you to connect the LAN local area network devices such as a hub switch and gateway to build a network connection For more instructions or detailed steps on connecting to the LAN please ask your MIS staff or network manager for help ...

Страница 73: ...to move around within a broad coverage area and still be connected to the network By using the 64 bit 128 bit Wired Equivalent Privacy WEP encryption technology and Wi Fi Protected Access feature the optional built in wirelesses LAN is capable to achieve a more efficient and a more secure solution to the wireless communication For more instructions or detailed steps on connecting to the Wireless L...

Страница 74: ...es a way to connect and exchange information between devices such as mobile phones personal computers printers GPS receivers PDAs digital cameras and video game consoles through a secure globally unlicensed Industrial Scientific and Medical ISM 2 4 GHz short range radio frequency bandwidth For more instructions or detailed steps on using the Bluetooth function please ask your MIS staff or network ...

Страница 75: ...to the device and click Stop The diagram shown below is for reference only Select the device you want to unplug or eject and then click Stop When Windows notifies you that it is safe to do so unplug the device from your computer Hardware Devices Properties Stop Close Safely Remove Hardware Confirm devices to be stopped Choose OK To continue Windows will attempt to stop the following devices After ...

Страница 76: ...t and Upgrade Please be noticed that the memory hard disk drive wireless LAN module and battery pack preinstalled in the product users purchased may be upgradable or replaceable by user s request depending on the models users purchased 1 2 3 4 ...

Страница 77: ...ped with a wireless LAN module and the module may be upgradable and replaceable by authorized dealer or service center This notebook is equipped with a hard disk drive and this storage device may be upgradable and replaceable by the authorized dealer or service center Additional memory module may be installed by the authorized dealer or service center to increase the performance of this notebook d...

Страница 78: ...ormation about the product users purchased please contact the local dealer Do not attempt to upgrade or replace any component of the product if you are not an authorized dealer or service center since it may cause the warranty void It is strongly recommended to contact the authorized dealer or service center for any upgrade or replace service ...

Страница 79: ...CHAPTER 4 BIOS Setup ...

Страница 80: ... How to Run BIOS Setup To run the BIOS Setup Utility turn on the notebook and press the Del key during the POST procedure If the message disappears before you respond and you still wish to enter Setup either restart the system by turning it OFF and ON or simultaneously pressing Ctrl Alt Delete keys to restart Be noted that the screen snaps and setting options in this chapter are for your reference...

Страница 81: ...e menu title Press down arrow to select one item under the menu title Increase the setting value or make changes Decrease the setting value or make changes 1 Open the selected item to change setting options 2 Bring up a sub menu when available In some items press this key to change setting field Bring up help screen providing the information of control keys 1 Exit the BIOS Setup Utility 2 Return t...

Страница 82: ...rsion CPU features memory size and setting of system time and date Advanced Menu Adjust the advanced settings such as power consumption USB PCI devices of the notebook in order to achieve a better performance Boot Menu Set up boot type and boot sequence Security Menu Install or clear the password settings for supervisor and user Save Exit Menu Save or discard the changes before leaving the BIOS Se...

Страница 83: ...rom 01 to 31 Year Year The year can be adjusted by users System Time This item allows you to set the system time The system clock will go on no matter you shut down the PC or get into sleep mode The time format is hour minute second SATA Information This item displays the types of the SATA devices installed in the notebook Press Enter to bring up a window showing the detailed information of the de...

Страница 84: ...4 6 BIOS Setup System Information This item provides the information about the firmware processor and system memory ...

Страница 85: ...ions Enabled and Disabled C States This item allows you to enable or disable CPU C State function When set to Enabled CPU chipset can enter power saving states under idle states AHCI Mode Advanced Host Controller Interface Use this item to enable or disable the AHCI Mode Setting options Disabled and Enabled The default setting is Enabled DVMT Memory Size This item allows you to select maximum memo...

Страница 86: ...d set the item to higher values Setting options 32 64 96 128 160 192 224 and 248 USB Configuration Select this item to enter the sub menu Legacy USB Support Selecting Enabled allows users to use USB devices such as mouse keyboard or portable disk in DOS system or allows users to boot the system by USB device Setting options Enabled Disabled and Auto Performance Enhanced Mode Use this item to enhan...

Страница 87: ...iority These items showing the sequence of boot devices where BIOS attempts to load the disk operating system Boot Option 1 6 These items allow you to set the sequence of boot devices where BIOS attempts to load the disk operating system ...

Страница 88: ...s ESC to abandon new password setting When the Supervisor Password is set new items User Password and Password Check will be added in the menu Select User Password to give or to abandon password setting same as Supervisor Password item above Note that Supervisor Password field allows users to enter and change the settings of the BIOS SETUP UTILITY while User Password field only allows users to ent...

Страница 89: ...book is powered on or when users try to access to BIOS SETUP UTILITY To clear a set Supervisor Password User Password just press Enter under Supervisor Password User Password field when you are prompted to enter the password Please note that when Supervisor Password has been cleared User Password will be cleared as well A message box will pop up confirming password will be disabled Once the passwo...

Страница 90: ...Menu Exit and Save Changes Save the changes you have made and exit the utility Exit and Discard Changes Exit the utility without saving the changes you have made Load Setup Defaults Select this item to load the default settings ...

Отзывы: