background image

2-6

MS-9266 1U Rackmount Server

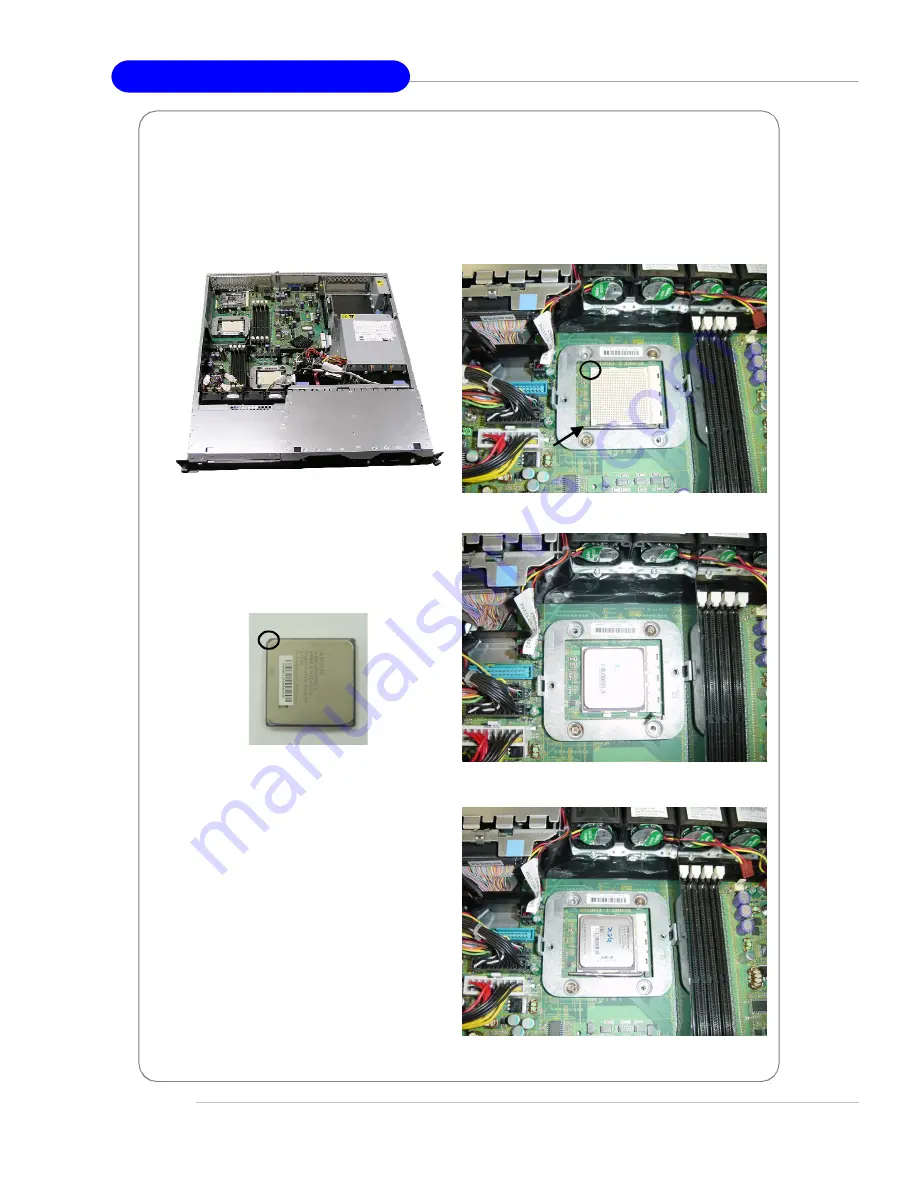
1.  Locate  the  First  and  Second  CPU

sockets.

CPU and Heatsink

3.  Place  the  CPU on  top  of  the  socket

with  the  cut edge  pointing  to  the  ar-
row  sign.

2. Lift the CPU lever up to a 90  degree

angle. (If you plan on installing single
CPU, use the first CPU socket.)

cut  edge

4.  Push  the  lever  down  to  secure  the

CPU in place.

1st CPU Socket

2nd CPU Socket

CPU lever up

arrow  sign

Содержание K2-102

Страница 1: ...i English Version G52 92661X3 K2 102 MS 9266 1U Rackmount Server...

Страница 2: ...area is likely to cause harmful interference in which case the user will be required to correct the interference at his own expense Notice 1 The changes or modifications not expressly approved by the...

Страница 3: ...2003 NT XP are registered trademarks of Microsoft Corporation Netware is a registered trademark of Novell Inc Award is a registered trademark of Phoenix Technologies Ltd AMI is a registered trademark...

Страница 4: ...card or module 9 All cautions and warnings on the equipment should be noted 10 Never pour any liquid into the opening that could damage or cause electrical shock 11 If any of the following situations...

Страница 5: ...v WEEE Statement...

Страница 6: ...vi...

Страница 7: ...vii...

Страница 8: ...ry 2 8 PCI Expansion Card 2 9 PCI Riser Card Optional 2 11 Serial ATA SCSI Hard Disk Drives Optional 2 12 Rack Mounting 2 14 OS Installation Guide 2 17 Chapter 3 Mainboard Hardware 3 1 Quick Component...

Страница 9: ...Rear Status LED J20 3 12 Ultra320 SCSI Connector SCSI 1 Optional 3 13 Slots 3 15 SO DIMM Small OutlineDIMM J15 3 15 PCI Peripheral Component Interconnect Slots 3 16 Chapter 4 BIOS Setup 4 1 Entering S...

Страница 10: ...Rackmount Server is a high performance barebone system powered by dual AMD OpteronTM processors BCM5780 BCM5785 PCI X Bridges and NS PC87417 ADM1027 With high scalability reliability ease of use and o...

Страница 11: ...s for possible future use Your MS 9266 1U Rackmount Server Barebone package should contain the following items Packing Checklist MS 9266 1U Rackmount Server x 1 includinganMS 9166mainboard anMS 9549BM...

Страница 12: ...e configuration of the MS 9266 from different angles and the connectors and buttons on the front and back panel Top View 1 Proprietary Power Supply 2 Slim CD ROM Drive 3 DIMM Slots 4 PCI Slots 5 Heats...

Страница 13: ...6 7 8 9 1 Slim CD ROM optional 2 Hot Swap SCSI or S ATA HDD HDD 1 ID0 3 Hot Swap SCSI or S ATA HDD HDD 2 ID1 4 USB Port 1 5 USB Port 2 6 from left to right IDE HDD Activity LED Location LED Info LED...

Страница 14: ...Port 3 USB Port 4 7 from left to right Gbit Port 2 Gbit Port 1 8 Power LED 9 NMI Switch 10 Error LED 1 2 5 3 4 6 7 8 9 10 MSI Reminds You Please refer to Table 1 MS 9266Front Bezel Rear I O LEDs Defin...

Страница 15: ...reen Random blink IDE HDD access activity IDE HDD Activity OFF OFF No disk activity Amber ON Some component error failure Error OFF OFF System normal operation Blue ON Identify active via iConsole com...

Страница 16: ...rst alters the users that an error has occurred Service personnel next check inside the system to deter mine which subsystem has an error LED lit This information helps the service person nel to locat...

Страница 17: ...O 64 I O 31 DB 8 65 DB 8 32 DB 9 66 DB 9 33 DB 10 67 DB 10 34 DB 11 68 DB 11 68 Pin Ultra320 SCSI Connector 1 35 34 68 USB Port 1 2 3 4 PIN SIGNAL 1 VCC 2 Data 3 Data 4 GND SCSI Connector Gigabit LAN...

Страница 18: ...CM5780 Chipset u One BCM5785 Chipset M emory u Supports eight 144 bit DDR at 200 266 333 400 MHz compliant registered ECC DIMMs u Supports up to 16GB memory size Drive Bays u 2 hot swap SCSI or 2 hot...

Страница 19: ...Management IPMI 1 5 optional u MSI 9549 BMC card with QLogic Zircon UL BMC and MSI iConsole AP support IPMI 1 5 optional FAN u 4 pcs 40 x 28 mm system fan u 1 pc 40 x 20mm I O fan u 3 pcs integrated...

Страница 20: ...vent log Support for CLI command line interface over Serial or shared NIC RMCP Ability to update firmware inband unattended Remote access security MD5 Out of band environmental monitoring and alerting...

Страница 21: ...1 12 MS 9266 1U Rackmount Server Mainboard Layout MS 9166 v2 X Server Board...

Страница 22: ...ures monitor fan speed s monitor system voltage monitor chassis intrusion If one of the items above is abnormal the program main screen will be immediately shown on the screen with the abnormal item h...

Страница 23: ...to assemble each component of the MS 9266 Rack Mounting de scribes the procedures for mounting the unit into the rack in details You can use the system assembly flowchart and the chart below to deter...

Страница 24: ...e note that always wear anti static gloves when handling electrical components and exercise caution during the installation process For more information contact your local dealer or experienced techni...

Страница 25: ...2 3 System Hardware INSTALL RISER CARDS INSTALL HARD DISK DRIVES CONNECTHDD FDD CD ROMCABLES POWER CORDS REPLACE RISERCARD BRACKET FINISH CHECK IF ALL PARTS ARE PROPERLY CONNECTED RESTORE CHASSISCOVER...

Страница 26: ...ake sure the server is not turned on or connected to the AC power System Assembly Removing the Chassis Cover Locate the release button on the chassis cover Lift the release button to the upright posit...

Страница 27: ...5 System Hardware Restoring the Chassis Cover 1 Replace the front chassis cover and slide it backwards Replace the rear chassis cover and slide it forwards 2 Push down the lever to fasten the chassis...

Страница 28: ...ce the CPU on top of the socket with the cut edge pointing to the ar row sign 2 Lift the CPU lever up to a 90 degree angle If you plan on installing single CPU use the first CPU socket cut edge 4 Push...

Страница 29: ...Place the heatsink on top of the CPU 8 Screw the heatsink to the chassis 5 Unscrew the heatsink as indicated below with blue circles 6 The heatsink paste helps to enhance heat dissipation of the CPU B...

Страница 30: ...must be of the same type and size Please refer to the following DIMM Module Combination table Option CPU Memory Modules Installed 1 1 CPU Socket1 with 2DIMMs Slot 1 2 2 1 CPU Socket1 with 4DIMMs Slot...

Страница 31: ...2 9 System Hardware PCI Expansion Card Remove the clip from the chassis Take out the I O shield on the first PCI slot Insert the add on card to the PCI slot...

Страница 32: ...2 10 MS 9266 1U Rackmount Server Replace the clip Follow the procedures described earlier to install the second PCI Card 5 6...

Страница 33: ...iser card is available upon request Please refer to the following for detailed specs and the instructions on riser card installation Standard PCI Riser Cards MS 95D7 Optional PCI Riser Card MS 95D8 In...

Страница 34: ...2 12 MS 9266 1U Rackmount Server Serial ATA SCSI Hard Disk Drives Optional Unlock the HDD device holder and pull it out from the chassis Screw the hard disk to the HDD device holder 3 2 1...

Страница 35: ...ystem Hardware Slide the HDD device holder into the chas sis and push it backward until you hear a click sound to secure the holder You may pull the USB tray open to rest any USB device on it USB tray...

Страница 36: ...Mounting Take out the rail set for rack mounting rail set Position the rail to the rack cabin Press the button to push the locking tab forward The rail will secure itself to the cabin Screw to secure...

Страница 37: ...15 System Hardware Position the rail to the rack cabin Press the button to push the locking tab forward The rail will secure itself to the cabin Screw to secure the rail on the front Front Right 5 4...

Страница 38: ...ollow the same procedures as men tioned earlier in this section to screw the left rail on the front and rear Align the 1U rackmount server to the rails and push it backward until it reaches the end Sc...

Страница 39: ...System Hardware OS Installation Guide Notice Before you install the server opreationg system please do refer the installation guide in the driver CD There are some specific steps to take before instal...

Страница 40: ...re setup procedures While doing the installation be careful in holding the components and follow the installation procedures For some components if you install in the wrong orientation the compo nents...

Страница 41: ...p 3 9 J20 p 3 12 B A T T B IO S B IO S CO M 2 U 1 J5 J7 SW 2 J1 4 JSM B 1 J16 FD D 1 J18 JA B R SW 1 PCIE1 JM G T1 J2 J1 J6 J11 J10 SF A N 2 SF A N 3 SF A N 4 S FA N 5 J9 JPW R1 JSA T A 1 SFA N 1 JS A...

Страница 42: ...llowing points in mind before installing CPU s 1 If SINGLE CPU is intended always install the CPU on the U1 socket 2 To install DUAL CPUs on the board you must use the same type stepping of AMD Optero...

Страница 43: ...an arrow on the Socket 940 Please note that the CPU can only fit in a correct orientation DO NOT use force to install the CPU into the socket 4 Place the CPU onto the socket and press it down firmly i...

Страница 44: ...the same type and size B A T T B IO S B IO S CO M 2 U 1 J5 J7 SW 2 J14 JSM B 1 J16 FD D 1 J18 JA B R SW 1 PC IE1 JM G T1 J2 J1 J6 J11 J10 SFA N2 SFA N 3 SFAN 4 SFA N 5 J9 JPW R1 JSA TA 1 SFA N 1 JSA...

Страница 45: ...les 1 The DDR DIMM has only one notch on the center of module The module will only fit in the right orientation 2 Insert the DIMM memory module vertically into the DIMM slot Then push it in until the...

Страница 46: ...er supply to the system board 14 Pin Standby and Status Control Connector J6 This connector provides power supply to the system board 24 Pin SCSI Power and I2C Connector J9 This connector is an option...

Страница 47: ...EPOW 2 FAN_FAULT 3 DCGOOD POR 4 FAN_HS 7 SDA 9 SCL 10 SPARE1 13 SPARE2 14 5VSB_RET2 12 MH1 MH1 MH2 MH2 J12 Molex_43045 2413 I2C_A0 17 12V_1 1 12V_2 3 12V_3 5 12V_4 7 I2C_A1 18 I2C_A2 19 I2C_CLK 21 I2...

Страница 48: ...1 Pin Definition Hard Disk Connector IDE The mainboard has a 32 bit Enhanced PCI IDE and Ultra DMA 33 66 100 133 controller that provides PIO mode 0 4 Bus Master and Ultra DMA 33 66 100 133 function Y...

Страница 49: ...e front panel connector for electrical connection to the front panel switches and LEDs Serial Port Connector COM 2 The mainboard provides one 9 pin header as serial port COM 2 The port is a 16550A hig...

Страница 50: ...rt Serial ATA host controller PIN SIGNAL PIN SIGNAL 1 GND 2 TXP 3 TXN 4 GND 5 RXN 6 RXP 7 GND JSATA1 2 Pin Definition Connect to JSATA1 or JSATA2 Take out the dust cover and connect to the hard disk d...

Страница 51: ...connected to GND If the mainboard has a System Hardware Monitor chipset on board you must use a specially designed fan with speed sensor to take advantage of the CPU fan control MSI Reminds You 1 Alw...

Страница 52: ...3 3 DB 14 37 DB 14 4 DB 15 38 DB 15 5 DB P1 39 DB P1 6 DB 0 40 DB 0 7 DB 1 41 DB 1 8 DB 2 42 DB 2 9 DB 3 43 DB 3 10 DB 4 44 DB 4 11 DB 5 45 DB 5 12 DB 6 46 DB 6 13 DB 7 47 DB 7 14 DB P 48 DB P 15 GROU...

Страница 53: ...3 pin while the system is either power on or reboot Then turn off the system power and return to 1 2 pin after 15 seconds Clear CMOS Jumper JBAT1 There is a CMOS RAM onboard that has a power supply fr...

Страница 54: ...BTN_OUT O 131 BMC_Heartbeat O 133 BMC_SMI 135 COM_EXCH_DIS O 139 COM_SHUT O 141 5VSB 143 LPC_AD1 4 LPC_AD2 6 LPC_AD3 8 GND 10 I LPC_CLK 12 LPC_RST 14 LPC_FRAME 16 O LPC_INT 20 GND 18 O LPC_DRQ 22 I PO...

Страница 55: ...the plug in riser card to expand one PCI E or one PCI X slot MSI Reminds You When adding or removing expansion cards make sure that you un plug the power supply first Meanwhile read the documentation...

Страница 56: ...each BIOS category described in this chapter are under continuous update for better system performance Therefore the description may be slightly different from the lat est BIOS and should be held for...

Страница 57: ...or pressing the RESET button You may also restart the system by simultaneously pressing Ctrl Alt and Delete keys Key F1 or Alt H Esc arrow keys or arrow keys Home or End PgUp or PgDn F5 or F6 or or Sp...

Страница 58: ...rom this field A sub menu contains additional options for a field parameter You can use arrow keys to highlight the field and press Enter to call up the sub menu Then you can use the control keys to e...

Страница 59: ...basic system configurations such as time date etc Advanced Menu Use this menu to set up the items of special enhanced features available on your system s chipset Security Menu Use this menu to set Sup...

Страница 60: ...e Press PgUp or PgDn to select Manual None or Auto type Note that the specifications of your drive must match with the drive table The hard disk will not work properly if you enter improper informatio...

Страница 61: ...and system memory Ultra DMA Mode Indicates the type of Ultra DMA Serial ATA Press Enter and the following sub menu appears Onboard SATA Device This setting is used to set the SATA device The settings...

Страница 62: ...to boot within 5 seconds since it will skip some check items Available options Enabled Disabled USB BIOS Legacy Support Set to Enabled if you need to use any USB 1 1 2 0 device in the operating syste...

Страница 63: ...ll use most commonly Options Other Win95 Win98 WinMe Win2000 Reset Configuration Data Select Yes if you want to clear the Extended System configuration Data ESCD area Options Yes No MTRR Mapping Metho...

Страница 64: ...r Manage ment Interface Function If your operating system is ACPI aware such as Windows 98SE 2000 ME select Enabled Settings Enabled and Disabled Memhole mapping In order to improve performance certai...

Страница 65: ...ill initial scrub dram and enable system requests to dram to be checked and or corrected Options Enabled Disabled ECC Scrub Redirection Enable Scrubber to correct errors detected in Dram during normal...

Страница 66: ...priority Selecting a device which does not contain a valid boot device could cause the system not bootable PCI Device Slot 1 Slot 2 Onboard SATA The sub menu is used to configure the specific PCI devi...

Страница 67: ...rd features for optimal system performance NumLock On or Off turns NumLock on or off at boot up Auto turns NumLock on if it finds a numeric key pad Options On Off Auto Keyboard auto repeat rate It set...

Страница 68: ...ows you to enable flow control Options None XON XOFF CTS RTS Console Type This feature allows you to enable the specified console type Options vt100 vt100 8bit ANSI 7bit ANSI ut100 plus UTF8 Continue...

Страница 69: ...ort version of IPMI specification read only BMC Firmware Version It shows the current BMC firmware version read only COM port on BMC Select this line to enable disable COM port on BMC Options Disabled...

Страница 70: ...ord for entering Setup The pass words are not case sensitive Pressing Enter at either Set Supervisor Password or Set User Password displays the following message Type the password and press Enter Repe...

Страница 71: ...ake up system by LAN devices Options On Off Resume On Time Select On to wake up system at predetermined time Options On Off Resume Time The time format is HH MM SS Resume Date The date format is MM DD...

Страница 72: ...pe If so the generic type is marked with a plus or minus sign Use the Enter key to expand or collapse the devices marked with or Press Ctrl Enter to expand all such devices To change a device s priori...

Страница 73: ...settings to the Optimal Defaults The Setup Defaults are the default values set by the mainboard manufacturer specifi cally for the optimized performance of the mainboard Discard Changes The option all...

Отзывы: