background image

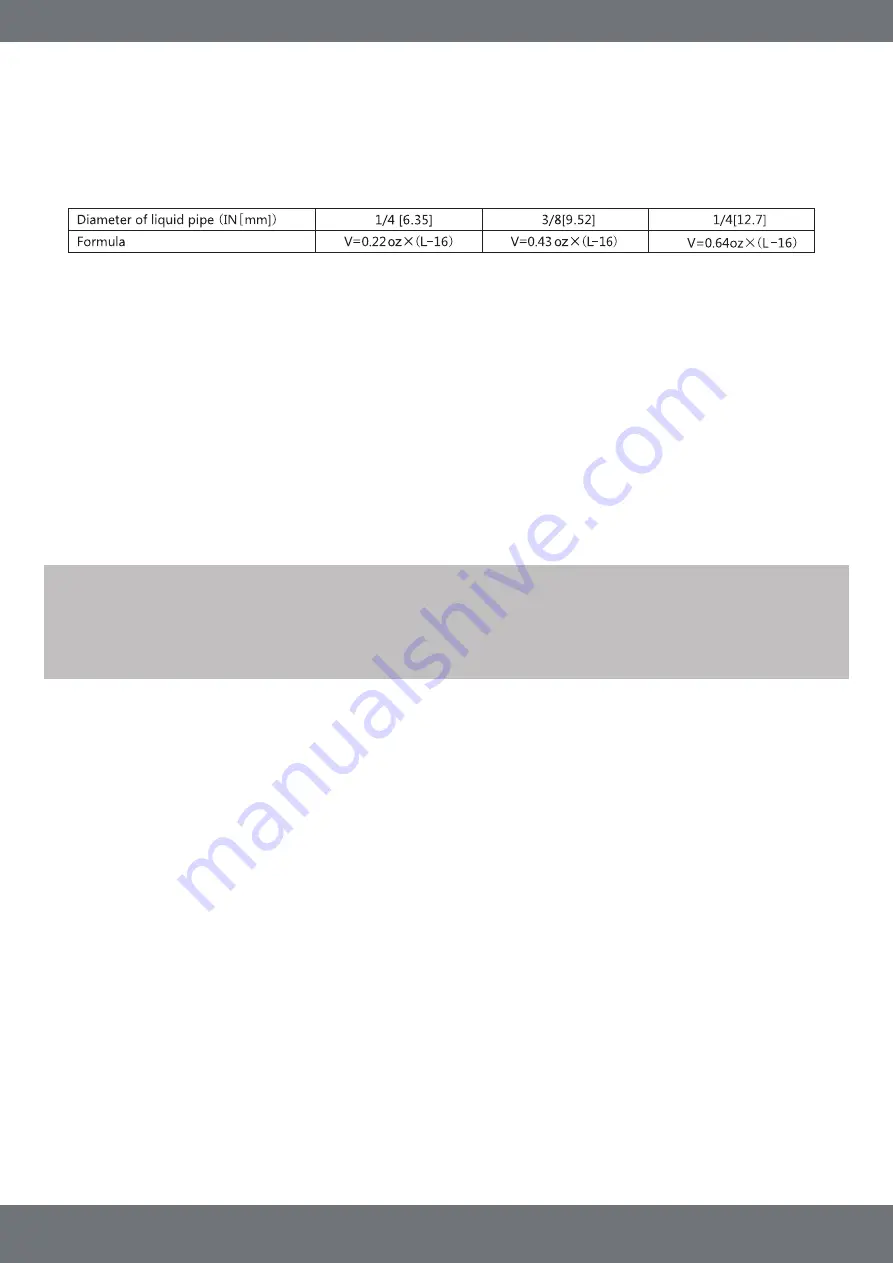
After the vacuum drying process is carried out, the additional refrigerant charge process needs to be 

performed. The outdoor unit is factory charged with refrigerant. The additional refrigerant charge volume is 

decided by the diameter and length of the liquid pipe between the indoor and outdoor unit. Refer to the 

following formula to calculate the charge volume. 

V=Additional refrigerant charge volume (oz). 

L=The length of the liquid pipe (ft). 

• Refrigerant may only be charged after the vacuum drying process is performed. 

• Always use gloves and glasses to protect your hands and eyes during the charging process. 

• Use an electronic scale, or a fluid infusion apparatus, to properly weigh refrigerant to be recharged. Be 

sure to avoid over-charging the system with refrigerant, as it could cause a leak, damage to the compressor, 

or result in personal injury. 

• Use supplemental flexible pipe to connect the refrigerant cylinder, pressure gauge, and outdoor unit. The 

refrigerant should only be charged in a liquid state. 

• After the refrigerant recharging process, check for refrigerant leaks at the connection joint. (By using either 

a gas leakage detector or soapy water to detect). 

12. Additional Refrigerant Charge

OUTDOOR UNIT

mrcool.com   |   Page 16

Table - 5

NOTE: 

There are two ways to verify the correct refrigerant charge. The most commonly 

used method is to adjust the refrigerant charge based on the subcooling range. The second 

method is rarely used, but it is being included for reference only. Multiply the length of the 

liquid pipe and the empirical coefficient (the coefficient is determined by the pipe diameter) 

to verify the correct charge.  

Содержание HAC140 Series

Страница 1: ...r choosing MRCOOL Please read this manual carefully before installation and keep it for future reference Due to updates and constantly improving performance the information and instructions within thi...

Страница 2: ...installation adjustment and operation of this unit Read these instructions thoroughly before attempting installation or operation Failure to follow these instructions may result in improper installat...

Страница 3: ...OUTDOOR UNIT INSTALLATION TOP DISCHARGE UNIT 10 REFRIGERANT PIPE INSTALLATION 11 VACUUM DRYING AND LEAKAGE CHECKING 12 ADDITIONAL REFRIGERANT CHARGE 13 PIPE INSULATION 14 ELECTRICAL WIRING INSTALLATI...

Страница 4: ...OUTDOOR UNIT mrcool com Page 2 Fig 1 Table 1 21 3 4 554 21 3 4 554 21 3 4 554 21 3 4 554 21 3 4 554 21 3 4 554 1 Dimensions...

Страница 5: ...OUTDOOR UNIT mrcool com Page 3 Fig 2 2 Service Space...

Страница 6: ...OUTDOOR UNIT mrcool com Page 4 Applicable for 18k 24k 30k 36k cooling only type Applicable for 18k 24k 30k 36k cooling heating type Fig 3 1 Fig 3 2 3 Piping Diagrams...

Страница 7: ...OUTDOOR UNIT mrcool com Page 5 Applicable for 42k 48k 60k cooling only type Applicable for 42k 48k 60k cooling heating type Fig 3 3 Fig 3 4...

Страница 8: ...ll the stated cross section ground wire and keep it grounding properly and reliably 4 According to the actual connection of low voltage switch or short wiring 1 Grounded and all wiring to conform to I...

Страница 9: ...OUTDOOR UNIT mrcool com Page 7 Table 2 5 Electrical Characteristics...

Страница 10: ...time may take 15 20 minutes It is suggested to install a booster in the outdoor unit 18K 24K 30K and 36K units only to shorten the restart time In the case of high and low pressure imbalance a booste...

Страница 11: ...r Unit Installation Refrigerant Pipe Installation and Insulation Refrigerant Pipe Installation and Insulation Drainage Pipe Installation And Insulation Drainage Pipe Installation And Insulation Vacuum...

Страница 12: ...port the outdoor unit s weight The location should put the outdoor unit as close to the indoor unit as possible The piping length and height drop can not exceed the allowable value Reference Table 4 S...

Страница 13: ...topped ground area where it will be exposed to the heat of the sun the unit should be raised su ciently above the roof or ground to avoid the unit from taking in the accumulated heat of those surface...

Страница 14: ...or precipitation Check the local weather bureau for average snow accumulation in the area Be sure to Isolate the unit from rain gutters to avoid the foundation from possible being washed out Roof inst...

Страница 15: ...he copper pipe 6 Before test operation the joint parts should not be heat insulated 7 Drill holes if the pipes need to pass through the wall 8 Bend the pipes if necessary to pass through the wall smoo...

Страница 16: ...as shown in the image below Also protect all painted surfaces and insulation during brazing After brazing cool the joint with a wet rag The valve can be opened by removing the plunger cap and then fu...

Страница 17: ...ressure gauge to the infusing mouth of the gas pipe and liquid pipe and keep vacuum pump running for an hour the degree of vacuum the pump should reach is 755mmHg 2 If the vacuum pump can not reach 75...

Страница 18: ...sure to avoid over charging the system with refrigerant as it could cause a leak damage to the compressor or result in personal injury Use supplemental exible pipe to connect the refrigerant cylinder...

Страница 19: ...ve 10 mm If in a hot or wet environment the layer of insulation should be thicker Installation of insulation NOTE Gas pipe and liquid pipe should be insulated separately If the gas pipe and liquid pip...

Страница 20: ...performed by a quali ed electrician Air conditioning equipment should be grounded according to the local electrical regulations Current leakage protection switch should be installed Do not connect the...

Страница 21: ...OUTDOOR UNIT mrcool com Page 19 Table 7...

Страница 22: ...nd indoor units Are both the gas side and liquid side valves fully opened Note the air conditioner is pre heated by turning on the power To test the operation set the air conditioner under the mode of...

Страница 23: ...roubleshooting OUTDOOR UNIT mrcool com Page 21 System Alarm Green light or Yellow light slowly ashes System lock Green light goes out and Yellow light is on Turn o power for 10 15 minutes and then res...

Страница 24: ...Sensor is open circuit Sensor is short circuit Component damaged Wet Replace PCB Condenser temp sensor abnormal Error T5 discharge Temperature sensor fault Error No Check the sensor is good or not Err...

Страница 25: ...efrigerant Error Remove the dirty and open the valve Error High pressure alarm Error OK Check the liquid side of the system Heat exchanger of outdoor unit is bad High Pressure alarm OK There is N2 or...

Страница 26: ...OK Replace PCB OK Error Discharge the refrigerant vacuum recharge the refrigerant Error High exhaust temperature protection Error OK Check the connection between sensor and PCB High exhaust temperatur...

Страница 27: ...nd speci cations of this product and or manual are subject to change without prior notice Consult with the sales agency or manufacturer for details Split System Heat Pump Air Conditioner 13 14 SEER 1...

Отзывы: