Mr.Tab MT-786 Скачать руководство пользователя страница 55

6.

Reenter new password and select “OK”.
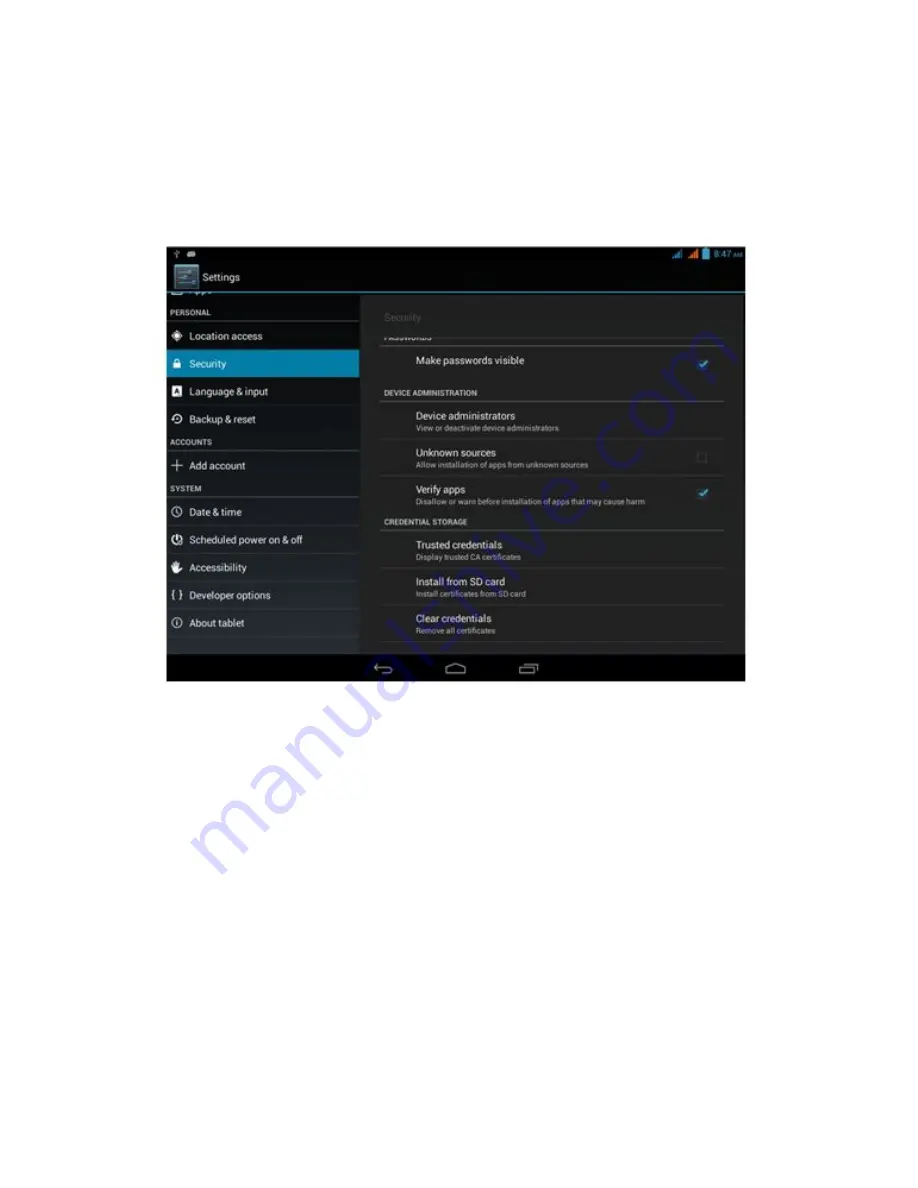
Unknown Sources

1. Click “Settings” on the main UI.

2. Click “Security”.

3. Click “Unknown Sources”, as shown in Picture 4.45.

Picture 4.45

Note:

Only when activating unknown sources can realize successful manual

installation of APK file.

4.13 Language and Input Method

Click “Settings” and select “Language and Input”. Select “Language” to change system
default language, as shown in Picture 4.46.

55

Содержание MT-786

Страница 1: ...1 Tablet PC User Manual...

Страница 2: ...Home Screen 11 3 6 Access Application 16 3 7 USB Connection 17 3 8 Input Text 18 3 9 Tips and Tricks 19 4 Basic Settings 21 4 1 SIM Management 21 4 2 Wi Fi WLAN 24 4 3 Bluetooth 26 4 4 Data Usage Stat...

Страница 3: ...tically introduces multi functions application skills and precautions of the mobile Internet device MID Please read the Manual carefully before using the MID 1 2 Precautions Maintenance Please keep th...

Страница 4: ...y from any magnetic equipment Otherwise the radiation emitted by the MID will clear the information stored in the magnetic equipment Do not use the MID at places with high temperature or inflammable g...

Страница 5: ...el is higher than 10 green light indicates that battery level is full 2 2 MID Status and Notification Notification Icons When a prompt message is displayed on your notification panel click the column...

Страница 6: ...on bar will report new mails Wi Fi activation and ongoing operations You can open the notification panel to view details Open Notification Panel When a new notification icon is displayed on the notifi...

Страница 7: ...interfaces to go back to parent directory The key will be displayed in apps of the Menu key Record the user s browsing history 3 2 Power On Power Off Power On The startup screen will be displayed afte...

Страница 8: ...mediately Switch on the screen under Switched Off mode Press the POWER key to switch on the screen in Switched Off mode The screen will proceed to the Lock mode after being switched on Then click the...

Страница 9: ...or horizontal drag and drop by a finger on the screen Drag and drop Before you start a drag and drop action you must hold the item hard with your finger and do not release your finger until the specif...

Страница 10: ...Infomation Drag downward after making a click on the upper left hand corner of the MID Then you can view basic system infomation You can view or revise information as required through all these shortc...

Страница 11: ...cture 3 3 3 5 Home Screen The Home screen is as shown in Picture 3 4 You can use apps and shortcuts and customize the wallpaper of the main UI user inferface by touching any blank space of the screen...

Страница 12: ...as to provide more space for you to accommodate additional shortcuts widgets etc Press at any blank space of the main UI and fastly slide to right or left Then you can reach the left or right side of...

Страница 13: ...hown in Picture 3 6 2 Then click the master icon where many shorcuts are overlayed and unfold all the app icons as shown in Picture 3 7 Click the lower edge of the black box to display the position of...

Страница 14: ...Picture 3 6 Picture 3 7 14...

Страница 15: ...picture Voice Search 1 Touch the MIC icon 2 Select from the pop up Google options as required 3 Set a language in the pop up voice search box as prompted Click OK 4 Speak to the MIC what you want to s...

Страница 16: ...Picture 3 8 3 6 Access Application Click the key at lower middle of Picture 3 4 to proceed to main menu interface as shown in Picture 3 9 Select the app to be accessed 16...

Страница 17: ...h PC by USB cable Prompt will be displayed in notification bar 2 Open notification panel please refer to Article 2 2 MID Status and Notification for details of how to open panel 3 In the notification...

Страница 18: ...vable Disk x 5 After copy completes just click Close USB Storage Device to uninstall the MID Note When your MID is connecting with USB cable if you want to open USB storage device you won t be able to...

Страница 19: ...f preferred input method Use and Switch Input Method Picture 3 11 1 Caps lock 2 Swithch to number input mode 3 Click to insert whitespace 4 Click to perform input operation 5 Delete the character at l...

Страница 20: ...esktop and access the corresponding app fast Create Shortcut Icon of Apps on Desktop In apps or widgets interface keep touching any icon will lead you to the desktop automatically By draging and holdi...

Страница 21: ...l Select Settings on the main menu interface and select SIM Management as shown in Picture 4 1 Picture 4 1 Click Voice Call and select the default SIM card for voice calls as shown in Picture 4 2 21 T...

Страница 22: ...Picture 4 2 4 1 2 Video Call Select Settings on the main menu interface and select SIM Management Click Video Call and select the default SIM card for video calls as shown in Picture 4 3 22...

Страница 23: ...k Messaging and select the default SIM card for messaging as shown in Picture 4 4 Picture 4 4 4 1 4 Data Connection Select Settings on main menu interface and select SIM Management Click Data Connecti...

Страница 24: ...terface 2 Click Wi Fi and the MID will automatically scan the available Wi Fi wireless networks as shown in Picture 4 6 3 Select the Wi Fi network for connection The Enter Password window will pop up...

Страница 25: ...Picture 4 6 2 Add Network 1 Click the icon in the upper right hand corner of Picture 4 6 as shown in Picture 4 7 25...

Страница 26: ...ring Sleep 1 Click the icon in the upper right hand corner of Picture 4 6 and select Advanced 2 Click to choose the status Keep WLAN on during sleep as shown in Picture 4 8 Picture 4 8 4 3 Bluetooth A...

Страница 27: ...Picture 4 9 4 Click the available devices and the Bluetooth Pairing Request window will pop up Just click the Pair as shown in Picture 4 10 Picture 4 10 27...

Страница 28: ...e icon to proceed to the interface as shown in Picture 4 11 Then you can perform the required operations Picture 4 11 Bluetooth Settings 1 Rename Tablet Click the icon in the upper right hand corner o...

Страница 29: ...2 2 Settings of Visibility Timeout Select Visibility timeout in Picture 4 12 to select the preferred time settings as shown in Picture 4 13 Note Visibility timeout refers to the time when Bluetooth is...

Страница 30: ...ure 4 14 1 File Transfer Service Turn on FTP server namely allow supporting connection with Bluetooth devices of FTP client to realize access and operation to server files 2 Bluetooth Remote Sensor Tu...

Страница 31: ...nctions When activates the Airplane mode Wi Fi and GSM signals will be shielded After turning off airplane mode Wi Fi and GSM modules will return to normal 4 5 2 VPN Open VPN and click the key in the...

Страница 32: ...Picture 4 16 Click the created VPN as shown in Picture 4 17 Input the purchased VPN account and password and then click Connect Picture 4 17 32...

Страница 33: ...hering and Portable Hotspot 1 WLAN Hotspot 1 Select Settings on the main menu interface 2 After making sure of connection to Wi Fi click the More option and open Tethering and Portable Hotspot Picture...

Страница 34: ...Picture 4 19 3 Click WLAN hotspot to turn it on other users can apply for connection to realize Wi Fi tethering as shown in Picture 4 20 Picture 4 20 34...

Страница 35: ...Fi hotspot on to set period of keeping WLAN on as shown in Picture 4 21 Picture 4 21 5 Click Set up Wi Fi hotspot to perform password setting and alteration to the activated Wi Fi hotspot as shown in...

Страница 36: ...vice to select the SIM to be accessed to 3G network and switch network models Preferred Networks Change different network environments for SIM as per personal preference Access Point Names APN Click M...

Страница 37: ...rk Operator Click Network Operator to choose the preferred network operator In addition it s applicable to manually select network connection type or automatically choose network connection as shown i...

Страница 38: ...Picture 4 25 4 6 Audio Profiles 1 Open Settings and click Audio profiles to make option as shown in Picture 4 26 38...

Страница 39: ...Picture 4 26 2 Click General to proceed to Picture 4 27 Picture 4 27 Vibrate 39...

Страница 40: ...ing calls Volumes In Picture 4 27 click Volumes to adjust volume of Ringtone Notification and Alarms as shown in Picture 4 28 Picture 4 28 Voice Call Ringtone In Picture 4 27 click Voice Call Ringtone...

Страница 41: ...Picture 4 29 Video Call Ringtone In Picture 4 27 click Video Call Ringtone to select video call ringtone as shown in Picture 4 30 41...

Страница 42: ...ick Settings 2 Click Display and then Theme Four kinds of different styles are available as shown in Picture 4 31 Picture 4 31 4 7 2 Wallpaper 1 Click Settings 2 Click Display and then Wallpaper 3 As...

Страница 43: ...Picture 4 32 4 7 3 Brightness 1 Click Settings 2 Click Display and then Brightness 3 Brightness settings panel pops up Drag the slider right and left to adjust brightness as shown in Picture 4 33 43...

Страница 44: ...nt environments with varied light intensity the MID will automatically change screen brightness if you have checked automatic brightness you won t be able to manually adjust brightness until you shut...

Страница 45: ...Setting after connection to HDMI Click Video Resolution to adjust resolution 4 7 6 Sleep 1 Click Settings 2 Click Display 3 Click Sleep 4 Screen timeout settings window pops up to select the preferred...

Страница 46: ...isk when installing new apps Check available storage space of the SD card and MID 1 Select Settings 2 Click Storage to check available storage space 1 Internal Storage 1 System Storage System storage...

Страница 47: ...2 Internal Device Internal device refers to the MID s NAND as shown in Picture 4 37 in need of checking its storage content it s applicable to select File Management on the main menu interface to vie...

Страница 48: ...Picture 4 37 2 SD Card In Storage interface you can check total space and available space of SD card and perform operations of Remove SD card and Format SD Card as shown in Picture 4 38 48...

Страница 49: ...k Remove SD Card 4 Then you can remove the SD card safely Note Safe removal of SD card can effectively protect SD card and extend the service life of SD card 4 9 Battery Click Settings function and th...

Страница 50: ...pps 1 Select Settings in the apps list 2 Select the Apps item to manage and delete installed apps Then check the used space and available space of system storage in the lower left hand corner as shown...

Страница 51: ...Picture 4 40 3 Check the used space and available space of internal storage as shown in Picture 4 41 51...

Страница 52: ...ture 4 41 4 Check the running apps used space and available space as shown in Picture 4 42 Picture 4 42 4 11 Location Access Click Settings function and select Location Access as shown in Picture 4 43...

Страница 53: ...to use unlocking pattern or password to lock touch screen so as to protect your MID s privacy Note After setting of screen lock you are requested to enter unlock code when you intend to start up or un...

Страница 54: ...n and click OK Picture 4 44 Set up Unlock PIN Code 1 Click Settings on the main UI 2 Click Security 3 Click Screen Lock 4 Select PIN in the pop up text setting area 5 Enter new PIN code Numbers and se...

Страница 55: ...ck Unknown Sources as shown in Picture 4 45 Picture 4 45 Note Only when activating unknown sources can realize successful manual installation of APK file 4 13 Language and Input Method Click Settings...

Страница 56: ...Picture 4 46 Click Settings and select Language and Input Select Android Keyboard Settings and Input Language as shown in Picture 4 47 56...

Страница 57: ...ck Use System Language and then choose your preferred default language under active input method as shown in Picture 4 48 Picture 4 48 Return to Language and Input and click Default to choose your fav...

Страница 58: ...nt you can select Backup My Data Then the system will back up your current data to Google server Factory Data Reset Click Factory Data Reset to erase all data from your tablet s internal storage In ne...

Страница 59: ...Picture 4 50 4 15 Accounts and Sync 1 Select Settings 2 Open Accounts and Sync as shown in Picture 4 51 59...

Страница 60: ...Picture 4 51 3 Select the email type to be accessed 4 Successful login will automatically activate sync function as shown in Pictures 4 52 and 4 53 60...

Страница 61: ...one 5 Click Select Time Zone and then select the time zone in the list Scroll down the list to view more time zones 6 Click Set Date and then click up or down key to adjust date month and year click S...

Страница 62: ...mat and then select the date format displayed on the MID Picture 4 54 Note In case of using network provided automatic time you ll fail to set date time and time zone manually 4 17 Scheduled Power On...

Страница 63: ...airment the system will make voice feedback for specific content you touch select and activate 4 18 2 Large Font After checking the system font will be larger 4 18 3 Auto Rotate Screen After checking...

Страница 64: ...loper Options and check the icon in the upper right hand corner corner to turn the function on 1 Unlocked Screen After turning on Unlocked Screen the MID will never automatically proceed to sleep mode...

Страница 65: ...e Cursor Location it s applicable to read horizontal and vertical axis coordinates of your operations to touch spots on the MID 4 20 About Tablet Local Update Store update zip package in the internal...

Страница 66: ...Address and other information 66...

Страница 67: ...device pursuant to part 15 of the FCC Rules These limits are designed to provide reasonable protection against harmful interference in a residential installation This equipment generates uses and can...

Страница 68: ...lth FCC RF Exposure Information and Statement The SAR limit of USA FCC is 1 6 W kg averaged over one gram of tissue Device types MT 786 IPS FCC ID 2AASXMTNTB786IPS has also been tested against this SA...

Страница 69: ...maintained between the user s body and the handset including the antenna Third party belt clips holsters and similar accessories used by this device should not contain any metallic components Body wor...

Отзывы: