background image

15

Operating Instructions and Owner’s Manual

Grand Teton Wood Pellet Fire Stove

MINIMIZING CREOSOTE FORMATION

See “MAINTENANCE” on page 18 for an explanation 

of Creosote formation and removal. To slow the build 
up of creosote within your chimney burn only the 
recommended fuel, see page 13.

DISPOSAL OF ASHES

 CAUTION: 

EMBERS MAY BE OBSCURED BY ASH. 

HANDLE ASH WITH TOOLS SUFFICIENT FOR 
FIRE TENDING, NEVER DIRECTLY WITH YOUR 
HANDS. WEAR FIRE RETARDANT CLOTHING 
AND PROTECTIVE EYEWARE.

Ashes should be placed in a metal container with a 
tight fitting lid. 
1. Other waste shall not be placed in ash containers.
2. The closed container of ashes should be placed 

on a noncombustible floor or on the ground, well 
away from all combustible materials, pending final 
disposal. 

3. Wood mineral residue (approximately 1-2%) remains 

in the ash and is an excellent natural fertilizer 
product for all garden plants. Before disposing ashes 
of by burial in soil or otherwise locally dispersed, 
they should be retained in the closed container until 
all any and all cinders have thoroughly cooled and 

should also be “quenched” with water.

SMART STOVE WIFI CONNECTION

This stove can be monitored, controlled, and 
programmed by using the smart stove app by NHHATC 
which is available for iOS or android device through 
the app store. 

Step 1. Download the Smart Stove app by NHHATC.
Step 2. Open the Smart Stove app. The app opens, by 

default, to the “Register” screen. Click on the 
“Register” button.

Step 3. 

Enter your email address in the “Email” field 
and click the “Get Verification Code” button.

Step 4. Enter the verification code that was emailed to 

you in the “Enter Verification Code” field.

Step 5. Now you can set a unique password for your 

device in the “Set Password” field and hit the 
“Done” button.

Step 6. If you have no other wifi enabled devices 

already added to this app there will be a large 

“Add Device” button in the center of the screen 

which you can select. Otherwise, select the + 
symbol in the top right of the screen.

Step 7. Make sure that your device is connected to the 

wifi network which you want the stove to be 
connected to.

Step 8. Make sure that the wood pellet fire stove is 

plugged into an electrical outlet and can be 
powered on.

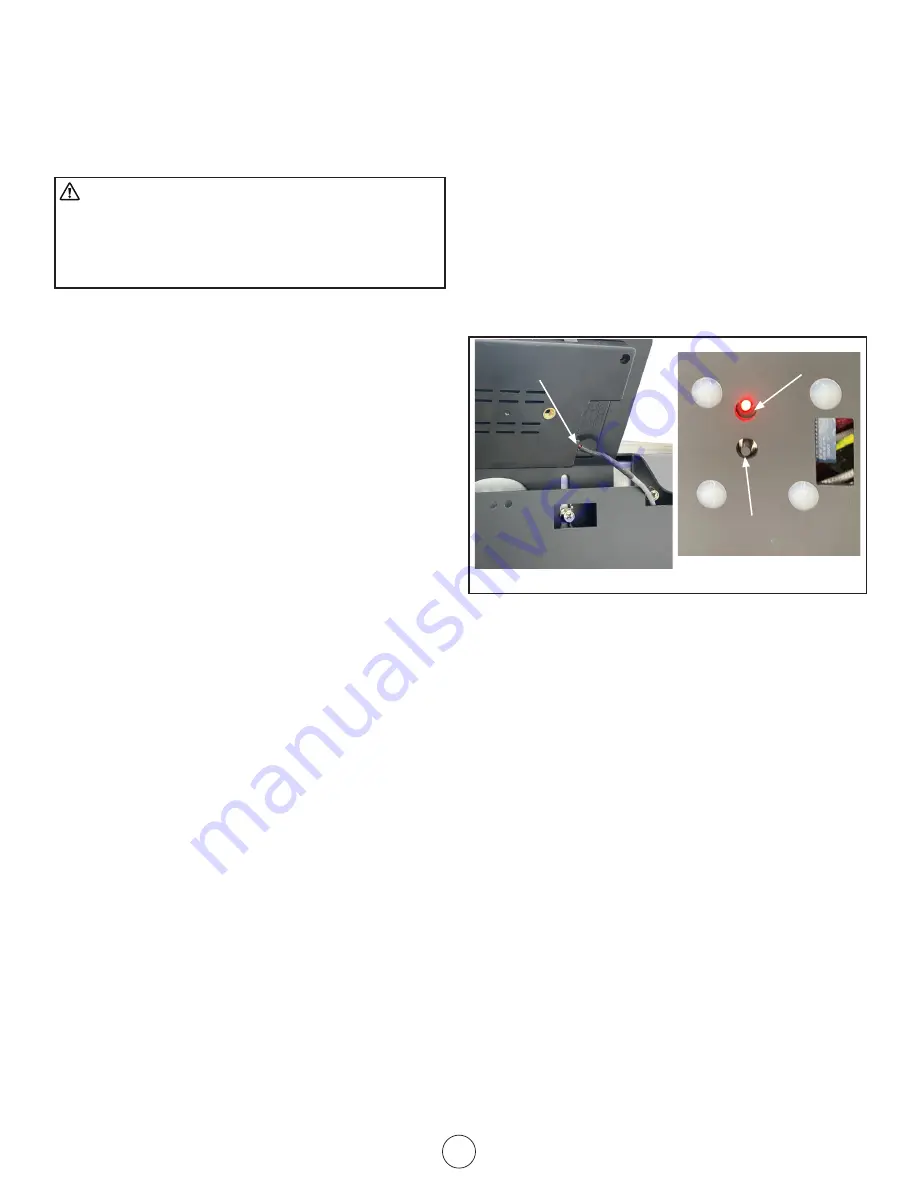
Step 9. Follow the directions on the screen by pressing 

and holding the connection button for 3 
seconds on the back bottom of the stove 
as illustrated in the figure below. Once you 
observe the desired blinking pattern on the 
indicator light, press the confirmation button at 
the bottom of the screen.

Figure 16


Display Panel Back/LED Light

Power Cord

LED Light

Button

Step 10.  Enter the password for the wifi network 

so that the stove can connect to the wifi 
network.

Step 11.  The stove will begin pairing with the device 

running the application through the wifi 
network. This process may take a few 
minutes.

Step 12.  After the device and stove are paired, you 

will be able to see the pellet stove as a 

connection option on the “Devices” tab at 

the bottom of the app screen.

Step 13. 

On your device, go to your device’s wifi 

settings which will now include the stove 
as an option. Select the stove as your wifi 
connection.

Step 14.  Open the Smart Stove phone app again.
Step 15.  You may now select this stove from this 

added devices list in order to monitor, 
control, and program the stoves operation. 

Содержание Grand Teton PS130WTS

Страница 1: ...E ANY NEED TO OBTAIN A PERMIT OBSERVE ALL LOCAL BUILDING CODES OPERATING INSTRUCTIONS AND OWNER S MANUAL Model PS60WTS PS130WTS PSBF66WTS READ INSTRUCTIONS CAREFULLY Please read this entire manual bef...

Страница 2: ...H AS BUILDING MATERIALS PAPER OR CARDBOARD A SAFE DISTANCE AWAY FROM THE STOVE AS RECOMMENDED BY THE INSTRUCTIONS NEVER USE THE STOVE IN SPACES WHICH DO OR MAY CONTAIN VOLATILE OR AIRBORNE COMBUSTIBLE...

Страница 3: ...w Pellet Consumption Rate Low LBS HR kg HR 1 43 0 65 2 4 1 09 1 48 0 67 Pellet Consumption Rate Medium LBS HR kg HR 1 81 0 82 2 47 1 12 2 16 0 98 Pellet Consumption Rate High LBS HR kg HR 4 01 1 82 6...

Страница 4: ...otection see FLOORING SPACE and FLOORING MATERIAL on page 6 Manufactured venting of 3 80mm in diameter of type L or PL which is listed to UL 641 ULC S609 Standard for 650 C Factory Built Chimneys or U...

Страница 5: ...E FLU WITH HEADACHE DIZZINESS AND OR NAUSEA IF YOU HAVE THESE SIGNS STOVE MAY NOT BE WORKING PROPERLY GET FRESH AIR AT ONCE HAVE STOVE SERVICED SOME PEOPLE PREGNANT WOMEN PERSONS WITH HEART OR LUNG DI...

Страница 6: ...Vertical runs of vent pipe must be at least 3 76 mm from any wall Finally the area which the wood pellet fire stove is installed shall have a floor to ceiling distance of at least 84 2134 mm FLOORING...

Страница 7: ...rd attaches to the stove at the exposed socket in the rear of the stove Once any necessary assembly of the display panel screen is complete you may briefly plug your stove in to make sure that it func...

Страница 8: ...it will not come into contact with the stove s surface FRESH AIR AND VENTILATION REQUIREMENTS When deciding the location of the stove ensure that the space will always have a source of fresh air avai...

Страница 9: ...dential Type and Building Heating Appliance UL 103 A International Conference of Building Officials ICBO standards for solid fuel Stoves code approved masonry chimney VENT TERMINATION Install exhaust...

Страница 10: ...annels separated from combustibles by a minimum of 6 inches 152 mm of glass fiber insulation Opening shall be covered and thimble supported with a sheet steel support minimum 24 gauge in thickness Fig...

Страница 11: ...red and can not be moved tipped or have ventilation seals compromised The stove must be provided a permanently ducted source of outside air to support combustion which meets the following requirements...

Страница 12: ...ites of chimney manufacturers will be able to provide stove pipe that is rated to these standards This listing indicates that the Chimney is rated for high temperatures up to 2100 F 1 149 C Only use c...

Страница 13: ...he pellet sediment debris at the bottom of the pellet container Store pellets in sacks made of environmentally neutral or biologically degradable plastic or from paper 2 3 layers similar to cement pac...

Страница 14: ...hrough the following stages Cleaning Cycle The firepot draws dust ash remnants out Feeding Cycle Pellets will be transported from the Pellet Hopper into the fire pot by the auger This can take 5 to 15...

Страница 15: ...tton Step 4 Enter the verification code that was emailed to you in the Enter Verification Code field Step 5 Now you can set a unique password for your device in the Set Password field and hit the Done...

Страница 16: ...ECO 1 The stove shuts off when the desired temperature has been reached The stove will turn back once the room cools to a factory set temperature ECO 2 The stove turns to minimum power preset P4 when...

Страница 17: ...e stove Displays the exhaust pipe temp the hopper protection temp and number of run hours etc Settings Press to enter User Settings Menu Figure 17b On this menu you may select F or C ECO Mode see Wi F...

Страница 18: ...y day Whichever is more frequent Ash Drawer After 50 bags of wood pellets Passageways After 100 bags of wood pellets Blower After 100 bags of wood pellets CLEANING FIRE POT PAN CAUTION IF STOVE IS INT...

Страница 19: ...ny ash or debris build up Build up of debris and ash can restrict the flow of gases which will affect stove performance and failure to remove creosote may result in a dangerous chimney fire FLYASH FOR...

Страница 20: ...the most up and most left position of the prepared gasket gutter 5 Continue pressing the replacement gasket clockwise along the gasket gutter until it has wrapped back to where the gasket was pressed...

Страница 21: ...ned to the base If a low pressure is created in the firebox by a leak opening the door to the firebox a blocked flue or an unsealed ash drawer then the switch will shut the stove off as a precaution E...

Страница 22: ...using low quality fuel in fire pot 2 Check that the firepot is sitting in the holder correctly and that the igniter is not obstructed 3 Check that the exhaust gas temperature sensor switch beside the...

Страница 23: ...itch Power Cord disconnected 1 Press power cord tightly into the heater 2 Ensure that the wall socket is delivering 120 Volts Fuse is blown Replace the fuse The blower does not turn on during Cleaning...

Страница 24: ...eding speed After the fire has started the stove turns off 15 minutes later The pellet hopper is low on fuel Check that the pellet hopper has a sufficient amount of fuel The auger is not operating 1 U...

Страница 25: ...Replace the 30 o C temperature switch The fire extinguishes and the power shuts off continued Requested temperature has been reached This is normal ECO mode behavior The stove will automatically swit...

Страница 26: ...sensor NO NC NO NC C Wifi Pellet Test Vaccum switch Display panel Blower Combustion Fan Auger motor Igniter GND FUSE Power GND N L Shorting Switch NOTE IF ANY OF THE ORIGINAL WIRE AS SUPPLIED WITH THE...

Страница 27: ...Long 13 n a Flue Fixed Plate Short 14 n a Pedestal Fixed Plate 15 66626 Left Side panel 16 66627 Right Side panel 17 n a Thermal Insulation Plate 18 n a Insulation Support Plate 19 66607 Combustion B...

Страница 28: ...Ground Screw 24 66610 Vacuum Switch 25 66611 Silicone Tube 26 66612 Circulation Blower 27 n a Chamber Insulation Cover NO P N DESCRIPTION 28 66613 Safety Sensor 29 n a Motherboard Fixed Plate 30 6661...

Страница 29: ...66622 Silicone Rubber Sealing Ring 10 66615 Power Socket 11 66663 Motherboard 12 66638 Fire Pot 13 66639 Vacuum Switch 14 66640 Igniter 15 66641 Combustion Blower 16 66612 Circulation Blower NO P N DE...

Страница 30: ...upply us with the purchase date and the name and address of the dealer from whom you purchased our product The foregoing is the full extent of the responsibility of the Company There are no other warr...

Страница 31: ...CODES DE LA CONSTRUCTIONS LOCAUX GUIDE DU PROPRI TAIRE ET INSTRUCTIONS D UTILISATION No de mod le PS60WTS PS130WTS PSBF66WTS LIRE LES INSTRUCTIONS ATTENTIVEMENT Veuillez lire le pr sent manuel au com...

Страница 32: ...U MANUEL NE JAMAIS UTILISER LE PO LE DANS UN LIEU AYANT OU QUI A POSSIBILIT D AVOIR DES MATI RES VOLATILES EN SUSPENSION DANS L AIR OU DES PRODUITS COMME L ESSENCE DES SOLVANTS DES DILUANTS PEINTURE D...

Страница 33: ...ois Grenailles de bois Chauffe approximativement m2 pi2 139 4 1 500 232 3 2 500 167 2 1 800 Monoxyde de carbone produit g min Sur r glage lev 0 59 Sur r glage bas 0 77 Sur r glage lev 0 00 Sur r glage...

Страница 34: ...r de montants Fil plomb Scie sauteuse Silicone haute temp rature ou scellant haute temp rature ou ruban de conduit de fum e haute temp rature Protection de plancher voir SUPERFICIE DE PLANCHER et MAT...

Страница 35: ...ES TOURDISSEMENTS ET OU NAUS ES SI VOUS SOUFFREZ DE CES SYMPT MES LE PO LE POURRAIT EN TRE LA CAUSE EN RAISON DE MAUVAIS FONCTIONNEMENT OBTENEZ DE L AIR FRAIS RESPIRER SUR LE CHAMP FAITES UN ENTRETIEN...

Страница 36: ...out mur Finalement l a pi ce dans laquelle le po le grenailles de bois est install devra avoir une hauteur de plafond d au moins 2 134 mm 84 po MAT RIAUX DE REV TEMENT DE SOL La protection de plancher...

Страница 37: ...on lectrique Le cordon d alimentation se branche dans la prise l arri re du po le Apr s tout assemblage requis du panneau d affichage vous pouvez brancher votre po le temporairement pour vous assurer...

Страница 38: ...le EXIGENCES D AIR FRAIS ET D A RATION Lorsque vous d cidez de la localisation du po le assurez vous que l aire sera toujours approvisionn e d air frais Un manque d air pourrait appauvrir tous les app...

Страница 39: ...e ma onnerie certifi e ICBO International Conference of Building Officials pour les po les combustible solide CAPUCHON D VENT Installer l vent d chappement en respectant les distances de d gagement sp...

Страница 40: ...et la section de chemin e support e et fix e deux montants d acier de calibre minimum no 24 La quincaillerie de fixation de la section de chemin e ne doit pas perforer sa paroi interne TECHNIQUES DE...

Страница 41: ...fa on compromettant une a ration ad quate Une canalisation permanente d admission d air frais pour entretenir la combustion devra tre install e en r pondant aux exigences suivantes La canalisation de...

Страница 42: ...domiciliaires les quincailleries et les magasins de fournitures CVCA ainsi que les sites Web de fabricants de chemin es pourront vous fournir des tuyaux de po le isol s r pondant ces normes Cet enreg...

Страница 43: ...sacs deux ou trois couches de papier comme ceux des sacs de ciment ou faits de produits synth tiques biologiquement d gradables et neutres au point de vue environnemental L utilisation de grenailles d...

Страница 44: ...tr mie 3 Appuyez sur le bouton d alimentation Le po le proc dera automatiquement effectuer ce qui suit Cycle de nettoyage Le pot de combustion est nettoy des cendres poussi res et r sidus accumul s Cy...

Страница 45: ...z votre adresse courriel dans le champ Courriel et cliquez sur le bouton Obtenir le code de v rification tape 4 Entrez le code de v rification qui vous a t envoy par courriel dans le champ Saisir le c...

Страница 46: ...llumera une temp rature de la pi ce pr r gl e en usine ECO 2 Lorsque la temp rature d sir e est atteinte le po le passe en chauffage minimum pr r glage P4 Il se remettra un r glage plus lev lorsque la...

Страница 47: ...ent la temp rature de protection de la tr mie et le nombre d heures de fonctionnement etc Param tres Appuyez sur pour acc der au menu des param tres utilisateur Figure 18b Dans ce menu vous pouvez s l...

Страница 48: ...lon la premi re ventualit Tiroir de cendre Apr s 50 sacs de grenailles de bois Canalisations internes Apr s 100 sacs de grenailles de bois Ventilateur Apr s 100 sacs de grenailles de bois NETTOYAGE PO...

Страница 49: ...umulation de d bris et les cendres peuvent restreindre le d bit de gaz qui affectera la performance du po le et ne pas retirer la cr osote pourrait r sulter en un dangereux feu de chemin e CENDRES VOL...

Страница 50: ...tanch it r sistant aux temp ratures lev es l int rieur du sillon 4 Presser l extr mit du joint d tanch it de remplacement dans le sillon pr par partir du point gauche le plus lev 5 Continuer presser...

Страница 51: ...e par une fuite l ouverture de la porte du pot de combustion une chemin e obstru e ou un tiroir de cendre non scell le pressostat teindra le po le comme mesure de pr caution Le code d erreur E5 s affi...

Страница 52: ...upport et qu il n y a pas d obstruction devant l allumeur 3 S assurer que le capteur de temp rature de gaz d chappement adjacent au ventilateur de combustion est en bon tat et n a pas subi de dommage...

Страница 53: ...s rer fond le cordon d alimentation dans le po le 2 S assurer que la prise murale fournit une tension de 120 V Le fusible est grill Remplacer le fusible Le ventilateur ne tourne pas durant les cycles...

Страница 54: ...e coincement 3 S assurer que la vis de fixation de la tari re au moteur est bien serr e Le thermostat de temp rature de 30 C s est d clench 1 S assurer que les fils du thermostat sont bien connect s 2...

Страница 55: ...sse de grenailles Le thermostat de temp rature de 30 C s est d clench 1 S assurer que les fils du thermostat sont bien connect s 2 Remplacer le thermostat de 30 C La combustion s arr te et le po le in...

Страница 56: ...t NO NC NO NC C Wifi Test de granul s Pressostat Panneau d affichage Ventilateur Ventilateur de combustion Moteur de tari re Allumeur GND FUSIBLE Alimmentation GND N L Court circuit Changer REMARQUE S...

Страница 57: ...8 66613 Capteur de s curit 29 n a Plaque fixe de la carte m re 30 66631 Capot arri re 31 66615 Prise de courant 32 66616 Capteur de pi ce 33 66622 Joint d tanch it en caoutchouc silicone 34 66617 Comm...

Страница 58: ...e 30 66614 Capot arri re 31 66615 Prise de courant 32 66616 Capteur de pi ce 33 n a tiquette de notation 34 66617 Commutateur de couvercle de tr mie 35 n a Outil de nettoyage voir n 47 36 n a Ventilat...

Страница 59: ...silicone dix 66615 Prise de courant 11 66663 Carte m re 12 66638 Pot de feu 13 66639 Commutateur de vide 14 66640 Allumeur 15 66641 Souffleur combustion No No de pi ce DESCRIPTION 16 66612 Ventilateu...

Страница 60: ...nt la demande de compensation Veuillez galement nous indiquer la date d achat ainsi que les nom et adresse du d positaire o vous avez achet votre produit Ce qui suit est la description compl te de la...

Отзывы: