Mr Coffee Concepts CBTC80 Скачать руководство пользователя страница 5

O

PERATION AND

U

SE

B

EFORE

F

IRST

U

SE

Before using your Coffeemaker for the first time, wash Thermal Carafe, lid and removable
brew basket using a mild, non-abrasive detergent and water. Rinse each thoroughly.
Follow steps 4-6 

(Brewing Coffee)

using water, to clean the inside of your Coffeemaker.

B

RE WING

C

OFFEE

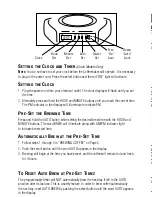
If the clock display is flashing, refer to section 

(setting the clock) 

before continuing.

1. Open the swivel filter basket holder to your right and remove the black inner filter basket.

Insert a M

R

. C

OFFEE

®

brand 8-12 cup basket paper filter into the black inner filter basket.

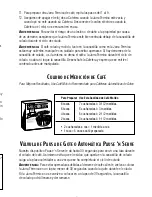
2. Add desired amount of coffee according to the coffee measurement chart found on

Page 6. Shake lightly to level coffee, and return the black inner filter basket to the
swivel basket filter holder, and swing closed.

3. Be sure the paper filter is properly centered before closing the swivel filter basket holder.

4. Fill the water reservoir with cold tap water to desired capacity as indicated by the water

window on the side of the Coffeemaker. 

(1 cup equals 5 ounces)
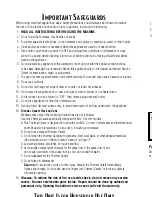
I

MPORTANT

:

To achieve the best performance of the Thermal Carafe, rinse the Thermal Carafe
with HOT tap water before brewing. This will yield a HOTTER cup of coffee.

5. While brewing, the brew through lid must be on the Thermal Carafe, and you must

have the BREW and POUR arrow aligned with the spout. Place the empty Thermal
Carafe onto the warmer plate.

6. Plug the power cord into an outlet. For a push button model, to start the brew cycle

press and release the select button firmly until the red “ON” light is lit. For a clock
model, just press the select button and the red “ON” light will go on.

7. When coffee stops flowing, the brewing cycle is complete.

8. When the brewing cycle is completed, the push button

and clock models will shut-off automatically.
The indicator light will go out to let you know
the brewing cycle is completed.

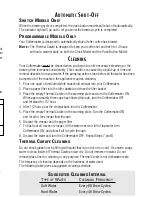
9. To pour coffee once the brewing process is complete,

make sure the BREW and POUR arrow of the lid is
aligned with the spout. Place thumb on the thumb
tab area of the lid and pour. Once pouring is complete
align the closed arrow of the lid to the spout of the
Thermal Carafe (See Figure 1).

10. When cooled, carefully remove the black inner filter

basket and discard the used grounds and filter.
Rinse the filter basket and replace.

5

4

I

NTRODUC TION

C

ONGRATULATIONS

!

You are the owner of a M

R

. C

OFFEE

®

T

HERMAL

G

OURMET

, 8-Cup Thermal Carafe

Coffeemaker. The Thermal Carafe allows coffee to stay hot and fresh for up to four hours. The portable
Thermal Carafe can go from countertop to tabletop and will not mar or burn surfaces.
A Thermal Carafe-activated Pause ‘n Serve drip-stop valve allows you up to 30 seconds to sample a cup
while the coffee is still brewing.
The TCX83 Model features a Programmable Timer. 
Please read all of the instructions in this booklet carefully before you begin to use this appliance.
Proper care and maintenance will ensure the long life of this appliance and its trouble-free operation.
Save these instructions and refer to them often for cleaning and care tips. 
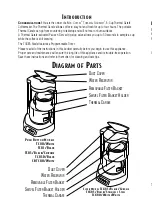
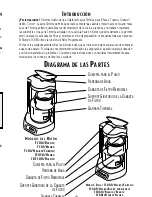
D

IAGRAM OF

P

ARTS

D

UST

C

OVER

W

ATER

R

ESERVOIR

R

EMOVABLE

F

ILTER

B

ASKET

S

WIVEL

F

ILTER

B

ASKET

H

OLDER

T

HERMAL

C

ARAFE

D

UST

C

OVER

W

ATER

R

ESERVOIR

R

EMOVABLE

F

ILTER

B

ASKET

S

WIVEL

F

ILTER

B

ASKET

H

OLDER

T

HERMAL

C

ARAFE

C

LO C K

M

O D E L

TC X83/B

L A C K

/C

H R O M E

TC X85/B

L A C K

/ S

TA I N L E SS

S

T E E L

TC X80/ W

H I T E

/ W

H I T E

TC X81/B

L A C K

/B

L A C K

P

U S H

B

U T TO N

M

O D E L S

TC80/ W

H I T E

TC81/B

L A C K

TC83/B

L A C K

/C

H R O M E

TC83D/B

L A C K

CBTC80/ W

H I T E

P

LACE

T

HUMB

O

N

T

HUMB

T

AB

B

EFORE

P

OURING

F

IGURE

1

Содержание CBTC80

Страница 1: ...On Start PM Hour Min Auto Auto Start On TC Series Serie de TC User Manual ...

Страница 2: ...rn any control to OFF then remove plug from wall outlet 12 Do not use appliance for other than intended use 13 Use on a hard flat level surface only to avoid interruption of air flow underneath the appliance 14 THERMAL CARAFE USE AND CARE Breakage may occur if the following instructions are not followed Use only Thermal Carafe specifically designed for MR COFFEE models A This Thermal Carafe is des...

Страница 3: ...hock this plug will fit in a polarized outlet only one way If the plug does not fit fully in the outlet reverse the plug If it still does not fit contact a qualified electrician Do not modify the plug in any way IF SERVICE IS REQUIRED DO NOT RETURN TO YOUR STORE For Service Call 1 800 MR COFFEE 1 800 672 6333 TO ASSIST US IN SERVING YOU PLEASE HAVE THE MODEL NUMBER TC80 TC81 TCX80 TCX81 TC83 TC83D...

Страница 4: ... a Programmable Timer Please read all of the instructions in this booklet carefully before you begin to use this appliance Proper care and maintenance will ensure the long life of this appliance and its trouble free operation Save these instructions and refer to them often for cleaning and care tips DIAGRAM OF PARTS DUST COVER WATER RESERVOIR REMOVABLE FILTER BASKET SWIVEL FILTER BASKET HOLDER DUS...

Страница 5: ...rformance of the Thermal Carafe rinse the Thermal Carafe with HOT tap water before brewing This will yield a HOTTER cup of coffee 5 While brewing the brew through lid must be on the Thermal Carafe and you must have the BREW and POUR arrow aligned with the spout Place the empty Thermal Carafe onto the warmer plate 6 Plug the power cord into an outlet For a push button model to start the brew cycle ...

Страница 6: ...ntents to cool before handling COFFEE MEASUREMENT CHART FOR BEST RESULTS USE DRIP GRIND RECOMMENDED FOR AUTOMATIC DRIP COFFEEMAKERS AUTOMATIC BREWING PAUSE N SERVE Our Brewing Pause n Serve feature allows you up to 30 seconds to pour a cup while the coffee is still brewing It also prevents any remaining coffee in the brew basket from dripping onto the warmer plate once brew cycle is complete WARNI...

Страница 7: ...art of undiluted white household vinegar into your Coffeemaker 2 Place a paper filter into the filter basket and close the filter basket 3 Place the empty Thermal Carafe on the warming plate and turn the Coffeemaker ON When approximately three cups have flowed through turn the Coffeemaker OFF and let stand for 1 2 hour 4 After 1 2 hour pour the vinegar back into the Coffeemaker 5 Place the empty T...

Страница 8: ...E SET THE BREWING TIME Press and hold the AUTO button while setting the desired brew time with the HOUR and MINUTE buttons The word BREW will illuminate along with AM PM indicator light to indicate brew start time AUTOMATICALLY BREW AT THE PRE SET TIME 1 Follow steps 1 through 5 in BREWING COFFEE on Page 5 2 Push the select button until the word AUTO appears in the display 3 Brewing will begin at ...

Страница 9: ...s cleaning FILTER BASKET OVERFLOWS The filter basket is not properly inserted Carafe is not placed all the way on the warming plate Carafe lid not on carafe Too many grounds placed in filter Carafe was removed from warming plate longer than 30 seconds BURNING COFFEE SMELL Coffee was spilled on a warming plate COFFEE IS NOT HOT Power outage COFFEE TASTES BAD Coffee ground other than for automatic d...

Страница 10: ...er Acts of God such as fire flood hurricanes and tornadoes Sunbeam shall not be liable for any incidental or consequential damages caused by the breach of any express or implied warranty Except to the extent prohibited by applicable law any implied warranty of merchantability or fitness for a particular purpose is limited in duration to the duration of the above warranty Some states provinces or j...

Страница 11: ...tro fin para el que fue diseñado 13 Usela solamente en una superficie dura horizontal para evitar la interrupción del flujo de aire por debajo del aparato 14 USO Y CUIDADO DE LA JARRA TÉRMICA Se puede romper la Jarra Térmica si no se siguen las siguientes instrucciones Use sólamente la Jarra Térmica diseñada específicamente para los modelos MR COFFEE A Esta Jarra Térmica está diseñada para usarse ...

Страница 12: ...a se conectará a un tomacorriente polarizado de una sola manera Si la clavija no entra totalmente en el tomacorriente inviértala Si todavía no entra contacte a un electricista calificado No modifique la clavija de ninguna forma SI REQUIERE SERVICIO NO LA REGRESE A SU TIENDA Llame al 1 800 MR COFFEE 1 800 672 6333 PARA QUE NOS AYUDE A SERVIRLE SÍRVASE TENER A MANO EL NÚMERO DEL MODELO TC80 TC81 TCX...

Страница 13: ...uidadosamente todas las instrucciones que se indican en este manual antes de comenzar a usar este aparato El cuidado y mantenimiento adecuados le asegurarán al aparato una larga duración y un funcionamiento sin problemas Conserve estas instrucciones y consúltelas frecuentemente para relacionarse los consejos de limpieza y cuidado DIAGRAMA DE LAS PARTES CUBIERTA PARA EL POLVO VENTANA DE AGUA CANAST...

Страница 14: ...ar alineada con el pico vertedor de la jarra Coloque la Jarra Térmica vacía sobre la placa de calentamiento 6 Enchufe el cordón eléctrico en la toma de corriente Para iniciar el ciclo de preparación en los modelos que tienen el botón que se presiona presione el botón selector firmemente y libérelo hasta que la luz de encendido ON se ilumine Para aquellos modelos que tienen el reloj solamente presi...

Страница 15: ... enfríe el contenido antes de manipularla CUADRO DE MEDICIÓN DE CAFÉ Para Mejores Resultados Use Café Molido Recomendado para Cafeteras Automáticas de Goteo VÁLVULA DE PAUSA DE GOTEO AUTOMÁTICA PAUSE N SERVE Nuestro dispositivo Pause n Serve le da hasta 30 segundos para servir una taza durante el colado del café Asimismo evita que el residuo que queda en la canastilla de colado caiga a la placa ca...

Страница 16: ...rre la canasta giratoria 3 Coloque la jarra vacía sobre la placa de calentamiento Gira el botón de ON Cuando tres tazas han atravesado gira el botón a ON Deje el soporte para la 1 2 hora 4 Después de 1 2 hora vierta el vinagre nuevamente dentro de la Cafetera Coloque la jarra vacía sobre la placa de calentamiento 5 Gira el Control a ON y permita que el modo de limpieza llegue a su fin 6 Deseche el...

Страница 17: ...nute La luz del indicador PM se iluminará para indicar las horas PM PARA COLAR AUTOMÁTICAMENTE A LA HORA PREFIJADA 1 Siga los pasos del 1 al 5 en la Sección de COLADO DEL CAFÉ 2 Ponga el interruptor de control en OFF y luego en AUTO 3 El colado empezará a la hora que haya prefijado y el café permanecerá caliente en la Jarra Térmica durante 4 horas PARA RESTABLECER LA PREPARACIÓN AUTOMÁTICA Y PONER...

Страница 18: ...cificación LA CANASTA DEL FILTRO SE DESBORDA La canasta del filtro no está correctamente insertada La jarra no está totalmente colocada sobre el plato calefactor La tapa de la jarra no está colocada sobre la jarra Hay demasiados granos de café en el filtro La jarra fue removida del plato calefactor por más de 30 segundos OLOR A CAFÉ QUEMADO Se dejo la jarra vacía sobre el plato calefactor caliente...

Страница 19: ...uracanes y tornados Sunbeam Products Inc no se hace responsable por ningún daño emergente o incidental causado por el rompimiento de cualquier garantía expresa o implícita Excepto al alcance prohibido por la ley aplicable cualquier garantía implícita de comercialización o arreglo para un propósito particular está limitada en duración de la garantía antes mencionada Algunos estados provincias o jur...

Страница 20: ...ademark of Sunbeam Products Inc Distributed by Sunbeam Products Inc Boca Raton Florida 33431 2002 Sunbeam Products Inc Todos los derechos reservados SUNBEAM e MR COFFEE son marcas registradas de Sunbeam Products Inc THERMAL GOURMET es una marca comercial de Sunbeam Products Inc Distribuido por Sunbeam Products Inc Boca Raton Florida 33431 Us ...

Отзывы: