background image

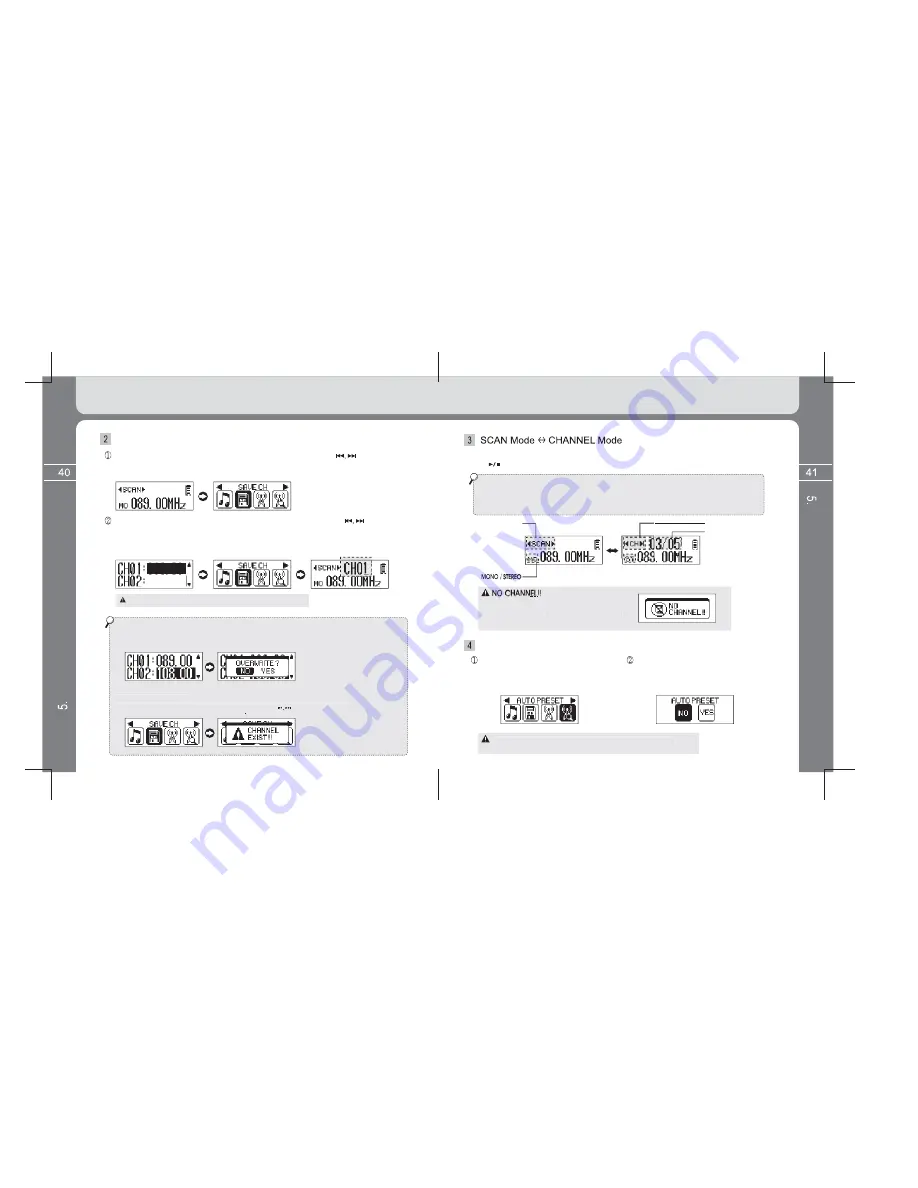
Search desired FM frequency band to save by using the            button. 
Enter into the Menu screen by pressing and holding the MENU button and then 
select the SAVE CH icon. 

Setup SAVE CHANNEL (Searched Frequency Band Save)

Select channel number (CH01~CH20) to save by using the          button
and then press the Menu button shortly to move to the MENU screen. 
If doing so, channel save is properly completed. You can check frequency 
is saved if returning to the FM Listening screen by pressing the Volume (+) button. 

20 channels are provided to save radio frequency. 

* For channel overwrite

EX) Message as below appears if trying to overwrite different frequency band at the channel (CH02)
whose frequency was already saved. In this case, OVERWRITE is completed if selecting [YES].

* For channel exist

Message as below appears where frequency to save is already saved in channel.
The popup message window disappears if pressing the          button

* You can change Scan mode and Channel mode from time to time if pressing 
  the       button while listening to FM. 

* SCAN mode
  - This is mode to scan frequency band in the unit of 500Hz or 100KHz.
* CHANNEL mode
  - This is mode to scan frequency band in the channel upreviously saved.

[SCAN Mode]

[CHANNEL mode]

SCAN mode

Channel mode
Current channel number/
Total channel numbers saved

Where there is no channel saved, 
‘NO CHANNEL!!’ message appears and 
it is not allowed to enter into Channel Mode.

Setup AUTO PRESET (Receivable Frequency Automatic Saving Function)

Select the AUTO PRESET icon 
after entering into the Menu screen 
by pressing and holding the MENU
button.

If changing to YES from No, all 
receivable frequency bands at the
location where the user is located,
and automatically are saved. 

Note that there may not be receivable frequency band
depending on the location where the user is located.

Detailed Information on FM 

TUNER Mode

Detailed Information on FM 

TUNER Mode

Содержание FL 350

Страница 1: ......

Страница 2: ...osoft Windows Windows Explorer and Windows logo are Microsoft Corporation s registered mark or trademark Intel and Pentium are Intel Corporation s registered trademark Macintosh and Macintosh logo are...

Страница 3: ...t perform a separate backup process for a received product considering that the customer has already backed up the data Therefore this company isn t responsible for data damage that occurs during the...

Страница 4: ...nce the player has a tree type composition like a window searcher so as to easily save and scan music file Voice Recording Firmware upgrade We ll do our best to improve the performance of the player t...

Страница 5: ...ormatting PC based operation requirements IBM PC Main body USB Interface Rev 1 1 2 0 supported standard equipment and CD ROM Driver mounted CPU Pentium 133MHz or more Memory 64MB or more Hard disk spa...

Страница 6: ...move MENU button Menu entry Long key Information change function Short key Sector repeat function when setting up A B sector repeat in Menu LCD display Displays file information FM listening screen a...

Страница 7: ...ng status released Raise the earphone to arrow direction to pull it out Either of necklace type of earphone or general high quality type of earphone MPIO OP200 is provided depending on sale area How t...

Страница 8: ...not done Battery charging when FL350 is completely discharged and thus the LCD turns off Connect the USB short cable provided with the earphone terminal of the unit and the USB terminal of the PC Char...

Страница 9: ...ity programs to be installed are as below Windows 98 Device Driver MPIO Utility Windows Media Player Plug in If clicking the Install button utility programs the user selected are installed sequentiall...

Страница 10: ...installation is normally done if entering into the next path Control Device System Device Manager Hard Disk Controller Sub Device It is normal only when a device called MPIO FL350 is displayed See le...

Страница 11: ...cklight turned on for a long time consumption of the battery increases and has an effect on playing time Volume control To increase the volume Press the button To decrease the volume Press the button...

Страница 12: ...con by using the button and press the MENU button shortly again The Mode Conversion screen temporarily appears and moves to the MUSIC MODE Music and data file storage Execute Window Searcher of a PC T...

Страница 13: ...n if failing to follow instructions Locate the mouse on the Removal and Disconnection of Player icon of the Task Tray and click the right button of the mouse Select Hardware Disconnection or Pull out...

Страница 14: ...turned on for a long time consumption of the battery increases and has an effect on playing time REPEAT setting Repeat Playback Repeat Normal Sequential play Repeat One Play only one music repeatedly...

Страница 15: ...ed for foreign language study Select the SYSTEM icon after entering into the MENU screen by pressing and holding the MENU button The A B sector repeat point is released if pressing the MENU button sho...

Страница 16: ...on Composed of OFF PURE STUDIO CONCERT SOUND GROOVE DYNAMIC BASS Setup LANGUAGE ID3 TAG language Select the LANGUAGE icon after entering into the MENU screen by pressing and holding the MENU button Se...

Страница 17: ...the MENU button shortly If setting year and changing month in this case day setting value is automatically changed to 1 as starting date Therefore be sure to check day when setting a month Setup ALARM...

Страница 18: ...contrast setting 1 5 step Select file information to be displayed in the LCD 2 line while playing file TAG INFO Displays ID3 TAG information File name Displays file name However in case of changing t...

Страница 19: ...N Sound slowly increases or reduces in volume setup while playing file Product information display Displays Firmware Version Used Memory and Total Memory information ERASE a function Erase a file or a...

Страница 20: ...channel search Fast channel search Operating methods by function It moves to the upper menu without setting values saved if pressing the Volume button when setting all menu status Menu Exit function M...

Страница 21: ...ed in channel The popup message window disappears if pressing the button You can change Scan mode and Channel mode from time to time if pressing the button while listening to FM SCAN mode This is mode...

Страница 22: ...the MENU button Change frequency scanning unit to 100KHz or 50KHz in SCAN mode Setup STEREO MONO Receive Sensitivity Select the STEREO MONO icon after entering into the Menu screen by pressing and hol...

Страница 23: ...on the ground screen of the user s PC For No proceed in the order as below Click the Format Config button Click the OK button Click the Start button Click the OK button Click the OK button after compl...

Страница 24: ...K button Firmware upgrade Download firmware from the MPIO website and unpack compact status and then save it in a PC www mpio co kr or www mpio com Select MPIO Utility from the supplied CD and then in...

Страница 25: ...gnosis FAQ Failure Diagnosis Firstly check this list out if considered that there seems to be failure Sound is not heard Or noise occurs Check volume status FM receipt status may get worse due to ambi...

Отзывы: