background image

-  29  - 


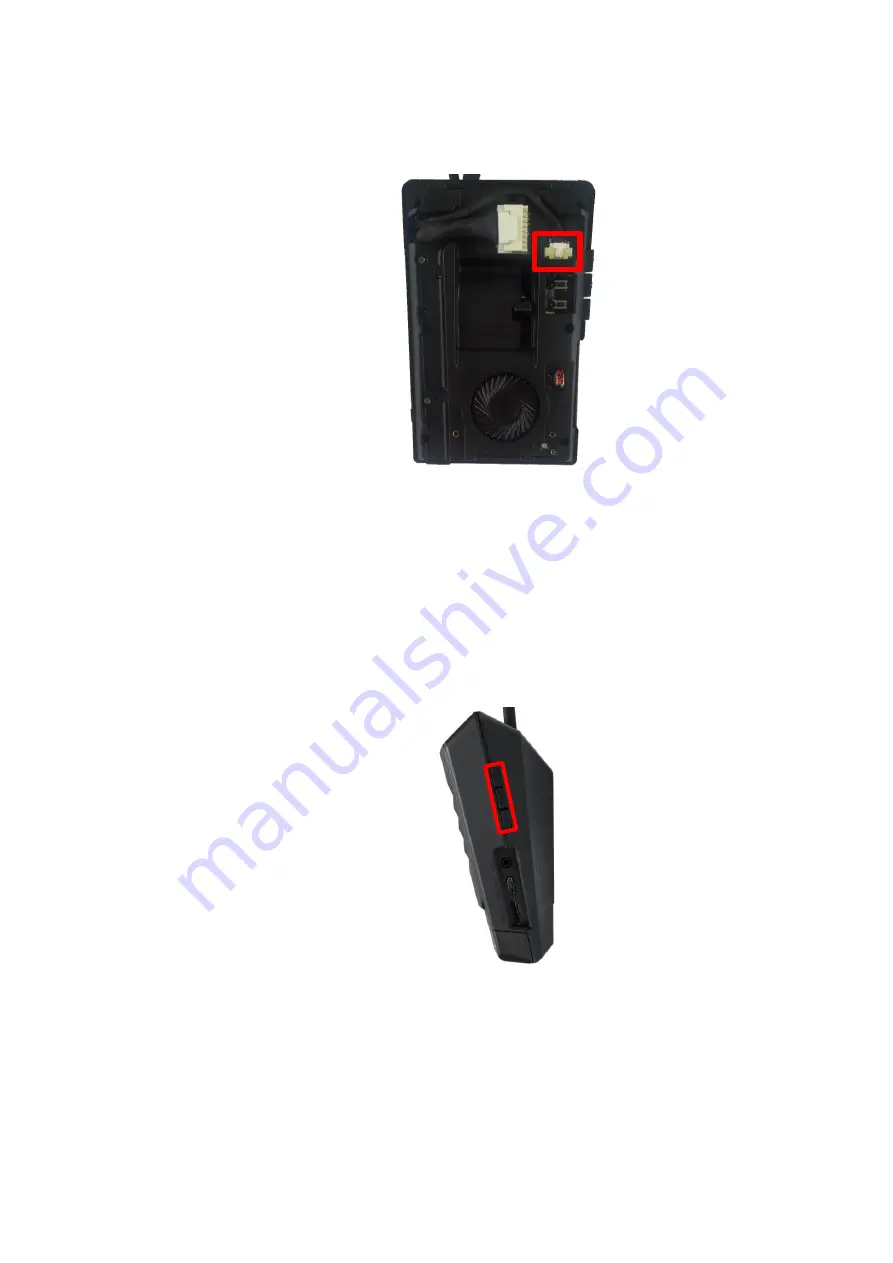
Connect Rear Camera Cable to connecter. 


3.7


Reset MDAS-9 
If MDAS-9 has any malfunction, reboot the system or clear reset MDAS-9. 

*  Caution:  Once  you  clear  reset  MDAS-9,  current  settings  such  as  CAN  data  or 
vehicle information will be removed   


Reboot (External) 
Press the Volume Down, Volume Up and Center Button at the same time. 


Содержание MDAS-9

Страница 1: ...MDAS 9 Installation Guidebook 3950 NW 120th Ave Coral Springs FL 33065 TEL 561 955 9770 FAX 561 955 9760 ...

Страница 2: ... 7 External Fuse Optional 12 2 8 Technical Cleaning Wipe Optional 12 2 9 Vibration unit Optional 13 2 10 GPS Optional 13 2 11 Video Out Cable Optional 13 2 12 FMS Cable Optional 14 2 13 FMS Converter Optional 14 Convert ADAS event data received from RS 232 to CAN Bus data to transmit 14 2 14 Micro SD Card Consumable 15 2 15 Wi Fi Dongle Optional for calibration 15 2 16 Micro 5 pin USB Cable Option...

Страница 3: ...28 3 7 Reset MDAS 9 29 4 PC and Android Phone Calibration 32 4 1 Driver Setup ONLY SUPPORTS WINDOWS OS 32 4 2 Calibration Setup 32 4 2 1 Access MDAS 9 Calibration page via PC 32 4 2 2 Select Vehicle Signal Types 33 You have 3 wiring options for installation CAN BUS Analog wiring GPS 33 4 2 2 1 Vehicle Data File CAN BUS 33 4 2 2 2 Analog GPIO 33 4 2 2 3 GPS 34 4 2 3 Vehicle Signal Check 34 4 2 3 1 ...

Страница 4: ...tup 41 4 2 14 Fleet management setup 42 4 2 15 Miscellaneous Settings 42 4 2 16 MDAS Setup Complete 43 4 3 Setting Modification 44 4 3 1 Menu Description 44 4 3 2 Update Firmware 45 4 3 3 Default MDAS Settings 45 4 3 4 Re calibration 46 4 3 5 Change settings from warning setups 46 5 How to Download CAN Data 47 5 1 Register in Vehicle Database 47 5 2 Download CAN Data file 47 6 Recognize MDAS 9 in ...

Страница 5: ...ed description of CAN Reader John 8 2 2 4 17 11 21 Modified 3Pin Power cable John 9 2 2 5 17 11 29 Added product accessory FMS Converter John 10 2 2 6 17 11 30 Modified description of CAN Reader John 11 2 2 7 17 12 01 Modified description of SD card John 12 2 2 8 18 01 16 Modified System Connection Scheme John 13 2 2 9 18 03 20 Modified Driver setup and vibration picture Hugh 14 2 2 10 18 04 25 Ge...

Страница 6: ...ed by users or unauthorized installers MDAS is developed to give only warnings to drivers The final decision to maneuver or control shall be made by drivers themselves Furthermore MDAS is not capable to provide 100 detection rate of lane markings vehicles and MDAS recognition performance can be fluctuated due to road conditions inclement weather poor installation etc Please ensure that keep eyes f...

Страница 7: ...6V Power Consumption 400mA 12V Max 3mA 12V Idle State Format Video MP4 h 264 codec Audio PCM Storage 4 128GB Micro SD card support Input Output Main Micro 5pin USB port Micro SD Card GPS port PCI Box Main Cable Vibrator Analog Indicator FMS Video OUT CAN POWER Fuse Size Body 80 x 120 x 50 mm Temperature Operation 20 70 4 158 Storage 40 85 40 185 ...

Страница 8: ...ptional Contactless CAN Reader Optional Video Out Cable Optional GPS Optional Vibrator Optional Micro 5PIN USB cable Optional for installers Wi Fi Dongle Optional for installers External Fuse Optional Technical cleaning wipe FMS Cable RS 232 Optional FMS Cable with D Sub RS 232 Optional FMS Converter RS 232 to CAN Optional ...

Страница 9: ... 9 2 3 Main Unit Main Cable 2 3 1 Main Unit 2 3 1 1 Parts description 2 3 1 2 Mounting Frame and Back Cover ...

Страница 10: ...3 LED Description 2 3 2 Main Cable 2 4 Contactless CAN Reader LED Status Illuminate Blink Illuminate Blink Blink Booting Turn signal L R Before booting Working mode Initialization Calibration Mode Firmware Update ...

Страница 11: ...or Error Table Camera Connection Error CAN Communicati on Error Camera View Block Error Indicator Communicati on Error Low Visibility Indication 2 6 Peripheral Component Interconnect Box PCI Box Peripheral Component Interconnect Box PCI Box is to connect the cables and accessories ...

Страница 12: ... of wiring constant power and ACC power 2 7 External Fuse Optional MDAS 9 provides with an External Fuse to prevent from short circuiting the vehicle electrical system 2 8 Technical Cleaning Wipe Optional MDAS 9 provides Technical Cleaning Wipe for cleaning and removing dust finger print on windshield ...

Страница 13: ...eed to enable in Calibration Read details in Chapter 4 Calibration 2 10 GPS Optional Important in case of use GPS for speed signal warning timing can be inaccurate in decelerating circumstances 2 11 Video Out Cable Optional Transmit analog video to another device using RCA connector ...

Страница 14: ...o Fleet Management System through RS 232 and CAN interfaces Caution For FMS device connection please connect RX TX and GND only You can cut off the ACC IGN 2 13 FMS Converter Optional Convert ADAS event data received from RS 232 to CAN Bus data to transmit ...

Страница 15: ...s and 30 minutes About 3 hours and 40 minutes 64GB About 15 hours and 20 minutes About 7 hours and 30 minutes Caution Depending on your environment actual recording duration and SD card lifespan may vary For stable performance it is recommended that you format the memory card every 2 3 weeks Formatting will delete all data in the card If you want to keep them please back up in advance If MDAS fail...

Страница 16: ...n USB Cable Optional for Calibration NOTE You can use a common USB cable that supports data transmission Use for Calibration procedures for Windows OS computers Before use please install RNDIS driver first See Chapter 4 1 ...

Страница 17: ...f signals the vehicle provides CAN Analog Connect vehicle signals See Chapter 3 3 Wiring Combination Attach MDAS 9 and indicator if needed to the vehicle Connect cables with MDAS 9 Access MDAS 9 using Micro 5pin USB cable or Wi Fi dongle Calibration See Chapter 4 Calibration procedure Test drive ...

Страница 18: ... any analog wires unattached If there are any unused wires please connect them to ground Color Label Connection Description Blue SIG_R To analog right turn signal Light Blue White Stripe SIG_L To analog left turn signal Brown White Stripe SPEED To analog speed signal be careful with old vehicles that do not have speed sensor Violet RPM To analog RPM signal Black White Stripe BRAKE To analog BRAKE ...

Страница 19: ... Color Label Connection Description Red IGN To ignition ACC power wire that turns off when key is at OFF Black GND To ground source Please ensure that is connected properly to ground or it could damage the vehicle and MDAS There are different ignition powers it is recommended to use an ignition power ACC IG1 that does not drop power shortly when the engine turns on 3 3 5 Contactless CAN Reader ...

Страница 20: ...le s CAN wire as straight as possible to the double sided tape by aligning with the hole marked in red Like this picture place CAN_L to the left and CAN_H to the right After case assembly if installing CAN_H and CAN__L correctly the red LED lights operates on the lower left side of the case as shown in the picture when the vehicle is Key on ...

Страница 21: ...info mdas co kr and check information before installation NOTE If you don t use whole analog cable you should wire the remaining cable of 5Pin analog with ground No Speed Turn signal Recommended connection 1 CAN BUS CAN BUS 4PIN CAN Cable or Contactless CAN Reader Use 4PIN CAN Cable or Contactless CAN Reader for speed and turn signals 2 CAN BUS Analog 4PIN CAN Cable or Contactless CAN Reader 5PIN ...

Страница 22: ...ce If MDAS 9 cannot be attached at the center due to interior or space attach MDAS 9 as close as possible to the center You can adjust the difference during Calibration in Chapter 4 MDAS 9 Should not be attached more than 10cm 4inches apart from the center For trucks buses For passenger cars MDAS 9 can change the cable layout as below for trucks buses Please refer to below procedure in Chapter 3 6...

Страница 23: ... 9 to windshield Insert a small screw driver into small holes marked in red in the Main Unit Back Cover and press the bracket to separate Unscrew two cross recessed screws marked in red to remove the Upper Back Cover ...

Страница 24: ...camera angle knob Refer to Chapter 4 2 6 to adjust the camera angle completely NOTE Do not reassemble the Back Cover before completing Calibration procedure NOTE In case of installing rear camera refer to Chapter 3 6 ...

Страница 25: ... 25 3 5 Parts connection 3 5 1 Indicator Connect Indicator using 4pin connector to Indicator port on PCI box 3 5 2 Vibration module Connect Vibrator using 3pin connector to Vibrator port on PCI box ...

Страница 26: ... 26 3 5 3 FMS Cable Use FMS cable and plug into FMS port on PCI box 3 5 4 FMS Converter Use FMS Converter and plug into FMS port on PCI box ...

Страница 27: ... 27 3 5 5 Video Out Cable Use RCA cable and plug into Video OUT port on PCI box This function does not provide other UI or graphics through via video out Screenshot ...

Страница 28: ...onnect Rear Camera to MDAS 9 Following Chapter 3 4 in Attach MDAS 9 Unscrew two cross recessed bolt marked in red on top side Push the two clips at the bottom side Remove PCB unit from mounting frame completely ...

Страница 29: ...If MDAS 9 has any malfunction reboot the system or clear reset MDAS 9 Caution Once you clear reset MDAS 9 current settings such as CAN data or vehicle information will be removed Reboot External Press the Volume Down Volume Up and Center Button at the same time ...

Страница 30: ... 30 Reboot Internal Press the lower small button in red box Clear Reset Internal Press the upper small button in red box ...

Страница 31: ... 31 ...

Страница 32: ... Access MDAS 9 Calibration page via PC Connect MDAS 9 to PC using Micro USB cable with 5 pins Start the engine If you hear repeating beep sound this means MDAS 9 is properly connected to computer Type 10 0 0 1 in an internet web browser to access MDAS 9 calibration page Google Chrome is recommended If you see the page below please select language you want and sign in using following information ID...

Страница 33: ...apter 5 How to Download CAN data NOTE MDAS 9 only reads a file named mdasinfo dat If you have downloaded multiple files and they are named like mdasinfo 1 dat or mdasinfo 2 dat they cannot be recognized in MDAS 9 4 2 2 2 Analog GPIO In case of using Analog signals you don t need CAN file Just click the Analog GPIO tab Enter speed correction factor value and RPM correction value Change polarity for...

Страница 34: ...r MDAS 9 is receiving vehicle data properly 4 2 3 1 Verify Speed Signal Start the engine and drive slowly in a safe place to see whether MDAS speed is corresponding with the vehicle s speed If it s working you will see the vehicle speed on the page If it s not you can adjust it by speed correction Drive and maintain the speed around 40km h 24mph Click the Correction button on the right Then MDAS 9...

Страница 35: ...from ground to the center of camera lens Camera Center Distance from the center of windshield to camera lens Left Side Right Side If MDAS 9 is attached 5cm to the right from the center input 5 If MDAS 9 is attached 5cm to the left from the center input 5 Camera to Wheel Distance from the camera to the center of the wheel For trucks or buses some vehicles wheels are located behind In this case plea...

Страница 36: ... 36 Camera Center Vehicle Width Camera Height Camera to bumper ...

Страница 37: ...In case of indoor installation or somewhere you cannot see the horizon properly use same data to Camera Height Mark the same height on the wall apart about 3 5 meters from the vehicle 4 2 5 1 Fine Camera Angle For better accuracy of ADAS locate the yellow dotted line in the horizon as close as possible ...

Страница 38: ...38 4 2 6 Hood Line Locate the red line at the end of the vehicle s hood line to remove the useless area 4 2 7 Rear Camera Setup For better angle of Rear Camera DVR adjust the camera module by rotating it ...

Страница 39: ...1 to 5 As the level gets higher you will hear the warning sound earlier Enable Repeat LDW On Off Warning sound Select preferred warning sound for LDW 4 2 9 Forward Collision Warning FCW Sensitivity You can adjust the FCW Sensitivity for your convenience Enable FCW function On Off Set the sensitivity of FCW warning on a scale of 1 to 5 As the level gets higher you will hear the warning sound earlie...

Страница 40: ...g sound for FCW 4 2 10 Safety distance alert setup Enable SDA function On Off Set the sensitivity of SDA on a scale of 1 to 5 As the level gets higher you will hear the warning sound earlier Repeat SDA and SDA re alert can be changed On Off 4 2 11 Pedestrian collision warning setup Enable PCW function On Off Warning sound Select preferred warning sound for PCW ...

Страница 41: ...arning sound earlier Enable Front vehicle start alarm On Off 4 2 13 DVR Dashcam setup Time Set the date and time Enable Voice recording function On Off Set Gravity sensory sensitivity on a scale of 1 to 5 It is for event recording Enable Driving log with video On Off Set the Recording ratio Continuous Event User You can choose between 5 ratios 8 1 1 7 2 1 6 3 1 6 2 2 ...

Страница 42: ...smit data RS 232 Off 9600 19200 Converter Set Lock volume button control on a scale of 1 to 5 and Off Set Break time alarm on a scale of 1 to 6 hours and Off Enable Vibration setting for LDW FCW PCW On Off Both 4 2 15 Miscellaneous Settings Set Speed Unit on Analog video output km h or MPH Set Video out format NTSC PAL Set Voice guide language English Korean Chinese Spanish Japanese Hebrew No Soun...

Страница 43: ...ofile button if you want to download vehicleprofile dat Procedure of applying vehicleprofile to MDAS 9 A Copy and paste vehicleprofile dat into the micro SD card formatted by MDAS 9 B Insert the micro SD card into MDAS 9 which you want to apply the exported profile C MDAS 9 will be rebooted automatically Then the profile will be applied to MDAS 9 ...

Страница 44: ...S 9 4 3 1 Menu Description System Update You can update your firmware here Default the System You can reset and default current MDAS settings Re calibration You can change current settings from the beginning Change settings from warning setups You can change current ADAS settings from Lane Departure Warning ...

Страница 45: ...button below You are done when you see a pop up message below NOTE Do not touch or change anything while updating Otherwise MDAS 9 might lose its data and stop working 4 3 3 Default MDAS Settings If you want to remove all data and return to a factory setting click the Default the System menu and wait until you see a message below ...

Страница 46: ... will restart from 4 2 4 1 Vehicle Signal Check 4 3 5 Change settings from warning setups If you click this menu you will restart from 4 2 9 Lane Departure Warning LDW Sensitivity If you only want to change settings about ADAS warnings please press this ...

Страница 47: ...base Open a web browser and enter http info mdas co kr You need to register and get an approval to log in Please contact Movon Corp or your local distributor for the approval 5 2 Download CAN Data file Once you log in you will see Vehicle profile database page ...

Страница 48: ... on the right side of the page If you find the right file for your vehicle click icon to see and download the CAN data Click CAN File Download button then you will get CAN data as mdasinfo dat If you want to download photos and signal data click PDF download button They will be downloaded as a PDF file ...

Страница 49: ...nloads rndissetup zip Please download and unzip it When you install it please click the right button on your mouse and select Run as administrator 6 2 Computer with Windows 10 Download RNDIS Driver here http movon co kr downloads rndisdriver zip Unzip the file and remember the unzipped folder location Press Window key R Type devmgnt msc You will see Device manager and a USB serial Port COM x under...

Страница 50: ... 50 Click it using the right button of your mouse then click Properties In the newly popped up window Go to Driver tab and click Update Driver ...

Страница 51: ... 51 Select Browse my computer for driver software Click Browser button and Browse For Folder window will pop up ...

Страница 52: ... 52 Choose rndisdriver Remember the path where you downloaded and unzipped the file Press Next on the page below After installing the driver you can close the windows ...

Страница 53: ... 53 Open a web browser and type http 10 0 0 1 If you see MDAS 9 page like above you have done everything perfectly ...

Отзывы: