7
3-1 Extension Arms Assembly
Allen Key
x1
Parts and Hardware
Extension Arm
x2
M6x16mm Bolt
M6x12mm Bolt
x4
Supporting Bar
M5x12mm Bolt
Страница 1: ...70 Max 600x400mm 24x16 Min 200x100mm 8x4 F r die Installationsanweisungen auf Deutsch siehe Seite 12 13 Pour l instruction en Fran ais veuillez vous reporter la page 14 15 Para las instrucciones de la...
Страница 2: ...his product contact Customer Service via customercare mountingdream com This product is designed for wood stud solid concrete and concrete block wall installation DO NOT install into drywall alone The...
Страница 3: ...x12mm M8x25mm M4x30mm M6x35mm M8x45mm M6x17mm M8x22mm M4 M6 10mm 2 5mm Washers Spacers TV Screws x4 x4 x4 x4 x4 x4 x4 x4 x4 x4 x8 x4 Parts and Hardware WARNING This product contains small items that c...
Страница 4: ...3 Tips If you need to combine M6 e or M8 c f screw with 2 5mm spacer j you have to remove the inner circle 1 3 Attach the TV Brackets Screw and washer Spacer s screw and washer No...
Страница 5: ...in Wood Stud Size nominal 2 51mm actual 1 1 2 38mm Min Wood Stud Size nominal 4 102mm actual 3 1 2 89mm Parts and Hardware Lag Bolt M8x70mm M8 Washer Wood Stud Installation O Mounting Template x1 x6 4...
Страница 6: ...rsonal injury or property damage All 4 lag bolts MUST BE firmly tightened to prevent unwanted movement of the wall plate assembly Ensure the wall plate assembly is securely fastened to the wall before...
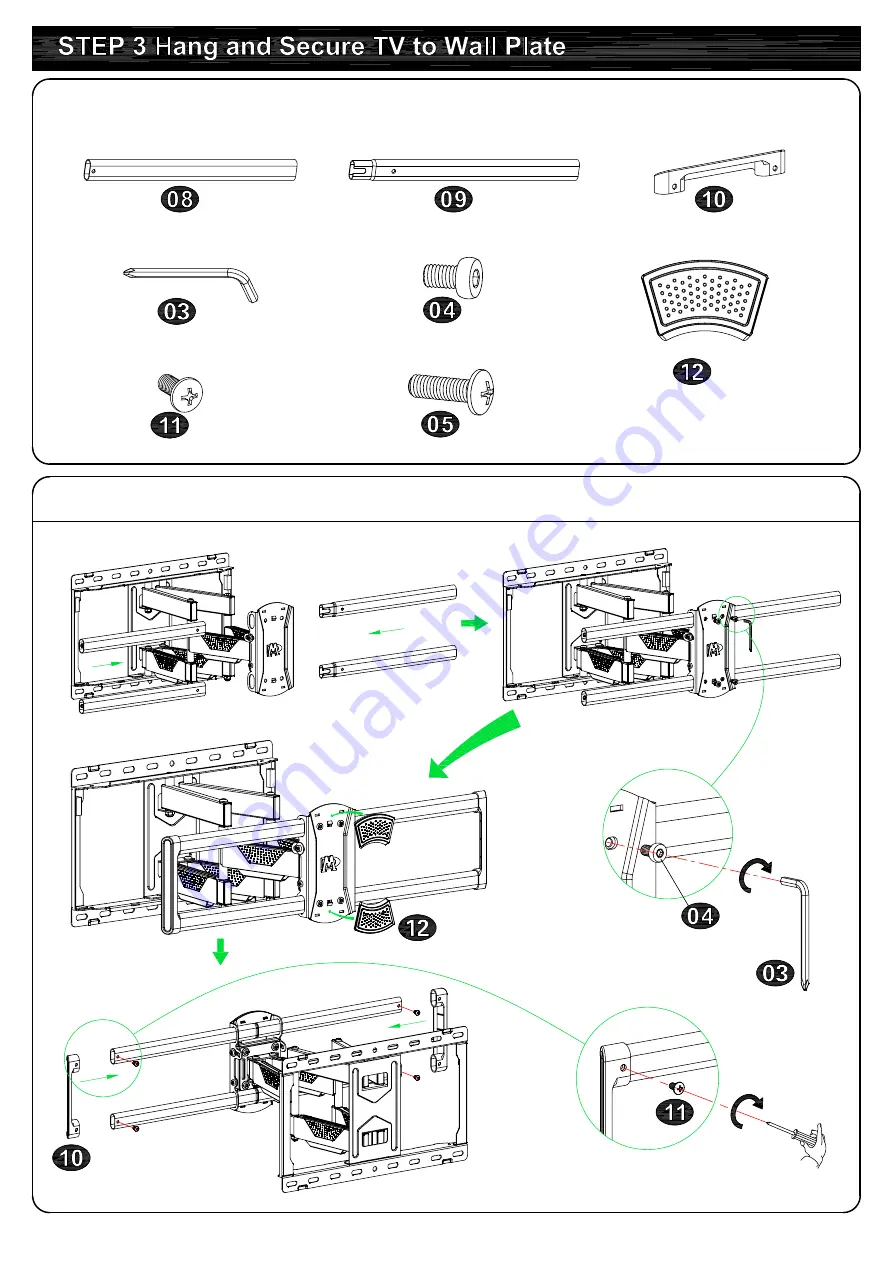
Страница 7: ...ed movement of the wall plate assembly Ensure the wall plate assembly is securely fastened to the wall before continuing on to the next step To prevent the TV falling down the Bolt Head Must Keep UP a...
Страница 8: ...7 3 1 Extension Arms Assembly Allen Key x1 Parts and Hardware Extension Arm x2 Extension Arm x2 M6x16mm Bolt x2 M6x12mm Bolt x4 Supporting Bar x2 M5x12mm Bolt x4 x2...
Страница 9: ...8 100 LBS 45 5 KG Before hanging TV please conduct wall plate installation integrity test first 3 2 Wall Plate Installation Integrity Test 3 3 Hang and Secure TV to Wall Plate TV 1 2...
Страница 10: ...bolts on the rear of TV plate by maximum 2 turns adjust to level and retighten to secure 9 4 2 Tilting angle adjustment 5 15 Pull TV to your desired angle then fasten 2 tilting bolts with Allen key T...
Страница 11: ...10 Allen key storage For easy adjustment you might put the Allen key on the wall plate as illustration...
Страница 12: ...11 698mm MAX 600mm MAX 400mm MIN 100mm 267mm 420mm 422mm 435mm 64mm 420mm 5 15 45 45 MIN 200mm...
Страница 13: ...st f r die Installation an W nden mit Holztr gern Massivbeton und Betonblockw nden bestimmt NICHT an einer reinen Gipskartonwand montieren Die Wand muss das F nffache des Gesamtgewichts des Fernsehapp...
Страница 14: ...m zu verhindern dass der Fernseher herunterf llt muss der Schraubenkopf bei diesem Schritt NACH OBEN bleiben Schritt 3 H ngen und befestigen Sie den Fernseher an der Wandplatte Siehe Seite 7 3 1 Monta...
Страница 15: ...produit s applique au montant en bois au mur en b ton plein et au mur en bloc de b ton creux Ne l installez pas la place o il n y a que la plaque de pl tre La force portante du mur doit atteindre au m...
Страница 16: ...re fermement serr s pour viter le mouvement non souhait de la plaque murale Veuillez v rifier que la plaque murale est fix e sur le mur avant de passer l tape suivante tape 5 Gestion des c bles Voir l...
Страница 17: ...ntingdream com Este producto es apto para paredes con pilares de madera de hormig n s lido y de ladrillos No instalar en paredes de solo yeso La capacidad de soporte de la pared debe ser cinco veces m...
Страница 18: ...vitar que la placa mural en la pared se mueva Favor de asegurarse que quede firmemente estable en la pared para poder continuar con los siguientes pasos de su instalaci n Paso 3 Colgar y sujetar del t...
Страница 19: ...in legno muri in calcestruzzo solido e muri di blocco in calcestruzzo NON installarlo in soli cartongessi Il muro deve essere capace di portare almeno cinque volte il peso totale del televisore e del...
Страница 20: ...ssere avvitate bene in modo da evitare movimenti indesiderati della piastra a muro Assicura che la piastra a muro sia ben fissata sul muro prima di eseguire il prossimo passo Passo 3 Appendi e fissa l...