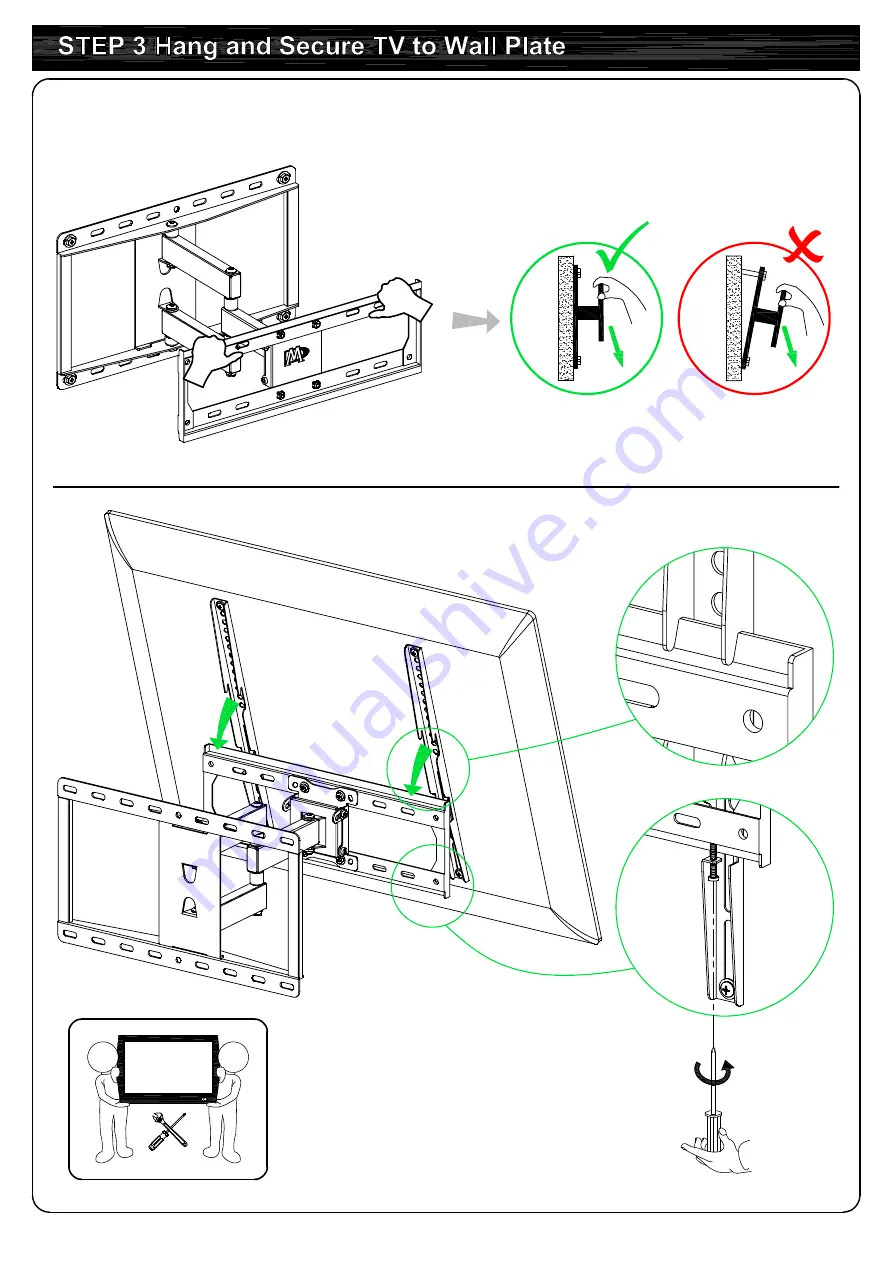
7
66 LBS (30 kg)
Before hanging TV, please conduct "wall plate installation integrity test" first.
TV
1
2
Страница 1: ...la page 12 13 Para las instrucciones de la instalaci n en espa ol favor vea la p gina 14 15 Per le Istruzioni in italiano vedi pagina 16 17 26 55 Max 400x400mm 16x16 Min 75x75mm 3x3 TV 1 2 x3 x1 x1 I...
Страница 2: ...do not understand these instructions or have doubts about the safety of the installation assembly or use of this product contact Customer Service via customerservice mountingdream com or call us at t...
Страница 3: ...ombination Yes go to PAGE 3 for detailed combination TV back 2 Washers Spacers TV Screws x4 x4 x4 x4 x4 x4 x4 x4 x4 x4 x4 x4 x8 x4 1 2 Need Spacer Short Screw Washer WARNING This product contains smal...
Страница 4: ...3 Tips If you need to combine M8 d h screw with 2 5mm spacer n you have to remove the inner circle 1 3 Attach the TV Brackets Screw and washer Spacer s screw and washer No...
Страница 5: ...ize nominal 4 102mm actual 3 1 2 89mm Parts and Hardware Lag Bolt M8x60mm M8 Washer Allen Key Wood Stud Installations O x1 Wall Plate Unit Mounting Template x1 x4 x4 x1 4 Centre line Contact us at tel...
Страница 6: ...ION To avoid potential personal injury or property damage All 4 lag bolts MUST BE firmly tightened to prevent unwanted movement of the wall plate assembly Ensure the wall plate assembly is securely fa...
Страница 7: ...y damage All 4 lag bolts MUST BE firmly tightened to prevent unwanted movement of the wall plate assembly Ensure the wall plate assembly is securely fastened to the wall before continuing on to the ne...
Страница 8: ...7 66 LBS 30 kg Before hanging TV please conduct wall plate installation integrity test first TV 1 2...
Страница 9: ...our desired angle then fasten 2 tilting bolts with Allen key 15 5 Tilting bolts Tilting bolts 4 1 TV leveling adjustment 3 Loosen 4 leveling bolts on the rear of TV plate by maximum 2 turns adjust to...
Страница 10: ...MAX 400mm 435mm 368mm MAX 400mm 420mm 78mm 90 90 5 15 9...
Страница 11: ...gdream com Oder rufen Sie 626 604 9048 USA an B rozeiten Montag bis Freitag 10 00 18 00 Uhr Pazifikzeit Dieses Produkt ist f r die Installation an W nden mit Holztr gern und Massivbetonwand NICHT an e...
Страница 12: ...ndreher um sicherzustellen dass keine Lockerheit auftritt Aus Sicherheitsgr nden wird dieser Schritt am besten von zwei Personen gemeinsam ausgef hrt Schritt 4 Funktionseinstellung Siehe Seite 8 4 1 N...
Страница 13: ...l installez PAS la place o il n y a que la plaque de pl tre Parfait Parfait Mur en b ton plein Avant l installation veuillez attentivement lire ce mode d emploi Si vous ne pouvez pas comprendre ces in...
Страница 14: ...uhait de la plaque murale Veuillez v rifier que la plaque murale est fix e sur le mur avant de passer l tape suivante tape 3 Suspendre et fixer votre t l viseur sur la plaque murale Voir la page 7 Ava...
Страница 15: ...d de que material esta construida En paredes de yeso o derivados no se debe instalar Perfecto Perfecto Instalar en paredes de hormig n s lido Antes de la instalaci n favor de leer en detalle el manual...
Страница 16: ...rse firmemente para evitar que la placa mural en la pared se mueva Favor de asegurarse que quede firmemente estable en la pared para poder continuar con los siguientes pasos de su instalaci n Paso 3 C...
Страница 17: ...e materiale fatto il muro Non installarlo in un posto solo in cartongesso Ideale Ideale Muro in calcestruzzo solido Leggi attentamente le istruzioni prima di installazione Se non puoi comprendere ques...
Страница 18: ...devono essere avvitate bene in modo da evitare movimenti indesiderati della piastra a muro Assicura che la piastra a muro sia ben fissata sul muro prima di eseguire il prossimo passo Passo 3 Appendi...