7
66 LBS (30 KG)
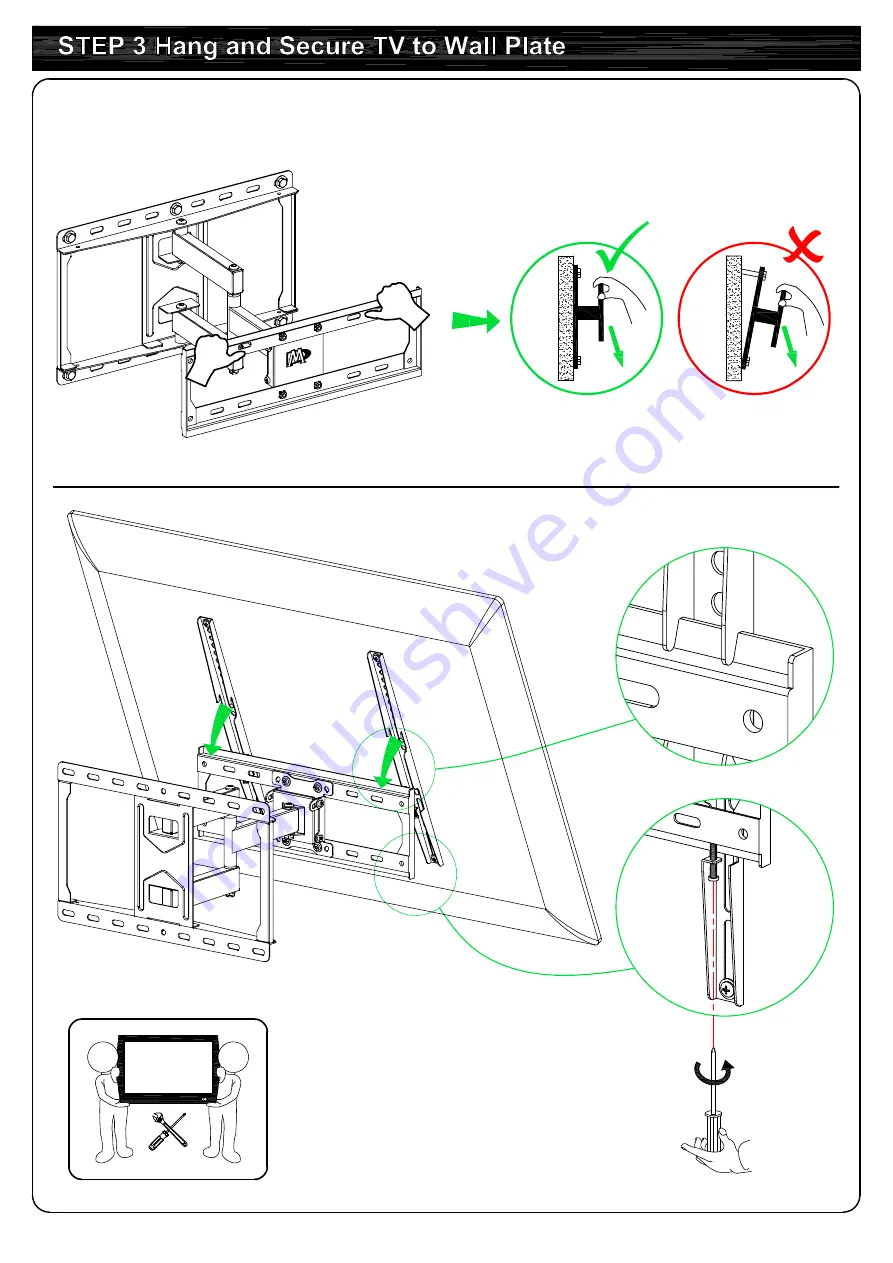
Before hanging TV, please conduct "wall plate installation integrity test" first.
TV
1
2
Страница 1: ...reporter la page 12 13 Para las instrucciones de la instalaci n en Espa ol favor vea la p gina 14 15 Per le Istruzioni in Italiano vedi pagina 16 17 MD2378 03 INSTALLATION INSTRUCTION If you have any...
Страница 2: ...ruction carefully before installation If you do not understand these instructions or have doubts about the safety of the installation assembly or use of this product please contact customer service Th...
Страница 3: ...mer service NOTE Not all hardware included will be used TV Brackets x2 M8 M6 M4 1 1 Select TV Screws TV back Bracket Washer Bracket Long Screw Spacer No go to PAGE 3 for detailed combination Yes go to...
Страница 4: ...3 Tips If you need to combine M6 e or M8 c f screw with 2 5mm spacer j you have to remove the inner circle 1 3 Attach the TV Brackets Screw and washer Spacer s screw and washer No...
Страница 5: ...Min Wood Stud Size nominal 2 51mm actual 1 1 2 38mm Min Wood Stud Size nominal 4 102mm actual 3 1 2 89mm Parts and Hardware Lag Bolt M7x70mm Allen Key Wood Stud Installations O x6 x1 4 Centre line Co...
Страница 6: ...jury or property damage All 4 lag bolts MUST BE firmly tightened to prevent unwanted movement of the wall plate assembly Ensure the wall plate assembly is securely fastened to the wall before continui...
Страница 7: ...ll plate assembly Ensure the wall plate assembly is securely fastened to the wall before continuing on to the next step To prevent the TV falling down the Bolt Head Must Keep UP at this step Solid Con...
Страница 8: ...7 66 LBS 30 KG Before hanging TV please conduct wall plate installation integrity test first TV 1 2...
Страница 9: ...our desired angle then fasten 2 tilting bolts with Allen key Tilting bolts Tilting bolts 4 1 TV leveling adjustment 3 Loosen 4 leveling bolts on the rear of TV plate by maximum 2 turns adjust to level...
Страница 10: ...9 Allen key storage For easy adjustment you might put the Allen key on the wall plate as illustration MAX 400mm 435mm 391mm MAX 400mm 420mm 90 90 5 15 81mm 267mm 150mm...
Страница 11: ...age von Holzbalkenwand Montage von Betonwand Bitte lesen Sie die Anweisungen sorgf ltig vor der Installation durch Falls Sie diese Anweisungen nicht verstehen oder Zweifel bez glich der Sicherheit der...
Страница 12: ...ass keine Lockerheit auftritt Aus Sicherheitsgr nden wird dieser Schritt am besten von zwei Personen gemeinsam ausgef hrt Schritt 4 Funktionseinstellung Siehe Seite 8 4 1 Nivellierungseinstellung 3 Ve...
Страница 13: ...quels genres mat riaux le mur est fait Ne l installez PAS la place o il n y a que la plaque de pl tre Parfait Avant l installation veuillez attentivement lire ce mode d emploi Si vous ne pouvez pas co...
Страница 14: ...le mur avant de passer l tape suivante tape 3 Suspendre et fixer votre t l viseur sur la plaque murale Voir la page 7 Avant de suspendre votre t l viseur sur la plaque murale veuillez tester la fiabil...
Страница 15: ...nci n Instalar en paredes con pilares de madera 3 La pared de que material esta construida En paredes de yeso o derivados no se debe instalar Perfecto Antes de la instalaci n favor de leer en detalle...
Страница 16: ...la pared se mueva Favor de asegurarse que quede firmemente estable en la pared para poder continuar con los siguientes pasos de su instalaci n Paso 3 Colgar y sujetar del televisor a la placa mural V...
Страница 17: ...Cautela Muro secco con i pilastri in legno 3 Di che materiale fatto il muro Non installarlo in un posto solo in cartongesso Ideale Leggi attentamente le istruzioni prima di installazione Se non puoi...
Страница 18: ...erati della piastra a muro Assicura che la piastra a muro sia ben fissata sul muro prima di eseguire il prossimo passo Passo 3 Appendi e fissa la TV alla piastra a muro Vedi pagina 7 Prima di appender...