Motorvac 500-0100 Скачать руководство пользователя страница 5

[email protected]     www.motorvac.com

Getting to Know the Cool Smoke

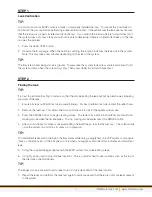
Component description:

1.  SMOKE SOLUTION DIPSTICK:

  Measure fluid level with dipstick fully installed.  Keep fluid level in 

hatched area on the dipstick.  The unit is filled through the dipstick tube.  


CAUTION:  DO NOT OVERFILL THE UNIT.

2.  SMOKE BUTTON:

  Press to activate smoke creating mode, press again to cancel smoke creating 

mode.  Note: The unit will automatically stop creating smoke after 5 minutes.

3.  SMOKE LED:  

Turns on when the unit is in smoke creating mode. 

4.  LEAK LED:  

Turns on when unit is in leak testing mode. 

5.  LEAK TEST BUTTON:  

Press to activate leak mode.  Press again to cancel leak mode.

6.  COMPOUND PRESSURE/VACUUM GAUGE:

  Can be used to verify leaks by pressure of vacuum 

      decay in the system.  To find the size of the leak the flow meter must be used.

7.  FLOW METER:  

When the unit is in leak detection mode the level that the ball settles to indicates the 

size of the leak in the system.  If the ball is at the bottom of the gauge there is no leak.

8.  COMPRESSED GAS INLET: 

 Connect appropriate male quick coupler to supply the Cool Smoke with 

compressed inert gas if testing an EVAP system or compressed air for general smoke purposes. 

9.  SMOKE HOSE:  

Used to connect the Cool Smoke to the system being tested in either smoke or leak 

mode.

10.  POWER CABLES:

  Connect to 12-volt DC power.

11.  WIRE AND HOSE STRAP: 

 Use this to safely store both the power cables and smoke hose when the 

unit is not in use.

1

2

3

5

4

6

10

9

11

8

2

7

Leak size in 
thousandths 
of an inch

*

Содержание 500-0100

Страница 1: ...dell Rd Mississauga ON Tel 905 615 8620 Fax 905 615 9745 www motorvac com Cool Smoke EVAP Leak Detection System Part No 500 0100 USER MANUAL Canada USA Patents 6 907 771 2 438 448 International Patent...

Страница 2: ...ks exhaust system leaks and under dash vacuum system leaks It will also diagnose many other closed systems where you may suspect a leak as well as pinpointing wind and water leaks entering the vehicle...

Страница 3: ...verview Technical Specifications Getting to Know the Cool Smoke Cautions Usage Tips Initial Setup Accessories EVAP System Overview EVAP Test Procedure Leak Verification Finding the Leak Other Leak Det...

Страница 4: ...hat must be maintained during EVAP testing You don t need to set flow rates and you don t need to be concerned with ambient temperatures or barometric pressures The MotorVac Cool Smoke is refillable b...

Страница 5: ...OMPOUND PRESSURE VACUUM GAUGE Can be used to verify leaks by pressure of vacuum decay in the system To find the size of the leak the flow meter must be used 7 FLOW METER When the unit is in leak detec...

Страница 6: ...acement parts will void the warranty may cause tester malfunction may cause damage to the vehicle to property or may cause personal injury To view the dye deposit use the optional UV Phazer NEO light...

Страница 7: ...400 1054 1 The unit needs to be filled with fluid before being used for the first time 2 Remove the dipstick 3 Install the bottle fill nozzle and pour fluid into the machine through the dipstick tube...

Страница 8: ...the solution s fluorescence fresh 060 0007 SMOKE DIFFUSER Allows the operator to lay down a thick path of smoke along doors sunroof windshield and window seams so any air disturbance caused by exiting...

Страница 9: ...ve 7 Connect the service port adapter 060 0005 to the EVAP service port Connect the Cool Smoke smoke hose to the service port adapter EVAP System Overview The vehicle s Fuel Vapor Recovery System is t...

Страница 10: ...away impairing your view of the leak 1 Ensure all steps outlined in test setup were followed For best performance fully unwind the outlet hose 2 Remove the fuel cap This allows the air out and the un...

Страница 11: ...ou to create a satisfactory seal in the system you are testing for leaks Or you may choose to use a latex rubber glove and a strong rubber band to accomplish this task Simply stretch the wrist of the...

Страница 12: ...at the heart of the emission control system Since the EGR valve operates in such a hostile environment it is susceptible to leakage During a normal test for vacuum leaks the EGR valve will be exposed...

Страница 13: ...eaks but more importantly it can seriously affect the stopping power of the vehicle The brake booster is a simple component to check for leaks 1 Disconnect the vacuum supply line and the check valve f...

Страница 14: ...he flow meter for any indication of flow confirming a leak 4 Set the selector switch on the tester to SMOKE and introduce smoke into the position determined to have a leak Use the spotlight to look fo...

Страница 15: ...e vehicle in an area that is shielded from the wind preferably inside a closed facility 2 Turn the vehicle s ignition to the ACCESSORIES position 3 Turn the heater AC blower to FRESH AIR and HIGH Veri...

Страница 16: ...Pull the outlet hose off the unit and make smoke again If the gurgling sound is gone fluid has condensed in the outlet hose Let the hose hang down vertically so any fluid drains out of the line The ba...

Страница 17: ...info motorvac com www motorvac com...

Страница 18: ...1324 Blundell Rd Mississauga ON Tel 905 615 8620 Fax 905 615 9745 www motorvac com ZIM11 00330...

Отзывы: