background image

QUICKSTART GUIDE 

| VB400

8

CONFIGURING YOUR VB400

Prior to using your VB400, your device must be 
configured and assigned to you using VideoManager. 
For detailed information on how to configure your 
device, please refer to the VideoManager User Guide.

Each VB400 requires a valid VideoManager Licence, or 
access to the VideoManager Cloud Service, in order for 
you to assign devices and access footage. For further 
details, see the VideoManager User Guide.

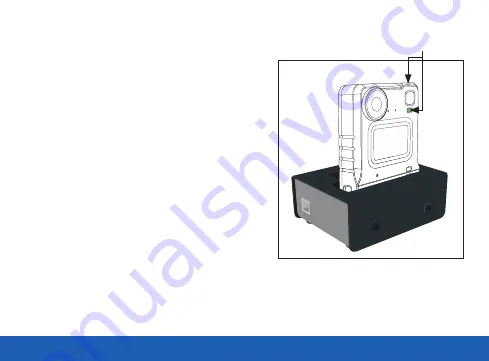
To ascertain whether your VB400 has been configured, 
please view the top LED on your device. This LED will 
turn solid green once configured and assigned. Your 
VB400 is charged, assigned and ready to use when the 
LEDs shown are both solid green.

Please Note:

 If you try to use your VB400 before it has been assigned, the bottom LED on the front face of the 

camera will start to flash red and you will hear an alarm tone. You will not be able to use your camera until it 
has been assigned.

Configured, charged & 

assigned Solid 

green light

Содержание VB400

Страница 1: ...VB400 QUICKSTART GUIDE ...

Страница 2: ...RGE YOUR VB400 4 CHARGING WITH A 1 PORT DOCK 5 CHARGING WITH A 14 PORT DOCK 6 BATTERY STATUS LED 7 CONFIGURING YOUR VB400 8 IDENTIFYING AN RFID ASSIGNED VB400 9 USING YOUR VB400 10 TO START STOP RECORDING 10 WEARING YOUR VB400 12 ACCESSORIES 13 REGULATORY INFORMATION 14 ...

Страница 3: ...ou for choosing the VB400 Body worn camera This simple guide will lead you through the set up and use of your VB400 Lens Buzzer Speaker Function Button A LED LED Function Button C Slider Dual Microphone Front Function Button Function Button B LED ...

Страница 4: ...commended that you fully charge the device before usage When charging using a 1 Port Dock or 14 Port Dock insert the camera into the slots as shown below ensuring the camera clicks securely in place Check that the top LED blinks green to indicate charging Slide down to click into place ...

Страница 5: ...ock VB 400 DOCK SOLO your camera will bleep to indicate charging has commenced and the LED as indicated will flash green to show charging Once fully charged the same LED will turn solid green If the LED is not lit the device is not charging Your VB400 will be fully charged within 8 hours from a flat battery Charging Flashing green LED Fully Charged Solid green LED ...

Страница 6: ...ortDock VB 400 DOCK14 the top LED will flash green to show charging and the camera will bleep when successfully connected to VideoManager Once fully charged the same LED will turn solid green If the LED is not lit the device is not charging Your VB400 will be fully charged within 8 hours from a flat battery Charging Flashing green LED Fully Charged Solid green LED ...

Страница 7: ... To quickly understand the current battery status of your VB400 press the bottom button on the front face of the camera and refer to the bottom LED Colour Key Green LED OK Orange Yellow LED Low Red LED Critical Battery Status Button Configurable ...

Страница 8: ... footage For further details see the VideoManager User Guide To ascertain whether your VB400 has been configured please view the top LED on your device This LED will turn solid green once configured and assigned Your VB400 is charged assigned and ready to use when the LEDs shown are both solid green Please Note If you try to use your VB400 before it has been assigned the bottom LED on the front fa...

Страница 9: ... users to utilise an RFID system for camera assignment For further information on assigning VB400s using an RFID reader please refer to the VideoManager User Guide Having presented your RFID card your docked assigned VB400 will identify itself with a solid red LED as shown RFID Assigned Badge RFID Reader RF 220 RFID Card RF CARD 10 ...

Страница 10: ...y pressing on the single front button located in the centre of the badge as shown Recording is stopped by pressing and holding the front button Record activation and deactivation buttons are configurable by Administrators Start Recording initiated will be indicated by a short bleep the two upper LEDs showing red Press centre button to start stop recording Solid red LED ...

Страница 11: ...ated is indicated by the two upper LEDs turning from red to off accompanied by a longer high pitched bleep Please Note All buttons are configurable Please consult with your administrator if you have any issues Power Down Button Configurable No LED ...

Страница 12: ...QUICKSTART GUIDE VB400 12 WEARING YOUR VB400 The VB400 body worn camera should always remain upright when capturing footage ...

Страница 13: ... for optimum performance and comfort in a wide range of situations the VB400 comes with a variety of fixing types to suit every uniform and body shape For more information on our range of body worn cameras please visit www motorolasolutions com bwc ...

Страница 14: ... may cause harmful interference to radio communications However there is no guarantee that interference will not occur in a particular installation If this equipment does cause harmful interference to radio or television reception which can be determined by turning the equipment off and on the user is encouraged to try to correct the interference by one of the following measures Reorient or reloca...

Страница 15: ...he following two conditions 1 this device may not cause interference and 2 this device must accept any interference including interference that may cause undesired operation of the device appareils radio exempts de licence Son fonctionnement est sujet aux deux conditions suivantes 1 le dispositif ne doit pas produire de brouillage prejudiciable et 2 ce dispositif doit accepter tout brouillage recu...

Страница 16: ...ise stated and are subject to change without notice MOTOROLA MOTO MOTOROLA SOLUTIONS and the Stylized M Logo are trademarks or registered trademarks of Motorola Trademark Holdings LLC and are used under license All other trademarks are the property of their respective owners 2020 Motorola Solutions Inc All rights reserved 06 20 ED 006 021 11 For more information please visit www motorolasolutions ...

Отзывы: