background image

SPAC-AS-MSV320 Antenna Installation

Installation of the 3-axis antenna on the mast is done according to FIG 21. The diameter 
of the post shall preferably be between 35 and 50 mm using the standard clamp supplied 
in the kit. Note the TORQUES for bolts and nuts.

A small loop should be made on the co-axial cable near the plug SPAC M00233 in order to
be able to pull the cable about 15 cm up through the mounting pole, when the antenna is
installed or removed.

If a long (e.g. 3m) post is used on board a ship it is recommended that this is fastened to the
ship using standard clamps rather than welding. This will enable the post to be laid down in
case removal of the antenna is required.

Vibration

The antennas (2- and 3-axis versions) are designed to meet the following operating vibration
levels in any of three perpendicular directions measured at the mounting base of the radome
i.e. at the flange of the standard mounting pole described above:

Random Vibration

1.05 Grms with the following spectral density

5-20 Hz………….0.02G2/Hz
20-150 Hz……….-3dB/octave 

And further,

Single Frequency Vibration

5-10 Hz with amplitude 2.54 mm

10-15 Hz with amplitude 0.76mm
15-25 Hz with amplitude 0.40mm

25-33 Hz with amplitude 0.23mm

Vibration levels in a typical installation are usually much less than the above mentioned
values. It is, however, the responsibility of the installer to verify that the cited levels are not
exceeded in any mode of operation of the vehicle/vessel. In case of abnormal vibration,
typically at a resonance frequency, measures much be taken in order to displace the 
resonance frequency or to dampen the vibration amplitude.

MSAT-G2 Installation Guide

21

Содержание MSAT-G2

Страница 1: ......

Страница 2: ...stallation General 11 Mounting Bracket Information 11 The Antenna Unit AU 14 Antenna Cable Lengths and Types 14 Installing the Antenna 14 SpaceCom SPAC AS MSV220 Land Mobile Fixed site Antenna 15 Magnetic Temporary Mounting option 16 Permanent Mast Mounting 17 SPAC AS MSV320 Maritime Antenna 18 Pole Mount Kit 18 Pole Mount Kit Component Description 19 SPAC AS MSV320 Antenna Installation 21 Vibrati...

Страница 3: ...e concludes with a troubleshooting section Installation Warning This product is to be installed by Authorized Service Personnel Damages resulting in the failure to conform to the instructions found herein as well as standard installation practices will be the responsibility of the installer MSAT G2 Mobile Satellite Radio The MSAT G2 mobile satellite radio is comprised of three core component parts...

Страница 4: ...al interfacing debugging software upgrading and future expansion capabilities Figure 2 System Overview MSAT G2 Installation Guide 2 Antenna Unit External Speaker External Interface Handset 12 power supply PC Debug Upgrade Future Expansion Transceiver Unit Antenna Cable Serial Ethernet Power Cable External Speaker Handset Cable ...

Страница 5: ...terface for the handset and antenna unit AU and manages the communications over the MSV network It also distributes power to the handset and Antenna Unit AU MSAT G2 Installation Guide 3 Figure 3 Transceiver Unit w o Mounting Bracket FRONT BACK ...

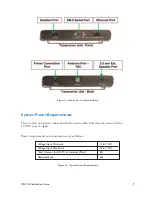
Страница 6: ...tionality The port supplies standard Ethernet line levels and supports all defined control line signaling The pinout of the port supports a direct straight through connection to a PC with a standard Ethernet cable The PC shall be supplied with a dynamic local IP address using a standard DHCP exchange Figure 5 Ethernet Port Pinout 0 25 A 1 1 4 BY 1 4 FUSE HORN ALERT AWG 20 STRANDED BLUE IGNITION SE...

Страница 7: ...he transceiver s fuse and or a fuse in the vehicle to blow No modifications should be made to the RF cable under any circumstance Figure 7 Antenna Port Detail MSAT G2 Installation Guide 5 Pin Data currently not supported GPS Crossband 1 CD Carrier Detect COR Carrier Operated Relay 2 RD Receive Data RD Receive Data 3 TD Transmit Data 4 DTR Data Terminal Ready 5 GND Signal Ground GND Signal Ground G...

Страница 8: ...or RJ45 The pinout is as follows Figure 8 Handset Connector Pin out External Speaker A 3 5 mm mono connection is provided for a 4W 8Ohm speaker MSAT G2 Installation Guide 6 Pin Number Signal Name 1 Audio TX Microphone 2 Audio TX Microphone 3 Data TX TU Send 4 Data RX TU Receive 5 12 VDC 6 Ground 7 Audio RX Speaker 8 Audio RX Speaker ...

Страница 9: ...r the entire radio This must be connected to a 12 VDC power supply Power requirements and consumption are as follows Figure 10 System Power Requirements MSAT G2 Installation Guide 7 Voltage Input Minimum 11 5 V DC Voltage Input Maximum 15 6 V DC Total Current for AU TU Handset Max 3A Required Fuse 5A ...

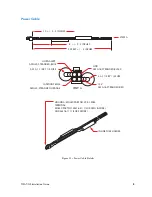
Страница 10: ... FEET 4 INCHES 6 0 5 INCHES VIEW A HORN ALERT AWG 20 STRANDED BLUE IGNITION SENSE AWG 20 STRANDED ORANGE VIEW A GND AWG 16 STRANDED BLACK 5 A 1 1 4 BY 1 4 FUSE 12 V AWG 16 STRANDED RED IN LINE FUSE HOLDER HOUSING MOLEX PART NO 39 01 2045 TERMINAL MOLEX PART NO 44476 3111 FOR AWG IG WIRE AND 44476 1111 FOR 20 WIRE ...

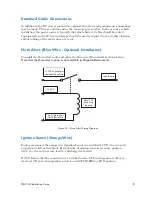
Страница 11: ...plice the blue wire Horn Alert as shown below Note that the Horn Alert option is not available in Dispatch Radio mode Figure 12 Horn Alert Wiring Diagram Ignition Sense Orange Wire Route and connect the orange wire Ignition Sense to a switched 12 VDC source such as ignition switch or fuse block Extended use of ignition sense in accessory position ACC by the end user may lead to a discharged car ba...

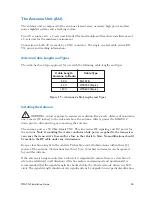
Страница 12: ...e to the satellite s Preferably avoid all obstructions within three 3 meters of the antenna Installation during windy conditions may be dangerous The owner and installer assume all responsibility to ensure that the equipment is properly installed with adequate structural stability of mounting surface to withstand all loads wind weight ice etc and is properly sealed to avoid leaks DO NOT ATTEMPT TO...

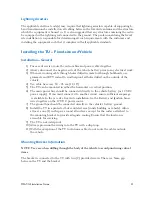
Страница 13: ...ry 30 45 cm 12 18 5 The TU can be mounted in either the horizontal or vertical position 6 The main power line should be connected directly to the vehicle battery or 12 VDC power supply If you must connect it to another circuit ensure sufficient amperage is available In the case of a fixed site installation tie the Battery and Ignition Sense wires together on the 12 VDC power source 7 The ground li...

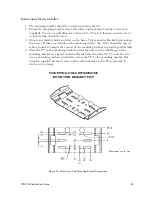
Страница 14: ...urface the screws should be spaced as far as possible towards the corners of the mounting bracket to provide good stability 4 Place the TU on the mounting bracket so that the holes on the side flanges of the mounting bracket are aligned with the threaded inserts on the TU Use only the two screws and spring washers provided to secure the TU to the mounting bracket Not using the supplied bracket scr...

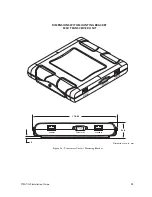
Страница 15: ...stallation Guide 13 HANDSET SERIAL PORT ETHERNET SERIAL PORT ETHERNET HANDSET 176 83 5 33 6 DIMENSIONS WITH MOUNTING BRACKET MSV TRANSCEIVER UNIT Figure 14 Transceiver Unit w Mounting Bracket Dimensions are in mm ...

Страница 16: ... port is a 50 Ohm female TNC This line carries RF signaling and DC power for the antenna Note Grounding the center conductor while power is applied to the transceiver can cause the transceiver s fuse and or a fuse in the vehicle to blow No modifications should be made to the RF cable under any circumstance Keep a clear line of sight to the satellite Preferably avoid all obstructions within three 3...

Страница 17: ...simultaneously and verify there is no co interference SpaceCom SPAC AS MSV220 Land Mobile Fixed site Antenna Magnetic Temporary Mounting option For temporary use or where drilling of holes is to be avoided a Magnetic Mount Installation Kit is offered SpaceCom part no SPAC AC 1016 Three 3 magnetic mounts each with an adhesive force of at least 420 N Newton are required to secure the MSV220 antenna ...

Страница 18: ...s important to protect against moisture using self amalgating tape or similar wrapped around the coaxial connector Also be careful with the cable run from the antenna and secure it at short intervals An unsupported length of cable will vibrate when driving and could negatively affect the connection over time Dismounting Grab the antenna near one of the magnets and lift When one magnet is loose the...

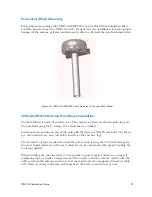
Страница 19: ...rt mast or similar First mount the antenna on top of the pole with 3 three pcs M6x50 mm bolts The 6 six pcs nylon washers are used just below and above the antenna legs The 44 mm U clamps are placed around the pole mount leaving the 50 mm U clamps for the mast Small tolerances in the mast diameter can be compensated by simply bending the U clamps slightly When installing the antenna cable it is im...

Страница 20: ... are not followed Pole Mount Kit The installation is based on a pole mounting kit AC 1005 and is shown in FIG 21 The kit consist of the following components subject to change 1pcs Mounting Pole Part No SPAC M00424 1pcs Rubber Gasket Part No SPAC M00425 6pcs Plastic Bushings Part No SPAC M00227 6pcs Washer Part No SPAC M90 10062 6pcs Screw Part No SPAC M90 10102 MSAT G2 Installation Guide 18 U clam...

Страница 21: ...andard tubing with a mounting flange welded onto it The component is made from a stainless steel alloy that is easy to cut machine and weld It is part of the ventilating system for the dome The standard length is 400mm and must not be shortened in maritime applications Shorter versions for non maritime applications may be supplied on special request Rubber Gasket Part No SPAC M00425 is used to ens...

Страница 22: ...00430 to the mounting pole refer to FIG 21 Clamps Part No SPAC M00429 are used to fasten the mounting pole to any post with a diameter between 35 and 50 mm refer to FIG 21 Nuts Part No SPAC M90 10105 are M8 nuts used for the clamps refer to FIG 21 Nuts are to be tightened to 5Nm Flange Part No SPAC M00430 are used for linking the clamp holding forces Plug Part No SPAC M00233 is used for partly clo...

Страница 23: ...ons are designed to meet the following operating vibration levels in any of three perpendicular directions measured at the mounting base of the radome i e at the flange of the standard mounting pole described above Random Vibration 1 05 Grms with the following spectral density 5 20 Hz 0 02G2 Hz 20 150 Hz 3dB octave And further Single Frequency Vibration 5 10 Hz with amplitude 2 54 mm 10 15 Hz with...

Страница 24: ...ng Part No SPAC M00227 6 ONLY Screw Part No SPAC M90 10102 6 ONLY To be tightened to 4Nm in two rounds Nut M8 8 ONLY To be tightened to 10 1Nm U Clamp SPAC M00428 2 ONLY Flange SPAC M00430 2 ONLY Screw M5x10 1 ONLY Rubber gasket Part No SPAC M00425 1 ONLY Washer Part No SPAC M90 10062 6 ONLY Mounting pole Part No SPAC M00421 1 ONLY 35 50MM U Clamp SPAC M00429 2ONLY Post on vessel 42 5 400 ...

Страница 25: ...pe it in and press OK 3 You are then prompted to select the antenna type TRACKING for mobile applications or OTHER for future applications Use the arrow keys to scroll to the appropriate option and press SELECT 4 You are then prompted for each of the Commission Parameters Control Channel Frequency CFC Pilot Channel Frequency PFC and Security Access Code SASK In each case you are asked to type in t...

Страница 26: ...Signifies the PTT key was been pressed then released just before the radio received the confirmation from the network Action Contact MSV Customer Support Ensure that you have a clear view of the southern sky and select YES to re initiate the commissioning procedure Contact MSV Customer Support if the radio fails to commission after several attempts Select YES to re initiate the commissioning proce...

Страница 27: ...ervals until the temperature is reduced If the temperature continues to increase then the radio will shutdown Signifies the user has entered the wrong Dealer or SYSTEM Menu password Signifies the user has entered the wrong Handset Lock code Ensure a valid DN is entered in tag position 00 If this condition persists contact MSV Customer Support Ensure that the antenna has a clear line of sight to th...

Страница 28: ...ers Environmental conditions Record information about the location and the line of sight to the satellite Are there any blockages What are were the weather conditions when the problem is was encountered Is there any pattern as to when the problems occur i e always when it rains always at 9 a m in the summertime but not the wintertime etc How long has the problem existed When did it first show up I...

Страница 29: ...tart by checking that the power supply is working properly Check the power level supplied by the cable going into the TU Check that the power cable is securely connected to the TU 2 Commissioning Fails Is there sufficiently high enough signal strength Check the antenna for line of sight Check that the correct SASK PFC CFC are entered Check the TU ESN is this the correct TU Check that the account i...

Страница 30: ... 8 x Height 3 9 SPAC AS MSV320 Antenna Diameter 11 x Height 11 Power Input voltage 11 5 to 15 6 VDC Input current 3 Amps max Fuses Power cable assembly 3004028 0001 Battery red wire 5 Amp 250 Volt Horn Alert blue wire 0 25 Amp 250 Volt CAUTION For continued protection against risk of fire replace only with same type and rating of fuse Humidity 98 at 100 4 F 38 C Operating Antenna 22 F 30 C to 109 ...

Страница 31: ...d completeness of the material in this document Mobile Satellite Ventures LP shall not be liable for errors contained herein The information in this document is subject to change without notice Mobile Satellite Ventures LP makes no warranty of any kind with regard to this material including but not limited to the implied warranties of merchantability and fitness for a particular purpose Trademarks...

Отзывы: