28
Wi-Fi® Internet Viewing
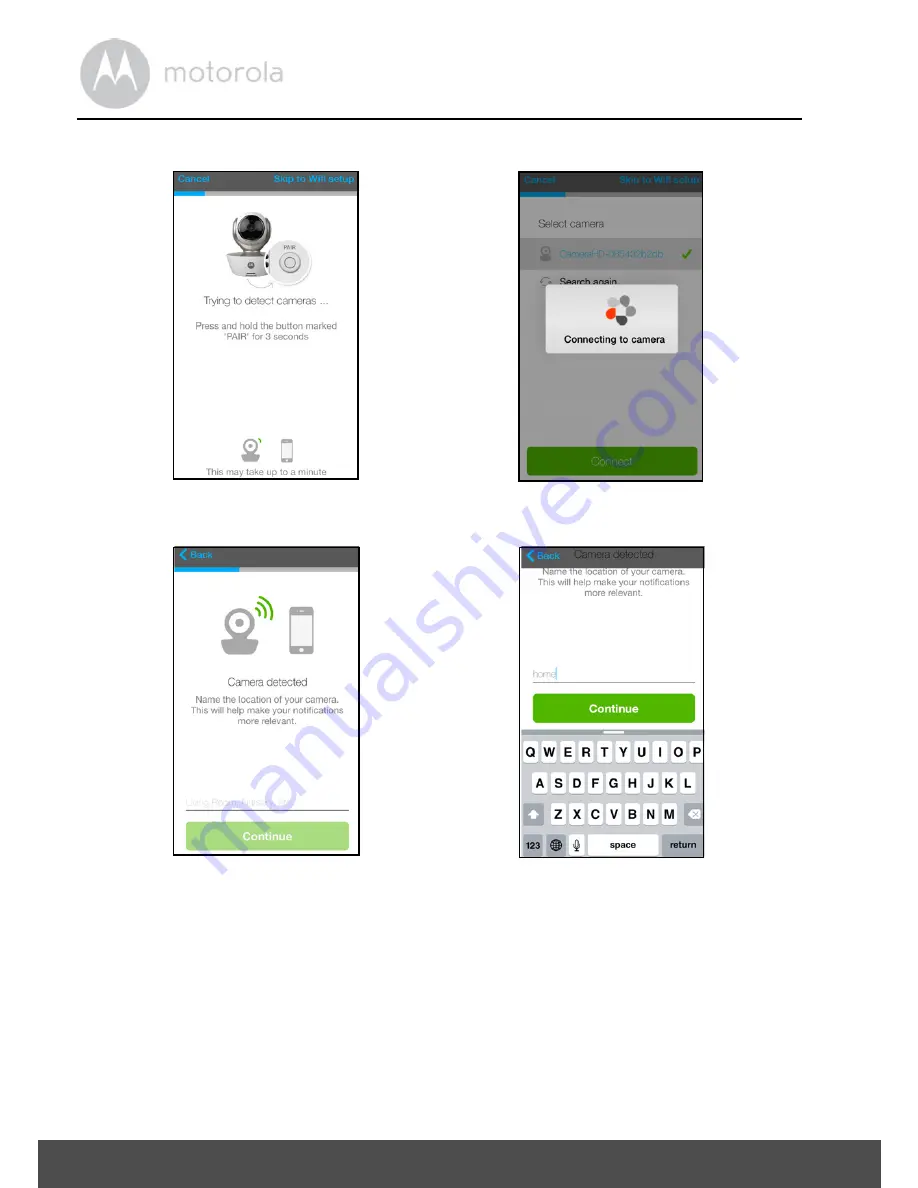
• The following will appear on the screen. (Pictures i7, i8)
• Name the location of your Camera Unit and tap
Continue
.
(Pictures i9, i10)
i7
i8
i9
i10
Страница 1: ...igital Video Baby Monitor With Wi Fi Internet Viewing Models MBP845CONNECT MBP845CONNECT 2 MBP845CONNECT 3 MBP845CONNECT 4 The features described in this User s Guide are subject to modifications without prior notice ...
Страница 2: ...r s Guide provides you with all theinformation you need to get the most from your product Before you use the Digital Video Baby Monitor we recommend that you insert and fully charge the battery in the Parent Unit so that it continues to work if you disconnect it from the power supply Please read the Safety Instructions on pages 7 9 before you install the Units Got everything 1 x Parent Unit 1 x Ba...
Страница 3: ...s to open the Menu options 8 OK button O 9 Micro USB power adapter socket 10 LEFT button Press to access different menu options While viewing a zoomed image press and hold to move the image leftward 11 RIGHT button Press to access different menu options While viewing a zoomed image press and hold to move the image rightward 12 Charging LED Blue when connected to the mains power socket 13 ON OFF LE...
Страница 4: ...Setting 6h 4h 2h OFF Temperature scale select o C o F Readings display in BLUE but turn RED 29ºC 84ºF or 14ºC 57ºF Displays HH o C o F if 36o C 97o F Displays LL o C o F if 1o C 34o F Camera Control scan view add delete Set Screen Off Timer Off 5 min 30 min 60 min Indicates the screen off timer is set Volume Level Control 8 Levels No Baby Unit detected View multiple cameras on screen Available whe...
Страница 5: ...dio link between them and the range will be affected by environmental conditions Any large metal object like a refrigerator a mirror a filing cabinet a metallic door or reinforced concrete between the Baby Unit and Parent Unit may block the radio signal The signal strength may also be reduced by other solid structures like walls or by radio or electrical equipment such asTVs computers cordless or ...
Страница 6: ...15 4 2 Brightness 15 4 3 Lullaby 15 4 4 Zoom 15 4 5 Alarm 15 4 6 Camera Control 16 4 7 Temperature 17 4 8 Power Saving Mode 18 4 9 View multiple cameras on screen 18 5 Wi Fi Internet Viewing 19 5 1 Minimum System Requirements 19 5 2 Getting Started Connecting Devices 20 5 3 User Account and Camera Setup on Android Devices 21 5 4 User Account and Camera Setup on iPhone iPad 25 5 5 Camera Functions ...
Страница 7: ...LISH 1 Safety Instructions WARNING Strangulation Hazard Children have STRANGLED in cords Keep this cord out of the reach of children more than 1m away Never use extension cords with AC Adapters Only use the AC Adapters provided ...
Страница 8: ...all its functions so that you are familiar with it prior to actual use Do not use the Digital Video Baby Monitor in damp areas or close to water Do not install the Digital Video Baby Monitor in extreme cold or heat direct sunlight or close to a heat source Only use the chargers and power adapters provided Do not use other chargers or power adapters as this may damage the device and battery pack On...
Страница 9: ...sion if the battery is replaced by an incorrect type Dispose of used batteries according to the instructions The Unit shall be setup and used so that parts of the user s body other than the hands are maintained at a distance of approximately 20 cm 8 inches or more ...
Страница 10: ... socket and insert the plug into the power socket on the back of the Baby Unit Camera 2 Slide the ON OFF switch to the ON position The power indicator LED will light up in blue 3 To switch offthe Baby Unit slide the ON OFF switch to the OFF position NOTE Only use the enclosed Power Adapter 5V DC 1000mA ON OFF switch ...
Страница 11: ...th the micro USB plug 2 Press and hold the 0 POWER ON OFF button for 3 seconds to switch ON the Parent Unit 3 Once the Baby and Parent Units are switched on the display on the Parent Unit will show the video captured by the Baby Unit 4 If there is no connection or you are out of range the unit will beep every few seconds Move the Parent Unit closer to the Baby Unit until the link is re established...
Страница 12: ...d press the O button to confirm 4 Camera will pop up Press the UP button or DOWN button to select the desired Camera and press the O button to start searching for a camera unit Note If a camera is currently paired with the Parent Unit its camera location with a against it cannot be selected for a new registration 5 Press and hold the PAIR button on the underside of the Baby Unit until the Parent U...
Страница 13: ...an be remotely controlled from the Parent Unit when in camera viewing mode 1 Press the UP button or DOWN button to tilt up or down 2 Press the LEFT button or RIGHT button to pan left or right 3 3 Night Vision Mode The Baby Unit has 8 high intensity infrared LEDs for picking up clear images in thedark Whenthebuilt inphotosensoron thetopofthe Unit detects alowlevel of ambient light the LEDs will aut...
Страница 14: ...ensor at the back of the Baby Unit will be displayed at the top of the LCD screen The readings will turn RED if the temperature goes above 29 C 84 F or below 14 C 57 F The reading will change to HH C F if the temperature goes above 36 C 97 F The reading will change to LL C F if the temperature goes below 1 C 34 F ...
Страница 15: ...til is highlighted 3 Press the UP button or DOWN button to select from the 5 sounds available If a sound is selected it will repeat continuously until it is deselected The default setting is OFF 4 To adjust the playback volume at the Baby Unit Camera press O then the UP button or DOWN button when a sound is selected 4 4 Zoom 1 Press the M button and the menu bar will pop up with highlighted 2 Pres...
Страница 16: ...the PAIR button on the underside of the Baby Unit until the Parent Unit finds the camera beeps and PAIR OK appears on the screen The video from the camera will then appear NOTE A camera can only be registered to one Parent Unit at any one time 4 6 2 View a camera 1 Press the M button and the menu bar will pop up 2 Press the LEFT button or RIGHT button until is highlighted and the del add view scan...
Страница 17: ...ered camera in the system 4 6 4 Scan camera This function is only available when you have more than 1 Baby Unit Camera 1 Press the M button and the menu bar will pop up 2 Press the LEFT button or RIGHT button until is highlighted and the del add view scan menu will pop up 3 Press the UP button or DOWN button to select scan and press the O button to confirm 4 The screen will then display images fro...
Страница 18: ... back on 4 9 View multiple cameras on screen This function is only available when you have more than 1 Baby Unit Camera When the Split Screen function is On you can view multiple cameras on the screen 1 Press the M button and the menu bar will pop up 2 Press the LEFT button or RIGHT button until is highlighted 3 Press the UP button or DOWN button to select Split Screen On Off 4 When the Split Scre...
Страница 19: ... 7 Mac OS 10 7 Chrome 24 Internet Explorer 9 Safari 6 Java 7 Firefox 18 0 Adobe Flash Player 15 0 Android System Version 4 2 or above iPhone iPad iOS Version 7 0 or above High Speed Wi Fi Internet At least 0 6 Mbps upload bandwidth per camera you can test your internet speed on this site http www speedtest net ...
Страница 20: ...witch to the ON position The Camera Unit must be within range of the Wi Fi router with which you want to connect Make sure that you have the password of the router for the setup process Behavior of the status Indicator LED Note You can only setup via a compatible smartphone or tablet and not via a PC Pairing and setting up Flashes slowly in red Unconnected Flashes slowly in blue Connected Lights u...
Страница 21: ...ting When you hear one beep this means that the Camera is ready for setup 5 3 2 Download Hubble for Motorola Monitors App Go to Google Play Store to search for Hubble for Motorola Monitors Download Hubble for Motorola Monitors App from Google Play Store and install it on your Android device 5 3 3 Run Hubble for Motorola Monitors App on Android device Ensure that your Android device is connected to...
Страница 22: ...n the top right corner of the screen to add camera Picture A2 The following setup instructions will appear on the screen Picture A3 Plug in and switch on the camera and wait for a couple of minutes for it to warm up Tap Continue when the Camera LED starts to blink A2 A3 ...
Страница 23: ...n the bottom left edge of the Camera Unit for 3 seconds You will then hear a beep tone followed by a voice prompt indicating that the Camera is ready for pairing Tap Continue The App will automatically search for and connect to your Camera as shown in the pictures below Pictures A5 A6 The blue red colour LED on the Camera Unit will flash A4 A5 A6 ...
Страница 24: ...few minutes for the Camera to connect to the Wi Fi network before showing the connection status Pictures A9 A10 If connection fails please tap Retry and repeat the steps starting from 5 3 4 Tap View Camera to view the video captured by the Camera Unit The LED indicator on the Camera Unit will light up in blue A7 A8 A9 A10 ...
Страница 25: ... When you hear one beep this means that the Camera is ready for setup 5 4 2 Download Hubble for Motorola Monitors App Go to App Store to search for Hubble for Motorola Monitors Download Hubble for Motorola Monitors App and install it on your iPhone iPad 5 4 3 Run Hubble for Motorola Monitors App on iPhone iPad Ensure that your iPhone iPad is connected to your Wi Fi Router Run the Hubble for Motoro...
Страница 26: ...i Internet Viewing 5 4 4 Add the Camera to your account Tap on the top right corner of the screen to add camera Picture i2 The following Bluetooth setup instructions will appear on the screen Picture i3 i2 i3 ...
Страница 27: ... home screen then tap on Hubble for Motorola Monitors App to resume setup The following setup instructions will appear on the screen Picture i6 Note that if Bluetooth is on you will be brought to this step directly Wait for a couple of minutes for the Camera Unit to warm up and tap Continue when the Camera LED indicator starts to blink i4 i5 i6 ...
Страница 28: ...28 Wi Fi Internet Viewing The following will appear on the screen Pictures i7 i8 Name the location of your Camera Unit and tap Continue Pictures i9 i10 i7 i8 i9 i10 ...
Страница 29: ... display a list of available networks Picture i12 Select your Wi Fi network and tap Continue Picture i13 Enter your Wi Fi password and tap Next Picture i14 It will take a few minutes for the Camera Unit to connect to the Wi Fi network before showing the connection status Pictures i15 i16 i11 i12 i13 i14 ...
Страница 30: ...net Viewing If connection fails tap Retry and repeat the steps starting from 3 3 4 Tap View Live Camera to view the video captured by the Camera Unit The LED indicator on the Camera Unit will light up in blue i15 i16 ...
Страница 31: ... access the camera list Tap Event Log to access the video record list that is triggered by Motion or Sound detection Tap Account to access user Profile subscription Plan Notifications setting Remote Connection Setting and About Hubble Photo Video Take a photo or record a video from your Camera Tap the Video icon to activate Video function Tap and hold the red button to start recording and release ...
Страница 32: ...goes beyond the High Low temperature that was set in your Account Two way communication Tap to activate the function Press the round button once to speak through the Camera Unit Toggle the button again to listen to the audio feedback from the Camera Unit Speaker Tap to toggle speaker on or off Zoom Slide the scroll bar on the right hand side of the screen to zoom in or zoom out You can also use th...
Страница 33: ...fications to set the sensitivity of Sound Detection Motion Detection and to set Alerts for High temperature Up to 33 o C or 91 o F Low temperature down to 10o C or 50 oF Tap Settings to set Ceiling mount Brightness and Volume Add Camera Enter Add Camera procedures Delete All Events Tap to delete all events Select Events Check the box to select recorded event s Edit Events Tap to select and delete ...
Страница 34: ...tructions 5 7 Procedure for Resetting the Camera Note If your Camera is moved from one router e g home to another e g office oryouhaveCamerasetupissues thentheCameramustbereset Please reset the Camera with the following procedures 1 Slide the ON OFF switch to OFF 2 Press and hold the PAIR button then slide the ON OFF switch to ON 3 Release the PAIR button when you hear a confirmation beep and wait...
Страница 35: ...e symbol on the product user s guide and or box indicates this Some of the product materials can be re used if you take them to a recycling point By reusing some parts or raw materials from used products you make an important contribution to the protection of the environment Please contact your local authorities in case you need more information on the collection points in your area Dispose of the...
Страница 36: ...ermanent damage to the product which is not covered by the warranty Keep your Digital Video Baby Monitor away from hot humid areas or strong sunlight and do not let it get wet Every effort has been made to ensure high standards of reliability of your Digital Video Baby Monitor However if something does go wrong please do not try to repair it yourself contact Customer Service for assistance IMPORTA...
Страница 37: ... alerts You can reactivate the screen by pressing any button Registration If the Baby Unit has lost its link with the Parent Unit Try recharging or replacing the battery pack If the Baby Unit is too far away it may be going out of range so move the Baby Unit closer to the Parent Unit Reset the Units by disconnecting them from the battery and electrical power Wait about 15 seconds before reconnecti...
Страница 38: ... your device To avoid background noise or echoes ensure that there is enough distance between your device and the Wi Fi Camera Unit Use of other 2 4 GHz products such as Bluetooth systems or microwave ovens may cause interference with this product Keep the Wi Fi Camera Unit at least 1 5m away from these types of products or switch them off if they appear to be causing interference Lost connection ...
Страница 39: ...lbesent to your registered email address Account I am unable toreceive a newpasswordalthough I have used the Forgot password option 1 The e mail might have been sent to your Junk Mail Folder Please check your Junk Mail Folder 2 There might be a delay in getting your e mail Please wait a few minutes and refresh your email account Connectivity Issues I get a message We are having problems accessing ...
Страница 40: ...shold is not right You can Adjust Sound Sensitivity to trigger notifications under Camera Setting menu Setting Up While I am adding a new Camera to my account I am not able to find any Cameras to add If you are trying to add a Camera which has previously been added into your account or another account you will firsthavetoresettheCamera This can be done by pressing and holding the PAIR button at th...
Страница 41: ...is stable The Camera is connected to the Wi Fi network Connectivity Issues I am not able to access my Camera Please check if the Camera is within Wi Fi range IftheLEDonyourCamera is flashing slowly pleasetryto movethe Camera closertotherouterforbetter Wi Fi connectivityandtryagain Setting Up During setup on devices for Android and iOS I am not able to find my Camera during the last step and the se...
Страница 42: ...ease upgrade your firmware This takes around 5 minutes We push upgrades from time to time to improve Camera features General Which platforms are supported for accessing my Camera Minimum requirement Windows 7 Java browser plug in needed Mac OS version 10 7 Chrome version 24 Internet Explorer version 9 Safari version 6 Java version 7 Firefox version 18 0 Adobe Flash Player 15 0 Android 4 2 iPhone i...
Страница 43: ... App for Android and iOS devices Android Open the Google Play Store on your Android device Select Search Type in Hubble for Motorola Monitors The results will show the Hubble App Select to install it iOS Device Open the App StoreSM Select Search Type in Hubble for Motorola Monitors The results will show the Hubble App Select to install it Setting up When the video is cut off the application attemp...
Страница 44: ...streaming will go through the remote server This allows for unlimited user access to a single Camera at one time Connectivity issues I found interference caused by my other webcam devices Video streaming performance is related to internet bandwidth especially if you have 2 or more video streaming devices that are working through the same router ...
Страница 45: ...ct Product orcertified accessory Accessory sold for use with this product that it manufactured to be free from defectsin materials and workmanship under normal consumer usage for the period outlined below This Warranty is your exclusive warranty and is not transferable Who is covered This Warranty extends only to the first consumer purchaser and is not transferable What will BINATONE do BINATONE o...
Страница 46: ...CE FOR DAMAGES IN EXCESS OF THE PURCHASE PRICE OF THE PRODUCT OR ACCESSORY OR FOR ANY INDIRECT INCIDENTAL SPECIAL OR CONSEQUENTIAL DAMAGES OF ANY KIND OR LOSS OF REVENUE OR PROFITS LOSS OF BUSINESS LOSS OF INFORMATION OR OTHER FINANCIAL LOSS ARISING OUT OF OR IN CONNECTION WITH THE ABILITY OR INABILITY TO USE THE PRODUCTS OR ACCESSORIES TO THE FULL EXTENT THESE DAMAGES MAY BE DISCLAIMED BY LAW Som...
Страница 47: ...ies for commercial purposes or subjecting the Product or Accessory to abnormal usage or conditions or d other acts which are not the fault of MOTOROLA or BINATONE are excluded from coverage Use of Non Motorola branded Products and Accessories Defects or damage that result from the use of Non Motorola branded or certified Products or Accessories or other peripheral equipment are excluded from cover...
Страница 48: ...ion please call You will receive instructions on how to ship the Products or Accessories at your expense and risk to a BINATONE Authorised Repair Centre To obtain service you must include a the Product or Accessory b the original proof of purchase receipt which includes the date place and seller of the Product c if a Warranty card was included in your box a completed Warranty card showing the seri...
Страница 49: ...EC on the approximation of the laws of the Member States relating to electromagnetic compatibility EMC and the European Community Directive 2006 95 EC relating to Electrical Safety Directive 2011 65 EC on the restriction of use of hazardous substances RoHS and 2009 125 EC relating to eco design requirement for Energy Related Products ErP Assessment of compliance of the product with the requirement...
Страница 50: ...P845CONNECTBU Frequency 2 4GHz to 2 48 GHz Image sensor colour CMOS 1M Pixels IR LED 6 pcs Operating Temperature0o C 45o C Power Adapter Ten Pao International Ltd S006AKU0500100 Input 100 240V AC 50 60Hz 200mA Output 5 0V DC 1000mA WARNING Use only with provided power supply ...
Страница 51: ... LCD Brightness Control 5 steps Volume Control 8 steps Power Adapter Ten Pao International Ltd S006AKU0500100 Input 100 240V AC 50 60Hz 200mA Output 5 0V DC 1000mA WARNING Use only with provided power supply Battery built in LG Chemical Limited Motorola BF6X 3 7V 1880mAh Lithium Ion Polymer rechargeable battery pack WARNING Do not attempt to replace the battery but contact Customer Service if it n...
Страница 52: ...ice mark of Apple Inc Google Play Android and Chrome are trademarks of Google Inc Wi Fi is a trademark of the Wi Fi Alliance Internet Explorer and Windows are trademarks of the Microsoft group of companies Firefox is a registered trademark of the Mozilla Foundation Adobe and Flash are either registered trademarks or trademarks of Adobe Systems Incorporated Java is a registered trademarkofOracleand...