Motorola MBP669CONNECT Скачать руководство пользователя страница 3

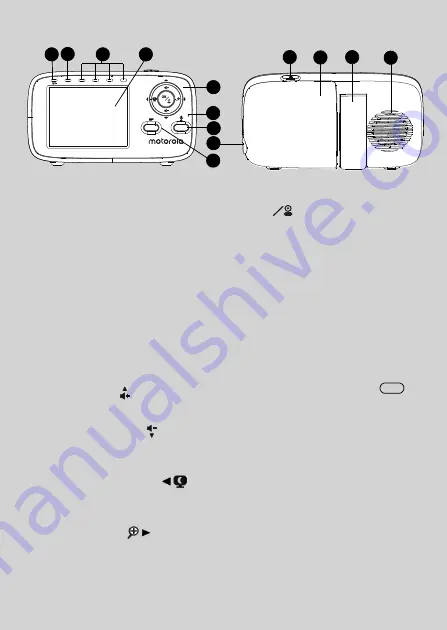
Overview of the Parent Unit

1.

Display (LCD screen)

2.

Sound Level indicators

Show the sound level detected by
the Baby Unit - the louder the sound
detected, the more LEDs light up.
The first green LED flashes while in
pairing mode.

3.

Power/Link indicator

Lights up in green when the Parent
Unit is turned on.

4.

Charging indicator

Lights up in blue when the power
adapter is plugged in. Lights up in
red when the battery is low.

5.

Control key panel

UP / 

Press to increase speaker volume.
When in a menu, press to scroll up.

DOWN / VOLUME -

Press to decrease speaker volume.
When in a menu, press to scroll
down.

LEFT / VIDEO ON-OFF

Press to turn the display ON or OFF.
When in a menu, press to choose
the option on the left.

RIGHT / ZOOM

Press to zoom in or out.
When in a menu, press to choose
the option on the right.

O

Press to Enter/Exit remote scan 
mode. 
When in a menu, press to choose an
item, or save a setting.

6.

Microphone

7.

TALK button 

T


Press and hold to speak to your 
baby.

8.

DC Power micro-USB Socket

9.

Menu button


M

Press to open menu options.

10.

POWER ON/OFF button


0

Press and hold to turn the Unit on or 
off. 

11.

Battery Cover

12.

Stand

13.

Speaker

1

2

3

4

5

6

7
8
9

10

11

12

13

Содержание MBP669CONNECT

Страница 1: ...ser s Guide 2 8 Wi Fi Video Baby Monitor Models MBP669CONNECT MBP669CONNECT 2 MBP669CONNECT 3 MBP669CONNECT 4 The features described in this User s Guide are subject to modifications without prior notice ...

Страница 2: ...all theinformation you need to get the most from your product Before you use the Digital Video Baby Monitor we recommend that you insert and fully charge the battery in the Parent Unit so that it continues to work if you disconnect it from the power supply Please read the Safety Instructions on pages 7 9 before you install the Units Got everything 1 x Parent Unit 1 x Baby Unit Camera 1 x Rechargea...

Страница 3: ...e When in a menu press to scroll up DOWN VOLUME Press to decrease speaker volume When in a menu press to scroll down LEFT VIDEO ON OFF Press to turn the display ON or OFF When in a menu press to choose the option on the left RIGHT ZOOM Press to zoom in or out When in a menu press to choose the option on the right O Press to Enter Exit remote scan mode When in a menu pressto choose an item or save ...

Страница 4: ...min 60min Brightness Level Control 8 Levels Zoom Level Control 1X 2X Audio Playlist Lullaby Soothing song Audio book and Personal audio playback Alarm Setting 6h 4h 2h OFF Temperature Scale setting in menu ºC ºF Readings turn RED if 29ºC 84ºF and reading displays HH ºC ºF 36ºC 97 ºF Readings turn RED if 14ºC 57ºF and reading displays LL ºC ºF 1ºC 34 ºF Multi screen option only available if more th...

Страница 5: ... them and the range will be affected by environmental conditions Any large metal object like a refrigerator a mirror a filing cabinet metallic doors or reinforced concrete between the Baby and Parent Unit may block the radio signal The signal strength may also be reduced by other solid structures like walls or by radio or electrical equipment such asTVs computers cordless or mobile phones fluoresc...

Страница 6: ...t Screen Off Time on the Parent Unit 15 4 4 Pan and Tilt 16 4 5 LCD Brightness t 16 4 6 Set Alarm time for the Parent Unit 17 4 7 Monitor the Temperature 17 4 8 Audio Playlist 17 4 9 Camera Control 18 5 Wi Fi Internet Viewing 20 5 1 Minimum System Requirements 20 5 2 Getting Started Connecting Devices 21 5 3 User Account and Camera Setup on Android Devices 22 5 4 User Account and Camera Setup on i...

Страница 7: ...tions 7 ENGLISH 1 Safety Instructions WARNING StrangulationHazard Childrenhave STRANGLEDincords Keepthiscordout ofthereachofchildren morethan1m away NeveruseextensioncordswithAC Adapters OnlyusetheACAdapters provided ...

Страница 8: ...all its functions so that you are familiar with it prior to actual use Do not use the Digital Video Baby Monitor in damp areas or close to water Do not install the Digital Video Baby Monitor in extreme cold or heat direct sunlight or close to a heat source Only use the chargers and power adapters provided Do not use other chargers or power adapters as this may damage the device and battery pack On...

Страница 9: ...sion if the battery is replaced by an incorrect type Dispose of used batteries according to the instructions The Unit shall be setup and used so that parts of the user s body other than the hands are maintained at a distance of approximately 20 cm 8 inches or more ...

Страница 10: ...ug of the power adapter to the Baby Unit camera and the other end to a suitable mains power socket NOTE Only use the enclosed Power Adapter 5V DC 1000mA 2 Slide the POWER ON OFF switch to the ON position to turn the Baby Unit on 3 Slide the POWER ON OFF switch to the OFF position to turn the Baby Unit off ...

Страница 11: ...t s Charge the battery in the Parent Unitbefore using it for thefirst timeor when the Parent Unit indicates that the battery is low flashes in red 1 Unclip and remove the battery compartment cover 2 Insert the plug of the battery pack into the socket inside the battery compartment and fit the battery pack into the compartment 3 Replace the battery compartment cover and pull out the desktop stand r...

Страница 12: ...ll and charge the rechargeable battery pack fully before use This will allow the Parent Unit to operate on battery in the event of a power failure or when moving to a different room 3 Once the Baby and Parent Units are both switched ON the display on the Parent Unit will show the colour image captured by the Baby Unit But if the room is dark the image will be displayed in black and white and with ...

Страница 13: ...Getting Started 13 ENGLISH 2 4 Desktop Stand of the Parent Unit Flip out the stand on the back of the Parent Unit to set up the desktop stand ...

Страница 14: ...e Unit detects a low level of ambient light the LEDs will automatically activate and the screen on the Parent Unit will display in black and white The icon will be displayed at the top of the screen 3 3 Video ON OFF Press the VIDEO On Offbutton on the Parent Unit to turn the LCD display on or off but still leaving the audio monitor on 3 4 Talk Mode Press and hold theTALK buttonTonthe ParentUnitto ...

Страница 15: ...c time interval to help extend the battery operation time The audio will still be heard even when the screen is off You can change the screen off time to 5mins 30mins or 60mins 1 Press M when the Parent Unit is in camera viewing mode 2 Press or to scroll to 3 Press or to select 60mins 30mins 5mins or OFF 4 Press O to confirm your selection 4 4 Pan and Tilt 4 5 LCD Brightness You can adjust the bri...

Страница 16: ...to camera viewing mode 4 6 Set Alarm Time on the Parent Unit You can use the Parent Unit to set a 2 4 or 6 hour alarm as a reminder for you to take care of your baby Ifan alarmtimeisselected the blue alarmiconwillappearatthetop ofthe screen The Parent Unitwill beep atthe end ofthe selected2 4 or6 hourperiod The alarm will reset and startthe nexttime period after60 seconds orbypressing anybutton on...

Страница 17: ...s The song name appears on the screen Press O button to play the selection 4 8 2 Audio Book English only Playback Press O button to play the selection 4 8 3 Personal Audio Playback NOTE Before playback your personal audio you are required to record your audio following the instructions in Hubble for Motorola Monitors App Press M button then or to scroll to option at the menu bar Scroll or button t...

Страница 18: ...ra in the system 1 Press M when the Parent Unit is in camera viewing mode 2 Press or button to scroll to 3 Press or button to choose add 4 Press the O button to confirm will pop up 5 Press or button to select the desired camera position and press O button to start searching for a amera unit The green audio level LED will flash rapidly while searching 1 Press M when the Parent Unit is in camera vie...

Страница 19: ...ra 4 10 2 Scan camera 4 The screen will then display images from different registered cameras in a loop of Camera changing about every 12 seconds 1 Press M when the Parent Unit is in camera viewing mode 2 Press or button to scroll to 3 Press or button to choose view 4 Press O button to confirm will pop up 5 Press or button to select the desired camera and press O button to view the picture from th...

Страница 20: ...net Explorer 9 Safari 6 Java 7 Firefox 18 0 Adobe Flash Player 15 0 Android System Version 5 0 or above iPhone iPad iOS Version 8 0 or above High Speed Wi Fi Internet At least 0 6 Mbps upload bandwidth per camera you can test your internet speed on this site http www speedtest net 20 Wi Fi Internet Viewing ...

Страница 21: ...t must be within range of the Wi Fi router with which you want to connect Make sure that you have the password of the router for the setup process Behavior of the status Indicator LED Note You can only setup via a compatible smartphone or tablet and not via a PC Pairing and setting up Flashes slowly in blue and red Unconnected Flashes slowly in blue Connected Lights up in blue Ready for connection...

Страница 22: ...at the Camera is ready for setup 5 3 2 Download Hubble for Motorola Monitors App Go to Google Play Store to search for Hubble for Motorola Monitors Download Hubble for Motorola Monitors App from Google Play Store and install it on your Android device 5 3 3 Run Hubble for Motorola Monitors App on Android device Ensure that your Android device is connected to your Wi Fi router Run Hubble for Motorol...

Страница 23: ... to add camera Picture A2 The following setup instructions will appear on the screen Picture A3 Plug in and switch on the camera and wait for a couple of minutes for it to warm up Tap Continue when the Camera LED starts to blink A2 A3 ENGLISH Android TM Wi Fi Internet Viewing 23 ...

Страница 24: ... seconds You will then hear a beep tone followed by a voice prompt indicating that the Camera is ready for pairing Tap Continue The App will automatically search for and connect to your Camera as shown in the pictures below Pictures A5 A6 The blue red colour LED on the Camera Unit will flash A4 A5 A6 24 Wi Fi Internet Viewing ...

Страница 25: ...ct to the Wi Fi network before showing the connection status Pictures A9 A10 If connection fails please tap Retry and repeat the steps starting from 5 3 4 Tap View Camera to view the video captured by the Camera Unit The LED indicator on the Camera Unit will light up in blue A7 A8 A9 A10 ENGLISH Android TM Wi Fi Internet Viewing 25 ...

Страница 26: ...at the Camera is ready for setup 5 4 2 Download Hubble for Motorola Monitors App Go to App Store to search for Hubble for Motorola Monitors Download Hubble for Motorola Monitors App and install it on your iPhone iPad 5 4 3 Run Hubble for Motorola Monitors App on iPhone iPad Ensure that your iPhone iPad is connected to your Wi Fi Router Run the Hubble for Motorola Monitors App enter your account in...

Страница 27: ... Camera to your account Tap on the top right corner of the screen to add camera Picture i2 The following Bluetooth setup instructions will appear on the screen Picture i3 i2 i3 iOS ENGLISH Wi Fi Internet Viewing 27 ...

Страница 28: ...for Motorola Monitors App to resume setup The following setup instructions will appear on the screen Picture i6 Note that if Bluetooth is on you will be brought to this step directly Wait for a couple of minutes for the Camera Unit to warm up and tap Continue when the Camera LED indicator starts to blink i4 i5 i6 28 Wi Fi Internet Viewing ...

Страница 29: ... The following will appear on the screen Pictures i7 i8 Name the location of your Camera Unit and tap Continue Pictures i9 i10 i7 i8 i9 i10 iOS ENGLISH Wi Fi Internet Viewing 29 ...

Страница 30: ...tworks Picture i12 Select your Wi Fi network and tap Continue Picture i13 Enter your Wi Fi password and tap Next Picture i14 It will take a few minutes for the Camera Unit to connect to the Wi Fi network before showing the connection status Pictures i15 i16 i11 i12 i13 i14 30 Wi Fi Internet Viewing ...

Страница 31: ...tap Retry and repeat the steps starting from 5 4 4 Tap View Live Camera to view the video captured by the Camera Unit The LED indicator on the Camera Unit will light up in blue i15 i16 iOS ENGLISH Wi Fi Internet Viewing 31 ...

Страница 32: ...og to access the video record list that is triggered by Motion or Sound detection Tap Account to access user Profile subscription Plan Notifications setting Remote Connection Setting and About Hubble Photo Video Take a photo or record a video from your Camera Tap the Video icon to activate Video function Tap and hold the red button to start recording and release to stop Tap the Camera icon to swit...

Страница 33: ...rature that was set in your Account Two way communication Tap to activate the function Press the round button once to speak through the Camera Unit Toggle the button again to listen to the audio feedback from the Camera Unit Speaker Tap to toggle speaker on or off Zoom Slide the scroll bar on the right hand side of the screen to zoom in or zoom out You can also use the pinch in and pinch out gestu...

Страница 34: ...ty of Sound Detection Motion Detection and to set Alerts for High temperature Up to 33 o C or 91 o F Low temperature down to 10o C or 50 o F Tap Settings to set Ceiling mount Brightness and Volume Add Camera Enter Add Camera procedures Delete All Events Tap to delete all events Select Events Check the box to select recorded event s Edit Events Tap to select and delete event s Delete Events Tap to ...

Страница 35: ...ing the Camera Note If your Camera is moved from one router e g home to another e g office or you have Camera setup issues then the Camera must be reset Please reset the Camera with the following procedures 1 Slide the ON OFF switch to OFF 2 Press and hold the PAIR button then slide the ON OFF switch to ON 3 Release the PAIR button when you hear a confirmation beep and wait for the Camera Unit to ...

Страница 36: ...mbol on the product user s guide and or box indicates this Some of the product materials can be re used if you take them to a recycling point By reusing some parts or raw materials from used products you make an important contribution to the protection of the environment Please contact your local authorities in case you need more information on the collection points in your area Dispose of the bat...

Страница 37: ...nent damage to the product which is not covered by the warranty Keep your Digital Video Baby Monitor away from hot humid areas or strong sunlight and do not let it get wet Every effort has been made to ensure high standards of reliability of your Digital Video Baby Monitor However if something does go wrong please do not try to repair it yourself contact Customer Service for assistance IMPORTANT A...

Страница 38: ...he screen by pressing any button Registration If the Baby Unit has lost its link with the Parent Unit Try recharging or replacing the battery pack If the Baby Unit is too far away it may be going out of range so move the Baby Unit closer to the Parent Unit Reset the Units by disconnecting them from the battery and electrical power Wait about 15 seconds before reconnecting Allow up to one minute fo...

Страница 39: ...avoid background noise or echoes ensure that there is enough distance between your device and the Wi Fi Camera Unit Use of other 2 4 GHz products such as Bluetooth systems or microwave ovens may cause interference with this product Keep the Wi Fi Camera Unit at least 5ft 1 5m away from these types of products or turn them off if they appear to be causing interference Lost connection Check yourWi F...

Страница 40: ...ss Account I am unable toreceive a newpasswordalthough I have used the Forgot password option 1 The e mail might have been sent to your Junk Mail Folder Please check your Junk Mail Folder 2 There might be a delay in getting your e mail Please wait a few minutes and refresh your email account Camera When I try to view the Camera I get aprompt for Camera firmware upgrade WhatshouldI do Please upgrad...

Страница 41: ...heck your wireless router settings For example for Buffalo brand routers there is an option called Wireless Isolation Please disable this option Connectivity Issues I am not able to access my Camera Please check if the Camera is within Wi Fi range Ifthe LEDonyour Camera is flashingslowly pleasetryto movetheCameraclosertotherouterfor betterWi Fi connectivityandtryagain Features The sound alert sett...

Страница 42: ...de Outofthe box the Camera is in Setup mode To resettoSetupmode pressandholdthe PAIR button on the Camera until you hear a beep Slow flashing 2 The Camera is either connecting to the router or haslost the linktotherouter Pleaseensurethatthe Camera is in the Wi Fi signal range LED is stable The Camera is connected to the Wi Fi network General Which platforms are supported for accessing myCamera Min...

Страница 43: ...gured it is a Local Camera When you are accessingyourCameraawayfromyour homeit is a Remote Camera You may be using 3G 4G or 4G LTE or a Wi Fi connectionoutside of your home General How do I download the App for Android and iOS devices Android Open the Google Play Store on your Android device Select Search Type in Hubble for Motorola Monitors The results will show the Hubble App Select to install i...

Страница 44: ... am not able to find my Camera during the last step and the setup fails Please reset the Camera to setup mode and try again Press and hold the PAIR button on the Camera until you hear a beep Wait for a minute for the Camera to restart When the Camera LED is flashing this indicates thatitisinsetupmode Nowrestartthe setup from your smartphone again Viewing Camera When I am in remote mode the videost...

Страница 45: ...t itmanufactured to befree from defects in materials and workmanship under normal consumer usage for the period outlined below This Warranty is your exclusive warranty and is not transferable THIS WARRANTY GIVES YOU SPECIFIC LEGAL RIGHTS AND YOU MAY HAVE OTHER RIGHTS THAT VARY BY STATE PROVINCE OR COUNTRY FOR CONSUMERS WHO ARE COVERED BY CONSUMER PROTECTION LAWS OR REGULATIONS IN THEIR COUNTRY OF ...

Страница 46: ...IVE REMEDY OF THE CONSUMER AND IS PROVIDED IN LIEU OF ALL OTHER WARRANTIES EXPRESS OR IMPLIED IN NO EVENT SHALL MOTOROLA OR BINATONE BE LIABLE WHETHER IN CONTRACT OR TORT INCLUDING NEGLIGENCE FOR DAMAGES IN EXCESS OF THE PURCHASE PRICE OF THE PRODUCT OR ACCESSORY OR FOR ANY INDIRECT INCIDENTAL SPECIAL OR CONSEQUENTIAL DAMAGES OF ANY KIND OR LOSS OF REVENUE OR PROFITS LOSS OF BUSINESS LOSS OF INFOR...

Страница 47: ...subjecting the Product or Accessory to abnormal usage or conditions or d other acts which are not the fault of MOTOROLA or BINATONE are excluded from coverage Use of Non Motorola branded Products and Accessories Defects or damage that result from the use of Non Motorola branded or certified Products or Accessories or other peripheral equipment are excluded from coverage Products Covered Length of ...

Страница 48: ...l receive instructions on how to ship the Products or Accessories at your expense and risk to a BINATONE Authorised Repair Centre To obtain service you must include a the Product or Accessory b the original proof of purchase receipt which includes the date place and seller of the Product c if a Warranty card was included in your box a completed Warranty card showing the serial number of the Produc...

Страница 49: ...le to this product Conformity to the essential requirements of the legislation s have been demonstrated by using the following standards see item 04 a simplified summary of used standards specifications should go here Health and Safety Art 3 1 a EN 62311 2008 EN 60950 1 2006 A11 A1 A12 A2 EMC Art 3 1 b EN 301 489 1 V2 2 1 Draft EN 301 489 17 V3 2 0 Draft Spectrum Art 3 2 EN 300 328 V2 1 1 Specific...

Страница 50: ...RNING Use only with supplied power supply Frequency Band 2400 MHz to 2483 5 MHz Image Sensor colour CMOS 1M Pixels Operating Temperature Arange 0 C 50 C S005BNB0500100 Tenpao Input 100 240V AC 50 60Hz 150mA Output 5 0V DC 1000mA 50 Technical Specifications ...

Страница 51: ...Tenpao Input 100 240V AC 50 60Hz 150mA Output 5 0V DC 1000mA WARNING Use only with provided power supply Battery JSTHIGH AAA 3 6V 900mAh or GPI GPRHCH93C021 Ni MH rechargeable battery pack WARNING Do not use non rechargeable batteries for the Parent Unit You risk the chance of explosion if the battery is replaced by an incorrect type Dispose of used batteries according to the instructions Operatin...

Страница 52: ...vice mark of Apple Inc Google Play Android and Chrome are trademarks of Google Inc Wi Fi is a trademark of the Wi Fi Alliance Internet Explorer and Windows are trademarks of the Microsoft group of companies Firefox is a registered trademark of the Mozilla Foundation Adobe and Flash are either registered trademarks or trademarksof Adobe Systems Incorporated Java is a registered trademarkofOracleand...

Отзывы: