en
read me
Caution: before using your phone, please read the safety,
regulatory and legal information provided with your product.
3 r d G E N E R A T I O N
motorola.com
This product meets the applicable national or
international RF exposure guidance (SAR guideline)
when used normally against your ear, or when worn
or carried, at a distance of 1.5 cm from the body.
The SAR guideline includes a considerable safety
margin designed to ensure the safety of all persons,
regardless of age and health.
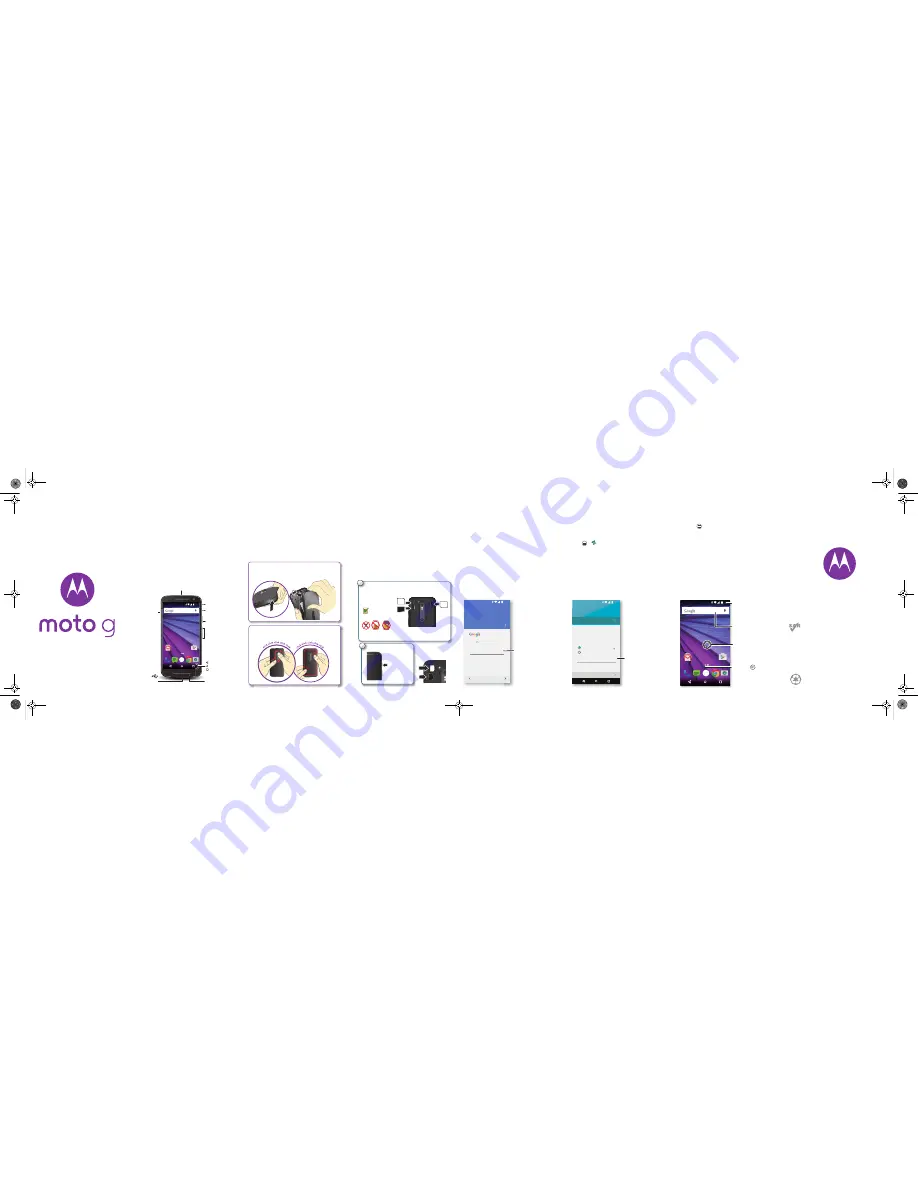
At a glance
Let's get started. We'll guide you through startup and tell
you a bit about your phone's features.
And when you're ready, customise your phone to match
your style with Motorola Shells (sold separately and not
available in all countries).
Note:
software updates happen frequently, so your
phone may look a little different.
Play Store
11:35
Volume keys
Power button
Micro USB/
charger
Microphone
Micro SIM card slot
(under back cover)
microSD memory
card slot
(under back cover)
Second
micro SIM
card slot
(under back
cover)
Back
Home
Overview
TV antenna or headset jack
Start
Remove the back cover
Your phone is water resistant,* but it depends on you
putting the cover on properly. You may need to remove
the cover to insert cards, but be sure to replace it
properly to ensure water resistance.
Caution:
don't use tools to remove the cover—doing so
may damage your phone.
Put your finger in the bottom corner hole in the cover and
pry it off. Don't be afraid to use a little muscle.
Take off the back cover.
Put on the back cover.
Press all the way around the camera area and the
cover's edges for a water-resistant seal.
Take off the back cover.
Put in the cards & power on
Caution:
make sure you use the correct size SIM cards,
don't cut the SIM card and don't use adapters with your
SIM cards.
Dual SIM phone settings
To set up a dual SIM phone, insert both SIM cards, turn
on your phone and follow the prompts. Then drag down
the status bar at the top of the home screen and touch
Welcome to your dual SIM
.
Power on.
Press and hold
Power until the
screen lights
up.
P
P
2
1
Put in the SIM and memory cards.
With the gold contacts facing down, push in a card.
Micro SIM
Mini
SIM
Nano SIM
& Adapter
Micro SIM 1
microSD
(optional)
Micro
SIM 2
Note:
the memory
card (microSD) won't
go in as far as the SIM.
Sign in
If you use Gmail™, you already have a Google™
account—if not, you can create an account during
setup. Signing in to your Google account lets you use
Google apps, see your contacts, appointments, photos
and more.
Select your language and follow the screen prompts to
get started.
Enter your email
OR CREATE A NEW ACCOUNT
Add your account
SKIP
11:35
i
Sign in to get the most out of your
device.
Sign in to see your
contacts, appointments
and photos.
Motorola Migrate
Copying your personal stuff from your old
Bluetooth-enabled phone to your new phone is easy.
Note:
if your old phone is an Android™ phone,
download the Motorola Migrate app on Google Play™
on your old phone before you get started.
Find it:
on your new phone, touch
Apps
>
Migrate
Migrate your stuff
EXIT
NEXT
Send data TO this device
Send data FROM this device
11:35
Copy stuff from your old phone to this
one in just a few minutes.
You may be able to transfer photos,
videos, music, call history, messages,
contacts and more.
Select your old phone type
Select your old
phone type.
Home screen & apps
Home screen & settings
From the Home screen, you can explore apps, check
notifications, speak commands and more.
•
Add a shortcut to a home screen page:
touch
Apps
, touch and hold an app, then drag it to your
home screen.
•
Customise:
to change your Wi-Fi, brightness and
more, drag the status bar down with two fingers.
Play Store
11:35
Search by typing or say
"OK, Google".
Touch Apps to
see all your apps.
Swipe down with one finger for
notifications or with two fingers
for settings.
Touch and hold an empty
spot to change widgets,
wallpaper and more.
MotoG_GSG_en-GB_68017927005A.fm Page 1 Wednesday, May 27, 2015 3:01 PM