background image

18

Remote Control

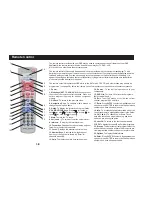
The remote control provided with your DSR may be used to operate and access all features of your DSR.
Additionally, the remote control may also be used to operate your TV, DVD, VCR,
A/V receiver, and other home theater components.

The remote control utilizes two AA batteries which were provided with your equipment packaging. To add
batteries to the remote control, remove the cover on the center back of the remote control by pressing down the
latch and pulling outward. Position each battery in the compartment so that the flat base of the battery (-) is
against the spring and the raised contact of the battery (+) is against the flat terminal. Make sure the batteries
are securely seated and replace the panel.

The remote contol will operate the DSR while in the SAT mode. TV, VCR, and other modes may need to be
programmed  (see page 20) before the remote control will operate your specific home theater components.

2

3

4

5

6

7

8

9

10

11

12

13

1

16

17

18

19

20
21

22

23

24

15

14

1. Power.

2. Mode keys (SAT, TV, VCR, AUX).

 Press once to set

the mode of the remote control functions. Press and
hold to program the mode for specific component
models.

3. Go Back. 

To return to the previous menu.

4. Navigation Keys. 

To navigate within menus or

change channel up and down.

5. Guide.

 To display the Interactive Program Guide.

6. DVR/DVD/VCR Keys.

 Press       for rewind or

back,    for play,       for fast-forward or skip,     for
record,    for stop, and    for pause.

7. Mute. 

To mute the TV sound.

8. Vol (+ and -).

 To raise or lower the volume level.

9. Interests. 

To display the Interests  menu.

10. Favourites. 

Changes the channel using only your

favourite (pre-selected) channels.

11. Locks. 

Displays the parental controls menu.

12. Number Keys.

 Enter the three-digit channel

number, or the number followed by “Enter” for
channels below 100.

13. Help.

 To display the main help screen menu.

14. Source.

 To control the input source to your

components.

15. DVR List.

 To view a list of recorded programs.

(Select models only.)

16. Exit. 

To exit all menus or to view the current

channel, program title, and time.

17. Enter. 

Press ENTER to select a highlighted menu

option, or press ENTER to tune in the channel whose
numbers you have already pressed.

18. Info. 

To display detailed information about the

current program or a highlighted program in the Guide.

19. Ch (+ and -).

 To channel up or down. These

keys also function as page (screen) up and down
when you are viewing the guide.

20. Last Ch. 

To return to the last channel viewed.

21. PPV.

 To display the current Pay-Per-View programs.

22. Browse.

 To display the current program title at the

bottom of the screen, and activate the browser to pre-
view program title on other channels or at a later time.

23. Options. 

To display the Main Menu.

24. Enter. 

Press ENTER to select a highlighted menu

option, or press ENTER to tune in the channel whose
numbers you have already pressed.

Содержание DSR500 Series

Страница 1: ...DSR500 User Guide DSR500 Series ...

Страница 2: ...rtant operating and maintenance servicing instructions in the literature accompanying the appliance This installation should be made by a qualified service person and should conform to all local codes REPAIRS If you find the unit in need of repair contact your system provider for repair or replacement NOTE TO SYSTEM INSTALLER The purpose of this reminder is to call your attention toArticle 820 40 ...

Страница 3: ...cal shock Do not spill liquid of any kind on the unit Overloading Do not overload power outlets or extension cords This can result in a risk of fire or electrical shock Power Lines Do not locate the satellite antenna system near overhead power lines electrical light or power circuits or where it can fall into power lines or circuits When installing a satellite antenna system avoid dangerous contac...

Страница 4: ...tances it may be necessary for your telephone company to request information from you concerning the equipment which you have connected to your telephone line Upon request of your telephone company provide the FCC registration number and the Ringer Equivalence Number REN of the equipment which is connected to your line both of these items are listed on the equipment label The sum of all the REN s ...

Страница 5: ...p or bottom of each transmitted page or on the first page of the transmission the date and time that it is sent and an identification of the business or other entity or other individual sending the message and the telephone number of the sending machine or such business other entity or individual The telephone number provided may not be a 900 number or any other number for which charges exceed loc...

Страница 6: ...n of this device does not enable or entitle the possessor to receive DigiCipher II television signals Contact program providers to obtain appropriate authorization WARNING The unauthorized modification of any decoder and the sale and use of any such decoder is prohibited by law Any such modification or alteration of this product or any unauthorized reception of television programming could subject...

Страница 7: ... 13 Authorizing Your Receiver 14 System Settings 15 Option 1 View and Lang Settings 15 Option 2 Audio Settings 16 Option 3 Installation Settings 16 Option 4 Video Settings 17 Option 5 Video Adjustments 18 Option 6 System Status 18 Remote Control 19 Remote Control Basic Key Functions 19 Programming 20 Specifications 27 ...

Страница 8: ...timer is set A flashing light indicates the DSR is tuned to a timer program or within two minutes of a timer program DSR Basics 1 2 3 4 5 6 9 10 11 12 13 7 8 7 GO BACK To return to a previous menu or the last channel viewed 8 OPTIONS To display the Main Menu 9 NAVIGATION To navigate within menus or change channels up and down 10 SELECT To select a highlighted menu option 11 HDTV MODE SELECT Toggle...

Страница 9: ...VCR with the receiver 21 ANTENNA INPUT For analog off air broadcast antenna 22 RF OUTPUT 22 18 20 14 15 16 17 19 21 24 26 25 27 28 30 29 23 23 CH3 4 SWITCH To set the RF output to channel 3 or 4 24 COMPOSITE VIDEO OUTPUTS 25 STEREO AUDIO OUTPUTS R L 26 ELECTRICAL DIGITAL AUDIO OUTPUT 27 S VIDEO OUTPUT 28 OPTICAL DIGITAL AUDIO OUTPUT 29 COMPONENT VIDEO OUTPUT Y Pb Pr 30 SATELLITE INPUT Back Panel ...

Страница 10: ...and home theater A V receiver Audio The modulated RF output also provides audio along with video to televisions or VCRs good Utilize the stereo audio output better or the electrical or optical Digital audio outputs best to connect the DSR directly to your television VCR and home theater A V receiver PPV Connect the telco phone jack to a home telephone jack for Instant Pay Per View IPPV reportback ...

Страница 11: ...nd native modes Native mode 0000 is the original transmitted signal You should leave this on native mode unless your TV or monitor requires a specific mode such as 1080i If you are using the RF output tune your TV to channel 3 or 4 to match the position of the channel 3 4 switch on the back panel of the satellite receiver Home theater A V receivers can provide a method to connect multiple input so...

Страница 12: ...n press the ENTER key to select it If the options are numbered simply press the number key to select To use the keys on the front panel of the receiver press the MENU key to first display the Main Menu screen Then press the34keys or the56keys to highlight an option Then press the SELECT key to select the highlighted option The remainder of this section provides instructions for various installatio...

Страница 13: ...option 7 and the menu will appear Line A shows your Unit ID number which you or your installer will need to provide to authorize your unit Once this unit ID number is provided press GO BACK to return to the System Settings menu Select Installation Settings option 3 then select Reportback option 3 to view the Trip Count When your receiver has received the authorization message the Trip Counter will...

Страница 14: ... Messages TTAs The choices are English eng or French fre The default setting is English GUI Language The GUI Graphical User Interface Language option allows you to select the language of the on screen menus for your programs The choices are English eng or French fre The default setting is English Clock on During Standby Enabling this option will allow a clock to appear on the segmented front panel...

Страница 15: ...igital audio jacks The options are PCM and Dolby Digital The default is Dolby Digital Systems Settings Option 3 Installation Settings The Installation Settings menu allows you to tune in the satellite signal change the remote control address and initiate a manual reportback 1 Tune in Satellite Signal This option is for the installer use only 2 Remote Control Address This option allows you to set t...

Страница 16: ...ttings to manually format how closed captions are displayed Utilize the user settin sub menus to modify the color opacity background and font attributes of the available hi def closed captions System Settings Option 5 Video Settings This menu allows you to set the TV output aspect ratio and select a method of conversion when the original aspect ratio does not match your TV TV Type Select one of th...

Страница 17: ...displays information about the status of the receiver Authorization Screens Sometimes when you tune to a program an Authorization screen will appear It will fade to black after a short time it will reappear when The channel or program is locked out because of your parental control setting which requires you to enter a password If you have not set a password just press the ENTER key The receiver is...

Страница 18: ... 6 DVR DVD VCR Keys Press for rewind or back for play for fast forward or skip for record for stop and for pause 7 Mute T o mute the TV sound 8 Vol and To raise or lower the volume level 9 Interests To display the Interests menu 10 Favourites Changes the channel using only your favourite pre selected channels 11 Locks Displays the parental controls menu 12 Number Keys Enter the three digit channel...

Страница 19: ...ur digit codes and the remote control does not work correctly you may be able to find a code that works by using the scan process Turn on the TV Press and hold the TV mode key on the remote control until the mode keys on the remote begin to flash While pointing the remote control at your TV press the UP navigation key to scan upward to the next code Use the DOWN key to return to the previous code ...

Страница 20: ...pted the Master Power command To cancel the Master Power feature just repeat the steps above Volume Control Crossover Your remote control is programmed from the factory to control the volume of your television set when you re using the remote control in the TV mode You can choose to have the SAT mode control the volume of your television directly instead The AUX mode can also be programmed to cont...

Страница 21: ...4 1225 Craig 1021 1041 1203 Crown 1026 1041 Curtis Mathes 1006 1016 1018 1023 1026 1041 1059 1090 1125 1131 1151 1163 1172 1192 1194 1224 Daewoo 1005 1023 1024 1026 1029 1030 1032 1130 1146 1172 1224 Daytron 1024 1026 1192 1194 1224 Dimensia 1125 Dixi 1120 1146 Dumont 1001 Electrohome 1026 1149 1224 Emerson 1017 1023 1026 1028 1033 1034 035 1037 1038 1039 1041 1090 1122 1132 141 1143 1163 1172 117...

Страница 22: ...57 1060 Video Concepts 1070 Vidtech 1005 1023 1172 1173 Viking 1022 Wards 1005 1006 1008 1018 1023 1034 1043 1044 1067 1068 1119 1125 1141 1151 1163 1172 1173 1182 1192 1194 1207 1224 Westinghouse 1037 1041 1090 1130 1176 Yamaha 1005 1006 1163 Yorx 1192 1194 Zenith 1001 1018 1024 1178 Zonda 1120 VCR Codes ASA 2065 2134 Admiral 2085 2178 Aiwa 2056 2088 2202 Akai 2008 2013 2014 2015 2016 2018 2019 2...

Страница 23: ... 2158 2173 2175 Semp 2034 2080 Sentra 2046 Sharp 2068 2085 2130 2161 2178 Signature 2085 2088 Sony 2000 2001 2002 2054 2158 Soundesign 2088 Sylvania 2050 2054 2065 2067 2070 2076 2088 2111 2134 2136 2137 2139 2154 2158 2159 2169 Symphonic 2088 TMK 2006 2091 2190 Tandy 2049 2068 2081 2082 2084 2085 2088 2161 Tashiko 2088 Tatung 2013 2086 Teac 2013 2086 2088 Technics 2054 2114 2138 2154 2158 Teknika...

Страница 24: ... 4054 Audio Matrix 4209 Audio Source 4155 Remote Control B K 4026 Bose 4020 4211 Capetronic 4253 Carver 4025 4083 4091 4093 4094 4147 Casio 4021 4170 Cinema Sound 4036 Citation 4052 4212 Clarion 4059 Curtis Mathes 4021 Daewoo 4105 Denon 4036 4106 4107 4108 4109 4110 Emerson 4163 Fisher 4083 4087 4147 4158 Fujitsu 4250 Garrard 4075 4163 General Electric 4067 4159 Goldstar 4112 Harman Kardon 4039 40...

Страница 25: ...amaha 5234 5251 Zenith 5219 5223 5251 CD Player ADC 3004 Aiwa 3000 3001 Burmeister 3006 California Audio 3024 Carver 3002 DKK 3008 Denon 3003 Fisher 3005 Genexxa 3011 3013 3014 Harmon 3007 3009 3010 Jensen 3012 Kenwood 3016 3017 Linn 3015 MTC 3006 Magnavox 3019 Mission 3015 NSM 3015 Nakamichi 3020 Nikko 3013 3018 Onkyo 3021 3022 Optimus 3023 Panasonic 3025 3026 3027 Polk Audio 3030 QED 3015 Quasar...

Страница 26: ...p pmaximum Differential phase 5 0deg p pmaximum S N 57 dB minimum unified weighting 100 kHz HPF 5MHz LPF Optical DigitalAudio Optical power output 0 032mw max Wave length 660mm typ 30mm Cable length 3 meter max not provided Electrical DigitalAudio Stereo Audio Modes Digital baseband stereo Fixed volume output volume control is from TV only Frequency response 1 0 dB maximum 20 Hz to 20 kHz RF Outpu...

Страница 27: ...from date of purchase Call our Customer Care Centre 1 888 554 STAR to see if we can help you troubleshoot the problem on the spot If it can t be fixed over the phone you ll be given a Return Tracking Code RTC and fail code needed to return the remote for warranty coverage Shipping fees may apply We ll have a replacement delivered to you RECEIVER REMOTE CONTROL WARRANTYENTITLEMENT WILLNOTAPPLY IN T...

Страница 28: ...ent Trademark Office All other product or service names are the property of their respective owners Manufactured under license from Dolby Laboratories Dolby ProLogic and the double D symbol are trademarks of Dolby Laboratories Motorola Inc 2003 2004 505721 001 C ...

Отзывы: