background image

Damaged Antennas 

Do not use the radio with a damaged antenna. If a damaged antenna comes in contact
with the skin, a minor burn may result.

Batteries

All batteries can cause property damage and/or bodily, injury or burns if a conductive
material such as jewelry, keys or beaded chains touches exposed terminals. The
material may complete an electrical circuit (short circuit) and become quite hot.
Exercise care in handling any charged battery, particularly when placing it inside a
pocket, purse or other container with metal objects.

For Vehicles With an Air Bag

Do not place a portable radio in the area over an air bag or in the air bag deployment
area. Air bags inflate with great force. If a portable radio is placed in the air bag
deployment area and the air bag inflates, the radio may be propelled with great  force
and cause serious injury to occupants of vehicle. 

Potentially Explosive Atmospheres

Turn your radio OFF when in any area with a potentially explosive atmosphere, unless
it is a type especially qualified for such use (for example, Factory Mutual Approved).
Sparks in such areas could cause an explosion or fire resulting in bodily injury or even
death. These radios are not Instrinsically Safe. If you need an Instrinsically Safe radio,
contact Motorola at 1-888-567-7347.


Batteries

Do not replace or charge batteries in a potentially explosive atmosphere. Contact
sparking may occur while installing or removing batteries and cause an explosion.


Blasting Caps and Areas

To avoid possible interference with blasting operations, turn your radio OFF near
electrical blasting caps or in a “blasting area” or in areas posted: “Turn off two-way
radio”. Obey all signs and instructions.

Note: Areas with potentially explosive atmospheres are often, but not always, clearly
marked. They include fuelling areas such as below deck on boats, fuel or chemical
transfer or storage facilities; areas where the air contains chemicals or particles, such
as grain, dust, or metal powders; and any other area where you would normally be
advised to turn off your vehicle engine.


 !"#

$


)#!#*

$

Содержание 6880906Z72-O

Страница 1: ......

Страница 2: ...he forms faxed to you by the FCC call the FCC Fax On Demand system at 1 202 418 0177 from your Fax machine and request document 000600 for all forms and instructions To have the forms mailed to you call the FCC forms hotline at 1 800 418 FORM 1 800 418 3676 For questions concerning the license application contact the FCC at 1 888 CALL FCC 1 888 225 5322 Or http www fcc gov Before filling out your ...

Страница 3: ...o a Selected Channel 12 Exiting Programming Mode 12 Programming the Code 13 Frequency and Code Verification13 Spirit GT Series Features Display Light 14 Auto Reset 14 Time out Timer 14 Lock 15 Spirit GT Features Channel Scan Spirit GT Only 16 Activating Scan Feature 16 Pausing on a Channel 16 Hands Free Use Enabling VOX 17 Setting VOX Sensitivity 18 Additional Information Accessories 19 Talk Range...

Страница 4: ...ul communications tool these line of site radios can communicate up to 4 miles in clear unobstructed environments Contents of Package Radio Holster NiMH Battery 3 Hour Charger Adapter Literature Not shown Owner s Manual Warranty Card Quick Reference Guide 1 Channel Model 2 Channel Model On Off Volume Knob Used to adjust volume turn radio on or off LED Indicator Light Indicates radio is on will be ...

Страница 5: ...ton Used to transmit messages Monitor Button Monitors frequency activity Used with On Off Volume Knob to adjust volume Charging Connector Used for charging battery Figure 1 3 Please read this manual carefully to ensure you know how to properly operate the radio before use FCC License required Antenna Not removable GT Model Shown ...

Страница 6: ...n with normal use Standard 5 5 90 duty cycle 5 transmit 5 receive 90 standby Removing the Battery Door 1 Grasp radio with one hand display side down do not hold radio antenna 2 Slide battery door back half way until you feel resistance Figure 3 3 Remove battery door from radio by lifting door up as shown Figure 4 Figure 2 Figure 3 4 Figure 4 Step 1 Step 2 Step 3 ...

Страница 7: ...si tioning it halfway up the radio body Figure 6 4 Push battery door up until secure Stop Sign The NiMH battery has a stop sign symbol to remind you to turn the battery over and align holes with pegs before inserting battery into the radio contact sides down Figure 7 When power is low recharge the battery immediately to avoid interrupted use 5 Figure 5 Figure 5 Figure 7 Figure 6 ...

Страница 8: ...ery life battery should not be left charging for extended periods Do not transmit while radio is charging Transmitting while radio is charging can cause transmitter or charger to operate improperly Turn radio off when charging If radio is on while charging at least twice as much time is required to charge the battery The battery may also be charged outside of the radio LED Color Charging Status Co...

Страница 9: ...rola NiMH rechargeable battery included with your radio Low Battery Alert When the battery is low the radio will beep 3 to 4 seconds after turning power on every 10 minutes in standby mode after releasing Push To Talk button after releasing the Call button Note Remove battery before storing your radio for extended periods Battery may corrode over time and cause permanent damage to your radio Figur...

Страница 10: ...base of the radio in bottom of holster 2 Push the radio towards the holster until it latches into place Figure 11 3 To remove radio from holster pull the top tab on holster away from radio Figure 12 4 Attach radio in its holster to your belt or waistband Figure 13 Figure 11 Figure 12 Figure 13 8 ...

Страница 11: ...s F1 through F8 to channel 1 for the Spirit GT one channel radio or to channel 1 or 2 for the Spirit GT two channel radio Interference Eliminator Codes Codes filter out static noise and unwanted messages on radio channels Since radio channels can be monitored this will not make your conversations private To avoid a congested frequency change radio s frequency code setting See chart on page 27 for ...

Страница 12: ...4 Note When you turn the radio on you are in normal operating mode Adjusting the Volume Hold Monitor button down to listen to audio level while rotating On Off Volume Knob Rotate clockwise to increase and counterclockwise to decrease volume Monitoring Channel Activity The Monitor button is used to check activity on current frequency before transmitting Check frequency activity by pressing the Moni...

Страница 13: ...tton once Call Tone number flashes Figure 15 2 Use Scroll button to select one of the four Call Tones Disabling Call and Alert Tones 1 Turn the radio off 2 Hold down the Monitor button while you turn radio on again 3 To re activate Alert Tones turn the radio off then on again while holding the Monitor button down Transmitting Messages Check frequency activity by pressing Monitor button You ll hear...

Страница 14: ...5 seconds then release the Push To Talk button 2 Use Scroll button to select one of the 8 frequencies Figure 16 3 On a Spirit GT press the Monitor button 4 The current channel will flash press scroll button to change channel 5 After the second channel is selected press Monitor button again current frequency for second channel will flash Figure 16 6 Use Scroll button to select new frequency Exit Pr...

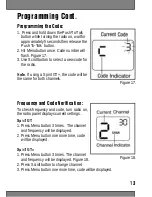
Страница 15: ...a Spirit GT the code will be the same for both channels Frequency and Code Verification To check frequency and code turn radio on the radio panel displays current settings 1 Press Menu button 3 times The channel and frequency will be displayed 2 Press Menu button one more time code will be displayed 1 Press Menu button 3 times The channel and frequency will be displayed Figure 18 2 Press Scroll bu...

Страница 16: ...le features back to the original factory settings 1 Turn radio off 2 Hold down both the Monitor and Push To Talk buttons while turning the radio on Radio emits audible confirmation tone The Time out Timer feature helps extend battery life by preventing accidental transmission If the Push To Talk button is pressed for 60 continuous seconds the radio will emit a warning beep approximately 4 seconds ...

Страница 17: ... tally Activating Lock Feature Press and hold the Lock or Scan Lock button until LOCK appears on the display Disabling Lock Feature 1 Press and hold Lock or Scan Lock button until LOCK disappears 2 Radio emits audible tone to confirm lock and unlock feature activation Disabled buttons will beep if pressed when AlertTones are enabled Figure 19 15 ...

Страница 18: ...adio on press and release the Scan Lock button SCAN appears on the display flashing Figure 20 2 When the radio detects frequency activity SCAN stops flashing and the active chan nel and code are displayed 3 If you want to talk back on this channel code press Push To Talk button within 5 seconds or radio will return to scanning 4 To turn off the Scan feature and return to normal operation mode pres...

Страница 19: ...r your voice in the ear piece confirming you are transmitting To receive stop talking Note There ll be a brief delay between when you start stop talking and transmission time You ll hear transmissions through the audio accessory s earpiece sold separately Pressing Push To Talk button disables VOX Resetting to Push To Talk Mode 1 Press Push To Talk button once VOX display will disappear 2 To transm...

Страница 20: ...OX will appear on display along with the cur rent VOX setting which will flash Figure 22 3 Use Scroll buttons to select sensitivity level Three Sensitivity Levels 1 Lowsensitivity high levels of background noise 2 Medium sensitivity used in most applications 3 High sensitivity low levels of background noise Note The radio will return to normal operation mode after 10 seconds or after you press the...

Страница 21: ...mmunications needs The right accessory can enhance produc tivity and can help you increase customer satisfaction For information contact your place of purchase or call Motorola at When using audio accessories the radio s volume should be kept at a com fortable listening level Before you place the audio accessory on your head or in your ear turn down the volume 8 ...

Страница 22: ...he following environments To clean the radio wipe with a soft cloth dampened with water Don t use cleaners or solvents on the radio they can harm the body and leak inside causing permanent damage Battery contacts may be wiped with a dry lint free cloth If the radio gets wet turn it off and remove battery immediately Dry battery compartment with a soft cloth to minimize potential water damage Leave...

Страница 23: ...g pressed Reposition replace or charge battery Buildings obstructions operating indoors or in vehicles may interfere with communica tion Change your location Make sure volume is turned up Confirm Interference Eliminator Code is set active settings are 1 38 Shared frequency or Interference Eliminator Code may be in use change frequency or code Steel concrete structures heavy foliage and use in resi...

Страница 24: ... information Recharge NiMH battery Extreme operating temperatures will affect the life of the battery Charger pin is not properly in place Check to make sure the charger pin is fully inserted into the radio If so allow the radio to charge until the LED glows solid green Make sure charger is plugged into a power source Remove battery from radio and try to charge separately If the radio still doesn ...

Страница 25: ... F Electromagnetic Fields To assure optimal radio performance and to ensure that exposure to RF energy is within the guidelines in the above standards the following operating procedures should be observed When transmitting with a two way portable radio Hold radio in a vertical position with its microphone 2 3 inches 5 0 to 7 5 cm away from your mouth Keep antenna at least 1 inch 2 5 cm from your h...

Страница 26: ... any area with a potentially explosive atmosphere unless it is a type especially qualified for such use for example Factory Mutual Approved Sparks in such areas could cause an explosion or fire resulting in bodily injury or even death These radios are not Instrinsically Safe If you need an Instrinsically Safe radio contact Motorola at 1 888 567 7347 Batteries Do not replace or charge batteries in ...

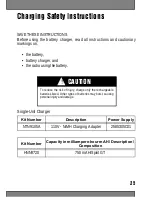
Страница 27: ... the battery Single Unit Charger Kit Number Description Power Supply NTN9105A 110V NiMH Charging Adapter 2585305C01 Kit Number Capacity in milliampere hour mAH Description Composition HNN9720 750 mAH Spirit GT To reduce the risk of injury charge only the rechargeable batteries listed Other types of batteries may burst causing personal injury and damage 3 ...

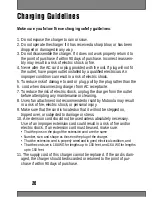
Страница 28: ...the charger from the outlet before attempting any maintenance or cleaning 8 Use of an attachment not recommended or sold by Motorola may result in a risk of fire electric shock or personal injury 9 Make sure that the cord is located so that it will not be stepped on tripped over or subjected to damage or stress 10 An extension cord should not be used unless absolutely necessary Use of an improper ...

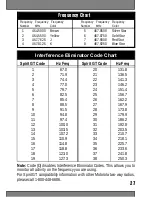
Страница 29: ... 14 15 16 17 18 19 67 0 71 9 74 4 77 0 79 7 82 5 85 4 88 5 91 5 94 8 97 4 100 0 103 5 107 2 110 9 114 8 118 8 123 0 127 3 20 21 22 23 24 25 26 27 28 29 30 31 32 33 34 35 36 37 38 131 8 136 5 141 3 146 2 151 4 156 7 162 2 167 9 173 8 179 9 186 2 192 8 203 5 210 7 218 1 225 7 233 6 241 8 250 3 1 464 5000 Brown 2 464 5500 Yellow 3 467 7625 J 4 467 8125 K 56 5 467 8500 Silver Star 6 467 8750 Gold Star...

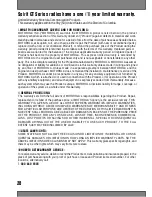
Страница 30: ...t not furnished by MOTOROLA which is attached to or used in connection with the Product or for operation of the Product with any ancillary equipment and all such equipment is expressly excluded from this warranty Because each system which may use the Product is unique MOTOROLA disclaims liability for range coverage or operation of the system as a whole under this warranty This warranty sets forth ...

Страница 31: ...ve sole controlof the defense of such suit and all negotiations for its settlementor com promise and c should the Product or parts become or in MOTOROLA s opinion be likely to become the subject of a claim of infringement ofa Unites States patent that such purchaser will permit MOTOROLA at its option and expense eithertoprocure for such purchaserthe rightto continue usingtheProductorparts or to re...

Страница 32: ... 6 1 States Patents Other Patents Pending ...

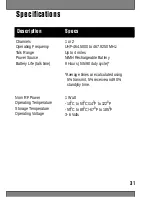
Страница 33: ...ge times are calculated using 5 transmit 5 receive and 90 standyby time Channels Operating Frequency Talk Range Power Source Battery Life talk time HVFULSWLRQ 6SHFV Nom RF Power Operating Temperature Storage Temperature Operating Voltage 1 Watt 100C to 500C 140F to 1220F 550C to 850C 670F to 1850F 3 6 Volts ...

Страница 34: ... 1 ...

Страница 35: ...1 ...

Страница 36: ... 0 6 8 8 0 9 0 6 Z 7 2 O ...

Отзывы: