Motorola 1.5 Скачать руководство пользователя страница 68

Help

ful T

ip

s

English

52

Taking Care of the Battery

Checking the Battery Charge Status

Your radio can indicate the battery’s charge status through:

the LED and sounds.

the fuel gauge icon on the display.

LED and Sounds

When your battery is low:

the LED blinks red when the 

PTT

 button is pressed.

you hear a low-battery “chirp” (short, high-pitched tone).

Fuel Gauge Icon

A blinking fuel gauge icon (

) is displayed only when the 

battery voltage drops to low level. In this case, replace with a 
fully charged battery.

*These are for IMPRES battery operation only.
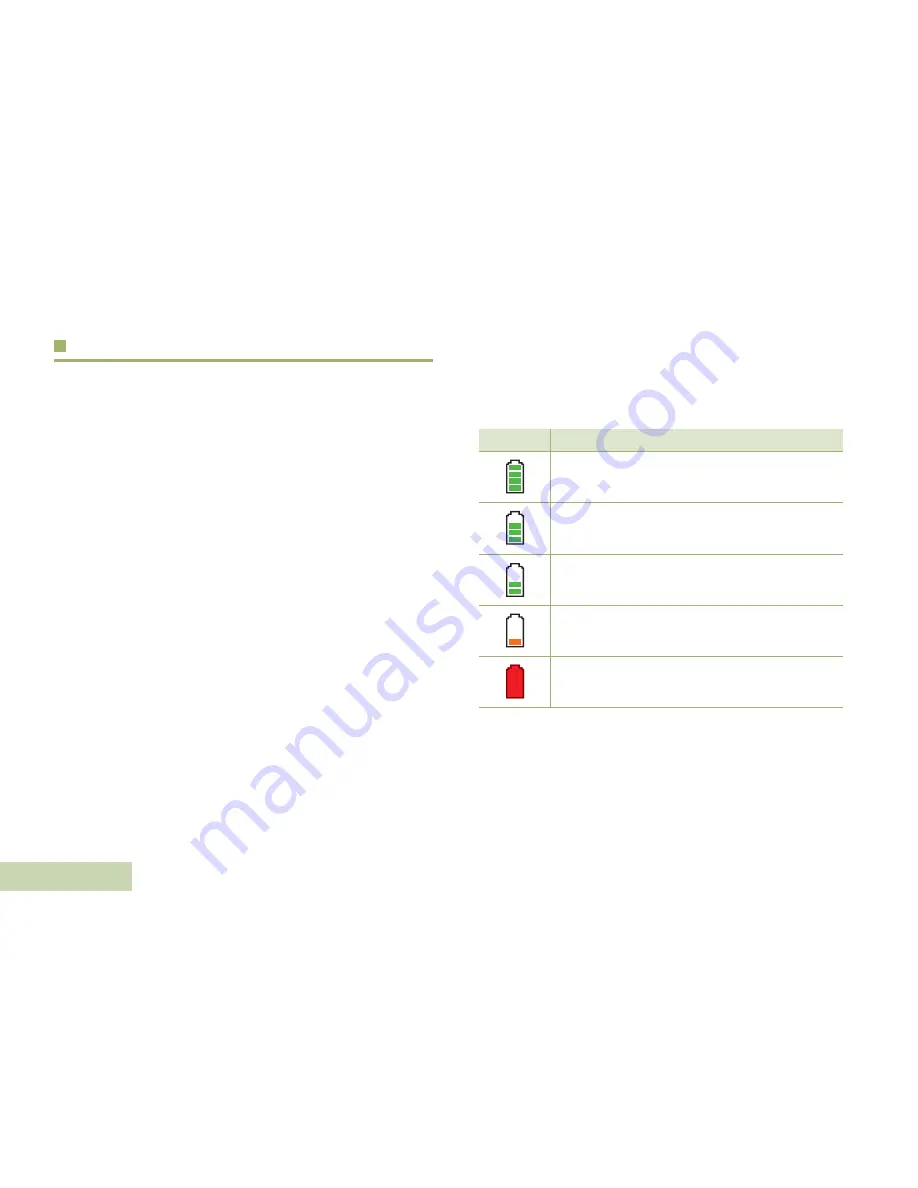
Gauge

Battery Charge

76% to 100% full*

51% to 75%*

26% to 50%*

 11% to 25%*

10% or less (at 10%, the gauge begins blinking.)

0

Содержание 1.5

Страница 1: ...APX 1000 APX TWO WAY RADIOS APX 1000 MODEL 1 5 USER GUIDE ...

Страница 2: ......

Страница 3: ...u Select button below Yes 1 Press the MFK to see on the screen 2 Turn the MFK to scroll to desired zone or channel 3 Press MFK to select the desired zone or channel and exit Mode Change Top Lightbar Side Button 1 __________ PTT Button Top Side Select Button __________ Main Speaker Microphone Side Button 2 __________ LED Menu Select Buttons Main Display Top Orange Button __________ 1 Select zone ch...

Страница 4: ...iving a call or data Transmitting a call or data Blinks when the battery is low The more stripes the stronger the signal strength for the current site trunking only Direct radio to radio communication or connected through a repeater On Direct Off Repeater This channel is being monitored L Radio is set at Low power H Radio is set at High power Scanning a scan list Blinking dot Detects activity on t...

Страница 5: ...nois 60196 U S A Phone Number 1 800 927 2744 Hereby declares that the product Model Name APX 1000 conforms to the following regulations FCC Part 15 subpart B section 15 107 a 15 107 d and section 15 109 a Class B Digital Device As a personal computer peripheral this device complies with Part 15 of the FCC Rules Operation is subject to the following two conditions 1 This device may not cause harmfu...

Страница 6: ...l interference to radio communications However there is no guarantee that interference will not occur in a particular installation If this equipment does cause harmful interference to radio or television reception which can be determined by turning the equipment off and on the user is encouraged to try to correct the interference by one or more of the following measures Reorient or relocate the re...

Страница 7: ...our radios bidirectionnelles portatives ix Version du logiciel x Avis aux utilisateurs FCC et Industrie Canada x Computer Software Copyrights xi Documentation Copyrights xi Disclaimer xii Getting Started 1 How to Use This Guide 1 Notations Used in This Manual 1 Additional Performance Enhancement 2 Dynamic System Resilience DSR 2 CrossTalk Prevention 2 What Your Dealer System Administrator Can Tell...

Страница 8: ... Zone 22 Selecting a Radio Channel 23 Using Mode Select Feature 24 Saving a Zone and Channel to a Softkey 25 Saving a Zone and Channel to a Button 25 Receiving and Responding to a Radio Call 26 Receiving and Responding to a Talkgroup Call 26 Receiving and Responding to a Private Call Trunking Only 27 Receiving and Responding to a Telephone Call Trunking Only 27 Repeater or Direct Operation 28 Moni...

Страница 9: ...king a Site 40 Viewing and Changing a Site 41 Viewing the Current Site 41 Changing the Current Site 41 Programming Over Project 25 POP 25 ASTRO 25 and ASTRO Conventional 41 Responding to the notification of Upgrade 42 Voice Announcement 42 Utilities 43 Selecting the Power Level 43 Enabling and Disabling the Radio Alias 44 Controlling the Display Backlight 44 Locking and Unlocking the Keypad and Co...

Страница 10: ...Disposal 53 Accessories 54 Highlights for the Accessories 54 Appendix Maritime Radio Use in the VHF Frequency Range 55 Special Channel Assignments 55 Emergency Channel 55 Non Commercial Call Channel 55 Operating Frequency Requirements 56 Declaration of Compliance for the User of Distress and Safety Frequencies 58 Glossary 59 Commercial Warranty 63 ...

Страница 11: ...otorolasolutions com APX Under Industry Canada regulations this radio transmitter may only operate using an antenna of a type and maximum or lesser gain approved for the transmitter by Industry Canada To reduce potential radio interference to other users the antenna type and its gain should be so chosen that the equivalent isotropically radiated power e i r p is not more than that necessary for su...

Страница 12: ...otice to Users FCC and Industry Canada This device complies with Part 15 of the FCC rules and RSS 210 of the Industry Canada rules per the conditions listed below 1 This device may not cause harmful interference 2 This device must accept any interference received including interference that may cause undesired operation 3 Changes or modifications made to this device not expressly approved by Motor...

Страница 13: ...ouvés par Motorola consultez le site Web http www motorolasolutions com APX Selon la règlementation d Industrie Canada cet émetteur radio ne peut être utilisé qu avec une antenne dont le type et le gain maximal ou minimal sont approuvés par Industrie Canada pour cet émetteur Afin de limiter les interférences radio pour les autres utilisateurs le type et le gain de l antenne doivent être choisis de...

Страница 14: ...Avis aux utilisateurs FCC et Industrie Canada Cet appareil est conforme à la Partie 15 des règlements de la FCC et RSS 210 du règlement d Industrie Canada selon les conditions énumérées ci dessous 1 Ce dispositif ne doit pas causer d interférences nuisibles 2 Cet appareil doit accepter toute interférence reçue y compris les interférences qui peuvent perturber le fonctionnement 3 Les changements ou...

Страница 15: ...ed reproduced modified reverse engineered or distributed in any manner without the express written permission of Motorola Furthermore the purchase of Motorola products shall not be deemed to grant either directly or by implication estoppel or otherwise any license under the copyrights patents or patent applications of Motorola except for the normal non exclusive license to use that arises by opera...

Страница 16: ...ity is assumed for inaccuracies Furthermore Motorola reserves the right to make changes to any products herein to improve readability function or design Motorola does not assume any liability arising out of the applications or use of any product or circuit described herein nor does it cover any license under its patent rights nor the rights of others ...

Страница 17: ...our radio for your specific needs Check with your dealer or system administrator for more information Notations Used in This Manual Throughout the text in this publication you will notice the use of WARNING Caution and Note These notations are used to emphasize that safety hazards exist and the care that must be taken or observed An operational procedure practice or condition etc which may result ...

Страница 18: ...ng especially when a wideband antenna is used This feature allows the adjustment of the Trident Transmitting SSI clock rate in the radio to be different from the Receiving Frequency This subsequently reduces the possibilities of radio frequency interfering spurs and it also prevents crosstalk What Your Dealer System Administrator Can Tell You Check with your dealer or system administrator for the ...

Страница 19: ...attery charge it for a minimum of 16 hours to ensure optimum capacity and performance For a list of Motorola authorized batteries available for use with your radio see Accessories on page 54 Note When charging a battery attached to a radio turn your radio off to ensure a full charge Battery Charger To charge the battery place the battery with or without the radio in a Motorola approved charger The...

Страница 20: ...e radio turned off slide the battery into the radio s frame until the bottom latch clicks into place To remove the battery turn the radio off Lift up the latch then slide the battery down to remove the battery from the radio Battery Latch is at the bottom of the battery ...

Страница 21: ...cessories to the radio Note To prevent damage to the connector shield it with the connector cover when not in use Insert the hooked end of the cover into the slot above the connector Press downward on the cover s top to seat it in the slot Once in place tighten by rotating the thumbscrew clockwise by hand To remove the accessory connector cover rotate the thumbscrew counterclockwise until it disen...

Страница 22: ...pward and away from your radio Turning On the Radio Press and hold the Multi Function Knob MFK until the radio display lights up then release the MFK If the power up test is successful you see the Home screen Note If the power up test is unsuccessful you see Error XX YY XX YY is an alphanumeric code Turn off your radio check the battery and turn the radio back on If your radio fails the power up t...

Страница 23: ... whenever the radio powers up To increase the volume turn the MFK clockwise The display shows volume bars and volume level when you change the volume Note If Volume Change is secondary feature of MFK see Multi Function Knob MFK on page 12 to toggle the function of the MFK To decrease the volume turn this MFK counterclockwise Note Ensure that the main speaker is pointed towards you for increased lo...

Страница 24: ...wing Radio Parts and Controls page 9 Programmable Features page 10 Assignable Radio Functions page 10 Assignable Settings or Utility Functions page 11 Accessing the Preprogrammed Functions page 11 Using the Menu Select Buttons page 12 Multi Function Knob MFK page 12 Push To Talk PTT Button page 13 ...

Страница 25: ... 5 6 7 Microphone 4 Top Orange Button 3 Battery Latch 8 Menu Select Buttons 10 Main Display 9 Multi Function Knob MFK Side Button 2 Side Button 1 14 Push to Talk PTT Button 17 Top Side Select Button Battery 11 13 Top Lightbar These radio controls buttons are programmable Speaker 15 Microphone 16 12 ...

Страница 26: ...itiates or cancels an emergency alarm or call Internet Protocol Address Displays the Internet Protocol IP address of the radio Mode Select Long press programs a button with the radio s current zone and channels then once programmed the short press of that button jumps the radio to the programmed zone and channel Monitor Conventional Only Monitors a selected channel for all radio traffic until func...

Страница 27: ...tings or Utility Functions Light Flip Press the button to toggle the display backlight on or off Keypad and Controls Lock Locks or unlocks the programmable buttons menu softkey and MFK Voice Announcement Audibly indicates the current feature mode Zone or Channel the user has just assigned Voice Mute Toggles voice mute on or off Volume Set Tone Sets the volume set tone Accessing the Preprogrammed F...

Страница 28: ...er Fast turn of MFK makes coarse tuning of the volume level slow turn of MFK makes fine tuning of the volume level The display shows the volume level and bars to indicate the current level The level of last selected volume before your radio powers down remains the same when the radio powers up The main display only shows the icon of secondary feature the main display does not show the icon of prim...

Страница 29: ...d down PTT button to talk Release the PTT button to listen The microphone is activated when the PTT button is pressed Identifying Status Indicators Your radio indicates its operational status through the following Status Icons page 14 Top Lightbar and LED Indicators page 16 LED Indications page 16 Top Lightbar Indications page 16 Intelligent Lighting Indicators page 17 Alert Tones page 18 Phone Ca...

Страница 30: ... Strength Indicator RSSI The number of bars displayed represents the received signal strength for the current site for trunking only The more stripes in the icon the stronger the signal Roaming The radio has roamed to and is currently registered to a foreign system Direct On Radio is currently configured for direct radio to radio communication during conventional operation only Off Radio is connec...

Страница 31: ...Secure operation Off Clear operation Blinking Receiving an encrypted voice call Hor i k m User Login Indicator IP Packet Data On User is currently associated with your radio Off User is currently not associated with your radio Blinking Device registration or user registration with the server failed due to an invalid username or pin Inverted User successfully login to the secured IP Packet Data Dat...

Страница 32: ...io is receiving a secured transmission Solid green Radio is powering up Blinking green Radio is receiving an individual or telephone call Note No LED indication when your radio receives a clear non secured transmission in trunking Mode Top Lightbar Indications The lightbar blinks green when the MFK is using the secondary feature See Multi Function Knob MFK on page 12 to understand the functionalit...

Страница 33: ...ification When Orange Emergency Alerts The radio initiates an emergency alarm or call The radio receives an emergency alarm or call Red Critical Alerts The radio battery is low The radio is out of range The radio enters failsoft mode The radio is unable to establish a full connection with the system The radio is unable to authenticate or register with the system Green Call Alerts The radio receive...

Страница 34: ...Warning Four seconds before time out No ACK Received When radio fails to receive an acknowledgment Individual Call Warning Tone When radio is in an individual call for greater than 6 seconds without any activity Long Low Pitched Tone Time Out Timer Timed Out After time out Talk Prohibit PTT Inhibit When PTT button is pressed transmissions are not allowed Out of Range When PTT button is pressed the...

Страница 35: ... Emergency Exit When exiting the emergency state A Group of Medium Pitched Tones Failsoft When the trunking system fails Automatic Call Back When voice channel is available from previous request Console Acknowledge When emergency alarm or reprogram request ACK is received Received Individual Call When Call Alert or Private Call is received Short High Pitched Tone Chirp Low Battery Chirp When batte...

Страница 36: ...rs English 20 Doh Sol MFK Enters Secondary Feature When MFK is toggled to secondary feature Sol Doh MFK Exits Secondary Feature When MFK is toggled to exit secondary feature and return to primary feature You Hear Tone Name Heard ...

Страница 37: ...ceive Phone calls The radio also uses alert tones to indicate the current status You Hear You See When Notes A Busy Tone Phone busy When a channel is not available The radio automatically connects when a channel opens A High Pitched Tone When you release the PTT button The radio indicates to the landline party that he or she may begin talking ...

Страница 38: ...ing a Radio Channel page 23 Using Mode Select Feature page 24 Receiving and Responding to a Radio Call page 26 Repeater or Direct Operation page 28 Monitoring Features page 28 Selecting a Zone A zone is a group of channels Use the following procedure to select a zone Note Your radio must be preprogrammed to allow you to use this feature If Mode Change is secondary feature of the MFK see Multi Func...

Страница 39: ...lect button Read carefully before you press Selecting a Radio Channel A channel is a group of radio characteristics such as transmit receive frequency pairs Use the following procedure to select a channel Note Your radio must be preprogrammed to allow you to use this feature If you select a channel that is not within the preprogrammed band the radio indicates that it is on an unsupported frequency...

Страница 40: ...hannel Note Positions of ChUp and ChDn on the display may differ each time you release the Menu Select button Read carefully before you press Using Mode Select Feature Mode Select allows a long press to save the radio s current zone and channel to a programmable button or a softkey then once programmed the short press of that button or softkey jumps the transmission to the saved zone and channel T...

Страница 41: ... Short press of the programmed softkey changes your current transmission to the zone and channel programmed in this softkey Saving a Zone and Channel to a Button All the programmable buttons allow you to save the frequent used zone and channel Procedure 1 Toggle your zone and channel to the required zone and channel 2 Press and hold the button you desire to program 3 You hear a short medium pitche...

Страница 42: ...ssion the LED blinks yellow Receiving and Responding to a Talkgroup Call To receive a call from a group of users the radio must be configured as part of that talkgroup Procedure When you receive a talkgroup call while on the Home screen depending on how your radio is preprogrammed 1 ASTRO Conventional Only The LED lights up solid yellow The display shows the talkgroup alias or ID and the caller al...

Страница 43: ...e call indicators begin 3 During the call the display shows the caller alias name if it is in the call list OR During the call the display shows the caller ID number if the caller s name is not in the call list 4 Press and hold the PTT button to talk Release the PTT button to listen Receiving and Responding to a Telephone Call Trunking Only This feature allows you to receive calls similar to stand...

Страница 44: ...re below 1 Press the Menu Select button directly below Dir 2 The display shows Repeater mode if the radio is currently in Repeater mode OR The display shows Direct mode and the Talkaround icon if the radio is currently in Direct mode during conventional operation only Monitoring Features Radio users who switch from analog to digital radios often assume that the lack of static on a digital channel ...

Страница 45: ...s on the display when you monitor a channel via the preprogrammed Monitor button Conventional Mode Operation Your radio may be preprogrammed to receive Private Line PL calls Procedure 1 Momentarily press the Monitor button to listen for activity The Carrier Squelch indicator appears on the display 2 Press and hold the Monitor button to set continuous monitor operation The duration of the button pr...

Страница 46: ...nly This feature allows you to receive a call from or to call a specific individual It is intended to provide privacy and to eliminate the annoyance of having to listen to conversations that are of no interest to you Receiving a Selective Call Procedure 1 When you receive a Selective Call the display shows Call received You hear two alert tones the LED lights up solid yellow to indicate the transm...

Страница 47: ...annel s name 2 Press the PTT button to talk Release PTT button to listen When the dispatcher cancels dynamic regrouping the radio automatically returns to the zone and channel that you were using before the radio was dynamically regrouped Requesting a Reprogram Trunking Only This feature allows you to notify the dispatcher when you want a new dynamic regrouping assignment Procedure Press the prepr...

Страница 48: ...ing channel The Scan or Private Call feature cannot be selected while your radio is Select Disabled Scan This feature allows you to monitor traffic on different channels by scanning a preprogrammed list of channels Turning Scan On or Off Procedure Press the preprogrammed Scan button to start or stop scan OR Follow the procedure below 1 Press the Menu Select button directly below Scan 2 The display...

Страница 49: ... Dynamic Priority button 2 The radio continues scanning the remaining channels in the list Deleting a Nuisance Channel If a channel continually generates unwanted calls or noise termed a nuisance channel you can temporarily remove the unwanted channel from the scan list This capability does not apply to priority channels or the designated transmit channel Procedure 1 Press and hold the Menu Select...

Страница 50: ... channel via the MFK Call Alert Paging This feature allows your radio to work like a pager The radio which you missed its call can send a Call Alert page to your radio The sender also able to know that your radio is active Note This feature must be preprogrammed by a qualified radio technician Receiving a Call Alert Page Procedure 1 When you receive a Call Alert page you hear four repeating alert ...

Страница 51: ...y one of the Emergency modes above can be assigned to the preprogrammed Emergency button Note To exit emergency at any time press and hold the preprogrammed Emergency button for about a second Note The radio operates in the normal dispatch manner while in Emergency Call except if enabled it returns to one of the following Tactical Non Revert The radio sends emergency alarm and or make emergency ca...

Страница 52: ...ows Ack received You hear four tones the alarm ends and the radio exits the Emergency Alarm mode OR If no acknowledgment is received the display shows No acknowledge The alarm ends and the radio exits the Emergency Alarm mode Sending an Emergency Call Trunking Only This feature gives your radio priority access to a talkgroup Procedure 1 Press the preprogrammed Emergency button 2 The display shows ...

Страница 53: ... PTT button while in the Emergency Alarm mode 4 Hold the radio vertically 1 to 2 inches 2 5 to 5 0 cm from your mouth 5 Press and hold the PTT button Speak clearly into the microphone 6 Release the PTT button to end the transmission and wait for a response from the dispatcher 7 Press and hold the preprogrammed Emergency button for about a second to exit the Emergency Call mode Sending a Silent Eme...

Страница 54: ...ou hear an invalid tone until you exit the Emergency state or change to a channel preprogrammed for Emergency Using the Emergency Keep Alive Feature This feature when enabled prevents the radio from being turned off via the MFK when the radio is in the Emergency state Note The radio only exits the Emergency state using one of the ways mentioned in the previous sections See Sending an Emergency Ala...

Страница 55: ...ming software Selecting or Changing the ARS Mode Procedure Turn the preprogrammed MFK once the zone you want is displayed to the desired mode Trunking System Controls Using the Failsoft System The failsoft system ensures continuous radio communications during a trunked system failure If a trunking system fails completely the radio goes into failsoft operation and automatically switches to its fail...

Страница 56: ...ne channel combination and Site trunking Note When this occurs you can communicate only with other radios within your trunking site Locking and Unlocking a Site This feature allows your radio to lock onto a specific site This feature should be used with caution since it inhibits roaming to another site in a wide area system Procedure Use the preprogrammed Site Lock Unlock button to toggle the lock...

Страница 57: ...turns to the Home screen Programming Over Project 25 POP 25 ASTRO 25 and ASTRO Conventional This feature enables configuration data to be upgraded to your radio over the air This feature retains full use of the radio during the configuration data transfer without interrupting communication The upgrade pauses to give priorities to voice call and continues after the voice call ended Once a configura...

Страница 58: ...n If your radio has problem of upgrade over the air consult the qualified technician for details Voice Announcement This feature enables the radio to audibly indicate the current feature mode zone or channel the user has just assigned This audio indicator can be customized per customer requirements This is typically useful when the user is in a difficult condition to read the content shown on the ...

Страница 59: ...Select button or preprogrammed button or switch of the radio to launch or terminate Scan PL Disabled Talkaround Direct or Transmit Inhibit The radio announces the corresponding feature activation or deactivation Utilities Selecting the Power Level This feature enables you to reduce the transmit power level for specific case that require a lower power level You can select the power level at which y...

Страница 60: ...as appears on the Home screen Controlling the Display Backlight You can enable or disable the radio s display backlight as needed if poor light conditions make the display difficult to read Depending on how your radio is preprogrammed you can also maintain a minimum backlight level on the radio s front display Note The backlight setting also affects the Menu Select buttons backlighting accordingly...

Страница 61: ... Procedure 1 Press the Menu Select button directly below Mute 2 The display shows momentary Tones off indicating that the tones are disabled OR The display shows momentary Tones on and you hear a short tone indicating that the tones are enabled Turning Voice Mute On or Off You can enable and disable voice transmission if needed Procedure Press the preprogrammed Voice Mute button to turn the featur...

Страница 62: ...oes out until you release the PTT button 2 Release the PTT button The timer resets 3 Press the PTT button to re transmit The time out timer restarts and the LED lights up solid red Using the Conventional Squelch Operation Features This feature filters out unwanted calls with low signal strength or channels that have a higher than normal background noise Analog Options Tone Private Line PL Digital ...

Страница 63: ... eight characters can be viewed by both the receiving radio and the dispatcher Your radio s ID number is also automatically sent every time the PTT button is pressed This is a per channel feature For digital voice transmissions your radio s ID is sent continuously during the voice message Using the Smart PTT Feature Conventional Only Smart PTT is a per personality programmable feature used in conv...

Страница 64: ...ode Description Transmit Inhibit on Busy Channel with Carrier You cannot transmit if any traffic is detected on the channel Transmit Inhibit on Busy Channel with Wrong Squelch Code You cannot transmit on an active channel with a squelch code other than your own If the PL code is the same as yours the transmission is not prevented Quick Key Override This feature can work in conjunction with either ...

Страница 65: ...age 51 Servicing Your Radio page 51 Taking Care of the Battery page 52 Checking the Battery Charge Status page 52 Battery Recycling and Disposal page 53 Caring for Your Radio The radio casting has a vent port that allows for pressure equalization in the radio Never poke this vent with any objects such as needles tweezers or screwdrivers Caution Vent Port ...

Страница 66: ...bserved on the battery contact area dry and clean the radio battery contacts before attaching a battery to the radio Otherwise the water could short circuit the radio If water is observed on the speaker grill area shake the radio well so that any water that may be trapped inside the speaker grille and microphone port can be removed Otherwise the water will decrease the audio quality of the radio D...

Страница 67: ...ep this and all other communication equipment in perfect operating condition A nationwide service organization is provided by Motorola to support maintenance services Through its maintenance and installation program Motorola makes available the finest service to those desiring reliable continuous communications on a contract basis For a contract service agreement please contact your nearest Motoro...

Страница 68: ... battery is low the LED blinks red when the PTT button is pressed you hear a low battery chirp short high pitched tone Fuel Gauge Icon A blinking fuel gauge icon is displayed only when the battery voltage drops to low level In this case replace with a fully charged battery These are for IMPRES battery operation only Gauge Battery Charge 76 to 100 full 51 to 75 26 to 50 11 to 25 10 or less at 10 th...

Страница 69: ...r battery collection and recycling Many retailers and dealers participate in this program For the location of the drop off facility closest to you access RBRC s Internet web site at www rbrc com or call 1 800 8 BATTERY This internet site and telephone number also provide other useful information concerning recycling options for consumers businesses and governmental agencies ...

Страница 70: ...ages for a list of FCC certified accessories or contact your sales representative for accessory compatibility http www motorolasolutions com APX Take a moment to review the following Highlights for the Accessories page 54 Highlights for the Accessories 1 Only the following programming cables are compatible with APX 1000 radios APX DMR Port Programming Cable PMKN4012B Test and Alignment Programming...

Страница 71: ...he name of the vessel 4 WE ARE LOCATED AT _______________________ State the position of the vessel in distress using any information that will help responders to locate you e g latitude and longitude bearing state whether you are using true or magnetic north distance to a well known landmark vessel course speed or destination 5 State the nature of the distress 6 Specify what kind of assistance you...

Страница 72: ...ow Note Simplex channels 3 21 23 61 64 81 82 and 83 cannot be lawfully used by the general public in US waters Additional information about operating requirements in the Maritime Services can be obtained from the full text of FCC Rule Part 80 and from the US Coast Guard Table A 1 VHF Marine Channel List Channel Number Frequency MHz Transmit Receive 1 156 050 160 650 2 156 100 160 700 156 150 160 7...

Страница 73: ...75 62 156 125 160 725 63 156 175 160 775 156 225 160 825 65 156 275 160 875 66 156 325 160 925 67 156 375 156 375 68 156 425 156 425 69 156 475 156 475 71 156 575 156 575 72 156 625 73 156 675 156 675 74 156 725 156 725 Table A 1 VHF Marine Channel List Continued Channel Number Frequency MHz Transmit Receive 75 76 77 156 875 78 156 925 161 525 79 156 975 161 575 80 157 025 161 625 157 075 161 675 ...

Страница 74: ...y a modulation other than the internationally adopted modulation for maritime use when it operates on the distress and safety frequencies spedified in RSS 182 Section 6 1 Table A 2 Technical Paratmeters for Interfacing External Data sources RS232 USB SB9600 Input Voltage Volts Peak to peak 18 V 3 6 V 5 V Max Data Rate 28 kb s 12 Mb s 9 6 kb s Impedance 5k Ohm 90 Ohm 120 Ohm ...

Страница 75: ... received so that the user does not have to listen to noise Central Controller A software controlled computer driven device that receives and generates data for the trunked radios assigned to it It monitors and directs the operations of the trunked repeaters Channel A group of characteristics such as transmit receive frequency pairs and radio parameters Control Channel In a trunking system one of ...

Страница 76: ...Definition Menu Entry A software activated feature shown at the bottom of the display selection of these features is controlled by the and buttons Monitor Check channel activity by pressing the Monitor button If the channel is clear you hear static If the channel is in use you hear conversation It also serves as a way to check the volume level of the radio since the radio opens the squelch when th...

Страница 77: ...he audio and infrared light regions about 10 kHz to 10 000 000 MHz Term Definition Repeater A conventional radio feature where you talk through a receive transmit facility that re transmits received signals in order to improve communications range and coverage Selective Call A feature that allows you to call a select individual intended to provide privacy and to eliminate the annoyance of having t...

Страница 78: ...or group of radio users who communicate with each other using the same communication path Trunking The automatic sharing of communications paths between a large number of users see Conventional Trunking Priority Monitor Scan List A scan list that includes talkgroups that are all from the same trunking system Zone A grouping of channels Term Definition ...

Страница 79: ...ons or liability for additions or modifications to this warranty unless made in writing and signed by an officer of MOTOROLA Unless made in a separate agreement between MOTOROLA and the original end user purchaser MOTOROLA does not warrant the installation maintenance or service of the Product MOTOROLA cannot be responsible in any way for any ancillary equipment not furnished by MOTOROLA which is ...

Страница 80: ...u can also call MOTOROLA at 1 800 927 2744 US Canada V WHAT THIS WARRANTY DOES NOT COVER A Defects or damage resulting from use of the Product in other than its normal and customary manner B Defects or damage from misuse accident water or neglect C Defects or damage from improper testing operation maintenance installation alteration modification or adjustment D Breakage or damage to antennas unles...

Страница 81: ...eturn The depreciation will be an equal amount per year over the lifetime of the Product or parts as established by MOTOROLA MOTOROLA will have no liability with respect to any claim of patent infringement which is based upon the combination of the Product or parts furnished hereunder with software apparatus or devices not furnished by MOTOROLA nor will MOTOROLA have any liability for the use of a...

Страница 82: ...mpensation for any other reasonably foreseeable loss or damage You are also entitled to have the goods repaired or replaced if the goods fail to be of acceptable quality and the failure does not amount to a major failure Motorola Solutions Australia s limited warranty below is in addition to any rights and remedies you may have under the Australian Consumer Law If you have any queries please call ...

Страница 83: ......

Страница 84: ... MOTOROLA SOLUTIONS and the Stylized M logo are trademarks or registered trademarks of Motorola Trademark Holdings LLC and are used under license All other trademarks are the property of their respective owners 2014 Motorola Solutions Inc All rights reserved June 2014 MN000253A01 MN000253A01 A ...

Отзывы: