24
Morton
r
Water Softener Installation & Operation Manual
REPAIR PARTS
1
2
7
8
9
13
14
15
16
17
19
18
20
21
22
11
12
23
26
Valve Assembly
(see pages 26 and 27)
34
5
6
10
25
Страница 1: ...lling operating or maintaining your water softener call our toll free number 1 888 64 WATER 1 888 649 2837 or visit www mortonwatersofteners com When you call please be prepared to provide the model a...
Страница 2: ...la that works with your softener to help prevent mineral buildup and keep your home s pipes and appliances working their best Whether you re looking to remove iron and fight buildup or extend your wat...
Страница 3: ...t a warranty issue we are just a phone call away Simply dial 1 888 64 WATER 1 888 649 2837 for assistance or visit www mortonwatersofteners com This water softener is manufactured for Morton P O Box 2...
Страница 4: ...SIVE SUN HEAT MAY CAUSE DISTORTION OR OTHER DAMAGE TO NON METALLIC PARTS THE SOFTENER REQUIRES A MINIMUM WATER FLOW OF 3 GALLONS PER MINUTE AT THE INLET MAXIMUM AL LOWABLE INLET WATER PRESSURE IS 125...
Страница 5: ...ter ials To avoid loss of the small parts we suggest you keep them in the parts bag until you are ready to use them 1 spare clip included Do not return the water softener to store If you have any ques...
Страница 6: ...to individual application factors including water hardness water usage and other contaminants that reduce a softener s capacity MODEL MSD45E RATED CAPACITY grains lbs salt dose 13 233 2 6 35 700 9 9...
Страница 7: ...the same or larger pipe size as the water supply pipe up to the softener inlet and outlet GUse copper brass or galvanized pipe and fittings Some codes may also allow PVC plastic pipe GALWAYS install...
Страница 8: ...R TO SOFTENER INLET FROM SOFTENER OUTLET CROSS OVER Use if water supply flows from the left Include single or 3 valve bypass INLET valve OUTLET valve BYPASS valve D for soft water SERVICE Open the inl...
Страница 9: ...f the hose adaptor elbow into the grommet 3 MOVE THE SOFTENER ASSEMBLY CAB INET MODEL OR RESIN TANK TWO TANK MODEL INTO INSTALLATION POSITION Be sure the installation surface is level and smooth If ne...
Страница 10: ...gth of hose is needed buy and use high quality thick wall hose that will not easily kink or collapse The water softener will not work if water cannot exit this hose during regen erations Tie or wire t...
Страница 11: ...everal times to allow the softener to pressurize slowly E After about three minutes open a HOT water faucet for one minute or until all air is expelled then close F Close both cold water faucets G Che...
Страница 12: ...p signals a change in the display Repeated beeps means the electronic control will not accept a change from the button you have pressed and you should use another D To program the electronic control y...
Страница 13: ...e bacteria to form or grow However during shipping storage installing and operating bacteria could get into the softener For this reason sanitizing as follows is suggestedw when installing 1 Be sure t...
Страница 14: ...et Water Hardness Number section Ferric red water and Bacterial and organically bound irons are insoluble This water softener will not remove ferric or bacterial iron This iron is visible immediately...
Страница 15: ...but the bridge is under it The following is the best way to check for a salt bridge Salt should be loose all the way to the bottom of the tank Take a broom handle or like tool and careful ly push it d...
Страница 16: ...ly Do not over tighten and break the cap or hous ing Install with numbered side up concave side down Cap O ring Seal Screen Support Screen Nozzle Venturi Gasket Flow Plug HVDC Nozzle Venturi Housing S...
Страница 17: ...0 shows Then as water is used the percentage decreases until the next regeneration During regenerations the percentage increments upward NOTE Zero 0 shows until after the first regen eration begins af...
Страница 18: ...l power to the softener is interrupted the time display is blank but the electronic control keeps correct time for about 24 hours When power is restored you have to reset the present time only if the...
Страница 19: ...initiate more frequent recharges however it will operate at 4000 grains per pound of salt or higher If you wish to turn the Salt Efficiency feature ON icon will show in display follow the instructions...
Страница 20: ...standard clock time 12 00AM to 11 59PM If 24 hr is set time displays are in military time 0100 1 00AM to 0000 midnight To change from the 12 hr setting do steps 1 3 4 5 and 7 GALLONS OR LITERS MEASURE...
Страница 21: ...t shows the error codes that could appear and possible defects for each code While an error code is displayed the RECHARGE and DATA buttons remain operable so you can perform the Manual Initiated Elec...
Страница 22: ...S CORRECT TIME AND DAY AND IS STEADY Do manual diagnostics Do manual diag nostics to verify proper function service MANUAL INITIATED ELECTRONICS DIAGNOSTIC 1 To enter diagnostics press and hold the DA...
Страница 23: ...ECHARGE button and hold in for 3 seconds RECHARGE NOW begins to flash as the softener enters the fill cycle of regeneration Re move the brinewell cover and using a flashlight ob serve fill water enter...
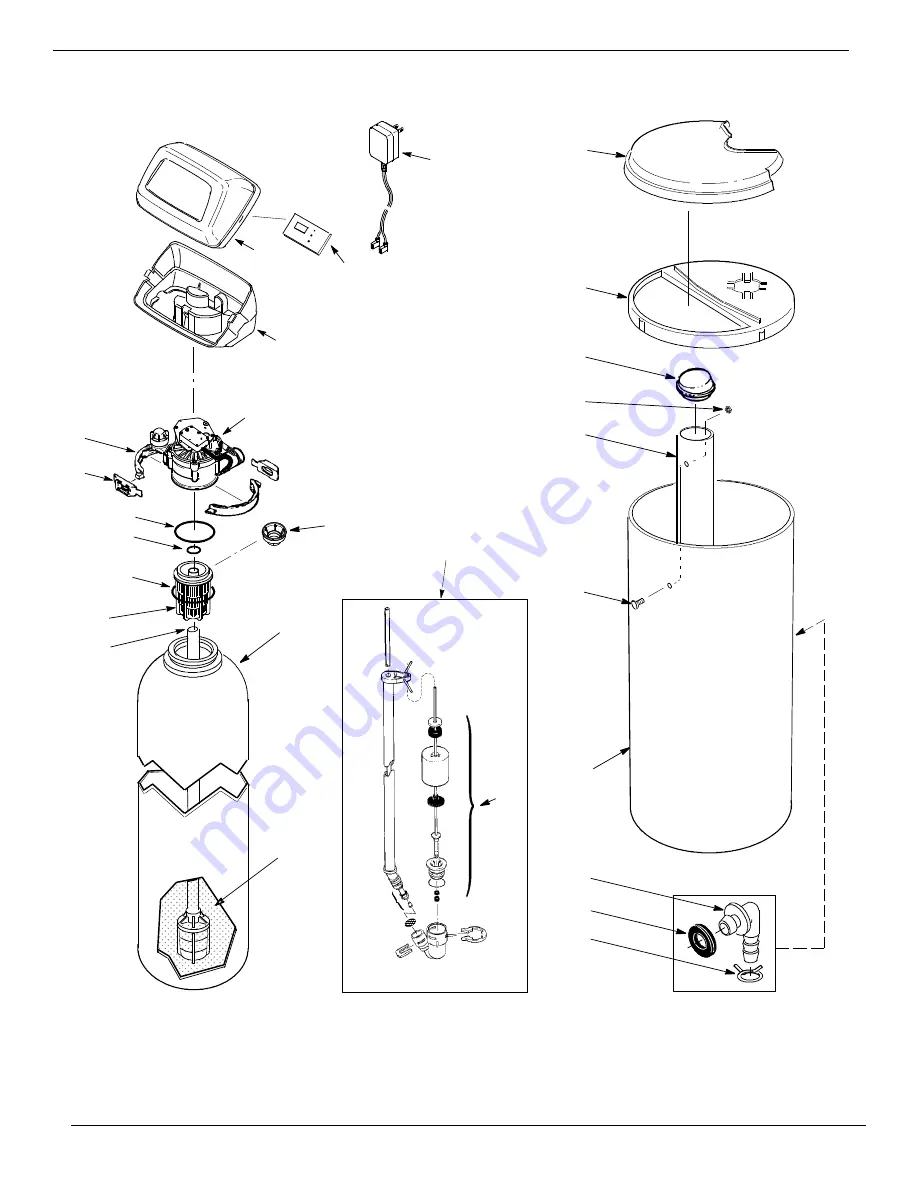
Страница 24: ...24 Mortonr Water Softener Installation Operation Manual REPAIR PARTS 1 2 7 8 9 13 14 15 16 17 19 18 20 21 22 11 12 23 24 26 Valve Assembly see pages 26 and 27 3 4 5 6 10 25...
Страница 25: ...ate 13 7310969 Repl Electronic Control Board PWA KEY NO PART NO DESCRIPTION 14 7351054 Power Supply 24V DC 15 7192785 Salt Cover 16 7178626 Rim 17 7155115 Cover Brinewell 18 7109871 Brinewell 7331648...
Страница 26: ...r Installation Operation Manual REPAIR PARTS 50 51 52 53 54 55 56 58 59 60 61 62 67 68 63 64 65 69 70 71 72 73 74 75 76 77 66 78 79 81 80 82 83 84 85 86 87 88 89 90 91 92 93 94 cross section view seal...
Страница 27: ...ack of 4 KEY NO PART NO DESCRIPTION 7290931 Turbine Support Assembly including 2 O Rings See Key No 73 1 ea of Key Nos 74 75 74 Turbine Support Shaft 75 Turbine 76 7309811 Sensor Housing Wiring Harnes...