background image

15

ENGLISH

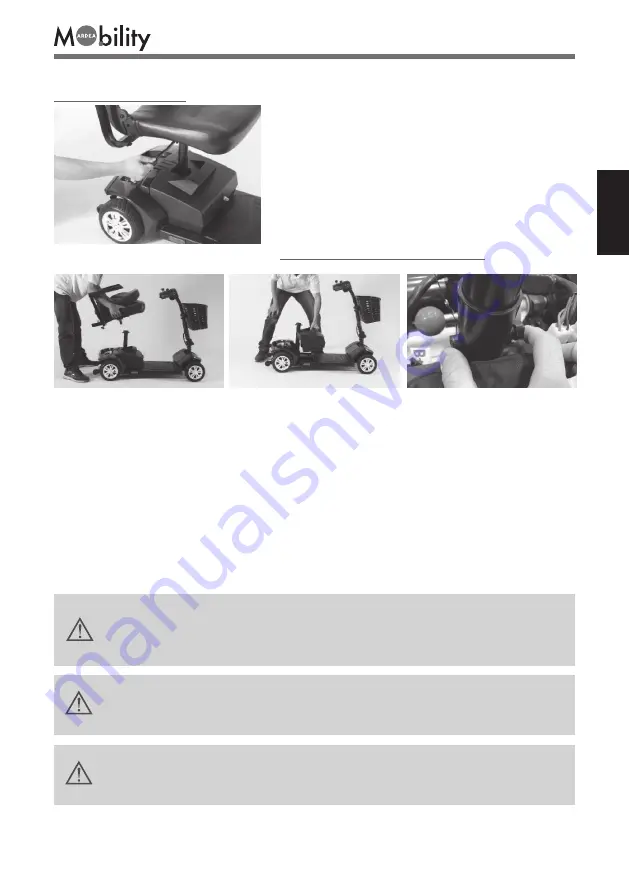
11.4 Seat adjustment

SEAT ROTATION LEVER

(Fig. 3) (illustrative image)

The seat can be rotated through 360 ° and locked at 
every 45 °:
1.  Press the lever down and rotate the seat to the 
desired position 

(Fig. 3)

.

2. Release the lever to lock the seat in position at 
every 45°.
 

ADJUSTMENT OF THE SEAT HEIGHT

(Fig. 4)

(Fig. 5)

(Fig. 6)

(illustrative images)

To adjust the seat height:
1.  


Bend the backrest towards the seat, pull the rotation lever upwards and raise the seat by 
extracting it from the base

 (Fig. 4)

;

2.  Lift and remove the battery 

(Fig. 5)

;

3. 


Remove the bolt + nut attaching the seat rod in the pedestal 

(Fig. 6)

;

4.  Position the seat at the desired height and align the holes with those on the pedestal:
5.  Remount the bolt + nut;
6.  Reposition the battery;
7.  


Place the seat in position again and push it downwards to lock it in position. Move the seat 
from side to side to ensure it is locked in position.


WARNING! 
Do not sit on the scooter or try to move it without first checking that the frame and 
the rear trolley are firmly inserted. The frame could accidentally detach from the 
trolley and cause injury or damage.

WARNING!
• Never sit on the scooter when the “free wheel” lever is inserted.
• Never disengage the stopping brake when you are using the scooter.

WARNING!
Always check that the stopping brake of the scooter is inserted before inserting the 
key in the ignition and turning it to the ON position.

Содержание ARDEA MOBILITY 210

Страница 1: ...MA CN210A CN210B 01 A_ITA_02 2022 SCOOTER ELETTRICO MOBILITY 210 MANUALE DI ISTRUZIONI ITALIANO ...
Страница 2: ...erso le strettoie pag 22 13 5 Percorrere salite e discese pag 22 13 6 Impianto frenante del motore pag 24 13 7 Freno di stazionamento pag 24 13 8 Protezione termica pag 24 14 TRASPORTO PAG 24 14 1 Trasportare lo scooter pag 24 15 PULIZIA PAG 25 15 1 Pulizia pneumatici pag 25 15 2 Pulizia corpo pag 25 15 3 Pulizia sedile pag 25 16 ISTRUZIONI GENERALI DI MANUTENZIONE PAG 25 16 1 Controlli e promemor...

Страница 3: ...verso da quanto indicato nel presente manuale Il produttore si riserva il diritto di apportare modifiche al dispositivo e al seguente manuale senza preavviso allo scopo di migliorarne le caratteristiche 4 DICHIARAZIONE DI CONFORMITÀ UE La MORETTI SpA dichiara sotto la sua esclusiva responsabilità che i prodotti fabbricati ed immessi in commercio dalla stessa MORETTI SpA e facenti parte della famig...

Страница 4: ...terminata dall usura di parti non riparabili e o sostituibili Prestare sempre attenzione alla presenza di bambini Peso Massimo Utilizzatore 149 kg Classificazione classe B EN 12184 Il prodotto non è indicato per le persone non vedenti Il dispositivo non può essere utilizzato da bambini di età inferiore ai 12 anni Lo scooter non è concepito per essere usato come sedile in un veicolo a motore L util...

Страница 5: ... ITALIANO EC REP 0197 S N Smaltimento prodotto secondo la direttiva CE 19 2012 Parte applicata di tipo B IPX4 Classe di protezione Peso max supportato 7 DESCRIZIONE GENERALE Immagine a scopo illustrativo ...

Страница 6: ...sso venga usato in tale ambiente PROVE DI EMISSIONE CONFORMITÀ AMBIENTE ELETTROMAGNETICO GUIDA Emissioni RF CISPR 11 Gruppo 1 Lo Scooter CN210X utilizza energia RF solo per il suo funzionamento interno e per la ricarica della batteria Perciò le sue emissioni RF sono molto basse e verosimilmente non causano nessuna interferenza negli apparecchi elettronici vicini Emissioni RF CISPR 11 Classe B Lo S...

Страница 7: ...pico ambiente commerciale o ospedaliero Sovratensioni IEC 61000 4 5 1 kV modo differenziale 2 kV modo comune 1 kV modo differenziale 2 kV modo comune La qualità della tensione di rete dovrebbe essere quella di un tipico ambiete commerciale o ospedaliero Buchi di tensione brevi interruzioni e variazioni della tensione sulle linee di ingresso e dell alimentazione IEC 61000 4 11 5 UT 95 buco in UT pe...

Страница 8: ...i conformità in ciascun intervallo di frequenza b Si può verificare interferenza in prossimità di apparecchi contrassegnati dal seguente simbolo RF irradiata IEC 61000 4 3 20 V m Da 80 MHz a 2 5 GHz 1 V m NOTA 1 a 80 MHz e 800 MHz si applica la distanza di separazione per l intervallo di frequenza più alta NOTA 2 queste linee guida potrebbero non applicarsi in tutte le situazioni La propagazione e...

Страница 9: ...ilizzo dello Scooter CN210X Per la fase di ricarica della batteria Durante l utilizzo Scooter CN210X Per la fase di ricarica della batteria Durante l utilizzo Scooter CN210X da 150 kHz a 80 MHz d 3 5 V1 P da 150 kHz a 80 MHz d 3 5 V1 P da 80 MHz a 800 MHz d 3 5 E1 P da 80 MHz a 800 MHz d 3 5 E1 P da 800 MHz a 2 5 GHz d 7 E1 P da 800 MHz a 2 5 GHz d 7 E1 P 0 01 0 35 0 35 0 35 0 35 0 7 0 7 0 1 1 1 1...

Страница 10: ...curva stretta o una frenata improvvisa mentre guidate lo scooter Non guidare lo scooter nel traffico Non tentare di salire cordoli di altezza superiore a quanto indicato nelle specifiche tecniche Non sporgere le mani e le gambe fuori dallo scooter durante la guida Non guidare lo scooter su strade scivolose o mentre nevica Non permettere ai bambini senza alcun controllo di giocare nelle vicinanze d...

Страница 11: ... consapevoli del fatto che abiti larghi si possono impigliare nelle ruote 10 Consultare il proprio medico se state assumendo farmaci o se avete specifiche limitazioni fisiche Alcunifarmaciealcunelimitazionipossono inficiare lacapacitàdiutilizzodelloscooterinmodosicuro 11 Verificare sempre che la leva di sblocco blocco ruote sia bloccata o sbloccata 12 Non rimuovere le ruotine antiribaltamento qual...

Страница 12: ...0 5 Temperatura 1 Alcune parti dello scooter sono suscettibili ai cambiamenti di temperatura Il controller può funzionare solo con una temperatura che varia tra 25 C e 50 C 2 A temperature molto basse le batterie potrebbero congelare e il vostro scooter potrebbe non essere in grado di operare In climi molto caldi lo scooter potrebbe funzionare a velocità inferiori a causa di una caratteristica di ...

Страница 13: ...ed in retromarcia GUIDARE per guidare in avanti utilizzare le dita della mano destra per tirare indietro la leva dell accelleratore posta a destra utilizzare il pollice sinistro per spingere la leva dell accelleratore posta a sinistra NOTA Portare sempre lo scooter ad un arresto completo prima di cambiare direzione da marcia avanti a retromarcia o da retromarcia ad marcia avanti per guidare in ret...

Страница 14: ...entare le manopole di regolazione poste sul retro del sedile Fig 1 2 Far scorrere il bracciolo all interno o all esterno fino a trovare la larghezza desiderata 3 Stringere di nuovo le manopole di regolazione ATTENZIONE Assicurarsi che le manopole di regolazione siano ben strette al tubo inserito nel bracciolo Non estrarre eccessivamente il bracciolo 2 1 Fig 2 immagine a scopo illustrativo RIBALTAR...

Страница 15: ...piedistallo Fig 6 4 Posizionare il sedile all altezza desiderata allineando i fori con quelli presenti sul piedistallo 5 Rimontare il dado bullone 6 Reinstallare la batteria 7 Posizionare nuovamente il sedile e spingerlo verso il basso per bloccarlo in posizione Spostare il sedile da un lato all altro per assicurarsi che sia bloccato ATTENZIONE Non sedersi o cercare di muovere lo scooter prima di ...

Страница 16: ...ntaggio ATTENZIONE Attenzione ad eventuali punti di pizzicamento quando si aggancia il telaio posteriore a quello anteriore Durante la fase di assemblaggio osservare le etichette di avvertenza in corrispondenza dei punti di pizzicamento Pericolo di pizzicamento e schiacciamento Aumento del rischio di pizzicamento o schiacciamento conseguenza del peso dei componenti come le batterie durante la fase...

Страница 17: ...ustrativo REINSTALLARE LA TRASMISSIONE Allineare telaio e trasmissione Fig 9 Abbassare il telaio sulla trasmissione finché la trasmissione non rilascia gli agganci della leva si udirà un click Fig 10 Spingere verso il basso il sedile per bloccarlo in posizione Spostare il sedile da un lato all altro per assicurarsi che sia bloccato in posizione Fig 9 immagine a scopo illustrativo Fig 10 immagine a...

Страница 18: ...brio Manopola di regolazione Cestino Fig 12 immagine a scopo illustrativo Per posizionare il manubrio a proprio piacimento attenersi alle seguenti indicazioni Con una mano afferrare un impugnatura Con l altra mano allentare la manopola di regolazione del manubrio Posizionare il manubrio in una posizione di guida comoda Stringere la manopola di regolazione del manubrio ATTENZIONE Assicurarsi di str...

Страница 19: ...to Verificare che il sedile sia bloccato correttamente facendolo ruotare leggermente a destra e a sinistra SBLOCCARE IL MANUBRIO Ruotare il bloccasterzo in posizione di sblocco Fig 14 Fig 14 immagini a scopo illustrativo ATTENZIONE Senza sbloccare il bloccasterzo il manubrio non girerà e ci si esporrà al rischio di lesioni Cisiesponealrischio diincidentiin caso diposizionamentoscorrettodelsedile P...

Страница 20: ...onamento ATTENZIONE Salendo o scendendo sullo dallo scooter tenere il peso verso il centro della pedana Spostareilpesoversoilbordodellapedanapotrebbecausareunacondizionediinstabilità SALIRE SULLO SCOOTER Posizionare il sedile in modo da poter salire in maniera sicura e semplice Riportare il manubrio in posizione verticale Appoggiare cautamente un piede al centro approssimativo della pedana e accom...

Страница 21: ...n si sente di avere controllo dello scooter 13 3 Sterzare Posizionare entrambe le mani sulle impugnature del manubrio e ruotare il manubrio verso destra per spostarsi a destra Ruotare il manubrio verso sinistra per spostarsi a sinistra Verificare che il passaggio sia sgombero a sufficienza quando si fa girare lo scooter di modo che le ruote posteriori possano superare ogni ostacolo ATTENZIONE Far ...

Страница 22: ...re Accelerare delicatamente dopo essersi fermati su qualsiasi superficie in pendenza SCENDERE DA UNA RAMPA Mantenere il selettore di velocità dello scooter completamente ruotato in senso orario impostato sul livello minimo di velocità Se è necessario fermarsi rilasciare la leva di controllo dell acceleratore in maniera lenta e costante MARCIAPIEDE Non salire o scendere su da un marciapiede più alt...

Страница 23: ...u una superficie in pendenza può originare una situazione molto pericolosa Tuttavia se dovesse essere necessario procedere in retromarcia seguire una delle due procedure NOTA Quando si esegue una delle seguenti procedure per scendere in retromarcia da una superficie in pendenza il costruttore consiglia vivamente di avvalersi dell assistenza di un altra persona Procedura 1 In funzione Girare l inte...

Страница 24: ... chiamato ripristino termico Un circuito incorporato controlla la temperatura del controller e del motore In caso di eccessivo calore del controller e del motore il controller toglierà l alimentazione per consentire il raffreddamento dei componenti elettrici Anche se il vostro scooter riprenderà la sua velocità normale quando la temperatura sarà tornata a livelli di sicurezza si consiglia di atten...

Страница 25: ...ione scorretta dello scooter provocherà un maggior numero di problemi tecnici renderà meno flessibile ed esulerà dai termini della garanzia La manutenzione preventiva è importante Di seguito elenco delle principali operazioni da eseguire ISPEZIONE QUOTIDIANA MENSILE SEMESTRALE ANNUALE FATTA DA Funzionamento del freno X Utente Condizioni degli pneumatici X Utente Controllo livello batteria X Utente...

Страница 26: ...ale del fissaggio di tutti i dadi e bulloni 16 2 Sostituzione ruota Se lo scooter è dotato di una gomma solida sostituire l intera ruota contattare il rivenditore locale 16 3 Console caricabatteria ed elettronica posteriore Mantenere queste parti al riparo dall umidità In caso di esposizione ad umidità farle asciugare completamente prima di usare nuovamente lo scooter 16 4 Riporre lo scooter Se si...

Страница 27: ...cabatterie esterno dopo ogni utilizzo e ricaricare per 6 8 ore Se lo scooter non verrà utilizzato per più di una settimana caricare completamente le batterie e poi scollegarle dallo scooter PER RICARICARE LE BATTERIE Elenco delle linee guida di ricarica per massimizzare la durata della batteria 1 Utilizzare solo il caricabatterie fornito con il vostro scooter 2 NON utilizzare mai un caricabatterie...

Страница 28: ... collegamento elettrico e problemi operativi Pulire le batterie corrose con una spazzola rigida e una miscela di bicarbonato di sodio e acqua 16 6 Carica della batteria Il carica batteria funziona con la tensione normale di una presa di corrente corrente alternata e la converte in V CC corrente continua Le batterie usano la corrente continua per far funzionare lo scooter Quando le batterie sono co...

Страница 29: ... Soluzioni Ricaricare le batterie dello scooter Consultare il capitolo 16 5 Batteria e ricarica del presente manuale Se il problema persiste rivolgersi al proprio rivenditore autorizzato per effettuare un test di caricamento dette batterie Se le batterie sono funzionanti il problema potrebbe essere il caricabatterie Rivolgersi al proprio rivenditore autorizzato RIPRISTINARE L INTERRUTTORE AUTOMATI...

Страница 30: ...perché il caricabatterie è collegato o la leva non è in posizione di guida 7 Flash Problema acceleratore Indica un problema alla leva di comando Assicurarsi che la leva sia in posizine di riposo prima di accendere lo scooter 8 Flash Problema nel controller Indica un errore nel controller Assicurarsi che tutti i collegamenti siano saldi 9 Flash Errore freno di stazionamento Il freno di stazionament...

Страница 31: ...mento inadeguato e permette di recuperare i materiali di cui è composto al fine di ottenere un importante risparmio di energie e di risorse Per rimarcare l obbligo di smaltire separatamente le apparecchiature elettromedicali sul prodotto è riportato il marchio del contenitore di spazzatura mobile sbarrato 18 3 Trattamento delle batterie esauste Direttiva 2006 66 CE Questo simbolo sul prodotto indi...

Страница 32: ...m ALTEZZA SEDUTA DA PEDANA 440 mm ALTEZZA SEDUTA DA TERRA 590 mm PROFONDITA SEDUTA 420 mm ALTEZZA SCHIENALE 390 mm INTERASSE 830 mm ALTEZZA DA TERRA 105 mm MASSIMA PENDENZA STIMATA SUPERABILE 12 21 SUPERAMENTO OSTACOLO 50 mm Il sedile dello scooter è testato secondo la normativa EN1021 per quanto riguarda la resistenza alla combustione ma si consiglia di evitare fiamme vicino allo scooter e fumo m...

Страница 33: ...a difetti di costruzione o secondo quanto richiesto dalle norme di legge Se si lasciano inutilizzate per più di tre mesi consecutivi batterie completamente cariche la garanzia viene automaticamente annullata Se si lasciano inutilizzate per più di tre giorni consecutivi batterie completamente scariche la garanzia viene automaticamente annullata 21 RIPARAZIONI Riparazione in garanzia Nel caso in cui...

Страница 34: ...ommerciabilità idoneità per uno scopo particolare non violazione e non interferenza Moretti non garantisce che l uso del prodotto Moretti sarà ininterrotto o senza errori La durata di eventuali garanzie implicite che possano essere imposte dalle norme di legge è limitata al periodo di garanzia nei limiti delle norme di legge Alcuni stati o paesi non permettono limitazioni sulla durata di una garan...

Страница 35: ...____________________________ Acquistato in data____________________________________________________________ Rivenditore __________________________________________________________________ Via _______________________ Località ___________________________________________ Venduto a____________________________________________________________________ Via ________________________ Località_________________...

Страница 36: ...MORETTI S P A Via Bruxelles 3 Meleto 52022 Cavriglia Arezzo Tel 39 055 96 21 11 Fax 39 055 96 21 200 www morettispa com info morettispa com ...

Страница 37: ...ENGLISH ELECTRIC SCOOTER MOBILITY 210 INSTRUCTION MANUAL MA CN210A CN210B 01 A_ENG_02 2022 ...

Страница 38: ... 21 13 5 Driving up and down slopes pag 22 13 6 Engine braking system pag 23 13 7 Stopping brake pag 24 13 8 Thermal protection pag 24 14 TRANSPORT PAG 24 14 1 Transporting the scooter pag 24 15 CLEANING PAG 24 15 1 Cleaning the tyres pag 24 15 2 Cleaning the body pag 24 15 3 Cleaning the seat pag 25 16 GENERAL MAINTENANCE INSTRUCTIONS PAG 25 16 1 Controls and reminders pag 26 16 2 Wheel replaceme...

Страница 39: ...se other than that specified in this manual The manufacturer reserves the right to modify the device and its relevant manual without prior notice in order to improve the product s features 4 DECLARATION OF CONFORMITY Moretti S p A declares under its sole responsibility that the product made and traded by Moretti S p A and belonging to the group of ELECTRIC SCOOTER ARDEA MOBILITY complies with the ...

Страница 40: ...nd tear of non repairable and or non replaceable parts Always take care when children are present Maximum user weight 149 kg Classification class B EN 12184 The product is not suitable for the visually impaired The device must not be used by children under 12 years of age The scooter is not designed for use as a seat in a motor vehicle The user and or the patient will have to report any serious ac...

Страница 41: ...5 ENGLISH EC REP 0197 S N Waste Electrical Electronic Equipment WEEE B Type IPX4 Protection class Max loading weight 7 GENERAL DESCRIPTION illustrative images ...

Страница 42: ...sure that it is used in these conditions EMISSION TESTS CONFORMITY ELECTROMAGNETIC ENVIRONMENT GUIDE RF emissions CISPR 11 Group 1 The CN210X Scooter uses RF energy only for internal functioning and for charging the battery Its RF emissions are therefore very low and in all likelihood do not interfere with nearby electronic equipment RF emissions CISPR 11 Class B The CN210X Scooter is suitable for...

Страница 43: ...Over voltages IEC 61000 4 5 1 kV differential mode 2 kV common mode 1 kV differential mode 2 kV common mode The quality of the mains supply must be that of a typical commercial or hospital environment Voltage drop outs brief interruptions and variations of voltage on the power supply lines IEC 61000 4 11 5 UT 95 UT drop out for 0 5 cycles 40 UT 60 UT drop out for 5 cycles 70 UT 30 UT drop out for ...

Страница 44: ...lower than the level of conformity of each frequency range b There may be interference near devices with the following symbol radiated RF IEC 61000 4 3 20 V m From 80 MHz to 2 5 GHz 1 V m NOTE 1 at 80 MHz and 800 MHz apply the separation distance for the higher frequency band NOTE 2 these guidelines may not apply in all situations Electromagnetic propagation is affected by absorption and reflectio...

Страница 45: ...X Scooter During battery charging During use of the CN210X Scooter During battery charging During use of the CN210X Scooter from 150 kHz to 80 MHz d 3 5 V1 P from 150 kHz to 80 MHz d 3 5 V1 P from 80 MHz to 800 MHz d 3 5 E1 P from 80 MHz to 800 MHz d 3 5 E1 P from 800 MHz to 2 5 GHz d 7 E1 P from 800 MHz to 2 5 GHz d 7 E1 P 0 01 0 35 0 35 0 35 0 35 0 7 0 7 0 1 1 1 1 1 1 1 1 1 2 2 2 2 1 3 5 3 5 3 5...

Страница 46: ...r Do not make tight curves or brake suddenly when you are driving the scooter Do not drive the scooter in traffic Do not attempt to mount curbs higher than those indicated in the technical specifications Do not put your hands or legs out when driving the scooter Do not drive the scooter on slippery roads or when it is snowing Do not allow unsupervised children to play near the scooter when the bat...

Страница 47: ...ooter Please remember that loose clothing could get caught in the wheels 10 Consult your doctor if you are taking drugs or if you have specific physical limitations Certain drugs and certain limitations could prevent safe use of the scooter 11 Always check that the wheel locking unlocking lever is locked or unlocked 12 Do not remove the roll over protection wheels if they are present on the scoote...

Страница 48: ...ity and cause it to tip over or fall 10 5 Temperature 1 Certain parts of the scooter are affected by changes in temperature The controller only functions at a temperature between 25 C and 50 C 2 The batteries could freeze at extremely low temperatures and prevent your scooter from operating In extremely hot climates the scooter might only function at lower speeds due to a safety feature of the con...

Страница 49: ...nd only It controls the forward and reverse speed DRIVING to drive forwards use the fingers of your right hand to pull back the accelerator lever on the right use your left thumb to push the accelerator lever on the left NOTE Always bring the scooter to a complete stop before changing direction from forward to reverse or from reverse to forward to drive in reverse use the fingers of your left hand...

Страница 50: ...tive image 1 Loosen the adjustment knob on the back of the seat Fig 1 2 Slide the armrest in or out to obtain the desired width 3 Tighten the adjustment knob again WARNING Ensure that the adjustment knobs are firmly screwed onto the tube inserted in the armrest Do not extract the armrest too far 2 1 Fig 2 illustrative image TIPPING THE ARMRESTS Raise the armrests to assist getting on and or off th...

Страница 51: ...l Fig 6 4 Position the seat at the desired height and align the holes with those on the pedestal 5 Remount the bolt nut 6 Reposition the battery 7 Place the seat in position again and push it downwards to lock it in position Move the seat from side to side to ensure it is locked in position WARNING Do not sit on the scooter or try to move it without first checking that the frame and the rear troll...

Страница 52: ...ISASSEMBLY 12 1 Assembly WARNING Take care over any pinching points when attaching the rear frame to the front frame During assembly check the warning labels at the pinching points Pinching and crushing risk There is an increased risk of pinching or crushing due to the weight of the components such as the batteries when preparing the scooter for transport or during maintenance activities Always ta...

Страница 53: ...illustrative image REINSTALLING THE TRANSMISSION Align the frame and the transmission Fig 9 Lower the frame onto the transmission until the transmission releases the lever attachments You will hear a click Fig 10 Push the seat downwards to lock it in position Move the seat from side to side to ensure it is locked in position Fig 9 illustrative image Fig 10 illustrative image ...

Страница 54: ...lebar adjustment knob Adjustment knob Basket Fig 12 illustrative image Follow the instructions below to position the handlebar as desired Grip a handle with one hand Loosen the handlebar adjustment knob with the other hand Position the handlebar in a comfortable driving position Tighten the handlebar adjustment knob WARNING Make sure that the knob is firmly screwed into the desired position REPOSI...

Страница 55: ...the seat is correctly locked by turning slightly to the left and to the right UNLOCKING THE HANDLEBAR Rotate the steering lock to the unlocked position Fig 14 Fig 14 illustrative images WARNING If the steering lock is not unlocked the handlebar will not turn and there is a risk of injury There is a risk of accidents if the seat is not positioned correctly Before sitting down to drive always turn t...

Страница 56: ...s the edge of the platform could cause instability GETTING ON THE SCOOTER Position the seat so that you can get on safely and easily Return the handlebar to the vertical position Carefully place one foot at the approximate centre of the platform and sit on the seat comfortably and safely Fasten the safety belt if the scooter has one Lower or reposition the armrests in place Insert the key in the i...

Страница 57: ... cause one of the rear wheels to leave the ground and the scooter to tip over Avoid this risk by decelerating and steering in a wide arc around corners and obstacles STEERING NEAR A NARROW PASSAGE To steer near a narrow passage such as when entering or exiting a door or changing direction 1 Bring the scooter to a complete stop 2 Set the minimum speed 3 Turn the handlebar in the direction in which ...

Страница 58: ...se otherwise the scooter will tip over Drive slowly down the curb to avoid jolts Use as little power as possible GRASS AND GRAVEL The scooter functions well on grass and gravel and also on hills but it is necessary to comply with the operating parameters indicated in this manual in the technical specifications chapter If any situation causes doubt avoid it Feel free to use the scooter on lawns and...

Страница 59: ...rate the controls at the minimum speed Slowly and carefully accompany the scooter along the sloping surface Carefully get back on the scooter and return to normal functioning Procedure 2 Emergency not in operation Turn the ignition to the Off position Get off the scooter Set the wheel unlocking lever to Unlocked Remain standing alongside the scooter and accompany it by hand along the entire slopin...

Страница 60: ...T Your scooter is designed to be transported easily in a car Consult chapter 12 2 on the scooter disassembly methods and chapter 12 1 on the scooter assembly methods 14 1 Transporting the scooter Disassemble or fold the seat and the handlebar as far as possible in the loading area of the vehicle used for transport The choice to disassemble or lower the seat and the handlebar depends on the size an...

Страница 61: ...to perform are listed below INSPECTION DAILY MONTHLY EVERY SIX MONTHS ANNUAL PERFORMED BY Brake functioning X User Tyre conditions X User Battery level check X User Check on reversibility of the front wheels X User Cleaning X User Cable check X User Battery terminals check X User Engine brushes X Retailers Frame stability check X Retailers Wheel bearing lubrication X Retailers Failure to perform m...

Страница 62: ...t 16 2 Wheel replacement If the scooter has a solid tyre replace the entire wheel Contact your local retailer 16 3 Control panels battery charger and rear electronics Protect these components from damp If exposed to damp dry them off completely before you use the scooter again 16 4 Storing the scooter If you do not intend to use the scooter for a lengthy period of time it is advisable to Completel...

Страница 63: ...1 Only use the battery charger supplied with your scooter 2 NEVER use a car battery charger or a wet one 3 Avoid deep discharges and never allow the batteries to discharge completely 4 Do not leave the batteries at low charge for lengthy periods Charge a discharged battery as soon as possible 5 Charge the batteries completely on a regular basis 6 Store the batteries completely charged 7 Check the ...

Страница 64: ...mperage of the battery charger is almost at zero This allows the battery charger to maintain the charge but not overcharge the battery Notes The batteries cannot be charged if they have discharged almost to zero voltage Always charge the batteries in a well ventilated place The battery charger is only for internal use Protect it against humidity To obtain maximum performance it is recommended to r...

Страница 65: ...tery and charging of this manual If the problem persists contact your authorised retailer to carry out a battery charging test If the batteries are working properly the problem could be the battery charger Contact your authorised retailer RESTARTING THE AUTOMATIC MAIN SWITCH If the automatic main switch trips due to the batteries being depleted or due to a temporary overload restart the automatic ...

Страница 66: ...attery charger is connected or the lever is not in the drive position 7 Flashes Accelerator problem Indicates a problem on the command lever Check that the lever is in the idle position before switching on the scooter 8 Flashes Problem in the controller Indicates an error in the controller Check that all the connections are correct 9 Flashes Stopping brake error The stopping brake is not properly ...

Страница 67: ...mprising the product which translates into significant energy and resource savings The product bears the barred bin symbol to underline the obligation of disposing of electro medical equipment 18 3 Disposal of exhausted batteries Directive 2006 66 EC This symbol on the product indicates that the batteries must not be considered as normal domestic waste Ensuring that the batteries are discarded cor...

Страница 68: ...SEAT WIDTH 450 mm SEA THEIGHTFROMTHEPLA TOFRM 440 mm SEATHEIGHTFROMTHEGROUND 590 mm SEAT DEPTH 420 mm BACKREST HEIGHT 390 mm WHEELBASE 830 mm HEIGHT FROM THE GROUND 105 mm MAXIMUM SLOPE ESTIMATED SURMOUNTABLE 12 21 SURMOUNTING OF AN OBSTACLE 50 mm The scooter is tested according to standard EN1021 for combustion resistance but it is recommended to avoid naked flames close to the scooter and smokin...

Страница 69: ...h warranty on manufacturing defects or as required by law If completely charged batteries are left unused for more than three consecutive months the warranty is automatically invalidated If completely discharged batteries are left unused for more than three consecutive days the warranty is automatically invalidated 21 REPAIRS Repairs under warranty If a Moretti product has material or manufacturin...

Страница 70: ...sale suitability for a given purpose non violation and non interference Moretti does not guarantee that the use of its product will be uninterrupted and problem free The duration of any implicit guarantee under the law is limited to the warranty period within the limits of the law Certain states and countries do not permit limitations on the duration of an implicit guarantee or the exclusion of li...

Страница 71: ..._____________________________________________ Date of purchase______________________________________________________ Reseller ______________________________________________________________ Street_______________________ Town ____________________________________ Sold to________________________________________________________________ Street_______________________ Town_________________________________...

Страница 72: ...MORETTI S P A Via Bruxelles 3 Meleto 52022 Cavriglia Arezzo Tel 39 055 96 21 11 Fax 39 055 96 21 200 www morettispa com info morettispa com ...

Отзывы: