2016/08/03
Step 3
Headquarters
No. 168 Mingjia Road Industrial Park North
Minhang District Shanghai 201107, P.R. China
Tel: +86(0)21-5263 4688 Fax: +86(0)21-6296 8682
Web: www.moonsindustries.com E-mail: [email protected]
TXM34Q/C
Quick Setup Guide
If you have any questions or comments, please call our Customer Support at +86-4008209661, or visit us online at
www.moonsindustries.com
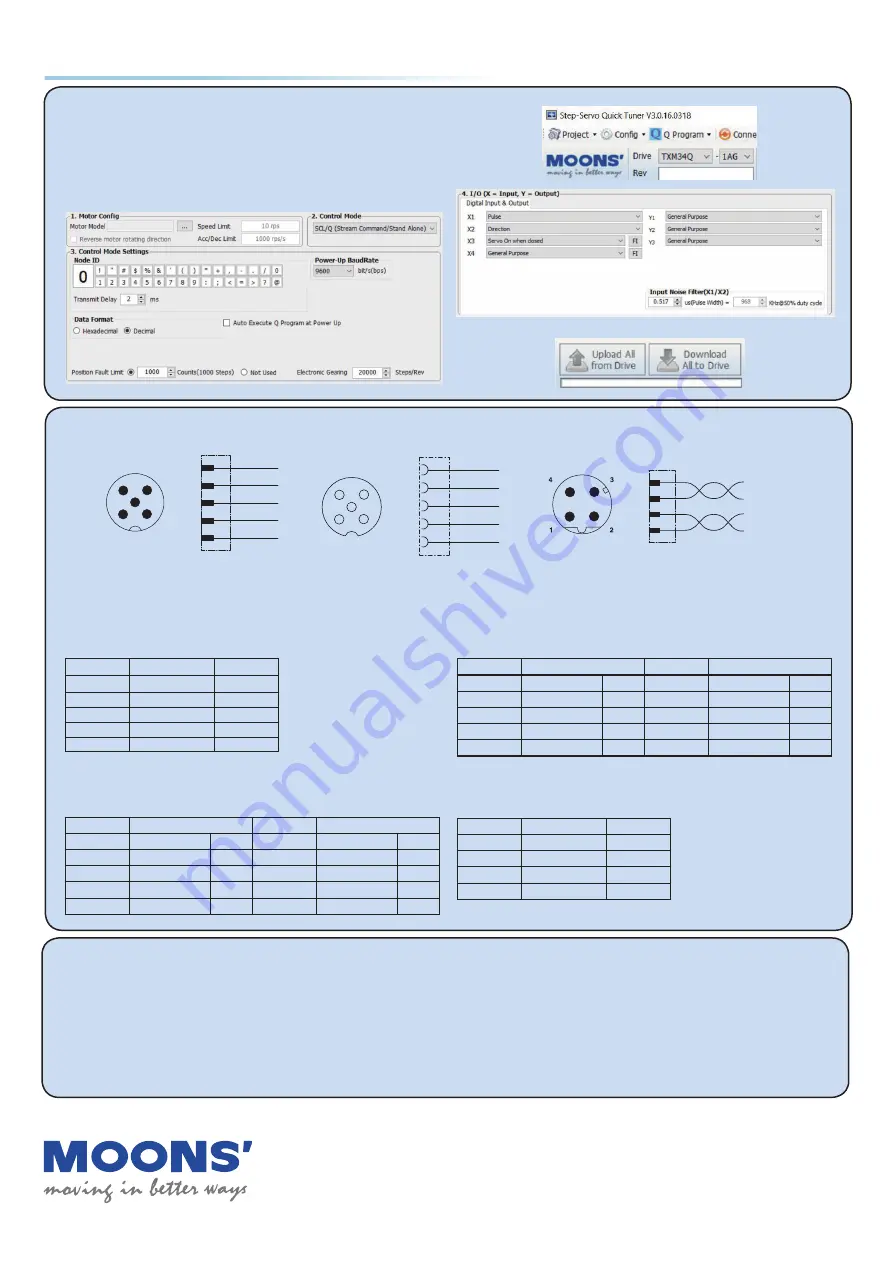
Configure the drive
a)
Apply power to the drive. The software will recognize
the drive & display the model & firmware version.
b)
Setup drive control mode, and control mode settings
c)
Setup I/O function
d)
Download to the drive
a
b
c
d
Choosing the Right COM Port
Open the "Device Manager" on the PC. If the PC has an
built-in RS-232 serial port, "Ports (COM & LPT)" will be
displayed. Connect the PC and motor with the included
RS-232 communication cable. Choose the connected
COM(n) port in the Step-Servo Quick Tuner software.
If the PC does not have an RS-232 serial port, a
USB to RS-232 serial port adapter will be needed.
Open the "Device Manager" on the PC. There
may or may not be a "Ports" selection. Connect
the adapter to the PC, this USB adapter COM port
should then be displayed. Choose this new COM(n)
port in the Step-Servo Quick Tuner software.
See Section 3.2.4 "Choosing the Right COM Port in the Hardware Manual for more information.
RS-232 Communication
Use part number 1407805 and connect as follows:
Color
Assignment
PIN
Brown
RX
1
White
N/C
2
Blue
TX
3
Black
GND
4
Gray
N/C
5
CANopen Communication
Only COM1 with RS-232 serial port
CANopen connection is as follows:
COM1
Part no. 1407805
COM2
Part no. 1407788
Brown
RS-232_TXD
1
Brown
N/C
1
White
RS-232_RXD
2
White
N/C
2
Blue
GND
3
Blue
GND
3
Black
CAN_H
4
Black
CAN_H
4
Gray
CAN_L
5
Gray
CAN_L
5
RS-485 Communication
RS-485 connection is as follows:
COM1
Part no. 1407805
COM2
Part no.1407788
Brown
RX+
1
Brown
RX+
1
White
RX-
2
White
RX-
2
Blue
TX+
3
Blue
TX+
3
Black
TX-
4
Black
TX-
4
Gray
GND
5
Gray
GND
5
Ethernet Communication
COM1 and COM2 are same connectors
Use part number 1407356 and connect as follows:
Color
Assignment
PIN
Yellow
TX+
1
White
RX+
2
Orange
TX-
3
Blue
RX-
4
Part 1407805
Part 1407788
Part 1407356
from Phoenix Contact
Communication Wiring
4
3
1
2
5
BN
1
2
BK
4
BU
GY
3
5
WH
3
4
2
1
5
BN
1
2
BK
4
BU
GY
3
5
WH
1
WH/OG
OG
3
2
WH/GN
GN
4


