Moog Videolarm SView FDP7C12N-9 Скачать руководство пользователя страница 3

LIMITED WARRANTY

FOR VIDEOLARM INC. PRODUCTS

VIDEOLARM INC. warrants this Product to be free from defectsin material or workmanship,as follows:

PRODUCTCATEGORY

PARTS


LABOR

All Enclosures and Electronics    

Five (5) Years


Five (5) Years

Pan/Tilts   


Three (3) Years **6 months if used in autoscan 

Three (3) Years **6 months if used in autoscan

Poles/PoleEvators 


Three (3) Years


Three (3) Years

Warrior/Q-View/I.R. Illuminators                            Five   (5) Years 

Five (5) Years

Controllers 


Five (5) Years


 Five (5) Years

Power Supplies 


Five (5) Years 


Five (5) Years

Accessory Brackets   


Five (5) Years 


Five (5) Years

During the labor warranty period, to repair the Product, Purchaser will either return the defective product, freight prepaid, or deliver it to Videolarm Inc.

Decatur GA. The Product to be repaired is to be returned in either its original carton or a similar package

an equal degree of protection with a

RMA # (Return Materials Authorization number) displayed on the outer box or packing slip. To obtain a RMA# you must contact our Technical Support

Team at 800.554.1124, extension 101. Videolarm will return the repaired Product freight prepaid to Purchaser. Videolarm is not obligated to provide

Purchaser with a substitute unit during the warranty period or at any time. After the applicable warranty period, Purchaser must pay all labor and/or

parts charges.

1.NOTIFICATIONOF CLAIMS: WARRANTYSERVICE:If Purchaser believes that the Product is defective in material or workmanship, then written notice

with an explanation of the claim shall be given promptly by Purchaser to Videolarm but all claims for warranty service must be made within the

warranty period. If after investigation Videolarm determines that the reported problem was not covered by the warranty, Purchaser shall pay Videolarm

for the cost of investigating the problem at its then prevailing per incident billable rate. No repair or replacement of any Product or part thereof shall

extend the warranty period as to the entire Product. The

warranty on the repaired part only shall be in

for a period of ninety (90) days

following the repair or replacement of that part or the remaining period of the Product parts warranty, whichever is greater.

2.EXCLUSIVE REMEDY: ACCEPTANCE:Purchaser’s exclusive remedy and Videolarm’s sole obligation is to supply (or pay for) all labor necessary to repair

any Product found to be defective within the warranty period and to supply, at no extra charge, new or rebuilt replacements for defective parts.

3.EXCEPTIONS TO LIMITED WARRANTY: Videolarm shall have no liability or obligation to Purchaser with respect to any Product requiring service

during the warranty period which is subjected to any of the following: abuse, improper use: negligence, accident, lightning damage or other acts

of God (i.e., hurricanes, earthquakes),

failure of the end-user to follow the directions outlined in the product instructions, failure of the

end-user to follow the maintenance procedures recommended by the International Security Industry Organization, written in product instructions,

or recommended in the service manual for the Product. Furthermore, Videolarm shall have no liability where a schedule is

for regular

replacement or maintenance or cleaning of certain parts (based on usage) and the end-user has failed to follow such schedule; attempted repair by

personnel; operation of the Product outside of the published environmental and electrical parameters, or if such Product’s original

(trademark, serial number) markings have been defaced, altered, or removed. Videolarm excludes from warranty coverage Products sold

AS IS and/or WITH ALL FAULTS and excludes used Products which have not been sold by Videolarm to the Purchaser. All software and accompanying

documentation furnished with, or as part of the Product is furnished “AS IS” (i.e., without any warranty of any kind), except where expressly provided

otherwise in any documentation or license agreement furnished with the Product.

4.PROOF OF PURCHASE:The Purchaser’s dated bill of sale must be retained as evidence of the date of purchase and to establish warranty eligibility.

DISCLAIMEROF WARRANTY

EXCEPT FOR THE FOREGOING WARRANTIES, VIDEOLARM HEREBY DISCLAIMS AND EXCLUDES ALL OTHER WARRANTIES, EXPRESS OR IMPLIED,

INCLUDING, BUT NOT LIMITED TO ANY AND/OR ALL IMPLIED WARRANTIES OF MERCHANTABILITY, FITNESS FOR A PARTICULAR PURPOSE AND/OR ANY WARRANTY WITH

REGARD TO ANY CLAIM OF INFRINGEMENT THAT MAY BE PROVIDED IN SECTION 2-312(3) OF THE UNIFORM COMMERCIAL CODE AND/OR IN ANY OTHER COMPARABLE

STATE STATUTE. VIDEOLARM HEREBY DISCLAIMS ANY REPRESENTATIONS OR WARRANTY THAT THE PRODUCT IS COMPATIBLE WITH ANY COMBINATION OF NON-VIDEOLARM

PRODUCTS OR NON-VIDEOLARM RECOMMENDED PRODUCTS PURCHASER CHOOSES TO CONNECT TO PRODUCT.

LIMITATION OF LIABILITY

THE LIABILITY OF VIDEOLARM, IF ANY, AND PURCHASER’S SOLE AND EXCLUSIVE REMEDY FOR DAMAGES FOR ANY CLAIM OF ANY KIND

WHATSOEVER, REGARDLESS OF THE LEGAL THEORY AND WHETHER ARISING IN TORT OR CONTRACT, SHALL NOT BE GREATER THAN THE ACTUAL PURCHASE PRICE OF THE


PRODUCT WITH RESPECT TO WHICH SUCH CLAIM IS MADE.  IN NO EVENT SHALL VIDEOLARM BE LIABLE TO PURCHASER FOR ANY SPECIAL, INDIRECT, INCIDENTAL, OR 

CONSEQUENTIAL DAMAGES OF ANY KIND INCLUDING, BUT NOT LIMITED TO, COMPENSATION, REIMBURSEMENT OR DAMAGES ON ACCOUNT OF THE LOSS OF PRESENT 

OR PROSPECTIVE PROFITS OR FOR ANY OTHER REASON WHATSOEVER.

/tour operation

/tour operation

**6 months if used in autoscan 

/tour operation

**6 months if used in autoscan 

/tour operation

SView Series 


Five (5) Years

Five (5) Years

The limited warranty stated in these product instructions is subject to all of the following terms and conditions:

TERMS AND CONDITIONS

Содержание SView FDP7C12N-9

Страница 1: ...t camera pendent mount MPEG 4 MJPEG video compression full D1 Clear dome with 12VDC input heater blower FDW7C12S 3 Analog Version 7 Outdoor FusionDome PTZ Camera System with 36x zoom Day Night camera wall mount MPEG 4 MJPEG video compression full D1 Clear dome with 12VDC input heater blower FDP7C12S 3 Analog Version 7 Outdoor FusionDome PTZ Camera System with 36x zoom Day Night camera pendent moun...

Страница 2: ...n be damaged if improperly handled or dropped If an item appears to have been damaged in shipment replace it properly in its carton and notify the shipper Be sure to save 1 The shipping carton and packaging material They are the safest material in which to make future shipments of the equipment 2 These Installation and Operating Instructions If technical support or service is needed contact us at ...

Страница 3: ...mage or other acts of God i e hurricanes earthquakes failure of the end user to follow the directions outlined in the product instructions failure of the end user to follow the maintenance procedures recommended by the International Security Industry Organization written in product instructions or recommended in the service manual for the Product Furthermore Videolarm shall have no liability where...

Страница 4: ... 100 12VDC 50 Watt Zusatzgerät Heizung 20 Watts Blower 2 Watt Kamera Energie Sehen Sie Kamera Spezifikationen 28 Watt Maximale Werkzeug Erfordert 100 Flacher Hauptschraubenzieher Kreuzkopfhauptschraubenzieher 12VDC 50 Watts De Acessórios Calefator 20 Watts Blower 2 Watt Poder Da Câmera De Veja Especificações Da Câmera 28 Watts De Ferramentas Máximas Requereram Chave de fenda Principal Phillips Da ...

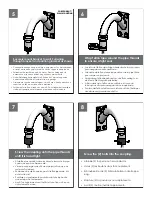
Страница 5: ...o encaixe entrante da canalização Se per mezzo del condotto colleghi colleghi al mon taggio ricevuto del condotto Open access door to access power and control connectors Abra la puerta de acceso en los conectadores de la energía y de control del acceso Ouvrez la porte d accès aux connecteurs de puissance et de commande d accès Öffnen Sie Zugang zur Zugang Energie und zu den Geräteanschlüssen Abra ...

Страница 6: ...rafusos no acoplamento Avviti 2 i bulloni nell accoppiamento 2 Wrap Teflon tape around the pipe threads to ensure a tight seal La cinta del Teflon del abrigo alrededor de la pipa rosca para asegurar un sello apretado La bande de teflon d enveloppe autour de la pipe filète pour assurer un joint serré Verpackung Teflonklebeband um das Rohr verlegt um eine feste Dichtung sicherzustellen A fita adesiv...

Страница 7: ... washers Deshaga el acollador tire de contener para arriba y tuerza seguro con el perno y las arandelas de fijación Défaites la lanière tirez loger vers le haut et tordez bloqué avec le boulon et les rondelles de fermeture Annulieren Sie die Abzuglinie ziehen Sie oben unterbringen und verdrehen Sie sicheres mit dem verriegelnschraubbolzen und den Unterlegscheiben Undo o colhedor puxe abrigar acima...

Страница 8: ...en und weiblichen Beziehungen her Innenmodell schließt nicht vor laufen lassen Kabel ein Faça as conexões masculinas e fêmeas apropriadas O modelo indoor não inclui pre funciona cabos Faccia i collegamenti maschii e femminili adatti Il modello dell interno non include pre fa funzionare i cavi RJ45 Large POWER Small POWER BNC Power and Control Inputs Outside of Housing Power and Control Inputs Insi...

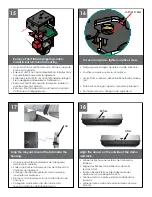
Страница 9: ...lleghi la cordicella in circuito intorno alla linguetta all interno dell alloggiamento CAPTIVE SCREW To secure in place tighten captive screw Para asegurar en lugar apriete el tornillo prisionero Pour fixer en place serrez la vis captive Um im Platz zu sichern ziehen Sie Sicherheitsschraube fest Para fixar se no lugar aperte o parafuso prisioneiro Per fissare sul posto stringa la vite prigioniera ...

Страница 10: ...n tournevis Phillips Befestigen Sie sich hinunter die Haube mit einem Kreuzkopfschraubenzieher Prenda abaixo a abóbada com uma chave de fenda Phillips Fissisi giù la cupola con un cacciavite phillips Wipe the dome clean Limpie la bóveda limpia Essuyez le dôme Wischen Sie die Haube sauber ab Limpe a abóbada limpa Asciughi la cupola 19 20 ...

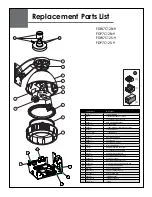
Страница 11: ... HOUSING HARDWARE 9 RPFD709 HOUSING TOP 10 RPFD2612 HOUSING TOP GASKET 11 WM10 WM10 WALL MOUNT 14 SD0170 PENDANT HOUSING COUPLING 15 SD0180 QUICK RELEASE PIPE COUPLING 16 SD0160 PENDANT MOUNT BRACKET 17 RPPKE1100 HOUSING HARDWARE PACKET B 18 RPPKH2090 ELECTRICAL PACKET 19 RPPKH2071 HOUSING HARDWARE PACKET A N S RPPKE1125 ELECTRICAL PACKET HB FIXED NETWORK N S RPTRN02 40VA WALL TRANSFORMER 20 23 25...

Страница 12: ...Before attempting to connect or operate this product please read these instructions completely www videolarm com S VIEW PAN TILT Analog IP Installation and Operation Supplement 81 IN5409 01 29 2009 ...

Страница 13: ... IP 20 WATTS Nur Kategorie 2 Spg Versorgungsteil MODELLE 24 VAC S Ansicht Analog 13 WATT S Ansicht IP 28 WATT MODELLE 12VDC S Ansicht Analog 13 WATT S Ansicht IP 20 WATT Fonte De Alimentação Da Classe 2 Somente MODELOS 24 VAC S vista Análogo 13 WATTS S vista IP 28 WATTS MODELOS 12VDC S vista Análogo 13 WATTS S vista IP 20 WATTS Gruppo di alimentazione Del Codice categoria 2 Soltanto MODELLI 24 VCA...

Страница 14: ...nalog Para fijar la dirección de la cámara fotográfica localice el tablero de PC en el lado de la unidad de Pan Tilt Pour placer l adresse d appareil photo localisez le panneau de PC du côté de l unité de Pan Tilt Um Kameraadresse einzustellen lokalisieren Sie PC Brett auf der Seite der Pan Tilt Maßeinheit Para ajustar o endereço da câmera encontre a placa de PC no lado da unidade de Pan Tilt Per ...

Страница 15: ...nstellungen werden angefordert getan A sustentação da S Vista Pan Tilt os protocolos acima Isto é feito automaticamente nenhuns ajustes é requerido Il supporto di S Vista Pan Tilt i suddetti protocolli Ciò è fatta automaticamente nessun regolazioni è richiesta 1 VL422 2 PELCO P 4800 9600 3 PELCO D 4800 9600 When using Videolarm controller to enter the menu select the camera you wish to control Al ...

Страница 16: ...lick on the PTZ control icon in top right corner Para el control de la inclinación de la cacerola chasque encendido el icono del control de PTZ en esquina derecha superior Pour le clic de commande d inclinaison de casserole sur l icône de commande de PTZ dans le bon coin supérieur Zur Wanne Neigungsteuerung klicken Sie an die PTZ Steuerikone in der Rechteecke Para o controle da inclinação da bande...

Страница 17: ...serole gauche vers la sortie Verwenden Sie dieses submenu um Kompaßsteuerkurs zu aktivieren Betätigen Sie Zoom innen um Zoom heraus an an zu wenden wenden weg die Wanne die an Ausgang link ist Use este submenu ativar o título de compasso Pressione o zumbido dentro para girar sobre zumbido para fora para desligam bandeja esquerda para a saída Usi questo submenu per attivare l intestazione di bussol...

Страница 18: ...select models Exhibirá datos de la presión de Pan Tilt en monitor Esta característica está solamente disponible en modelos selectos Montrera des données de pression de Pan Tilt sur le moniteur Ce dispositif est seulement disponible sur les modèles choisis Zeigt Druckdaten von Pan Tilt auf Monitor an Diese Eigenschaft ist auf auserwählten Modellen nur vorhanden Indicará dados da pressão de Pan Tilt...

Страница 19: ...er 1 cuando la entrada del alarmar es cerrada Employez le menu secondaire pour activer l alarme Quand permis l appareil photo ira prérégler 1 quand l entrée d alarme est fermée Benutzen Sie Vormenü um Warnung zu aktivieren Wenn sie ermöglicht wird geht Kamera 1 einzustellen wenn Warnung Eingang geschlossen ist Use o menu secundário ativar o alarme Quando permitida a câmera irá pré ajustar 1 quando...

Страница 20: ...ractères de titre Filtrez gauche ou droit de changer la position d impression Employez l inclinaison haut bas pour montrer des caractères Le bourdonnement de pression dedans pour placer le bourdonnement de menu de titre sortie dehors reconstituera au titre original Erlauben Sie Ihnen Titelbuchstaben vorzuwählen Verschieben Sie links oder recht Zeichenstelle zu ändern Verwenden Sie die Neigung die ...

Страница 21: ...e saturation pour que chacun exister stocké a préréglé Les préréglages stockés par 6 ci dessus d exposition d écran avec des temps d angle de saturation de 9 5 12 5 5 5 secondes Erlaubt Benutzer Verweilzeit für jedes einzustellen stellte das Bestehen gespeichert ein Die oben genanntes gespeicherten Voreinstellungen des Schirmerscheinens 6 mit Verweilzeiten von 9 5 12 5 5 5 Sekunden Permite que o u...

Страница 22: ...0 to start pattern Presione preestablecen 81 para parar el registrar 81 Preestablezca 80 para comenzar el patrón Serrez prérèglent 81 pour cesser d enregistrer 81 Préréglez 80 pour commencer le modèle Betätigen Sie sich einstellen 81 um zu notieren zu stoppen 81 Stellen Sie 80 ein um Muster zu beginnen Pressione pré ajustam 81 para parar de gravar 81 Pré ajuste 80 para começar o teste padrão Premi...

Страница 23: ...ON ON ON OFF 63 OFF OFF ON ON ON ON ON ON 64 OFF ON OFF OFF OFF OFF OFF OFF 65 OFF ON OFF OFF OFF OFF OFF ON 66 OFF ON OFF OFF OFF OFF ON OFF 67 OFF ON OFF OFF OFF OFF ON ON 68 OFF ON OFF OFF OFF ON OFF OFF 69 OFF ON OFF OFF OFF ON OFF ON 70 OFF ON OFF OFF OFF ON ON OFF 71 OFF ON OFF OFF OFF ON ON ON 72 OFF ON OFF OFF ON OFF OFF OFF 73 OFF ON OFF OFF ON OFF OFF ON 74 OFF ON OFF OFF ON OFF ON OFF 7...

Страница 24: ... ON 132 ON OFF OFF OFF OFF ON OFF OFF 133 ON OFF OFF OFF OFF ON OFF ON 134 ON OFF OFF OFF OFF ON ON OFF ADDRESS SW8 SW7 SW6 SW5 SW4 SW3 SW2 SW1 45 OFF OFF ON OFF ON ON OFF ON 46 OFF OFF ON OFF ON ON ON OFF 47 OFF OFF ON OFF ON ON ON ON 48 OFF OFF ON ON OFF OFF OFF OFF 49 OFF OFF ON ON OFF OFF OFF ON 50 OFF OFF ON ON OFF OFF ON OFF 51 OFF OFF ON ON OFF OFF ON ON 52 OFF OFF ON ON OFF ON OFF OFF 53 O...

Страница 25: ...N OFF ON ON OFF 215 ON ON OFF ON OFF ON ON ON 216 ON ON OFF ON ON OFF OFF OFF 217 ON ON OFF ON ON OFF OFF ON 218 ON ON OFF ON ON OFF ON OFF 219 ON ON OFF ON ON OFF ON ON 220 ON ON OFF ON ON ON OFF OFF 221 ON ON OFF ON ON ON OFF ON 222 ON ON OFF ON ON ON ON OFF 223 ON ON OFF ON ON ON ON ON 224 ON ON ON OFF OFF OFF OFF OFF ADDRESS SW8 SW7 SW6 SW5 SW4 SW3 SW2 SW1 135 ON OFF OFF OFF OFF ON ON ON 136 O...

Страница 26: ...y 2 6 RP605007 Bearing 7 RPVL2316 90T Pan Pulley 8 RPVL2318 60T Tilt Pulley 9 RPVL2320 Tilt Bearing Hub 10 RP605011 Bearing 14 RP73CAVKS454 23 X Zoom Camera 15 RP92WSFN11 Nylon Washer 2 16 RP605009 Tilt Belt 17 RP605008 Pan belt 18 RP95FSSR06 Retaining ring large 19 RP95FSSR07 Retaining ring 21 RP605010 Tilt Bearing 22 RPVL2312R1 Quick Release Bracket 23 RP76V385T Tilt PCB 24 RP76V385P Main PCB 25...

Страница 27: ... Form at www videolarm com productregistration jsp or complete and mail in the bottom portion of this flyer Register your recent Videolarm purchases and benefit from the following Simple and Trouble Free RMA process Added into customer database to receive product updates news Eliminate the need to archive original purchase documents Receipts Purchase Orders etc Main Contact Info First Name Last Na...

Отзывы: