1
•
888
•
557
•
3848
Wards.com
8
9
How to Use (cont.)
How to Use (cont.)
2. Material or solution to be sprayed should always be strained to remove any
impurities which may clog the sprayer or cause poor performance/finish.
FILL THE CONTAINER
1. Unscrew the container from the sprayer.
2. After the material or solution has been properly thinned and strained, fill the
container to the neck.
3. Carefully screw the container back onto the sprayer.
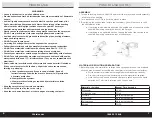
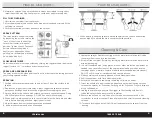
SPRAY PATTERN
The spray pattern shape is adjusted
by loosening the nut and turning the
“ears” of the air cap to either the
vertical, horizontal, or diagonal
position. Tighten the nut. Test each
pattern to determine which is
best for your application. When
painting, we recommend practicing
on a hidden area first.
FLOW ADJUSTMENT
Adjust the material or solution volume by turning the regulator knob (behind the
trigger) or - to increase or decrease volume.
SPRAY AREA PREPARATION
The spray area must be clean and free of dust in order to avoid blowing dust onto
your freshly sprayed surface.
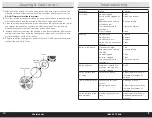
SPRAYING
1. Position the sprayer perpendicular to, and at least 1
"
from, the surface to be
sprayed.
2. Depress the trigger to activate spray. Always trigger the sprayer after each
spray pass has begun and release the trigger before stopping the pass.
3. Spray parallel to the surface with smooth passes at a consistent speed. Doing
this will help avoid runs and sags. DO NOT flex wrist while spraying.
4. When painting, always apply a thin coat of material on the first pass and allow
to dry before applying a second, slightly heavier coat.
5. Adjust distance from surface being sprayed as needed.
6. Keep strokes smooth and at an even speed.
7. When painting, keep the sprayer pointed squarely at the surface and overlap
passes slightly to obtain the most consistent finish possible.
Cleaning & Care
1. Unplug the sprayer. Depress the trigger so the material or solution left inside
the sprayer flows back into the container.
2. Screw off the container. Empty any remaining material or solution back into its
original packaging.
3. In a well-ventilated area (using gloves, mask or other protective equipment as
needed), pour a small amount of the appropriate cleaning solution into the
container (check material or solution label to determine appropriate cleaner).
DO NOT use solvents or lubricants which contain silicone.
4. Clean container and properly dispose of used cleaning solution.
5. Refill the container with fresh cleaning solution.
6. Attach the container to the sprayer and plug cord into an outlet.
7. Direct the nozzle into a pail lined with paper and spray the cleaning solution
through the sprayer for 2 seconds. Spray again for 2 seconds. Properly dispose
of the soiled paper.
8. Unplug the sprayer and depress the trigger so the cleaning solution left
inside the sprayer flows back into the container.
9. Remove the nut and air cap. Use a pliers to take out the nozzle and a flat
screwdriver to pull out the seal. Clean all pieces with a small brush and cleaning
solution.
10. Turn both locking knobs to UNLOCK; pull and separate the sprayer from the
housing.
1–12"
incorrect
correct
Содержание 774679
Страница 8: ...15 14...

