Monster Flatscreen SUPERTHIN Скачать руководство пользователя страница 9

9

wood Stud Mounting 

(cont’d)

6 

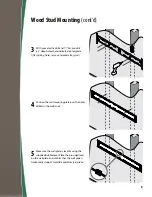
With the help of another person, attach the 
wall plate to the wall using the lag bolts and 

round washers as shown to the right. Tighten each 
bolt with your wrench. Turn clockwise until secure. 
 
Continue to page 13 to continue your installation. 

DO NOT over tighten bolts. This can 
damage the wall plate or the surface  
of your wall.

DO NOT release the wall plate until 
you are absolutely sure it is secured  
to the wall.

Содержание Flatscreen SUPERTHIN

Страница 1: ...SUPERTHIN Large Tilt MOUNT SECURE EASYTO INSTALL LOW PROFILETilting MOUNT Installation manual and warranty 42 63 106 160cm 120lbs 54 43kg...

Страница 2: ...Pacific China 400 820 8973 contact Monster LLC 455 Valley Drive Brisbane CA 94005 at 1 877 800 8989 If you bought the Product anywhere else contact Monster Technology International Ltd Ballymaley Bus...

Страница 3: ...o 85cm 15 75 40cm 19 36 49 18cm 34 78 88 6cm 16 93 43cm Specifications and Notes VESA 200 200 300 300 400 200 400 400 600 400 800 400 Compliant Monster is constantly striving to improve its products S...

Страница 4: ...ter number for your location See page 2 for phone numbers 1 Wall Mounting Plate 4 Rectangular Washers 4 Round Washers 2 Tilting Vertical Adjustment Bars Screws 4 each M5 10 M5 15 M5 25 4 each M6 10 M6...

Страница 5: ...des for more information 9 DO NOT over tighten screws or bolts This can damage the wall plate or the surface of your wall Thread screws or bolts carefully by hand before tightening If you feel any res...

Страница 6: ...cklist For wood stud mounting your mounting location must have at least two wall studs Your view of the mounting location must be free of glare or other obstructions Your mounting location must be nea...

Страница 7: ...r and slide the studfinder along the wall until the indicator light goes on 1 Locate two adjacent wall studs at least 12 31 5cm apart at your desired mounting location 2 Position the supplied cardboar...

Страница 8: ...tric drill and bit pre drill a 3 deep hole where indicated on template After drilling holes remove template from wall 5 Make sure the wall plate is level by using the supplied bubble level Place the p...

Страница 9: ...round washers as shown to the right Tighten each bolt with your wrench Turn clockwise until secure Continue to page 13 to continue your installation DO NOT over tighten bolts This can damage the wall...

Страница 10: ...the supplied cardboard template in the desired location and tape template to wall with masking tape Make sure the template is level by using the supplied bubble level 2 With your electric drill and m...

Страница 11: ...l studs 3 Install the supplied plastic concrete anchors in each hole Tap into hole with hammer until fully seated 5 Make sure the wall plate is level by using the supplied bubble level Place the level...

Страница 12: ...using the lag bolts and round washers as shown to the right Tighten each bolt with your wrench Turn clockwise until secure DO NOT over tighten bolts This can damage the wall plate or the surface of y...

Страница 13: ...gn them place the vertical adjustment bars with the screw holes and channels oriented toward the outer edge of the back of your TV Your mounting system features 9 sets of screws of varying diameter an...

Страница 14: ...ks of the vertical adjustment bar engage the wall mounting plate Gently push the bottom of the TV to engage the locking mechanism to the bottom of the wall mounting plate You ll hear a click when the...

Страница 15: ...tilt down gently pull the upper part of your TV away from the wall At first you ll hear a click then you will be able to tilt to the maximum angle To tilt up gently push back to make the TV parallel...

Страница 16: ...g mechanism While pulling on the cords have a friend lift the TV up to from the wall mounting plate Hang the excess cord behind the TV It s OK to cut the cord to fit behind the TV but make sure to lea...

Страница 17: ...ords and cables for a clean sleek look Easy to install with paintable covers to match any decor Monster FlatScreen CleanView Cable Manager Monster Flatscreen Cables are compact and flexible for easy r...

Страница 18: ...or flood Warranty Period means the time period during which Monster must have received Your Formal Warranty Claim The different Warranty Periods related to Product Defects are defined in the Specifica...

Страница 19: ...ts the completed claim form and printed Return Authorization Number on the outside of the return package the claim form will include instructions for return TELEPHONE NUMBERS If You bought the Product...

Отзывы: