background image


User Guide 


17 


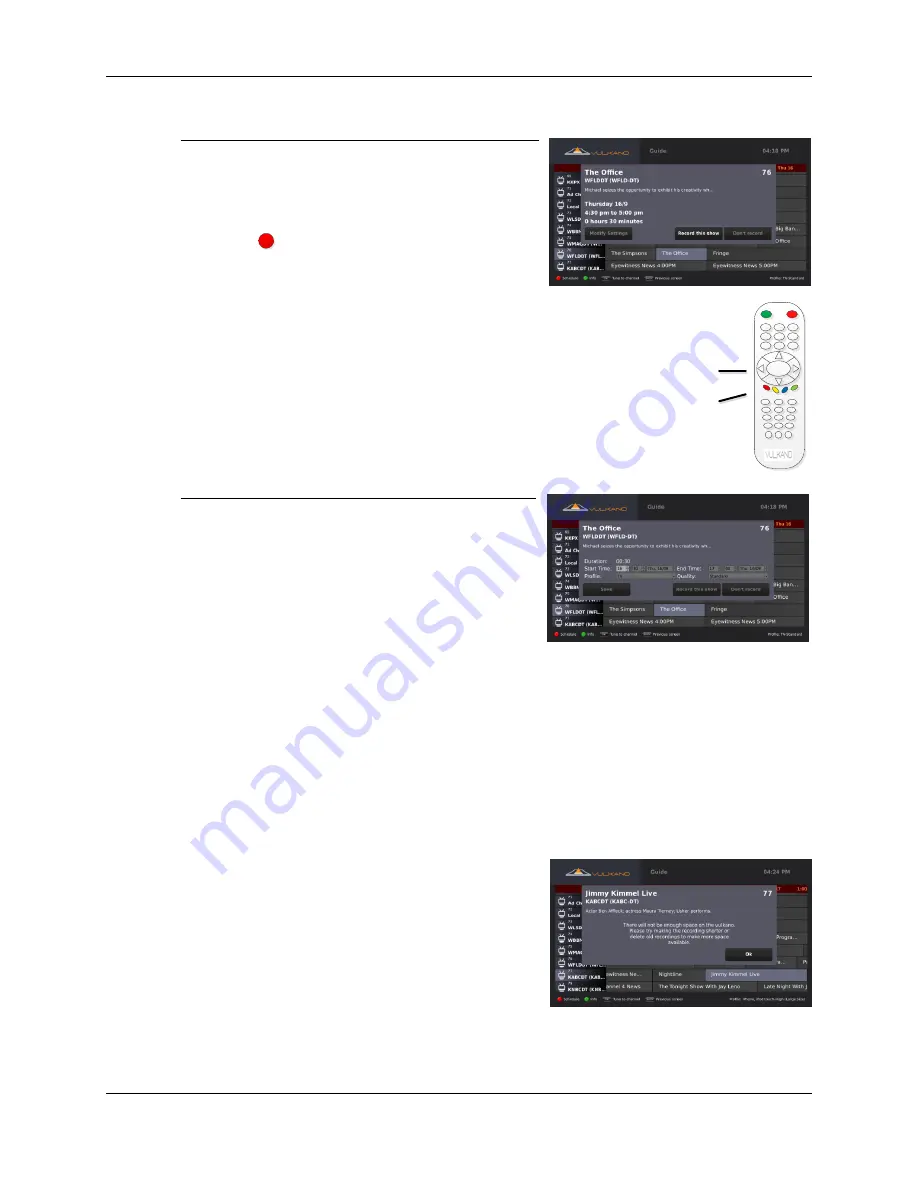
Schedule a recording 

To schedule a recording from the Guide: 

1.


Use the Arrow buttons on your Vulkano remote 
to select the program you wish to schedule 

2.


Press   

An information dialog box will be displayed. 
 
From the Information dialog box, you can perform one of the following 
options: 


Select 

Modify Settings

 to manually specify the start time, end 

time, profile format and quality of the recording 


Select 

Record this show

 to manually schedule a recording 


Select 

Don’t record

 to cancel the scheduling option 

Modify settings 

In the Modify Settings dialog box, you can perform any 
of the following options: 


Use the left and right Arrow buttons on your 
Vulkano remote to navigate to the 

Start Time

End Time

Profile

 and 

Quality 

setting


options 


Use the up and down Arrow buttons on your 
Vulkano remote to adjust the 

Start Time

End Time

Profile

 and 

Quality 

settings options 

 
Using the Arrow buttons on your Vulkano remote: 

1.


Select 

Save

 to make the Profile and Quality settings the default settings for future 

recordings scheduled from the Guide. This will return you to the previous screen 

2.


Select 

Record this show

 to manually schedule a recording 

3.


Select 

Don’t record

 if you choose to cancel the scheduling option 

Note: 

Profile options include the following: 

TV

iPhone

iPad

Droid

Milestone

PC/Mac/TV

. Quality options 

include the following: 

Standard

High


(Large Size)

If the amount of space required for a recording exceeds 
your available space, an information dialog box will be 
displayed. 


Press 

OK


OK

|

|

|

|

|

|

|

|

|

|

|

Schedule 

Recording

OK

Содержание Vulkano

Страница 1: ...2010 Monsoon Multimedia Inc All Rights Reserved MONSOON MULTIMEDIA User Guide...

Страница 2: ...nts INTRODUCTION 2 HOOK UP THE CABLES 4 CONFIGURE YOUR VULKANO 7 USING YOUR VULKANO FEATURES 15 LIVE TV 15 GUIDE 16 MY RECORDINGS 19 INTERNET APPS 21 SETTINGS 22 SETUP 23 ADVANCED SETUP 23 FREQUENTLY...

Страница 3: ...perience on your Smartphone iPhone iPad PC Mac and big screen television Vulkano allows you to enjoy live and recorded television videos photos and music on multiple devices WHAT S IN THE BOX Vulkano...

Страница 4: ...nnel guide Number keys Power Main Menu Refresh Show Information Live TV Stop video Internet applications Previous Next Rewind Play Pause Fast Forward VULKANO UNIT IR Blaster Power HDMI Output Componen...

Страница 5: ...uts on the back of the Vulkano Connect your Vulkano to your STB as shown in the Component or Composite diagram CONNECT VULKANO TO YOUR TV Connect either the Component or HDMI output cables from the ba...

Страница 6: ...emory card or an external hard disk drive depending on the model SD Card Insert the SD card into your Vulkano as shown if it is not pre installed Hard Disk Drive Connect your Vulkano to the supplied H...

Страница 7: ...r settings menu This connection should be consistent with the cable connection from Vulkano to the television input ie HDMI or Component to your television Plug the Vulkano power adapter into a wall p...

Страница 8: ...he HDMI input Press 1 on your Vulkano remote Note Make sure you do not press OK If you have connected your Vulkano to your TV with the Component input Press OK on your Vulkano remote Note Make sure yo...

Страница 9: ...sword or Router Key 2 Select Done 3 Press OK DELETE ARROW ICONS A Network Configuration confirmation screen will be displayed Press OK VULKANO NAME You will need to give your Vulkano a name and passwo...

Страница 10: ...ns on your Vulkano remote 1 Select the appropriate video input configuration that corresponds to how you connected Vulkano to your STB o Composite if you used Red White Yellow cables o Component if yo...

Страница 11: ...f you receive high definition channels SERVICE PROVIDER Using the Arrow buttons on your Vulkano remote 1 Select your TV service provider from the list 2 Press OK TV PACKAGE S Using the Arrow buttons o...

Страница 12: ...t your STB manufacturer 2 Press OK Using the Arrow buttons on your Vulkano remote 1 Select the STB model 2 Press OK Note If your exact device model is not listed choose a similar model number if possi...

Страница 13: ...the format you use when entering single digit channels on your regular television remote 2 Press OK Note Some STB Cable and Satellite boxes require users to enter leading zeros in front of single dig...

Страница 14: ...e 1 Select your time zone 2 Press OK STORAGE Your Vulkano needs to format the attached storage device hard drive or SD card for recording The First Time you configure your Vulkano the Storage screen m...

Страница 15: ...tphones are available on Monsoon Multimedia s website http www myvulkano com mobile_players html and from the Apple App Store PC and Mac Players A Vulkano PC Player is available for download at http w...

Страница 16: ...en and press OK or Press TV A television picture will be displayed on your screen When viewing Live TV you can perform any of the following functions Press the up down Arrows or CH and CH to select an...

Страница 17: ...the Guide GUIDE To access the Guide you can Use the Arrow buttons on your Vulkano remote to select the Guide option from the Menu screen and press OK or Press Guide When viewing the Guide you can perf...

Страница 18: ...ano remote to navigate to the Start Time End Time Profile and Quality setting options Use the up and down Arrow buttons on your Vulkano remote to adjust the Start Time End Time Profile and Quality set...

Страница 19: ...tons on your Vulkano remote to select the program 2 Press to stop the recording and keep the part which has already been recorded A confirmation dialog box will be displayed Press OK Viewing program i...

Страница 20: ...the Ready to watch screen you can perform any of the following functions 1 Use the Arrow buttons on your Vulkano remote to select a recorded program 2 Press OK The name of the program program descript...

Страница 21: ...you can perform any of the following functions 1 Use the Arrow buttons on your Vulkano remote to select a recorded program 2 Press OK The name of the program program description record profile and fil...

Страница 22: ...that can be accessed using the Arrow buttons on your Vulkano remote Recently Featured Top Rated Most Viewed Top Favorited Search When viewing the Recently Featured Top Rated Most Viewed or Top Favorit...

Страница 23: ...ou can 1 Use the Arrow buttons on your Vulkano remote to select the Internet Settings option from the Menu screen 2 Press OK The Settings menu contains the following options Setup Advanced Setup Reboo...

Страница 24: ...P The Advanced Setup option allows you to choose specific settings to edit in the following categories Network Video Input IR Blaster Video Output EPG Vulkano Name and Password Time Zone Remote Access...

Страница 25: ...ss OK Note Select the Let me specify a static IP address Advanced option if you specifically know that you are using a static IP address REBOOT The Reboot option allows you to restart Vulkano To reboo...

Страница 26: ...K The Help screen provides tips and tricks for getting the most out of your Vulkano 1 Use the Arrow buttons on your Vulkano remote to select a Help topic 2 Press OK Topic tips and tricks will be displ...

Страница 27: ...o C Users Your Account AppData Local Monsoon Multimedia Vulkano PlayerSettings xml Kindly Note Local Settings and AppData are Hidden Folders Kindly Unhide them to get to the PlayerSettings xml file Fo...

Страница 28: ...ent Y Pb Pr In and Out HDMI Out Q HOW CAN I SET UP MY VULKANO PLAYER ON PC AT A REMOTE LOCATION I AM UNABLE TO COMPLETE THE WIZARD A You do not need to Run Wizard to configure Vulkano at your office c...

Страница 29: ...es whenever it gets an IP address it should not need to have a static IP set if your router supports UPnP and UPnP is enabled However there is no harm in having the IP set for static either just the s...

Отзывы: