background image

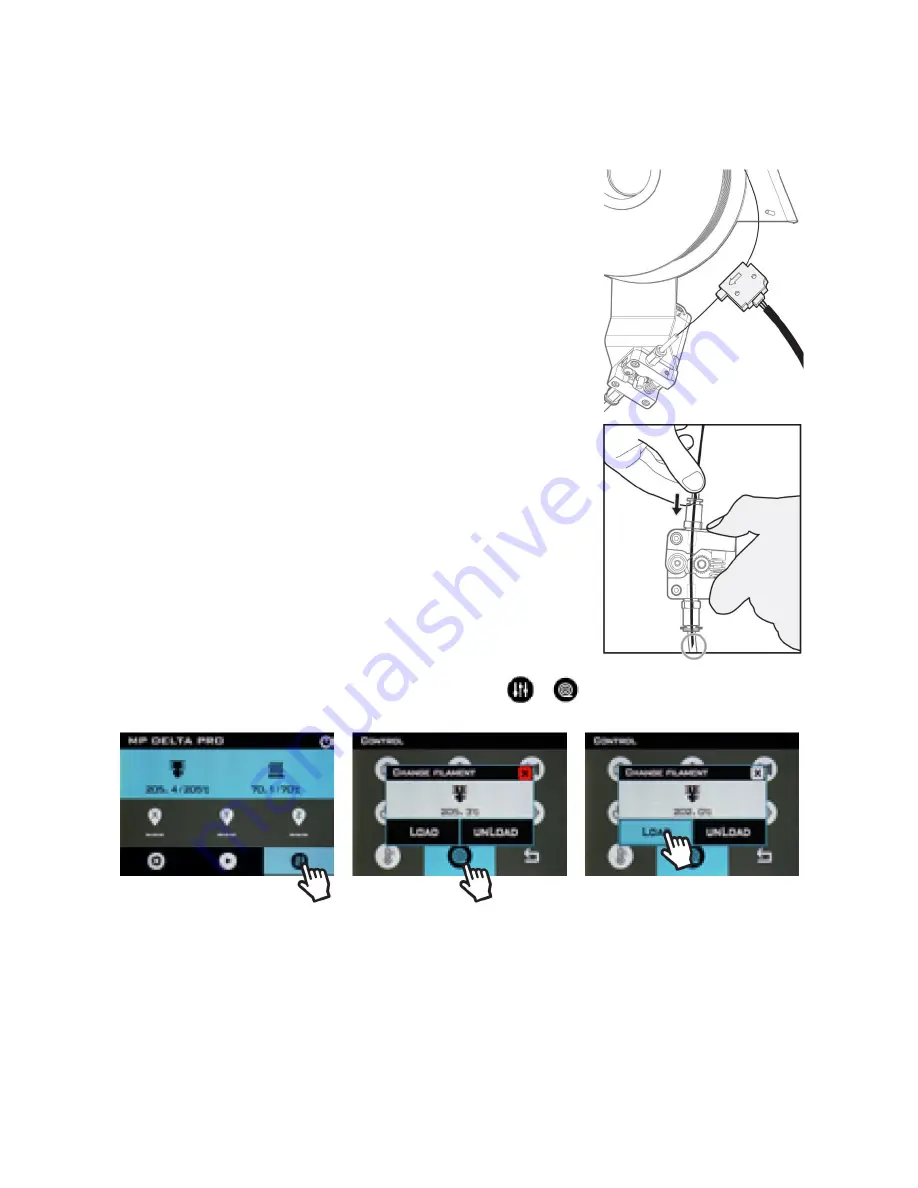
LOADING FILAMENT 

1.


Place the filament spool on the holder so that the end 
of the filament hangs down to the right. 

2.


Using a pair of scissors or diagonal cutters, cut the 
end of the filament at an angle. 

3.


Gently straighten about 2" of the end of the filament 
with your fingers, so that it is easier to feed through 
the sensor and extruder. 

4.


Remove the filament sensor from its holder, then feed 
the end of the filament through the sensor and into 
the tube on the right side of the extruder. 

5.


Pinch the extruder idler lever and push the filament 
past the gear and into the Bowden tube, just past the 
pneumatic connector. 

6.


Turn the printer on, then preheat the nozzle to the 
appropriate temperature for the material being used 
(e.g., 200°C for PLA). 

7.


Once the nozzle is up to temperature, touch 

 > 

 > Load. 


Содержание MP Delta Pro

Страница 1: ...MP Delta Pro 3D Printer P N 30993 33346 User s Manual ...

Страница 2: ...TO LEVELING 10 ADJUSTING THE Z OFFSET 11 CLEANING THE BUILD PLATE 12 CALIBRATING THE PRINTER 12 Calibrating Dimensional Accuracy 12 PID Tuning 13 PREFERENCES 15 Changing the LCD Screen Color 15 1 Tap Preheat Temperature 15 Maximum Temperatures 16 UPDATING THE FIRMWARE 17 CARE AND MAINTENANCE 18 TECHNICAL SUPPORT 18 SPECIFICATIONS 19 REGULATORY COMPLIANCE 20 Notice for FCC 20 Radio Notice for FCC 2...

Страница 3: ... during operation Always allow the printer and extruded filament to cool before reaching inside Ensure that the printer is turned off and unplugged from its power source before making repairs or performing service Do not install this device on an unstable surface where it could fall and cause either personal injury or damage to the device and or other equipment Do not subject the product to extrem...

Страница 4: ...ith other cords Ensure that the power cord does not present a tripping hazard Never unplug the unit by pulling on the power cord Always grasp the connector head or adapter body CUSTOMER SERVICE The Monoprice Customer Service department is dedicated to ensuring that your ordering purchasing and delivery experience is second to none If you have any problem with your order please give us an opportuni...

Страница 5: ...Roll Black 1 kg 1x Spare PTFE lined Nozzle 1x Spare All metal Nozzle 1x Auto level Sensor 1x 1 5mm Hex Wrench 1x 2mm Hex Wrench 1x Touchscreen Stylus 2x Spare Bowden Clips 1x User s Manual SLICING SOFTWARE We recommend the use of the KISSlicer slicing software to slice your models and create the gcode print files You can download a version of KISSlicer that is preconfigured for use with the Delta ...

Страница 6: ...m Firmware 5D Absolute E File Extension gcode Fan On M106 fan can do PWM or blip to speed Fan Off M107 fan can do PWM or blip to speed Bottom Top and Perimeter Speeds 30mm sec Loops and Infill Speeds 60mm sec Travel Speed 100mm sec Z speed 50mm sec Maximum Acceleration 1000mm sec Extrusion Width 0 4mm Minimum Flow Rate 1mm sec Maximum Flow Rate 4mm sec Destring Retraction Distance 3 6mm Destring R...

Страница 7: ...ier to feed through the sensor and extruder 4 Remove the filament sensor from its holder then feed the end of the filament through the sensor and into the tube on the right side of the extruder 5 Pinch the extruder idler lever and push the filament past the gear and into the Bowden tube just past the pneumatic connector 6 Turn the printer on then preheat the nozzle to the appropriate temperature f...

Страница 8: ...L cause filament jams and failed prints SWAPPING HOTENDS The Delta Pro s hotend is easily swappable so you can print with different materials at different temperatures While we always recommend using the default PTFE line hotend for use with PLA and many other low temperature materials the included all metal hotend allows you to print with materials that require higher temperatures than what the P...

Страница 9: ...nch to loosen the two headless hex screws on the side of the heat sink below the effector then remove the hotend 7 Install the new hotend in the same orientation then tighten the screws 8 Reconnect the heater thermistor and Bowden tube ensuring that the tube is pushed all the way in PRINTING A MODEL 1 On the LCD screen touch 2 Use the up and down arrows on the right side of the screen to highlight...

Страница 10: ...wing steps to auto level the printer 1 Ensure that the hotend is at room temperature 2 Connect the auto level sensor to the green wire from the cable harness then attach the sensor s foam ring to the nozzle IMPORTANT Use the minimum amount of force required to attach the sensor to the nozzle If the nozzle is touching the plastic membrane it may prematurely trigger the switch 3 Touch AUTO LEVELING ...

Страница 11: ...e is consistent across the build plate but the distance itself must be manually calibrated You can easily do this using a piece of clean flat copy printer paper which is usually about 100 microns thick Perform the following steps to adjust the Z offset 1 Touch 2 Place a piece of copy printer paper on the build plate 3 Touch in the middle of the screen 4 Touch or to adjust the height of the nozzle ...

Страница 12: ...ecessary to recalibrate certain functions over the natural course of use Calibrating Dimensional Accuracy If you find that the dimensions of your prints differ from the dimensions of your CAD model beyond 10 microns or so you may want to the adjust the firmware to correct the discrepancy Perform the following steps to calibrate the dimensional accuracy 1 Go to the Delta Pro page 30993 33346 on the...

Страница 13: ...to PID tune you may need to replace the thermistor or heater Perform the following steps to run an auto PID tune 1 The tuning process varies slightly depending on the nozzle hotend type and the target temperature of the material you are using For the PTFE lined nozzle turn the part cooling fans side fans to 100 power before proceeding to tune the PID Leave the fans off for the all metal nozzle and...

Страница 14: ...14 2 Touch Temperature Hotend 1 Settings PID Settings Auto PID Tuning Wait for the process to complete ...

Страница 15: ...n Color To change the LCD screen color touch System 1 Tap Preheat Temperature You can change the default 1 Tap preheat target temperature by touching Temperature Preheat Setting 1 Tap Preheat then enter the desired target temperature value ...

Страница 16: ... maximum safe operating temperature of the PTFE lined hotend which is 260 C If you want to increase this while using the all metal hotend touch Temperature Hotend 1 Setting Max Temperature and enter a value at least 5 C higher than the desired target temperature to allow the PID to function properly ...

Страница 17: ...download and install the latest firmware Perform the following steps to update the firmware 1 Download the zip file containing the updated firmware files then extract the files to a USB flash drive 2 Touch System 3 Select the folder containing the bin firmware file then touch Update 4 Touch System 5 Select the folder containing the ui user interface file then touch Update ...

Страница 18: ... thousands of hours of consistent precision movement If after an extended period of time they seem noisy lubricate the wheels using silicone lubrication ONLY Use a dry brush to clean the extruder gear s teeth when they become clogged or when the gear starts to slip Clean the LCD touchscreen display with the printer powered off using a soft cloth DO NOT use any solvents or cleaning fluids on the di...

Страница 19: ... Print Cooling Two part cooling fans On board Calibration Automatic bed leveling and PID Operating System Compatibility Windows 10 Mac OS X Web Supported Slicing Software KISSlicer Cura Interface Touchscreen USB File Format gcode Printing Speed Up to 150mm sec Filament Diameter 1 75mm Filament Materials PLA ABS PETG nylon thermoplastics metal fill wood fill etc 3rd Party Filament Support Yes Maxim...

Страница 20: ...required to correct any interference to radio or television communications at your own expense This equipment has been tested and found to comply with the limits for a Class B digital device pursuant to Part 15 of the FCC Rules These limits are designed to provide reasonable protection against harmful interference in a residential installation This equipment generates uses and can radiate radio fr...

Страница 21: ... expressly approved by Monoprice including the use of non approved antennas could void the user s authority to operate this device This device complies with Part 15 of the FCC Rules Operation is subject to the following two conditions 1 this device may not cause harmful interference and 2 this device must accept any interference received including interference that may cause undesired operation Mi...

Отзывы: